Showing posts with label nuts/seeds. Show all posts
Showing posts with label nuts/seeds. Show all posts
Wednesday, February 13, 2013
A Day Late OR 364 Days Early? (King Cake Cake Pops!)


Tuesday, February 5, 2013
Big, Fat, Chewy, Perfect: The Best Gluten-Free Chocolate Chip Cookie Recipe

While I'm aware on some level that multiple types exist, the only CC cookies that my brain registers are crisp around the edges, chewy in the center, oozing with melted chocolate chunks, and bursting with a flavor akin to butterscotch. All of us who share this concept of Cookie Nirvana as well as an interest in gluten-free baking owe Alanna a huge debt of gratitude. With some slight tweaking of the types/proportions of grains, she's created a GF cookie that stays chewy in the center, spreads like a wheat cookie, and is equal or superior to any CC cookie I've ever tasted (conventional OR GF)! For you skeptics out there, know that all my


Wednesday, November 14, 2012
Pumpkin Nut Streusel Muffins with Cream Cheese Filling

Pumpkin Nut Spice Muffins with Cream Cheese Filling [Printable Recipe]
Adapted from Annie's Eats
Makes 11 muffins
XIAOLU'S NOTES: Filling needs to chill for at least 1 1/2 hours, so plan accordingly. Cooled muffins can be sealed in an airtight freezer bag and frozen for up to 3 months. Thaw then reheat in an oven at 350 degrees F.
Filling
3 oz. cream cheese, softened [low-fat is fine]
1.5 oz. (Scant 1/3 cup) powdered sugar, sifted
1/4 tsp unsulphured molasses
1/3 tsp pure vanilla extract
Rounded 1/2 tsp dark rum (optional)
Topping
3 Tbsp sugar
3 Tbsp flour
3/4 tsp ground cinnamon
2 Tbsp unsalted butter, cold and cut into 6 pieces
2 Tbsp walnuts OR pecans, lightly toasted and finely chopped (optional)
Muffin Batter
1 1/2 cups (6.75 oz.) all purpose flour
1 Tbsp unsweetened cocoa powder
1/2 Tbsp ground cinnamon
1 tsp ground nutmeg
3/4 tsp ground cloves [1/3 to 1/2 tsp if freshly ground]
1/2 tsp ground ginger
Large pinch of ground cardamom
1/2 tsp salt
1/2 tsp baking soda
Scant 1/4 tsp baking powder
2 large eggs, room temperature
3/4 cup PLUS 2 Tbsp sugar
1/2 Tbsp unsulphured molasses
1 cup pumpkin puree
6 Tbsp vegetable oil
1/4 cup unsweetened applesauce
1/2 tsp pure vanilla extract
To make the filling, combine all filling ingredients in a medium bowl and mix well until blended and smooth. Transfer the mixture to a piece of plastic wrap and shape into a log about 1 inch in diameter. Smooth the plastic wrap tightly around the log, and place on a plate wide enough to hold the entire log straight and flat. Transfer to the freezer and chill until at least slightly firm, at least 1 1/2 hours.
To make the topping, combine the sugar, flour and cinnamon in a small bowl; whisk to blend. Add in the butter pieces and work into the dry ingredients with a fork or your fingertips until the mixture is coarse and crumbly. Add in chopped walnuts and mix to distribute evenly. Transfer to the refrigerator until ready to use.
To make the muffin batter, preheat the oven to 375 degrees F. Grease top of standard muffin pan, then line with 11 paper liners OR skip the liners and grease the cups. Sift dry ingredients flour through baking powder into a medium bowl and whisk to blend; set aside. In a separate large mixing bowl, combine ingredients eggs through vanilla. Mix on medium-low speed or by hand until blended. With the mixer on low speed, gradually add in the dry ingredients, mixing just until incorporated.
To assemble the muffins, fill the muffin cups just under full with batter, then sprinkle a small amount of the topping mixture over each. Next, remove the frozen log of cream cheese filling from the freezer, slice into 11 equal pieces, then quickly place a slice of the cream cheese mixture into each muffin cup.
Lower the oven temperature to 350 degrees F, then bake the muffins for 20 to 25 minutes, or until a toothpick comes out clean from the upper muffin part (avoid the cream cheese). Let muffins cool in pans for 5 minutes, then transfer them to a wire rack. Let cool COMPLETELY before serving (the cream cheese filling will be very hot!).
2 large eggs, room temperature
3/4 cup PLUS 2 Tbsp sugar
1/2 Tbsp unsulphured molasses
1 cup pumpkin puree
6 Tbsp vegetable oil
1/4 cup unsweetened applesauce
1/2 tsp pure vanilla extract
To make the filling, combine all filling ingredients in a medium bowl and mix well until blended and smooth. Transfer the mixture to a piece of plastic wrap and shape into a log about 1 inch in diameter. Smooth the plastic wrap tightly around the log, and place on a plate wide enough to hold the entire log straight and flat. Transfer to the freezer and chill until at least slightly firm, at least 1 1/2 hours.
To make the topping, combine the sugar, flour and cinnamon in a small bowl; whisk to blend. Add in the butter pieces and work into the dry ingredients with a fork or your fingertips until the mixture is coarse and crumbly. Add in chopped walnuts and mix to distribute evenly. Transfer to the refrigerator until ready to use.
To make the muffin batter, preheat the oven to 375 degrees F. Grease top of standard muffin pan, then line with 11 paper liners OR skip the liners and grease the cups. Sift dry ingredients flour through baking powder into a medium bowl and whisk to blend; set aside. In a separate large mixing bowl, combine ingredients eggs through vanilla. Mix on medium-low speed or by hand until blended. With the mixer on low speed, gradually add in the dry ingredients, mixing just until incorporated.
To assemble the muffins, fill the muffin cups just under full with batter, then sprinkle a small amount of the topping mixture over each. Next, remove the frozen log of cream cheese filling from the freezer, slice into 11 equal pieces, then quickly place a slice of the cream cheese mixture into each muffin cup.
Lower the oven temperature to 350 degrees F, then bake the muffins for 20 to 25 minutes, or until a toothpick comes out clean from the upper muffin part (avoid the cream cheese). Let muffins cool in pans for 5 minutes, then transfer them to a wire rack. Let cool COMPLETELY before serving (the cream cheese filling will be very hot!).
Monday, April 9, 2012
P's Birthday Treats (Chocolate Peanut Butter Rice Krispies Bars)


Lexington, Virginia -- where P and I grew up and eventually met

I bet you guys have some beloved schoolgirl/boy treats of your own that you've been dying to bring back. I'd love to hear about them in the comments below!

Wednesday, December 21, 2011
Mexican Tea Cakes (Guest Feature on Food Network UK)

Thursday, December 8, 2011
Guest Post: Coconut Rice
You may have noticed that I'm not posting recipes as frequently these days. With both final exams and GREs descending on me in less than 2 weeks, I've simply had to shelf my planned posts until winter recess (with one exception this weekend ^-^). Luckily my dear friend Sala of Veggie Belly has kindly stepped in with an absolutely delicious and doable recipe for her fragrant coconut rice! You may recall that I shared a chocolate chestnut cake roll on her blog back in June. We lived not too far from each other then and I've really missed her company since she moved to the West Coast. While I've never tasted this specific dish of hers, I've sampled enough of her cooking to have confidence that all her recipes are dynamite! Please give your warmest welcome to the exceedingly sweet and talented Sala!
 What I enjoy the most about blogging is the fact that I’ve met some amazing, like-minded people through blogging. And that’s how I met Xiaolu; through my blog. After weeks of emailing back and forth, we met up for a meal. It was the start of a great friendship, and exchange of ideas. I’ve come to admire Xiaolu for her passion for baking and blogging, and her meticulous food styling. I’m delighted to guest post today and share with you a simple, flavorful, childhood recipe.
 Coconut rice was a staple school lunch. I’d take it to school in a little tiffin box, and it always tasted great, hot or cold. Now, coconut rice has become a standard weeknight meal for me. It’s easy to put together and served with a steamed or curried vegetable like my cauliflower broccoli poriyal or some spinach dal and some yogurt, makes a complete meal.
 Good quality, fresh coconut is essential for this recipe. You can find fresh-frozen grated or shredded coconut at Indian and Asian stores. Just break off a chunk and let it thaw on your counter top.
If you like some fruity sweetness in your coconut rice, throw in 2 tablespoons of raisins or dried cranberries or dried apricots.
If you like some fruity sweetness in your coconut rice, throw in 2 tablespoons of raisins or dried cranberries or dried apricots.
Wednesday, November 23, 2011
A Pretty Sweet (Potato) Cake for Thanksgiving!
Woohoo! Thanksgiving break is finally here and my bags are already packed for the long weekend of great food n' family ahead. Still, I just couldn't duck out without sharing one more fun, festive fall dessert for any of you still needing a last-minute Thanksgiving dessert.
 I love sweet potatoes in just about any form. And I'm betting that many of you feel the same...especially around this time of year! Which is why I simply couldn't resist making this richly flavored sweet potato cake this Thanksgiving. You'll love how quickly this comes together. Plus it only dirties up a bowl and measuring cup. It's also quite friendly to guests on restrictive diets, since the cake is already egg and dairy-free. If any dairy is an issue, simply swap dairy substitutes into the frosting to make this a welcome Thanksgiving dessert for all =).
P.S. - I want to thank Oh Nuts! for the wonderful Jumbo Raw Georgia pecans they sent me for free to use in my holiday baking. These pecans were so fresh and yummy. I sampled one as I was measuring them out for this cake and ended up eating so many I had to get more for the recipe O:-). They're big, as the name suggests, and have a wonderful subtle sweetness that made them downright addictive.
P.S. - I want to thank Oh Nuts! for the wonderful Jumbo Raw Georgia pecans they sent me for free to use in my holiday baking. These pecans were so fresh and yummy. I sampled one as I was measuring them out for this cake and ended up eating so many I had to get more for the recipe O:-). They're big, as the name suggests, and have a wonderful subtle sweetness that made them downright addictive.
Wednesday, November 16, 2011
Ruff(le)'s Up, Doc? (Carrot Cupcakes with Ruffled Frosting and Marzipan Carrots)
A few months back, P's cousin K asked me if I'd be willing to bake the cupcakes for her wedding (!!). This was the first time I'd been asked to contribute to someone's Big Day, and I was really touched by the request. And agreed right away, of course! K had her sights set on carrot cake from the start, which worked great for me. I loves me a client who knows what she wants =D. K's wedding doesn't actually take place until next October, but is it really ever too early to test run delicious carrot cupcakes? (Hint: the answer is "no!")
The weird thing about this carrot cupcake recipe is that I converted it into an all-apple recipe the first time I made it (that's just what I happened to need at the time). And I tell you what, the apple-fied version was so darn good that I couldn't resist re-converting it back to experience it in its full beta-carotene glory ^_^.
 I also couldn't resist just a few tweaks here and there (swapping out some oil for the more flavorful melted coconut oil/butter, amping the spices up a touch, and so on...). What came out of the oven was to my mind the perfect basic carrot cupcake: delightfully moist but with no oily mouthfeel, packed with flavor from a balanced medley of spices, and boasting a subtle nuttiness and crunch from the toasted walnuts. Feel free to adapt this to your personal carrot-cake preferences! Like your carrot cake to have more nuts, no nuts, other nuts, coconut flakes, raisins, chocolate chips, whatever else? Go for it!
The only popular add-in that I'd expect any trouble from is pineapple chunks, since they'd add significant moisture to the batter. But I'm on a quest here, folks...I won't rest until I've found the perfect carrot cupcake for K's wedding day! And on the chance that the very best carrot cake contains pineapple, I'll be trying a recipe with pineapple in it next. Right now I'm eying this one, but please don't hesitate to speak up if you wanna share one better!
The weird thing about this carrot cupcake recipe is that I converted it into an all-apple recipe the first time I made it (that's just what I happened to need at the time). And I tell you what, the apple-fied version was so darn good that I couldn't resist re-converting it back to experience it in its full beta-carotene glory ^_^.
The only popular add-in that I'd expect any trouble from is pineapple chunks, since they'd add significant moisture to the batter. But I'm on a quest here, folks...I won't rest until I've found the perfect carrot cupcake for K's wedding day! And on the chance that the very best carrot cake contains pineapple, I'll be trying a recipe with pineapple in it next. Right now I'm eying this one, but please don't hesitate to speak up if you wanna share one better!
Saturday, September 10, 2011
Collaborative Post: Pink Macarons with Chocolate Ganache Filling
UPDATE: To further encourage those of you who want to try baking macarons but are still hesitating, I've decided to give away my good-as-new copy of i <3 macarons by Hisato Ogita to one lucky reader. This giveaway is open to anyone with a US or Canadian shipping address. To enter, simply leave a comment on this post including a way to contact you should you win. For additional entries, follow 6 Bittersweets or Heaven in a Wild Flower via email, reader, and/or Twitter (@6bittersweets or @heavenwildfleur). You must leave a separate comment for each entry for them to count. This giveaway closes at midnight on September 18 -- good luck! THIS GIVEAWAY HAS ENDED. THANKS TO ALL WHO ENTERED!
 I mentioned in my Singapore post that I was lucky enough to catch up with 2 groups of lovely bloggers during my trip. I say "lucky" not only because we managed to match up schedules on such short notice, but also because 4 of them had just returned from being overseas and also planned to stay in Singapore only briefly. Eunice of Heaven in a Wild Flower, having moved to London some years ago, was one of these globetrotters ^_^.
I'd discovered Eunice's blog through her gorgeous macaron posts, so it wasn't long after we met that we began gabbing about which patisserie made them best and the secrets to making good macs at home. At this point, hearing that I was already missing baking in Singapore, Eunice was sweet enough to invite me into her chocolatier friend's professional kitchen where she'd be making macarons for a wedding! She led the baking, while I put myself in charge of visually documenting the process. We really hope you enjoy the following step-by-step photo tutorial of macaron-making that is the fruit of our collaboration. Now please turn your full attention to our resident macaron master =).
Wedding Photography by Eunice; Tutorial Photography by me.
 I had the lovely fortune of meeting up with Xiaolu from 6 Bittersweets when she went to Singapore recently for a holiday. I too, was back in Singapore for a holiday as I'm usually based in London. The precise reason was for a good friend's wedding and I had promised her I'd make her a dessert table, as well as arrange some of her wedding flowers. Little did I know what a big undertaking that would be!
 So when a few of us met up over dinner and I mentioned this, Xiaolu gamely said she'd love to come and help out as I attempt to make 75 macarons, 12 meringues and 2 trays of rice krispies treats! Luckily for me, I also had the use of a proper commercial kitchen, courtesy of my friend E who owns the lovely chocolate shop Truffs, in return for showing his staff how macarons are made. This was the first time I had conducted a class of some sort, or made macarons in such a big batch, so I was fairly worried about everything working properly. I'm happy to report that all went well, and I was very lucky to have Xiaolu helping out as well as taking pictures.
For the wedding, the bride wanted a whimsical fun garden theme. The colour palette she had picked was raspberry pink and lime green. I made green bouquets for the bridesmaids, and a pink one for her bridal bouquet, as well as the table flowers. We also placed apples all around as decor. I set up a dessert table using some vintage china I've been collecting, and decorated it with some of the leftover flowers. The macarons and other treats were laid out together with some luscious cupcakes baked by another friend. I must say that they looked really enticing and lovely. By the end of the lunch, all the desserts were gone!
I hope the visual recipe tutorial below helps you to recreate these little beauties!
Pink Macarons with Chocolate Ganache Filling [Printable Recipe]
Makes about 50 to 54 shells (about 25 macarons)
EUNICE'S NOTES: This basic recipe can be scaled up or down, I always use the egg whites as the base for proportioning the rest of the ingredients. So for every 1 part egg whites, use 1.3 parts almond flour, 1.6 parts icing sugar and 0.55 parts castor sugar.
XIAOLU'S NOTE: For additional tips on making French macarons at home as well as several very helpful videos of the mixing process, please check out my first macaron post!
100 g egg whites, aged for a day (equivalent to about 3 egg whites)
3 g egg white powder
130g almond flour (blitz in food processor together with icing sugar to get a finer texture)
160 g powdered sugar
55 g castor sugar
Pink gel food coloring (or other color)
Sift processed powdered sugar and almond flour together in a bowl. Set aside.
 Mix egg whites with egg white powder and whisk in electric mixer until soft peaks on medium high speed.
Lower speed on electric mixer and add in castor sugar slowly while still whisking until fully incorporated. Continue whisking on medium high speed until your egg white meringue mixture reaches stiff peak stage. Add in your food colouring when whisking.
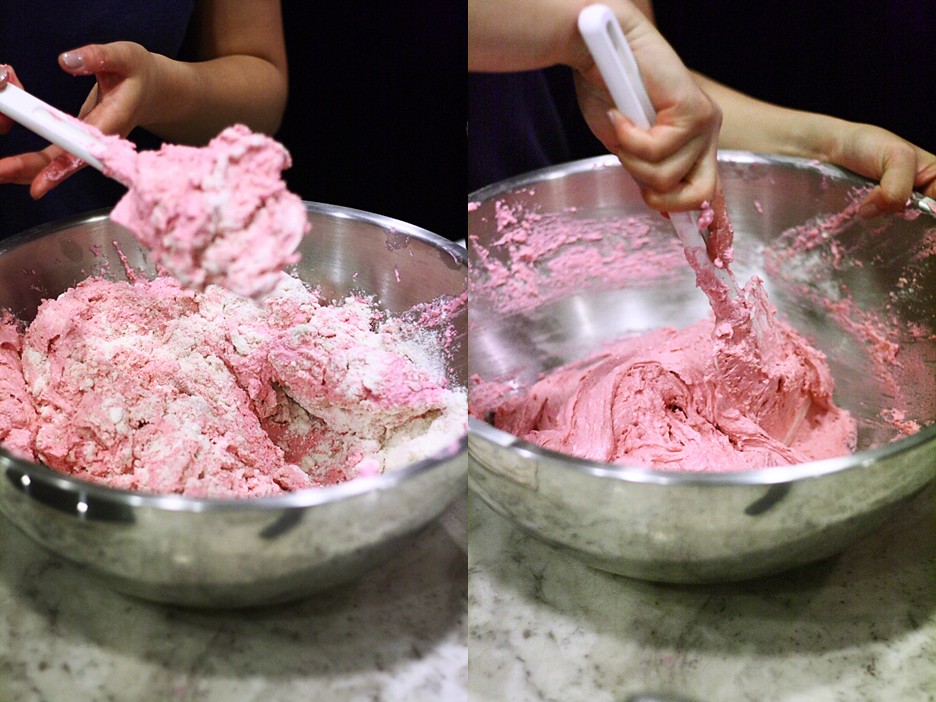
 Fold in 1/3 of dry ingredients (icing sugar + almond flour) into meringue with a spatula gently. Add in 1/3 more and fold again before mixing in the last 1/3 of the dry ingredients.
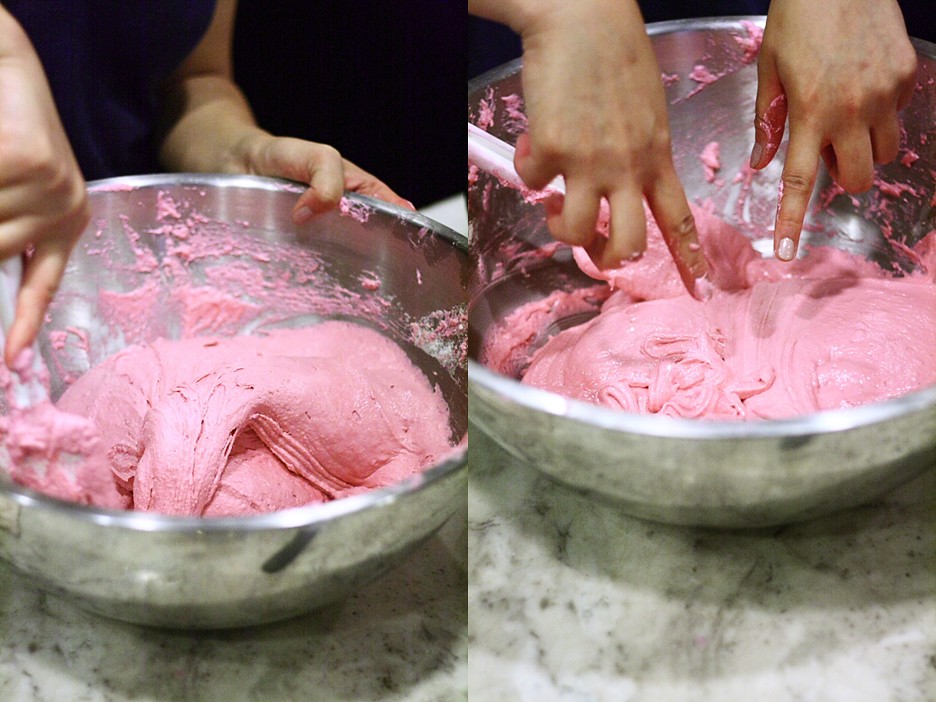
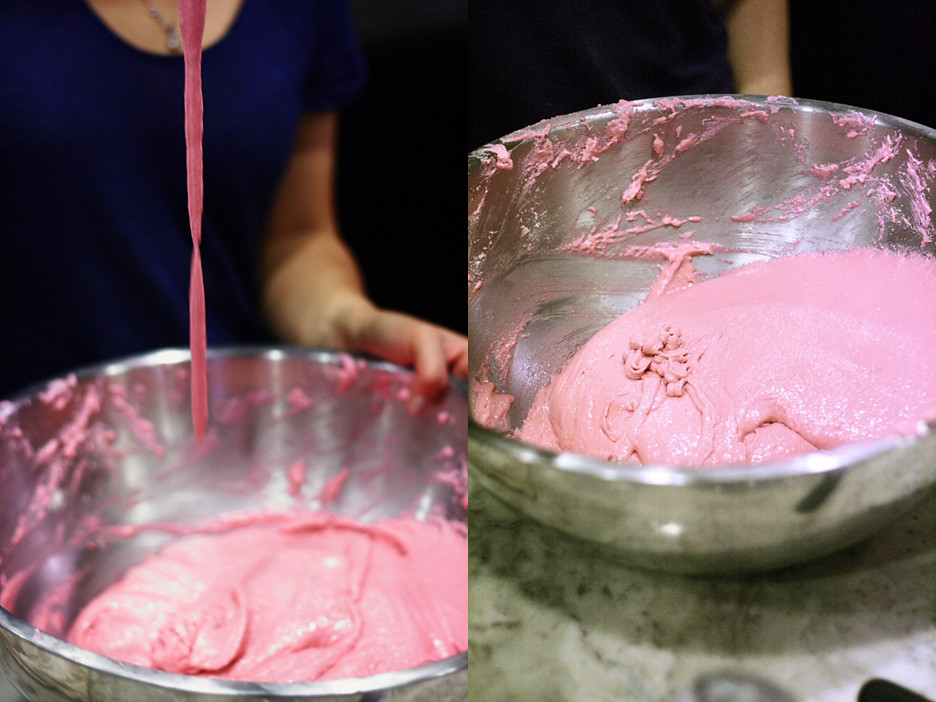
 Make sure all dry ingredients are incorporated into the meringue and start folding mixture more vigorously to form a shiny batter with the consistency of flowing magma or drips down like ribbons.
 When you lift the batter up and let it drip down, it should slowly disappear into itself without leaving a peak. Be careful not to over mix as batter will spread too much when piped.
 Line 2 baking trays with non-stick parchment paper (or silpat). You can stick it down with bits of batter in the four corners.
Fill a piping bag fitted with a 1-cm (about 2/5-inch) round tip with the batter, and pipe even rounds of batter, about 3.5 cm (about 1 1/3 inches) across, onto the tray. If you've mixed the batter properly, it should not spread flatly out too much (overmixed) or leave a peak (undermixed).
 Let the batter dry for about 30 minutes. Preheat oven to 170 degrees C/335 degrees F (for convection ovens) OR 180 degrees C/350 degrees F (for regular ovens).
When batter is dry to touch (it forms a slight crust), turn the oven down to 140 deg C (or 150 deg C for conventional oven) and bake shells for 14-15 minutes, turning the trays halfway through baking.
 After baking, lift parchment onto wire rack to let shells cool and gently lift up from paper when cool.
Chocolate Ganache Filling
125 g dark chocolate, broken into small pieces
125 ml single [light] cream
Heat cream in saucepan until it comes to a boil.
Pour the cream over the chocolate and use a spatula or wooden spoon to stir in a circular motion from the centre of the bowl and slowly incorporate more and more of the cream until the chocolate and cream comes together into a smooth emulsion.
Let it cool at room temperature until it thickens, about 4 hours, or in a fridge for 2 hours.
Assembly
Match pairs of shells of even size.
Fit piping bag with plain round 1 to 1.5 cm tip [about 1/2 to 2/3 inch]. Fill piping bag with chocolate ganache. Pipe a small mound of chocolate ganache filling onto one half of each pair of shells. Top with the other shell.

I'd discovered Eunice's blog through her gorgeous macaron posts, so it wasn't long after we met that we began gabbing about which patisserie made them best and the secrets to making good macs at home. At this point, hearing that I was already missing baking in Singapore, Eunice was sweet enough to invite me into her chocolatier friend's professional kitchen where she'd be making macarons for a wedding! She led the baking, while I put myself in charge of visually documenting the process. We really hope you enjoy the following step-by-step photo tutorial of macaron-making that is the fruit of our collaboration. Now please turn your full attention to our resident macaron master =).
Wedding Photography by Eunice; Tutorial Photography by me.
For the wedding, the bride wanted a whimsical fun garden theme. The colour palette she had picked was raspberry pink and lime green. I made green bouquets for the bridesmaids, and a pink one for her bridal bouquet, as well as the table flowers. We also placed apples all around as decor. I set up a dessert table using some vintage china I've been collecting, and decorated it with some of the leftover flowers. The macarons and other treats were laid out together with some luscious cupcakes baked by another friend. I must say that they looked really enticing and lovely. By the end of the lunch, all the desserts were gone!

I hope the visual recipe tutorial below helps you to recreate these little beauties!
Pink Macarons with Chocolate Ganache Filling [Printable Recipe]
Makes about 50 to 54 shells (about 25 macarons)
EUNICE'S NOTES: This basic recipe can be scaled up or down, I always use the egg whites as the base for proportioning the rest of the ingredients. So for every 1 part egg whites, use 1.3 parts almond flour, 1.6 parts icing sugar and 0.55 parts castor sugar.
XIAOLU'S NOTE: For additional tips on making French macarons at home as well as several very helpful videos of the mixing process, please check out my first macaron post!
100 g egg whites, aged for a day (equivalent to about 3 egg whites)
3 g egg white powder
130g almond flour (blitz in food processor together with icing sugar to get a finer texture)
160 g powdered sugar
55 g castor sugar
Pink gel food coloring (or other color)
Sift processed powdered sugar and almond flour together in a bowl. Set aside.
Lower speed on electric mixer and add in castor sugar slowly while still whisking until fully incorporated. Continue whisking on medium high speed until your egg white meringue mixture reaches stiff peak stage. Add in your food colouring when whisking.

Fill a piping bag fitted with a 1-cm (about 2/5-inch) round tip with the batter, and pipe even rounds of batter, about 3.5 cm (about 1 1/3 inches) across, onto the tray. If you've mixed the batter properly, it should not spread flatly out too much (overmixed) or leave a peak (undermixed).
When batter is dry to touch (it forms a slight crust), turn the oven down to 140 deg C (or 150 deg C for conventional oven) and bake shells for 14-15 minutes, turning the trays halfway through baking.
Chocolate Ganache Filling
125 g dark chocolate, broken into small pieces
125 ml single [light] cream
Heat cream in saucepan until it comes to a boil.
Pour the cream over the chocolate and use a spatula or wooden spoon to stir in a circular motion from the centre of the bowl and slowly incorporate more and more of the cream until the chocolate and cream comes together into a smooth emulsion.
Let it cool at room temperature until it thickens, about 4 hours, or in a fridge for 2 hours.
Assembly
Match pairs of shells of even size.
Fit piping bag with plain round 1 to 1.5 cm tip [about 1/2 to 2/3 inch]. Fill piping bag with chocolate ganache. Pipe a small mound of chocolate ganache filling onto one half of each pair of shells. Top with the other shell.
Tuesday, August 16, 2011
Guest Post: Summer Greens Salad with Grapes, Goat Cheese, and Walnuts
A few months back, I had the honor of sharing a guest post for Joy of Joylicious blog on her birthday. She is one talented lady, so I was delighted and not a bit surprised when many of you were as excited to discover her as I was to introduce her. There's been plenty of fabulous stuff going on since then over at Joylicious, ranging from a website redesign to irresistible new recipes like these honey yogurt berry popsicles. But being the sweetheart she is, Joy still took the time to make us a lovely picnic-worthy summer salad. And here to tell you all about it, I present to you my good friend, Joy!
 I met Xiaolu this year through the wonderful World of blogging. I was initially attracted to her jaw-dropping photos on 6 Bittersweets and with time have discovered that her inner beauty was just as beautiful as her talent. She was sweet enough to bake me cupcakes on my birthday and even mailed me the adorable pompoms she used to decorate them with. See why I love this girl? You’re the sweetest Xiaolu, thank you for having me guest post on your blog today.
 When I was a little girl, my family loved going on picnics. My fondest memories were of us laying a big blanket across the softest patch of earth we could find. Dad would carry the large cooler of food, Mom trotting along with miscellaneous bags of “stuff”, and I’d follow clumsily behind lugging a Sprite bottle half the size of my body (at the time.) We’d sit there enjoying chive dumplings dipped in chili oil, drunken chicken with ginger and scallions, boiled peanuts, marinated beancurd – what? You thought I was going to say, sandwiches and potato salad?
Laying there for hours, we’d talk about our hopes and dreams, laugh about memories of our families back home. We’d play card games that mostly involved math because dad said my math skills were subpar at best. But it was still fun, promise =). And we’d always end our picnics with my favorite part.
The food would be packed up, trash thrown away, and when there was nothing else left except for the blanket on the ground I’d lay in the middle of it. Mom and dad would grab opposite ends of the blanket and with a slick flick of their wrists they’d fling me up to the sky. I’d fly up so-high that I’d be only inches away from the clouds. Closing my eyes, embracing my weightless moments in the air, laughing so hard my stomach would hurt as tears streamed down my face. Though I’m no longer small enough to be thrown into oblivion, I still very much love my picnics.
With Summers being blistering hot, the only thing that I feel good eating are salads. They’re light, easy to prepare and most certainly healthy. This recipe would be perfect for picnics – Summer Greens with Tart Cherries, Goat Cheese and Walnuts. Dress the salad when you’re ready to eat to ensure the best results.
 Summer Greens Salad with Red Grapes, Goat Cheese, and Walnuts [Printable Recipe]
Serves 4; prep time: 15 minutes
5 cups of mixed greens, washed
1/2 cup red grapes, washed
1/4 cup thinly sliced red onion
1/4 cup walnuts
4 oz. goat cheese
2 Tbsp high-quality olive oil
Fleur de sel salt and freshly cracked black pepper to taste
In a large bowl mix greens, grapes, onion, and walnuts together. Drizzle generously with olive oil and top with salt and pepper. Top with goat cheese slices (1 oz. per serving) and serve immediately.
Laying there for hours, we’d talk about our hopes and dreams, laugh about memories of our families back home. We’d play card games that mostly involved math because dad said my math skills were subpar at best. But it was still fun, promise =). And we’d always end our picnics with my favorite part.
The food would be packed up, trash thrown away, and when there was nothing else left except for the blanket on the ground I’d lay in the middle of it. Mom and dad would grab opposite ends of the blanket and with a slick flick of their wrists they’d fling me up to the sky. I’d fly up so-high that I’d be only inches away from the clouds. Closing my eyes, embracing my weightless moments in the air, laughing so hard my stomach would hurt as tears streamed down my face. Though I’m no longer small enough to be thrown into oblivion, I still very much love my picnics.

With Summers being blistering hot, the only thing that I feel good eating are salads. They’re light, easy to prepare and most certainly healthy. This recipe would be perfect for picnics – Summer Greens with Tart Cherries, Goat Cheese and Walnuts. Dress the salad when you’re ready to eat to ensure the best results.
Serves 4; prep time: 15 minutes
5 cups of mixed greens, washed
1/2 cup red grapes, washed
1/4 cup thinly sliced red onion
1/4 cup walnuts
4 oz. goat cheese
2 Tbsp high-quality olive oil
Fleur de sel salt and freshly cracked black pepper to taste
In a large bowl mix greens, grapes, onion, and walnuts together. Drizzle generously with olive oil and top with salt and pepper. Top with goat cheese slices (1 oz. per serving) and serve immediately.
Wednesday, July 13, 2011
Nut-Free Sunflower Seed Coconut Macarons with Pumpkin Filling (Guest Post for Food Wanderings)


Saturday, July 9, 2011
A Lotta Chocolate Part 4: Cherry Pistachio Orange Cocoa Couscous Salad
UPDATE: In case anyone's interested in trying the fantastic dried fruit or other products from Payson Fruit Growers, including the dried cherries I used for this salad, they're offering $3 off any order of $15 or more. The coupon code is 3off15 and will be valid for the next couple of months. Enjoy!
Does anyone still remember my chocolate series? I wouldn't be surprised if you didn't. What else could I expect when I'm the one who put it on the back-burner for over a month in favor of other festivities? Well fret not because we're getting this show back on the road for 2 more posts in this series. And I promise it's gonna end with a bang!
At the beginning of this series I promised to show you some "less common ways" for using chocolate. And there was no doubt in my mind already that at least one savory recipe would need to be included to truly fulfill that promise. A great idea I immediately came across was to add a little of the dark stuff to your chili. I did this with a pumpkin black bean chili I made last fall, and all I have to say about it is try it! You'll love the depth of flavor it adds.
 But who wants to stew chili in the dead of summer? I chose instead to try this couscous salad with an exciting blend of fruits, nuts, herbs, and -- you guessed it -- chocolate! Between the orange zest, toasted pistachios, chopped mint, dried cherries, and cocoa, this salad had a lot going on...but in a good way. Fragrant and fresh, each ingredient held its own in every bite of this salad. Together they became nothing short of a beautiful harmony.
And I love the role that chocolate played in this composition. Rather than the bold starlet it's accustomed to being in desserts, chocolate stepped back to play subtle but steady support in this dish. Almost acting as a spice here, the addition of cocoa powder produced a warm nutty backdrop that worked superbly to balance the brightness of orange and mint.
I was lucky to get my hands on some great quality tart dried cherries for this salad. Payson Fruit Growers sent them to me for free to review, and I've honestly been very impressed. Their dried cherries are fresh, juicy, and not a bit too sweet -- great for cooking, baking, or just for eating out of hand. I also got some tart cherry juice concentrate from them that I'll tell you more about soon. But for now, let me just encourage you to play with chocolate in this or another savory dish =D.
Cherry Pistachio Orange Cocoa Couscous Salad [Printable Recipe]
Slightly adapted from Batter Licker
Serves 2 to 4, but easily doubled or tripled
1 1/2 cups water
1 Tbsp PLUS 1 tsp extra virgin olive oil, divided
2 tsp freshly grated OR frozen orange zest
Pinch of salt, plus more to taste
1 cup dry couscous
1/2 cup shelled pistachios, toasted and chopped
1/2 cup unsweetened dried cherries, chopped
1 1/2 Tbsp natural cocoa powder
1/8 tsp chili powder (optional)
2 Tbsp fresh mint, chopped
1/2 Tbsp honey
Combine water, 1 teaspoon of oil, zest, and salt in a medium saucepan and bring to a boil over medium-high heat. Stir couscous in, cover the pot, and remove from the heat. Let stand covered for about 5 minutes, then remove the lid and fluff couscous lightly with a fork.
Stir in chopped pistachios, cherries, cocoa powder, chili powder, mint, and remaining tablespoon of oil. Add salt to taste. Taste and stir in honey if you'd prefer a sweeter taste.
PREVIOUSLY: Chocolate Chunk Challah Bread French Toast, Snickers Macarons, and Chocolate Cake Roll with Chestnut Cream
Does anyone still remember my chocolate series? I wouldn't be surprised if you didn't. What else could I expect when I'm the one who put it on the back-burner for over a month in favor of other festivities? Well fret not because we're getting this show back on the road for 2 more posts in this series. And I promise it's gonna end with a bang!
At the beginning of this series I promised to show you some "less common ways" for using chocolate. And there was no doubt in my mind already that at least one savory recipe would need to be included to truly fulfill that promise. A great idea I immediately came across was to add a little of the dark stuff to your chili. I did this with a pumpkin black bean chili I made last fall, and all I have to say about it is try it! You'll love the depth of flavor it adds.
And I love the role that chocolate played in this composition. Rather than the bold starlet it's accustomed to being in desserts, chocolate stepped back to play subtle but steady support in this dish. Almost acting as a spice here, the addition of cocoa powder produced a warm nutty backdrop that worked superbly to balance the brightness of orange and mint.
I was lucky to get my hands on some great quality tart dried cherries for this salad. Payson Fruit Growers sent them to me for free to review, and I've honestly been very impressed. Their dried cherries are fresh, juicy, and not a bit too sweet -- great for cooking, baking, or just for eating out of hand. I also got some tart cherry juice concentrate from them that I'll tell you more about soon. But for now, let me just encourage you to play with chocolate in this or another savory dish =D.
Cherry Pistachio Orange Cocoa Couscous Salad [Printable Recipe]
Slightly adapted from Batter Licker
Serves 2 to 4, but easily doubled or tripled
1 1/2 cups water
1 Tbsp PLUS 1 tsp extra virgin olive oil, divided
2 tsp freshly grated OR frozen orange zest
Pinch of salt, plus more to taste
1 cup dry couscous
1/2 cup shelled pistachios, toasted and chopped
1/2 cup unsweetened dried cherries, chopped
1 1/2 Tbsp natural cocoa powder
1/8 tsp chili powder (optional)
2 Tbsp fresh mint, chopped
1/2 Tbsp honey
Combine water, 1 teaspoon of oil, zest, and salt in a medium saucepan and bring to a boil over medium-high heat. Stir couscous in, cover the pot, and remove from the heat. Let stand covered for about 5 minutes, then remove the lid and fluff couscous lightly with a fork.
Stir in chopped pistachios, cherries, cocoa powder, chili powder, mint, and remaining tablespoon of oil. Add salt to taste. Taste and stir in honey if you'd prefer a sweeter taste.
PREVIOUSLY: Chocolate Chunk Challah Bread French Toast, Snickers Macarons, and Chocolate Cake Roll with Chestnut Cream
Wednesday, June 8, 2011
Guest Post: Spicy Lentil Tart with Pomegranate and Mint
Those of you who've been reading my blog for some time will know that I eat a mostly vegetarian diet (plus occasional seafood) and am a BIG fan of vegetarian and vegan cooking. One of my long-time favorite blogs has been Veggie num num, written by the wonderful Trudy from Australia. Not only does she take gorgeous photos, she also creates the most creative vegetarian recipes. They're guaranteed to have you drooling whether you're a veggie or meat-lover! I tried her Spanish Chickpea Balls a few months ago and was captivated by the unique spicing. Equally mesmerizing is the savory lentil, pomegranate, and mint tart she's sharing today, which -- believe it or not -- was adapted from a lamb recipe! I'll let her tell you all about it now. Thanks for your stunning guest post and for being such an inspiration to me, Trudy!
 I have to say I am a little excited to be here! Without a doubt I am a devoted fan of 6 Bittersweets and Xiaolu’s beautiful inspiring desserts and photography and so thrilled and honoured to be guest posting today!!
I am constantly blown away with Xiaolu’s clever and amazingly scrumptious looking recipes. Her talent for creating truly beautiful and imaginative food is absolutely inspiring. So my first thought when I started to brainstorm ideas for a recipe to share was it must be something elegant and pretty and of course delicious.
 Being a vegetarian it can be hard to convince people that you eat interesting, varied and delicious foods. I still think there is a popular misconception out there that vegetarian food is boring and plain and can’t be inspiring and tasty and beautiful in it’s own right.
There is nothing I love more than turning this idea on its head and providing vegetarian recipes that I really hope everyone finds delicious and appealing!!

I had been meaning to experiment with a vegetarian version of a Lebanese tart for some time and thought this post would be the perfect opportunity to do just that. Something I find so rewarding in the kitchen is to take a traditional meat dish and transform it into a vegetarian meal. I love the challenge and the fun of experimenting with different ingredients and flavours and this tart did not disappoint.
Middle Eastern flavours are some of my absolute favourites and this dish is wonderfully fragrant, spicy, colourful and I hope you’ll agree super tasty.
Thank you so very much Xiaolu for the opportunity to share this veggie recipe and I hope you’ll all enjoy it as much as I enjoyed creating and photographing it for you.
Spicy Lentil Tart with Pomegranate and Mint [Printable Recipe]
Preparation time: 40 minutes
Serves 4
1 sheet of ready-rolled puff pastry (thawed)
1 free range egg lightly whisked or 1/4 cup non-dairy milk
1 cup brown lentils, rinsed
3 cups vegetable stock
2 bay leaves
1/2 cinnamon stick
1 Tbsp pomegranate molasses
2 Tbsp warm water
1 tsp black peppercorns
1 tsp ground cumin
1 tsp paprika
1/2 tsp coriander seeds
1/2 tsp salt flakes or rock salt
2 Tbsp olive oil
1/2 red onion, finely diced
1 red chili, seeded and finely diced
1/2 cup pine nuts, roasted
1 cup flat leaf parsley, roughly chopped
1 cup fresh mint, roughly chopped
1 tsp sumac
1/2 pomegranate, seeds only
To serve
1/2 cup tahini paste
1 Tbsp olive oil
1 lemon, juiced
1/2 Tbsp water
Extra lemon wedges
Preheat the oven to 180°C/356°F.
Bring the stock, lentils, bay leaves and cinnamon stick to a gentle simmer in a large pot, allow to cook for 15-20 minutes over a medium/low heat, stirring occasionally until the lentils are tender and liquid absorbed. Remove the bay leaves and cinnamon stick and strain off any excess liquid, set aside.
Grind the black peppercorns, salt flakes or rock salt, cumin, paprika and coriander seeds together in a mortar & pestle or spice grinder to form a fine spice powder.
Combine the pomegranate molasses with the warm water until smooth, set aside.
Lay the thawed puff pastry sheet out on a baking tray, carefully score a 3cm (1 inch) border around the outside and brush with the prepared egg or non-dairy milk being careful not to brush over the score mark.
Place in the oven and bake for 10 minutes until the pastry just begins to puff and golden, remove from the oven and set aside.
Meanwhile fry off the onion in the olive oil for a few minutes over a medium heat in a large frying pan until soft, add the cooked lentils and prepared spice powder and continue to cook for 3-4 minutes over a medium heat.
Add the pomegranate molasses & water mixture and the pine nuts, fry the lentils until they just begin to brown and stick to the bottom of the pan, add the fresh herbs reserving half the mint and stir though.
Spoon the lentil mixture onto the prepared puff pastry sheet, sprinkle over the sumac and return to the oven for 15 minutes until pastry is golden.
Meanwhile whisk the tahini paste with the olive oil, lemon juice and water until smooth.
Remove the tart from the oven a serve sprinkled with pomegranate seeds and reserved mint. Accompany with the tahini dressing and wedges of fresh lemon.
A wonderfully colourful and tasty vegetarian recipe perfect for parties or picnics, enjoy!!
{This recipe was inspired by the Spicy Lebanese Lamb Tart found in ABC’s Delicious Magazine.}
I am constantly blown away with Xiaolu’s clever and amazingly scrumptious looking recipes. Her talent for creating truly beautiful and imaginative food is absolutely inspiring. So my first thought when I started to brainstorm ideas for a recipe to share was it must be something elegant and pretty and of course delicious.
There is nothing I love more than turning this idea on its head and providing vegetarian recipes that I really hope everyone finds delicious and appealing!!
I had been meaning to experiment with a vegetarian version of a Lebanese tart for some time and thought this post would be the perfect opportunity to do just that. Something I find so rewarding in the kitchen is to take a traditional meat dish and transform it into a vegetarian meal. I love the challenge and the fun of experimenting with different ingredients and flavours and this tart did not disappoint.
Middle Eastern flavours are some of my absolute favourites and this dish is wonderfully fragrant, spicy, colourful and I hope you’ll agree super tasty.
Thank you so very much Xiaolu for the opportunity to share this veggie recipe and I hope you’ll all enjoy it as much as I enjoyed creating and photographing it for you.
Spicy Lentil Tart with Pomegranate and Mint [Printable Recipe]

Preparation time: 40 minutes
Serves 4
1 sheet of ready-rolled puff pastry (thawed)
1 free range egg lightly whisked or 1/4 cup non-dairy milk
1 cup brown lentils, rinsed
3 cups vegetable stock
2 bay leaves
1/2 cinnamon stick
1 Tbsp pomegranate molasses
2 Tbsp warm water
1 tsp black peppercorns
1 tsp ground cumin
1 tsp paprika
1/2 tsp coriander seeds
1/2 tsp salt flakes or rock salt
2 Tbsp olive oil
1/2 red onion, finely diced
1 red chili, seeded and finely diced
1/2 cup pine nuts, roasted
1 cup flat leaf parsley, roughly chopped
1 cup fresh mint, roughly chopped
1 tsp sumac
1/2 pomegranate, seeds only
To serve
1/2 cup tahini paste
1 Tbsp olive oil
1 lemon, juiced
1/2 Tbsp water
Extra lemon wedges
Preheat the oven to 180°C/356°F.
Bring the stock, lentils, bay leaves and cinnamon stick to a gentle simmer in a large pot, allow to cook for 15-20 minutes over a medium/low heat, stirring occasionally until the lentils are tender and liquid absorbed. Remove the bay leaves and cinnamon stick and strain off any excess liquid, set aside.
Grind the black peppercorns, salt flakes or rock salt, cumin, paprika and coriander seeds together in a mortar & pestle or spice grinder to form a fine spice powder.
Combine the pomegranate molasses with the warm water until smooth, set aside.
Lay the thawed puff pastry sheet out on a baking tray, carefully score a 3cm (1 inch) border around the outside and brush with the prepared egg or non-dairy milk being careful not to brush over the score mark.
Place in the oven and bake for 10 minutes until the pastry just begins to puff and golden, remove from the oven and set aside.
Meanwhile fry off the onion in the olive oil for a few minutes over a medium heat in a large frying pan until soft, add the cooked lentils and prepared spice powder and continue to cook for 3-4 minutes over a medium heat.
Add the pomegranate molasses & water mixture and the pine nuts, fry the lentils until they just begin to brown and stick to the bottom of the pan, add the fresh herbs reserving half the mint and stir though.
Spoon the lentil mixture onto the prepared puff pastry sheet, sprinkle over the sumac and return to the oven for 15 minutes until pastry is golden.
Meanwhile whisk the tahini paste with the olive oil, lemon juice and water until smooth.
Remove the tart from the oven a serve sprinkled with pomegranate seeds and reserved mint. Accompany with the tahini dressing and wedges of fresh lemon.
A wonderfully colourful and tasty vegetarian recipe perfect for parties or picnics, enjoy!!
{This recipe was inspired by the Spicy Lebanese Lamb Tart found in ABC’s Delicious Magazine.}
Saturday, June 4, 2011
Rhubarberric Macarons (Guest Post for Journey Kitchen)

Friday, May 27, 2011
Black Sesame Sweet Rice Dumplings 2 Ways (Guest Post on Fork Spoon Knife)

Just as starting a food blog 2 years ago introduced me to friends around the globe, joining Twitter this year has enriched my life with even more talented, caring, and equally food-obsessed pals. Asha of Fork Spoon Knife was one of the first among these new friends. Her warm and cheerful spirit, exciting recipes, and wonderful photography were irresistible from the start. When she then invited me to contribute to the celebration of her 3-year blog anniversary, of course I said yes right away! Though the party's theme was Street Food, Asha let me share a Chinese dessert that is traditionally a soup, but which I made more "street-savvy" by borrowing an idea from our Japanese neighbors. Please stop by Asha's site to wish her a happy anniversary and read all about my Black Sesame Sweet Rice Dumplings. If you're in a rush and just want to grab the recipe, you can also find it here.

Thursday, May 19, 2011
Indian-Inspired Macarons (Cashew Cardamom Carrot Halwa Macarons)
Yep, I'm back with another set of macarons! Many of you might be thinking "wow she's really caught mac fever!" and you'd be right. But the other (and less frivolous) reason I'm making these charming French treats so often is to achieve consistently tasty and pretty results so I can offer these babies for sale. I just know there are plenty of macaron-lovers out there who simply haven't had the opportunity to try them. So I guess you could also say that I'm on a mission to spread the joy of macarons =p.
After no small number of attempts, I've finally got a feel for proper macaronage (folding the meringue and dry ingredients together). But I continue to struggle with (1) reining in my moody oven with its numerous hot spots and (2) reducing sweetness without sacrificing consistency. I've seen other bloggers use much less sugar with great success, so I know it's possible. Unfortunately I think the sugar stabilizes the batter, so my recent batches have been more finicky than the Snickers macarons recipe. Basically I think problem (1) is the result of (2). If you've any insight on this, I'd love to hear it!
 Since I needed to bake multiple batches to iron out the kinks, I figured why not have some fun with exotic flavors? If you follow me on Twitter, you may have noticed I'm quite fond of Indian food as well as food bloggers. Having grown up with my Indian best friend's family cooking, I've developed quite a taste for that cuisine. In fact, several Indian friends have told me that I must be Indian on the inside =p! After taking my previous macaron inspiration from oriental flavors, it's almost too predictable that I turn to the subcontinent next!
After tossing some ideas around with my friend, Sala, I settled upon a fun and unexpected combination of cardamom-spiced cashew shells filled with buttercream made with real Indian carrot halwa (pudding). I must warn you that the cardamom in these pack quite a punch, especially since I ground mine fresh before using. Feel free to reduce the amount of spice if you're just taking it for a test drive. The macarons will still be tasty regardless.
Now that I've hit India, I'm looking for the next destination on my around-the-world macaron trip. What's next -- Africa, Ireland, Italy, South America? So many possibilities! Where do you think I should stop next? =D
Cashew Cardamom Macarons with Carrot Halwa Filling [Printable Recipe]
Filling adapted from Manjula’s Kitchen
Makes about 25 to 35 macarons
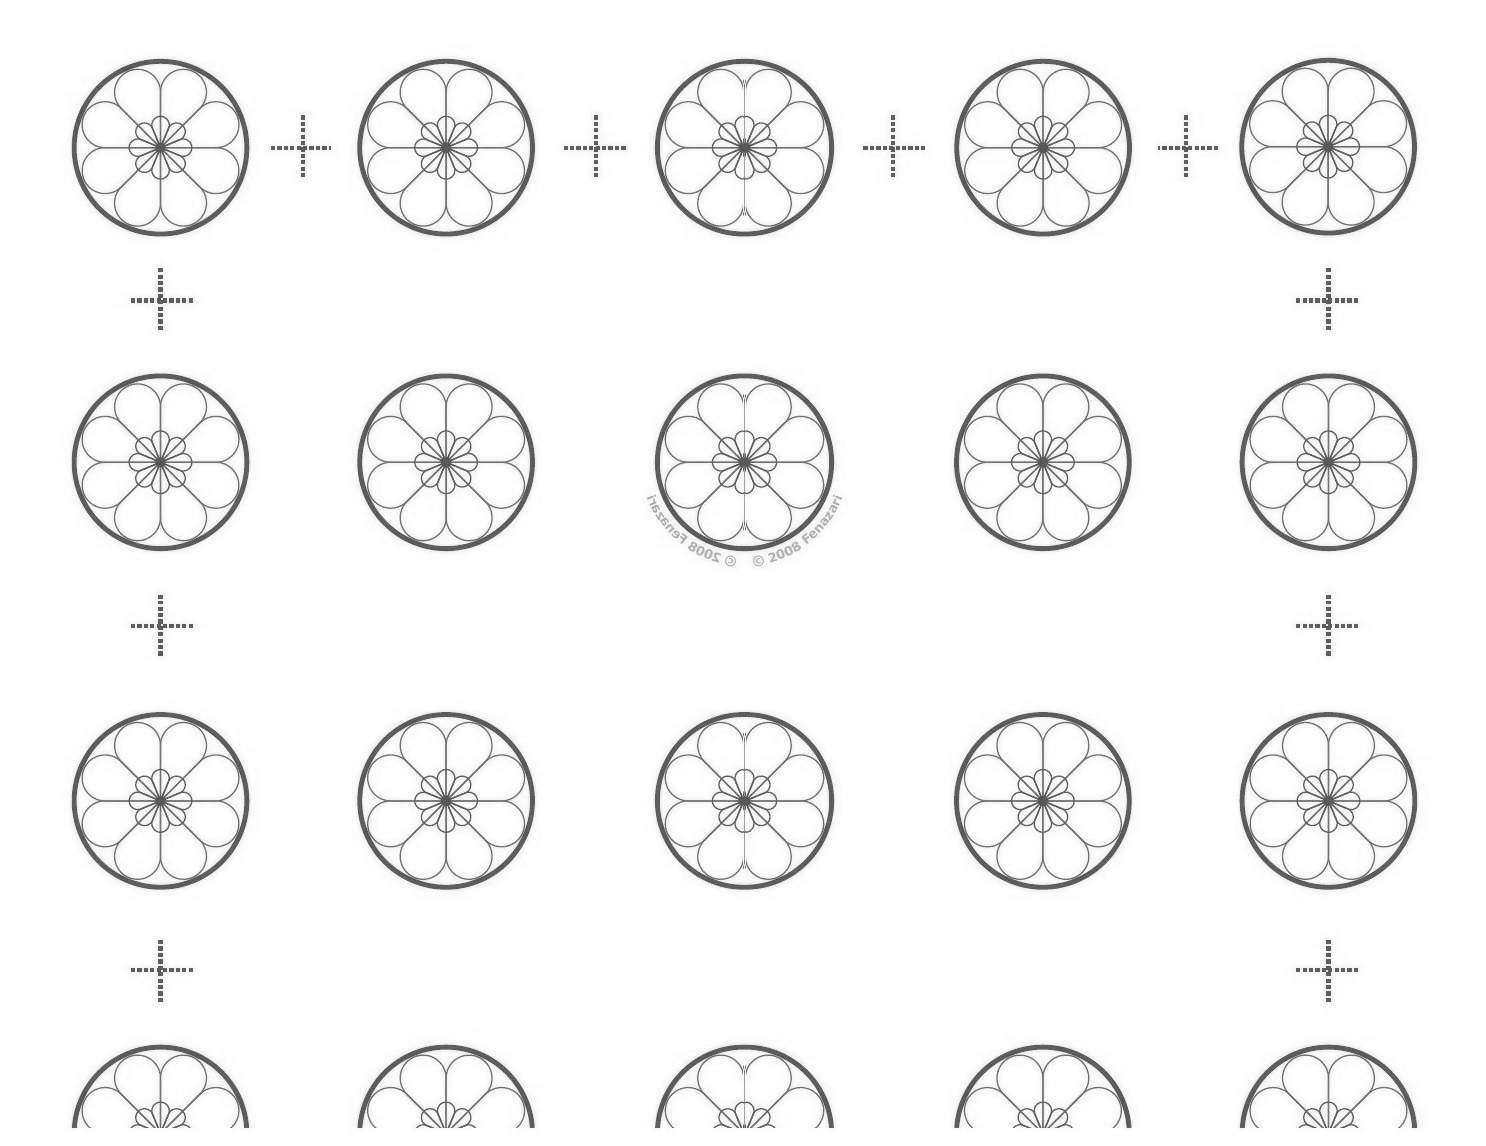
XIAOLU'S NOTES: Please do not try to convert this recipe to volume measurements if you don't have a scale (I use and love this one). This recipe is very sensitive and will not work if the measurements are not exact. Please also note that every oven is different and you'll figure out what works best for yours over time (see this post for great information on ovens and macarons). Since mine has major hot spots, I bake on 2 stacked pans for insulation. If you're uncertain of your ability to pipe uniformly-sized macarons, like me, simply trace 1 1/4-inch circles on your parchment paper, flip the paper over, and pipe on the other side, using the outlines as your guide OR print (choose "fit to page") and slide this template under your parchment as a guide but don't forget to remove before baking! Macarons are best after having been refrigerated for 24 to 48 hours, according to French pastry master, Pierre Herme, "An osmosis takes place between the garnish and the biscuit. When freshly baked this is hard and crisp, but it absorbs some humidity from the filling and its inside becomes more tender while the crust on the surface stays intact" (quote via Not So Humble Pie). So even if you accidentally overbake the shells by a few minutes, maturing the macarons in the fridge for at least 48 hours should undo most of the damage =). See my first macaron post for helpful videos of the whole macaron-making process!
70 g almonds [not roasted or salted]
55 g cashews [not salted]
145 g powdered sugar
1/2 tsp ground cardamom
Pinch of salt
40 g granulated sugar
2 g egg white powder [optional, to stabilize batter in humid weather]
95 to 100 g egg whites [about 3 large egg whites]
1/8 tsp cream of tartar or 1/4 tsp lemon juice [optional, to stabilize meringue]
1 to 1 1/3 cups Carrot Halwa Filling [Recipe below]
Microwave fresh egg whites 10 to 15 seconds in the microwave on medium heat.
Combine the almonds, cashews, powdered sugar, cardamom, and salt in a food processor, and pulse on and off until the nuts are finely ground (about 1 to 2 minutes). Sift the powder to remove any large chunks that remain. Put those chunks back into the food processor and pulse again for another 30 to 60 seconds. Sift again. You will probably have some slightly chunkier almond bits. Hopefully they're no more than a tablespoon or so, in which case you can throw them out.
Weigh out and mix your granulated sugar and egg white powder in a small bowl until uniform; set aside. Using a handheld or stand mixer, whip the egg whites on medium-low speed with cream of tartar until foamy, then turn the speed up to medium to medium-high and gradually add the sugar mixture until you obtain a glossy meringue (it'll look like shaving cream, hold stiff peaks, and stay in place if you turn the bowl upside-down; but don't overbeat your meringue or it will be too dry).
Add all of the nut mixture to the meringue and fold together. Use both a folding motion that scrapes the bottom of the bowl (to incorporate the dry ingredients) and a gentle pressing motion, to deflate the meringue against the side of the bowl. Slow down after all the dry ingredients have been incorporated, and continue folding the mass carefully until you obtain a batter that looks somewhat glossy and flows from the spatula in a thick ribbon. Test the batter by spooning a small amount of the batter up, then dropping it back down on itself. If it melts back into the rest of the batter within 30 seconds, it's ready for piping (this page has a nice photo of this test). If not, fold 2 more strokes and test again.
Fill a pastry bag fitted with a 1/3 to 1/2-inch wide plain tip (I like Ateco #804 or 806) with half of the batter. (When your bag is too full, the pressure causes the batter to rush out in a way that’s difficult to control, making for sloppy macarons.) Pipe tiny blobs of batter onto the 4 corners and center of 2 baking sheets, then line baking sheets with parchment paper OR line with silicone mats. Pipe small rounds (slightly larger than 1 inch wide) straight down and about 1 inch apart onto the baking sheets. Pick up each sheet with both hands and slam it firmly straight downward on the counter 2 to 3 times. This will to force out any large air bubbles. Immediately pop any bubbles that rise up but don't break with a toothpick. Do NOT do this once a few minutes have passed because you'll mess up the shell that's forming.
Preheat the oven to 285 to 300 degrees F. Let the macarons sit out for 25 to 90 minutes to harden their shells a bit (to prevent tops from cracking during baking). Test if they're ready by touching the top and side of one shell lightly. It should feel dry and not stick to your finger at all. Bake one pan at a time for 15 to 22 minutes, depending on the size of the macarons. Let cool completely before trying to move the shells.
Once cool, flip the shells over. If you have trouble removing them from parchment paper, pour a couple of drops of water under the paper while the sheet is still a bit warm, and the macarons will lift up more easily due to the moisture. Don't let them sit there in it too long or they will become soggy.
Fill the shells (spooning or piping) with 1 1/2 to 2 teaspoons buttercream and top with a similarly-sized top shell. For the best flavor and texture, store in the refrigerator for 24 to 48 hours before eating (see notes above for detailed explanation) but they are best if eaten within 6 days. Bring to room temperature before eating.
Carrot Halwa Buttercream
1 Tbsp unsalted butter
1/2 cup shredded carrots
1/3 cup milk
1 tsp sugar
1/16 tsp ground cardamom
1/3 cup sugar
2 large egg whites
Pinch of salt
10 Tbsp unsalted butter, room temperature
Melt the butter in a frying pan on medium heat. Add the shredded carrots and stir-fry for about 5 minutes. Carrots should be tender and slightly darker in color. Add the milk and cook until the milk dries, stirring occasionally.
Next add the sugar, and cardamom powder; stirfry for another 3 minutes until the halwa starts to leave the side of frying pan. Let cool then mash with a potato masher.
Combine the sugar and egg whites in the clean stand mixer bowl. Place the bowl over a pot of boiling water making sure the bottom does not actually touch the water. Whisk constantly until the sugar is completely dissolved and the top becomes foamy.
Remove the bowl to your stand mixer, add a pinch of salt, and beat on high speed with the whisk attachment for at least 3 minutes, until the mixture holds glossy, marshmallow-esque peaks and the bowl is completely cool (very important - the frosting's consistency will be off otherwise).
With mixer on medium-low speed, add butter 1 tablespoon at a time, beating well after each addition (about 10 seconds between each). Increase speed to medium-high; continue beating until frosting appears thick, at least 3 minutes. (You'll hear a distinct slapping sound and visibly see the buttercream go from soupy to a cohesive, pipeable consistency.)
Reduce speed to low and slowly add the cooled carrot halwa. Mix until evenly incorporated.
After no small number of attempts, I've finally got a feel for proper macaronage (folding the meringue and dry ingredients together). But I continue to struggle with (1) reining in my moody oven with its numerous hot spots and (2) reducing sweetness without sacrificing consistency. I've seen other bloggers use much less sugar with great success, so I know it's possible. Unfortunately I think the sugar stabilizes the batter, so my recent batches have been more finicky than the Snickers macarons recipe. Basically I think problem (1) is the result of (2). If you've any insight on this, I'd love to hear it!
After tossing some ideas around with my friend, Sala, I settled upon a fun and unexpected combination of cardamom-spiced cashew shells filled with buttercream made with real Indian carrot halwa (pudding). I must warn you that the cardamom in these pack quite a punch, especially since I ground mine fresh before using. Feel free to reduce the amount of spice if you're just taking it for a test drive. The macarons will still be tasty regardless.
Now that I've hit India, I'm looking for the next destination on my around-the-world macaron trip. What's next -- Africa, Ireland, Italy, South America? So many possibilities! Where do you think I should stop next? =D
Cashew Cardamom Macarons with Carrot Halwa Filling [Printable Recipe]
Filling adapted from Manjula’s Kitchen
Makes about 25 to 35 macarons
XIAOLU'S NOTES: Please do not try to convert this recipe to volume measurements if you don't have a scale (I use and love this one). This recipe is very sensitive and will not work if the measurements are not exact. Please also note that every oven is different and you'll figure out what works best for yours over time (see this post for great information on ovens and macarons). Since mine has major hot spots, I bake on 2 stacked pans for insulation. If you're uncertain of your ability to pipe uniformly-sized macarons, like me, simply trace 1 1/4-inch circles on your parchment paper, flip the paper over, and pipe on the other side, using the outlines as your guide OR print (choose "fit to page") and slide this template under your parchment as a guide but don't forget to remove before baking! Macarons are best after having been refrigerated for 24 to 48 hours, according to French pastry master, Pierre Herme, "An osmosis takes place between the garnish and the biscuit. When freshly baked this is hard and crisp, but it absorbs some humidity from the filling and its inside becomes more tender while the crust on the surface stays intact" (quote via Not So Humble Pie). So even if you accidentally overbake the shells by a few minutes, maturing the macarons in the fridge for at least 48 hours should undo most of the damage =). See my first macaron post for helpful videos of the whole macaron-making process!
70 g almonds [not roasted or salted]
55 g cashews [not salted]
145 g powdered sugar
1/2 tsp ground cardamom
Pinch of salt
40 g granulated sugar
2 g egg white powder [optional, to stabilize batter in humid weather]
95 to 100 g egg whites [about 3 large egg whites]
1/8 tsp cream of tartar or 1/4 tsp lemon juice [optional, to stabilize meringue]
1 to 1 1/3 cups Carrot Halwa Filling [Recipe below]
Microwave fresh egg whites 10 to 15 seconds in the microwave on medium heat.
Combine the almonds, cashews, powdered sugar, cardamom, and salt in a food processor, and pulse on and off until the nuts are finely ground (about 1 to 2 minutes). Sift the powder to remove any large chunks that remain. Put those chunks back into the food processor and pulse again for another 30 to 60 seconds. Sift again. You will probably have some slightly chunkier almond bits. Hopefully they're no more than a tablespoon or so, in which case you can throw them out.
Weigh out and mix your granulated sugar and egg white powder in a small bowl until uniform; set aside. Using a handheld or stand mixer, whip the egg whites on medium-low speed with cream of tartar until foamy, then turn the speed up to medium to medium-high and gradually add the sugar mixture until you obtain a glossy meringue (it'll look like shaving cream, hold stiff peaks, and stay in place if you turn the bowl upside-down; but don't overbeat your meringue or it will be too dry).
Add all of the nut mixture to the meringue and fold together. Use both a folding motion that scrapes the bottom of the bowl (to incorporate the dry ingredients) and a gentle pressing motion, to deflate the meringue against the side of the bowl. Slow down after all the dry ingredients have been incorporated, and continue folding the mass carefully until you obtain a batter that looks somewhat glossy and flows from the spatula in a thick ribbon. Test the batter by spooning a small amount of the batter up, then dropping it back down on itself. If it melts back into the rest of the batter within 30 seconds, it's ready for piping (this page has a nice photo of this test). If not, fold 2 more strokes and test again.
Fill a pastry bag fitted with a 1/3 to 1/2-inch wide plain tip (I like Ateco #804 or 806) with half of the batter. (When your bag is too full, the pressure causes the batter to rush out in a way that’s difficult to control, making for sloppy macarons.) Pipe tiny blobs of batter onto the 4 corners and center of 2 baking sheets, then line baking sheets with parchment paper OR line with silicone mats. Pipe small rounds (slightly larger than 1 inch wide) straight down and about 1 inch apart onto the baking sheets. Pick up each sheet with both hands and slam it firmly straight downward on the counter 2 to 3 times. This will to force out any large air bubbles. Immediately pop any bubbles that rise up but don't break with a toothpick. Do NOT do this once a few minutes have passed because you'll mess up the shell that's forming.
Preheat the oven to 285 to 300 degrees F. Let the macarons sit out for 25 to 90 minutes to harden their shells a bit (to prevent tops from cracking during baking). Test if they're ready by touching the top and side of one shell lightly. It should feel dry and not stick to your finger at all. Bake one pan at a time for 15 to 22 minutes, depending on the size of the macarons. Let cool completely before trying to move the shells.
Once cool, flip the shells over. If you have trouble removing them from parchment paper, pour a couple of drops of water under the paper while the sheet is still a bit warm, and the macarons will lift up more easily due to the moisture. Don't let them sit there in it too long or they will become soggy.
Fill the shells (spooning or piping) with 1 1/2 to 2 teaspoons buttercream and top with a similarly-sized top shell. For the best flavor and texture, store in the refrigerator for 24 to 48 hours before eating (see notes above for detailed explanation) but they are best if eaten within 6 days. Bring to room temperature before eating.
Carrot Halwa Buttercream
1 Tbsp unsalted butter
1/2 cup shredded carrots
1/3 cup milk
1 tsp sugar
1/16 tsp ground cardamom
1/3 cup sugar
2 large egg whites
Pinch of salt
10 Tbsp unsalted butter, room temperature
Melt the butter in a frying pan on medium heat. Add the shredded carrots and stir-fry for about 5 minutes. Carrots should be tender and slightly darker in color. Add the milk and cook until the milk dries, stirring occasionally.
Next add the sugar, and cardamom powder; stirfry for another 3 minutes until the halwa starts to leave the side of frying pan. Let cool then mash with a potato masher.
Combine the sugar and egg whites in the clean stand mixer bowl. Place the bowl over a pot of boiling water making sure the bottom does not actually touch the water. Whisk constantly until the sugar is completely dissolved and the top becomes foamy.
Remove the bowl to your stand mixer, add a pinch of salt, and beat on high speed with the whisk attachment for at least 3 minutes, until the mixture holds glossy, marshmallow-esque peaks and the bowl is completely cool (very important - the frosting's consistency will be off otherwise).
With mixer on medium-low speed, add butter 1 tablespoon at a time, beating well after each addition (about 10 seconds between each). Increase speed to medium-high; continue beating until frosting appears thick, at least 3 minutes. (You'll hear a distinct slapping sound and visibly see the buttercream go from soupy to a cohesive, pipeable consistency.)
Reduce speed to low and slowly add the cooled carrot halwa. Mix until evenly incorporated.
Friday, May 6, 2011
You Might Call Me Hooked... (Black Sesame Macaron Pops with Mochi Filling)

But anyway, the real point here is that no one should be surprised that after finally baking my first successful macarons, I caught the Mac Bug bigtime ^_^. Both before and after that batch, I've poured over countless tutorials from fellow bloggers, YouTube videos, and basically any piece of helpful information on the process that I could get my hungry eyes and greedy hands on hehe. But as I learned in my previous attempts, there's no education like rolling up your sleeves and getting in the kitchen. Especially after I remembered the black sesame seeds still stashed in my freezer, it didn't take long for another mac creation to materialize.
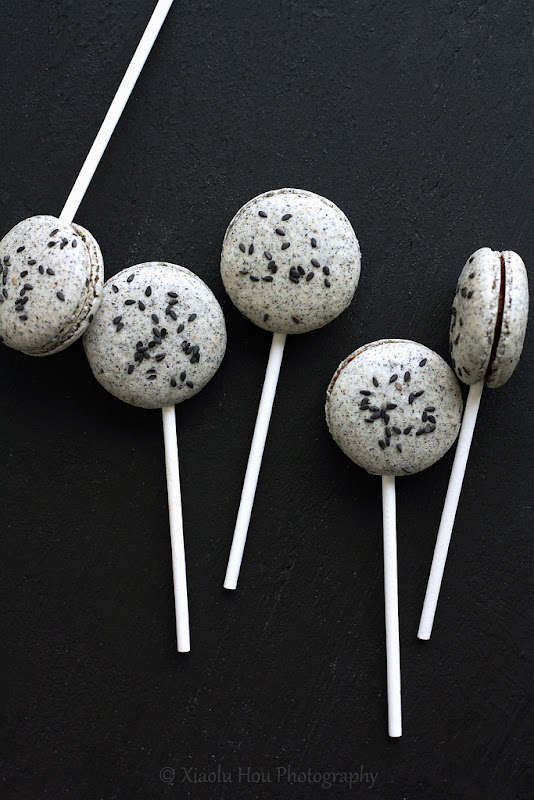
This unusual mix of French and Asian flavors, of crisp, moist, and chewy textures was definitely a risk for me. Especially for what was only my second date with lovely Mr. Macaron, but it definitely paid off! These have been a real hit with my friends, both Chinese and not. Some found them so addictive that my pleas to wait 24 hours before eating them were beyond futile. But that's really not something to complain about =D!

Black Sesame Macaron Pops with Mochi Filling and Ganache [Printable Recipe]
Fillings adapted from Bonbini and Evan’s Kitchen Ramblings
Makes about 25 to 35 macarons
XIAOLU'S NOTES: Please do not try to convert this recipe to volume measurements if you don't have a scale (I use and love this one). This recipe is very sensitive and will not work if the measurements are not exact. Please also note that every oven is different and you'll figure out what works best for yours over time. Since mine has major hot spots, I bake on 2 stacked pans for insulation (see this post for great information on ovens and macarons). If you're uncertain of your ability to pipe uniformly-sized macarons, like me, simply trace 1 1/4-inch circles on your parchment paper, flip the paper over, and pipe on the other side, using the outlines as your guide OR print (choose "fit to page") and slide this template under your parchment as a guide but don't forget to remove before baking! Macarons are best after having been refrigerated for 24 to 48 hours, according to French pastry master, Pierre Herme, "An osmosis takes place between the garnish and the biscuit. When freshly baked this is hard and crisp, but it absorbs some humidity from the filling and its inside becomes more tender while the crust on the surface stays intact" (quote via Not So Humble Pie). So even if you accidentally overbake the shells by a few minutes, maturing the macarons in the fridge for at least 48 hours should undo most of the damage =). See my first macaron post for helpful videos of the whole macaron-making process!
85 g almonds [not roasted or salted]
40 g black sesame seeds
145 g powdered sugar
Pinch of salt
40 g granulated sugar
3 g egg white powder [optional, to stabilize batter in humid weather]
95 to 100 g egg whites [about 3 large egg whites]
1/8 tsp cream of tartar or 1/4 tsp lemon juice [optional, to stabilize meringue]
1/2 cup Black Sesame Ganache (Recipe below)
25 to 35 Pieces of Mochi Filling (Recipe below)
25 to 35 4-inch lollipop sticks
Microwave fresh egg whites 10 to 15 seconds in the microwave on medium heat.
Combine the almonds, sesame seeds, powdered sugar, and salt in a food processor, and pulse on and off until the nuts are finely ground (about 1 to 2 minutes). Sift the powder to remove any large chunks that remain. Put those chunks back into the food processor and pulse again for another 30 to 60 seconds. Sift again. You will probably have some slightly chunkier almond bits. Hopefully they're no more than a tablespoon or so, in which case you can throw them out.
Weigh out and mix your granulated sugar and egg white powder in a small bowl until uniform; set aside. Using a handheld or stand mixer, whip the egg whites on medium-low speed with cream of tartar until foamy, then turn the speed up to medium to medium-high and gradually add the sugar mixture until you obtain a glossy meringue (it'll look like shaving cream, hold stiff peaks, and stay in place if you turn the bowl upside-down; but don't overbeat your meringue or it will be too dry).
Add all of the nut mixture to the meringue and fold together. Use both a folding motion that scrapes the bottom of the bowl (to incorporate the dry ingredients) and a gentle pressing motion, to deflate the meringue against the side of the bowl. Slow down after all the dry ingredients have been incorporated, and continue folding the mass carefully until you obtain a batter that looks somewhat glossy and flows from the spatula in a thick ribbon. Test the batter by spooning a small amount of the batter up, then dropping it back down on itself. If it melts back into the rest of the batter within 30 seconds, it's ready for piping (this page has a nice photo of this test). If not, fold 2 more strokes and test again.
Fill a pastry bag fitted with a 1/3 to 1/2-inch wide plain tip (I like Ateco #804 or 806) with half of the batter. (When your bag is too full, the pressure causes the batter to rush out in a way that’s difficult to control, making for sloppy macarons.) Pipe tiny blobs of batter onto the 4 corners and center of 2 baking sheets, then line baking sheets with parchment paper OR line with silicone mats. Pipe small rounds (slightly larger than 1 inch wide) straight down and about 1 inch apart onto the baking sheets. Pick up each sheet with both hands and slam it firmly straight downward on the counter 2 to 3 times. This will to force out any large air bubbles. Immediately pop any bubbles that rise up but don't break with a toothpick. Do NOT do this once a few minutes have passed because you'll mess up the shell that's forming.
Preheat the oven to 320 degrees F. Let the macarons sit out for 25 to 90 minutes to harden their shells a bit (to prevent tops from cracking during baking). Test if they're ready by touching the top and side of one shell lightly. It should feel dry and not stick to your finger at all. Bake one pan at a time for 5 minutes in the middle shelf of your oven. Now lower the temperature to 300 degrees F and continue baking another 10 to 15 minutes, depending on the size of the macarons. Turn oven back up to 320 degrees F and let it come to temperature again before baking the next batch. Let cool completely before trying to move the shells.
Once cool, flip the shells over. If you have trouble removing them from parchment paper, pour a couple of drops of water under the paper while the sheet is still a bit warm, and the macarons will lift up more easily due to the moisture. Don't let them sit there in it too long or they will become soggy.
Fill the shells (spooning or piping) with 1 teaspoon of ganache, top with a mochi round, add another small dollop of ganache (just enough to cover the mochi because the macaron shell will cause the mochi to dry and harden if they touch directly), and a similarly-sized top shell. For the best flavor and texture, store in the refrigerator for 24 to 48 hours before eating (see notes above for detailed explanation) but they are best if eaten within 5 days. Bring to room temperature before eating.
Black Sesame Ganache
1/3 cup heavy cream
3 oz. semisweet chocolate, roughly chopped
2 tsp honey or light corn syrup
1 Tbsp ground black sesame powder
Pinch of salt
In a small saucepan over medium high heat, bring the cream to a boil. Meanwhile, place chopped chocolate into a small heatproof bowl. Remove cream from heat, pour over chocolate and let stand 5 minutes. Add honey or corn syrup, sesame powder, and salt, then stir everything together until smooth. Set aside until it cools down and thickens a bit (chilling in the fridge or freezer is fine).
Mochi Filling
2/3 cup glutinous rice flour [like Mochiko brand]
Slightly rounded 1/3 cup powdered sugar
2/3 cup PLUS 2 Tbsp water, divided
Cornstarch, for dusting
Put water and 1/4 cup powdered sugar in a microwave-safe bowl and mix well until sugar has dissolved. Add glutinous rice flour to the bowl and mix well until uniform. Put the bowl in the microwave and heat the dough on high heat for 2 minutes. Stir. If the dough pulls away from the side of the bowl, add the remaining 2 tablespoons of water until combined. If not, return bowl to the microwave and heat in 20-second intervals until the dough pulls away from the sides of the bowl, then mix with the remaining water.
Dust a flat pan and your hands with cornstarch. Carefully transfer the hot mochi from the bowl to the pan. Let cool slightly until you can handle the mochi with your hands. Keep your hands well dusted in cornstarch. Cut small pieces of mochi and roll them in your hands so that you end up with about 25 to 35 fairly flat 3/4-inch rounds.
Thursday, April 28, 2011
A Lotta Chocolate Part 2: Snickers Macarons
Not sure how many of you follow me on Twitter, but I've been yappin' about macarons a lot lately and posted this teaser image for a future post last week. Little did I know at the time, but successful macarons would elude me for over a week. So those of you who saw that image had plenty o' time to figure it out! If you put 2 and 2 together and guessed my next post would be Snickers macarons, you get brownie points from me today! =D
 Similar to my first successful souffles, which took me 5 attempts to attain, the 5th time was the charm for my triumph over macarons (Here's some evidence of my failed attempts...I really hope this doesn't become a pattern!). And I must divide credit among my Twitter friends Stella of Bravetart, Kaitlin of Whisk Kid, Josie of Daydreamer Desserts, Steph of Desserts for Breakfast, Mardi of eat.live.travel.write., and of course the Macaron Queen herself, Helene of Tartelette for their invaluable advice helping me to troubleshoot each failed batch until I got it right this morning. Thank you so much, ladies!
While you probably expect I got frustrated with all these failures (and I did at times), I actually got very invigorated by the learning process. The aggravating yet oddly fun thing about macarons is that there are so many ways to go wrong 8). When each batch came out with a new set of problems, (after the initial wailing) it was fun to play detective, teasing out causes to each symptom. I learned a lot, the most important being that 3 factors really make or break French macarons: properly whipping up the egg whites to stiff peaks, knowing when to stop mixing the batter, and knowing your oven (especially any major hot/cold spots). Each of my failed attempts resulted directly from a failure to do one of the above, and once I figured them out I got the results I wanted. On the flip side, humidity and heat are NOT the great saboteurs of macaron success you've heard them to be. It was warm and humid (rainy with no AC!) all 5 times I baked them but hottest and wettest on the day I succeeded 8).
 If you'll remember, this is the second in a series of chocolate posts that began with my chocolate chunk challah french toast. Plus I'm submitting these to this month's MacTweets challenge: "Decadently Chocolate." Macarons may not be such an unusual way to feature chocolate, but Tartelette's idea to transform a common candy bar into a fancy macaron drew my curiosity enough to warrant a try (or 5 in this case =p). And in the end, I was very impressed. These adorable treats combine the best of both worlds: the classic taste of Snickers bars with the delicate texture and portion-control (ha!) of macarons. Do you love chocolate, Snickers, and/or macarons? If the answer is yes, I really recommend you try these soon!
Now I've probably scared you with all this talk of failed macarons and the recipe below will look impossibly long at first glance, but please rest assured that it's really not so hard. Macaron-making is simply a process that requires hands-on familiarity to perfect, and if you focus on the 3 key things I listed above, you'll have it down in no time. To give you a head's start, I've included some helpful videos below (not my own!) and lots of useful tips in the body of the recipe (which is why it's so long!). Once you've run through the process once or twice, you won't even look at directions anymore 'cause it'll be second nature. And if you learn anything from my experience, I hope it's to try try and try again! While I'm a beginner myself, I'd be happy to answer any macaron questions you may have via Twitter or email.
P.S. - If anyone's interested in this banner, you can print it on PDF HERE, preferably in color on card stock paper. Simply cut it out and glue/tape it to some wood skewers. Enjoy!
Snickers Chocolate Peanut Caramel Macarons [Printable Recipe]
Adapted from Tartelette, Daydreamer Desserts, and Not So Humble Pie (a great macaron troubleshooting post)
Makes about 25 to 35 macarons
XIAOLU'S NOTES: Please do not try to convert this recipe to volume measurements if you don't have a scale (I use and love this one). This recipe is very sensitive and will not work if the measurements are not exact. Please also note that every oven is different and you'll figure out what works best for yours over time. Since mine has major hot spots, I bake on 2 stacked pans for insulation. If you're uncertain of your ability to pipe uniformly-sized macarons, like me, simply trace 1 1/4-inch circles on your parchment paper, flip the paper over, and pipe on the other side, using the outlines as your guide OR print (choose "fit to page") and slide this template under your parchment as a guide but don't forget to remove before baking! Macarons are best after having been refrigerated for 24 to 48 hours, according to French pastry master, Pierre Herme, "An osmosis takes place between the garnish and the biscuit. When freshly baked this is hard and crisp, but it absorbs some humidity from the filling and its inside becomes more tender while the crust on the surface stays intact" (quote via Not So Humble Pie). So even if you accidentally overbake the shells by a few minutes, maturing the macarons in the fridge for at least 48 hours should undo most of the damage =).
65 g almonds [not roasted or salted]
60 g peanuts [not salted]
15 g cocoa powder
160 g powdered sugar
Pinch of salt
55 g granulated sugar
2 g egg white powder [optional, to stabilize batter in humid weather]
100 g egg whites [about 3 large egg whites]
1/8 tsp cream of tartar or 1/4 tsp lemon juice [optional, to stabilize meringue]
Milk Chocolate Ganache (Recipe below)
Marshmallow Peanut "Nougat" (Recipe below)
About 1/3 cup caramel sauce OR dulce de leche (Recipe below)
About 25 to 35 peanut halves
Separate your eggs 2 to 5 days before, and store the whites in a covered container in the fridge. Bring the egg whites to room temperature before proceeding with the recipe. OR just microwave fresh egg whites 10 to 15 seconds in the microwave on medium heat.
Combine the almonds, peanuts, cocoa powder, powdered sugar, and salt in a food processor, and pulse on and off until the nuts are finely ground (about 1 to 2 minutes). Sift the powder to remove any large chunks that remain. Put those chunks back into the food processor and pulse again for another 30 to 60 seconds. Sift again. You will probably have some slightly chunkier almond bits. Hopefully they're no more than a tablespoon or so, in which case you can throw them out.
Weigh out and mix your granulated sugar and egg white powder in a small bowl until uniform; set aside. Using a handheld or stand mixer, whip the egg whites on medium-low speed with cream of tartar until foamy, then turn the speed up to medium to medium-high and gradually add the sugar mixture until you obtain a glossy meringue (it'll look like shaving cream, hold stiff peaks, and stay in place if you turn the bowl upside-down; don't overbeat your meringue or it will be too dry).
Add all of the nut mixture to the meringue, and fold in. Use both a folding motion that scrapes the bottom of the bowl (to incorporate the dry ingredients) and a gentle pressing motion, to deflate the meringue against the side of the bowl. Slow down after about 25 strokes, and fold the mass carefully until you obtain a batter that flows like magma or a thick ribbon. The whole process should not take more than 50 strokes. Test the batter by spooning a small amount of the batter up, then dropping it back down on itself. If it melts back into the rest of the batter within 30 seconds, it's ready for piping (this page has great photos of this test). If not, fold 2 more strokes and test again.
Fill a pastry bag fitted with a 1/3 to 1/2-inch wide plain tip (I like Ateco #804 or 806) with half of the batter. (When your bag is too full, the pressure causes the batter to rush out in a way that’s difficult to control, making for sloppy macarons.) Pipe tiny blobs of batter onto the 4 corners and center of 2 baking sheets, then line baking sheets with parchment paper OR line with silicone mats. Pipe small rounds (slightly larger than 1 inch wide) straight down and about 1 inch apart onto the baking sheets. Pick up each sheet with both hands and slam it firmly straight downward on the counter 2 to 3 times. This will to force out any large air bubbles. Immediately pop any bubbles that rise up but don't break with a toothpick. Do NOT do this once a few minutes have passed because you'll mess up the shell that's forming.
Preheat the oven to 275 to 300 degrees F. Let the macarons sit out for 25 to 60 minutes to harden their shells a bit (to prevent tops from cracking during baking). Test if they're ready by touching the top and side of one shell lightly. It should feel dry and not stick to your finger at all. Bake one pan at a time for 15 to 20 minutes in the middle shelf of your oven, depending on the size of the macarons. Let cool for 15 to 30 minutes before trying to move the shells.
Once cool, flip the shells over. If you have trouble removing them from parchment paper, pour a couple of drops of water under the paper while the sheet is still a bit warm, and the macarons will lift up more easily due to the moisture. Don't let them sit there in it too long or they will become soggy.
Fill the shells with 1/2 to 1 teaspoon of ganache, then 1/2 to 1 teaspoon of caramel sauce, top with a peanut, a 3/4-inch circle of flattened marshmallow nougat, and a similarly-sized top shell. For the best flavor and texture, store in the refrigerator for 24 to 48 hours before eating (see notes above for detailed explanation) but they are best if eaten within 5 days. Bring to room temperature before eating.
Milk Chocolate Ganache
3 oz. milk chocolate, roughly chopped
4 Tbsp heavy cream
In a small saucepan over medium high heat, bring the cream to a boil. Remove from heat, drop in the milk chocolate and let stand 5 minutes. Stir the chocolate into the cream until smooth. Set aside until it cools down and thickens a bit (chilling in the fridge or freezer is fine).
Marshmallow Peanut "Nougat"
3/4 cup marshmallows
2 Tbsp smooth peanut butter
In a heavy saucepan over medium low heat, melt marshmallows and peanut butter until smooth. Let cool. Once cooled you will be able to pull the "nougat" and from the saucepan and cut pieces to flatten in the palm of your hands and sandwich within the macarons.
Dulce de Leche
Adapted from Cooking for Engineers
Makes about 1 3/4 cups
14-oz. can sweetened condensed milk (NOT evaporated milk)
Heavy cream, as needed
MICROWAVE METHOD:
Pour into large (preferably 2 1/2-qt. capacity) microwave-safe bowl. Heat on medium for 2 minutes. Whisk and repeat until appears curdled (around 7 to 10 minutes total, depending on your microwave oven). To use as a caramel sauce, simply stop heating at this point and stir the dulce de leche until smooth. For a thicker candy-like caramel, continue heating for another 2 minutes or so and stir until smooth again while still hot.
PRESSURE COOKER METHOD:
Peel the label off the can of sweetened condensed milk. Put it in a pressure cooker with enough water to come 2/3 up the can. Do NOT open the cans at all. The can won't explode because the pressure cooker equalizes the pressure, but please still proceed with caution and follow the manufacturer's directions for operating the pressure cooker safely! Close the pressure cooker, and bring it up to full pressure. Turn the heat down to maintain the pressure for 20 (lighter) to 30 (darker and thicker) minutes. Turn off the heat and and let the pressure cooker cool slowly. Once the cooker is completely cool, open the lid and remove the can with tongs. Do not open the can while it is still warm. If there’s any pressure left in the can, it could spray and burn you with hot caramel. Wait until the can has completely cooled before opening it. Remove cooled caramel from can. If too thick for your liking, stir in 2 tablespoons of warm heavy cream at a time until desired consistency.
PREVIOUSLY: Chocolate Chunk Challah Bread French Toast
While you probably expect I got frustrated with all these failures (and I did at times), I actually got very invigorated by the learning process. The aggravating yet oddly fun thing about macarons is that there are so many ways to go wrong 8). When each batch came out with a new set of problems, (after the initial wailing) it was fun to play detective, teasing out causes to each symptom. I learned a lot, the most important being that 3 factors really make or break French macarons: properly whipping up the egg whites to stiff peaks, knowing when to stop mixing the batter, and knowing your oven (especially any major hot/cold spots). Each of my failed attempts resulted directly from a failure to do one of the above, and once I figured them out I got the results I wanted. On the flip side, humidity and heat are NOT the great saboteurs of macaron success you've heard them to be. It was warm and humid (rainy with no AC!) all 5 times I baked them but hottest and wettest on the day I succeeded 8).
Now I've probably scared you with all this talk of failed macarons and the recipe below will look impossibly long at first glance, but please rest assured that it's really not so hard. Macaron-making is simply a process that requires hands-on familiarity to perfect, and if you focus on the 3 key things I listed above, you'll have it down in no time. To give you a head's start, I've included some helpful videos below (not my own!) and lots of useful tips in the body of the recipe (which is why it's so long!). Once you've run through the process once or twice, you won't even look at directions anymore 'cause it'll be second nature. And if you learn anything from my experience, I hope it's to try try and try again! While I'm a beginner myself, I'd be happy to answer any macaron questions you may have via Twitter or email.
P.S. - If anyone's interested in this banner, you can print it on PDF HERE, preferably in color on card stock paper. Simply cut it out and glue/tape it to some wood skewers. Enjoy!
Snickers Chocolate Peanut Caramel Macarons [Printable Recipe]
Adapted from Tartelette, Daydreamer Desserts, and Not So Humble Pie (a great macaron troubleshooting post)
Makes about 25 to 35 macarons
XIAOLU'S NOTES: Please do not try to convert this recipe to volume measurements if you don't have a scale (I use and love this one). This recipe is very sensitive and will not work if the measurements are not exact. Please also note that every oven is different and you'll figure out what works best for yours over time. Since mine has major hot spots, I bake on 2 stacked pans for insulation. If you're uncertain of your ability to pipe uniformly-sized macarons, like me, simply trace 1 1/4-inch circles on your parchment paper, flip the paper over, and pipe on the other side, using the outlines as your guide OR print (choose "fit to page") and slide this template under your parchment as a guide but don't forget to remove before baking! Macarons are best after having been refrigerated for 24 to 48 hours, according to French pastry master, Pierre Herme, "An osmosis takes place between the garnish and the biscuit. When freshly baked this is hard and crisp, but it absorbs some humidity from the filling and its inside becomes more tender while the crust on the surface stays intact" (quote via Not So Humble Pie). So even if you accidentally overbake the shells by a few minutes, maturing the macarons in the fridge for at least 48 hours should undo most of the damage =).
65 g almonds [not roasted or salted]
60 g peanuts [not salted]
15 g cocoa powder
160 g powdered sugar
Pinch of salt
55 g granulated sugar
2 g egg white powder [optional, to stabilize batter in humid weather]
100 g egg whites [about 3 large egg whites]
1/8 tsp cream of tartar or 1/4 tsp lemon juice [optional, to stabilize meringue]
Milk Chocolate Ganache (Recipe below)
Marshmallow Peanut "Nougat" (Recipe below)
About 1/3 cup caramel sauce OR dulce de leche (Recipe below)
About 25 to 35 peanut halves
Separate your eggs 2 to 5 days before, and store the whites in a covered container in the fridge. Bring the egg whites to room temperature before proceeding with the recipe. OR just microwave fresh egg whites 10 to 15 seconds in the microwave on medium heat.
Combine the almonds, peanuts, cocoa powder, powdered sugar, and salt in a food processor, and pulse on and off until the nuts are finely ground (about 1 to 2 minutes). Sift the powder to remove any large chunks that remain. Put those chunks back into the food processor and pulse again for another 30 to 60 seconds. Sift again. You will probably have some slightly chunkier almond bits. Hopefully they're no more than a tablespoon or so, in which case you can throw them out.
Weigh out and mix your granulated sugar and egg white powder in a small bowl until uniform; set aside. Using a handheld or stand mixer, whip the egg whites on medium-low speed with cream of tartar until foamy, then turn the speed up to medium to medium-high and gradually add the sugar mixture until you obtain a glossy meringue (it'll look like shaving cream, hold stiff peaks, and stay in place if you turn the bowl upside-down; don't overbeat your meringue or it will be too dry).
Add all of the nut mixture to the meringue, and fold in. Use both a folding motion that scrapes the bottom of the bowl (to incorporate the dry ingredients) and a gentle pressing motion, to deflate the meringue against the side of the bowl. Slow down after about 25 strokes, and fold the mass carefully until you obtain a batter that flows like magma or a thick ribbon. The whole process should not take more than 50 strokes. Test the batter by spooning a small amount of the batter up, then dropping it back down on itself. If it melts back into the rest of the batter within 30 seconds, it's ready for piping (this page has great photos of this test). If not, fold 2 more strokes and test again.
Fill a pastry bag fitted with a 1/3 to 1/2-inch wide plain tip (I like Ateco #804 or 806) with half of the batter. (When your bag is too full, the pressure causes the batter to rush out in a way that’s difficult to control, making for sloppy macarons.) Pipe tiny blobs of batter onto the 4 corners and center of 2 baking sheets, then line baking sheets with parchment paper OR line with silicone mats. Pipe small rounds (slightly larger than 1 inch wide) straight down and about 1 inch apart onto the baking sheets. Pick up each sheet with both hands and slam it firmly straight downward on the counter 2 to 3 times. This will to force out any large air bubbles. Immediately pop any bubbles that rise up but don't break with a toothpick. Do NOT do this once a few minutes have passed because you'll mess up the shell that's forming.
Preheat the oven to 275 to 300 degrees F. Let the macarons sit out for 25 to 60 minutes to harden their shells a bit (to prevent tops from cracking during baking). Test if they're ready by touching the top and side of one shell lightly. It should feel dry and not stick to your finger at all. Bake one pan at a time for 15 to 20 minutes in the middle shelf of your oven, depending on the size of the macarons. Let cool for 15 to 30 minutes before trying to move the shells.
Once cool, flip the shells over. If you have trouble removing them from parchment paper, pour a couple of drops of water under the paper while the sheet is still a bit warm, and the macarons will lift up more easily due to the moisture. Don't let them sit there in it too long or they will become soggy.
Fill the shells with 1/2 to 1 teaspoon of ganache, then 1/2 to 1 teaspoon of caramel sauce, top with a peanut, a 3/4-inch circle of flattened marshmallow nougat, and a similarly-sized top shell. For the best flavor and texture, store in the refrigerator for 24 to 48 hours before eating (see notes above for detailed explanation) but they are best if eaten within 5 days. Bring to room temperature before eating.
Milk Chocolate Ganache
3 oz. milk chocolate, roughly chopped
4 Tbsp heavy cream
In a small saucepan over medium high heat, bring the cream to a boil. Remove from heat, drop in the milk chocolate and let stand 5 minutes. Stir the chocolate into the cream until smooth. Set aside until it cools down and thickens a bit (chilling in the fridge or freezer is fine).
Marshmallow Peanut "Nougat"
3/4 cup marshmallows
2 Tbsp smooth peanut butter
In a heavy saucepan over medium low heat, melt marshmallows and peanut butter until smooth. Let cool. Once cooled you will be able to pull the "nougat" and from the saucepan and cut pieces to flatten in the palm of your hands and sandwich within the macarons.
Dulce de Leche
Adapted from Cooking for Engineers
Makes about 1 3/4 cups
14-oz. can sweetened condensed milk (NOT evaporated milk)
Heavy cream, as needed
MICROWAVE METHOD:
Pour into large (preferably 2 1/2-qt. capacity) microwave-safe bowl. Heat on medium for 2 minutes. Whisk and repeat until appears curdled (around 7 to 10 minutes total, depending on your microwave oven). To use as a caramel sauce, simply stop heating at this point and stir the dulce de leche until smooth. For a thicker candy-like caramel, continue heating for another 2 minutes or so and stir until smooth again while still hot.
PRESSURE COOKER METHOD:
Peel the label off the can of sweetened condensed milk. Put it in a pressure cooker with enough water to come 2/3 up the can. Do NOT open the cans at all. The can won't explode because the pressure cooker equalizes the pressure, but please still proceed with caution and follow the manufacturer's directions for operating the pressure cooker safely! Close the pressure cooker, and bring it up to full pressure. Turn the heat down to maintain the pressure for 20 (lighter) to 30 (darker and thicker) minutes. Turn off the heat and and let the pressure cooker cool slowly. Once the cooker is completely cool, open the lid and remove the can with tongs. Do not open the can while it is still warm. If there’s any pressure left in the can, it could spray and burn you with hot caramel. Wait until the can has completely cooled before opening it. Remove cooled caramel from can. If too thick for your liking, stir in 2 tablespoons of warm heavy cream at a time until desired consistency.
PREVIOUSLY: Chocolate Chunk Challah Bread French Toast
Subscribe to:
Posts (Atom)