Hope you all had a fun (and safe) Halloween! Between Hurricane Sandy and coming down with a cold, I didn't go all out this year like I did last time. But I did manage to add a gorily festive touch to these fluffy Coconut Cupcakes with Chocolate Filling and Frosting by splattering them with red-colored simple syrup. I usually need to put my personal stamp on recipes, but this super versatile white/yellow cake recipe from Beyond Buttercream is perfect as is. I followed her directions for a coconut variation, and it was a thing of beauty. For a cupcake version, fill liners 1/2 to 2/3 full (this batter rises a lot) and bake at 350 degrees F for 19 to 22 minutes or just until a toothpick inserted into the center of a cupcake comes out mostly clean (moist crumbs are okay; wet batter means it needs to bake longer). Since my chocolate frosting has my personal spin, I will post the recipe below. Enjoy!
I know I've been out of the blogging loop and haven't been visiting your sites as much as I'd like to, so I'd love to hear about your Halloween or just about how you've been in general in the comments below!
Dark, Rich Chocolate Buttercream Frosting [Printable Recipe]
Makes enough to frost at least 2 dozen cupcakes
2 cups unsweetened cocoa powder
4 to 5 cups powdered sugar
Large pinch salt
1 1/2 cups (3 sticks) unsalted butter, softened
5 to 8 Tbsp milk, half and half, OR heavy cream
1 Tbsp pure vanilla extract
Sift the cocoa powder, powdered sugar, and salt into a large bowl. In another large mixing bowl, cream the butter using an electric mixer. Alternate adding the sifted mixture (1 cup at a time) with adding the cream, mixing well between each addition. Once all the powdered mixture and 5 tablespoons of the milk have been incorporated into the frosting, turn the speed up to high and continue beating until a light, fluffy texture is achieved, at least 2 minutes. [Since the frosting will significantly lighten in color as it's beaten, you will need to scrape the sides of the mixing bowl carefully to ensure the darker portions are mixed in to make a uniformly colored frosting. Add more cream or powdered sugar if you want to thin or thicken the frosting. Use finished frosting right away to frost cooled cupcakes or cakes. If not using right away, frosting can be covered and stored at cool room temperature for at least 2 days. However, you may need to re-beat the frosting briefly if it's been siting a long time.
Showing posts with label ganache. Show all posts
Wednesday, October 31, 2012
Happy Halloween!
Labels:
baking,
buttercream,
chocolate,
coconut,
cupcake,
ganache,
Halloween,
holiday,
vegetarian
Thursday, October 11, 2012
Celebration Cake (Yellow Layer Cake with Milk Chocolate Ganache)
When it comes to yellow cake, fluffy and moist are where it's at in my book. But sometimes I just can't deal with all the crumbs that break off the second I apply frosting. Especially in planning my first ever multiple-tiered cake, I knew I'd need a yellow cake endowed with a touch more strength and structure than my current go-to. I get enough baking anxiety without adding collapsing cake tiers to the not-so-little list of horrors! Luckily my favorite white cake recipe had a yellow cake (egg yolk) variation built right in! A double batch was just right for the 2 tall tiers pictured above (5 x 4 inches and 8 x 5 inches), and the cake came out nicely firm without sacrificing moistness or flavor.
Surrounding each cake layer was a generous coating of milk chocolate ganache (I used Trader Joe's Pound Plus bars, which are just $5 for 17.6 oz. and taste seriously amazing). I recommend a milk chocolate-to-heavy cream ratio of 2.8 or 2.9 to 1 so that the ganache will set up firmly and provide a sturdy, smooth (and decadent) base for your fondant covering. And I calculated the total amount of ganache needed using this awesome tool called The Ganacherator. Now if you've read anything about fondant, you'll have heard that a cake covered in fondant will only look as good (read: smooth and straight) as the buttercream or ganache underneath. This is absolutely true, and ganache is much easier to learn with as it will set really firm at room temperature (unlike buttercream). Making celebration cakes is really an art-form and I've got a long long ways to go (as evidenced by the elephant skin, not-quite-straight sides, and drooping of the corners in the above cake). But for anyone interested in going down the rabbit hole, I've shared some of my favorite video tutorials below of ganaching, covering, and smoothing the fondant to get a clean professional look to your fondant cakes. I hope this helps the other beginners out there, and I'd love to get feedback on improving my fondant work from any cake experts out there! Cheers!
Making Ganache for Decorating Cakes by Inspired by Michelle
Covering a Cake in Ganache with Smooth and Straight Sides by Inspired by Michelle
Rolling out Fondant, Covering, and Smoothing a Ganached Cake by Planet Cake
Smoothing Cake Covered in Fondant to Get Sharp Edges by Inspired by Michelle
Labels:
baking,
cake,
cake decorating,
chocolate,
eggs,
fondant,
ganache,
heavy cream,
multi-tiered,
vegetarian
Saturday, June 11, 2011
When Life Gives You Lemons...It's Time for a Mac Attack! (Lemon Macarons with White Chocolate Ganache)
Guest posts and macarons have become quite the norm recently here, haven't they? I'm actually getting a bit tired of photographing these cookies so much 8p. In fact I'd have waited weeks to post these, except that I've gotten such positive feedback on the taste of them from friends and family alike! Plus, I've been dying to share these adorable lemon shapes with you as soon as I came across the idea on Erica's blog. Believe it or not I actually lost my Mac Mojo a bit this week and had to make these 3 times before they came out to my liking. Not only have I continued to struggle with my hot spot-laden oven but this recipe also added in a new factor of slightly adjusting the shape of the shells.
Fortunately, despite my meekness in dealing with certain issues in life, that's not a problem I have with baking! I simply take each imperfect batch (still delicious, thankfully) as a challenge to improve myself. And whether you've yet to try your hand at macarons or have failed a few times, let me assure you that the satisfaction of getting them right is so worth it in the end!
As I mentioned before, a lot of my macaron issues have been the result of reducing the sugar in the shells. Because sugar stabilizes the batter, decreasing it compromises the cookie's structure. So if you're new to them, I'd definitely recommend starting with a full sugar recipe. In the continuing evolution of my own shell recipe, I've also decided to add some (but not all) the customary sugar back in, while making other tweaks to reduce the experience of sweetness instead of just the actual amount of sugar.
What do I mean? Based on personal experience, perception of sweetness is based both on the objective amount of sugar present AND on the relative strength of salty and sour flavors also present. So how do we use this to our mac-vantage? Well first, we add a healthy pinch of salt to the shells as suggested by my friend/macaron authority, Stella of Bravetart. Other than that there's not too much we can do without upsetting the delicate balance of the batter, so let's turn our attention inward...
The sweetness of the shells can be countered with fillings that can be only mildly sweetened with out losing structural integrity (like Swiss meringue buttercream, mascarpone, or whipped cream). Or why not try a tart fruit curd (like rhubarb raspberry) or dark chocolate ganache with a bitter edge? Plenty of great options there...but being stubborn as I am I was stuck on the idea a lemon white chocolate ganache. So how did I turn an ingredient infamous for being tooth-achingly sweet into a treat even the sugar-shunners in my life loved? I gave it a good sour kick in the arse with a liberal dose of citric acid (a natural powder often used to add sourness to food/drinks)!
Do you have your own way of showing those overly sweet macs who's boss that I haven't mentioned above? Lemme hear 'em, please! =D
Lemon Party Macarons [Printable Recipe]
Lemon-shaping method adapted from Macarons by Erica
Makes 25 to 30 macarons
XIAOLU'S NOTES: I purchased citric acid fairly cheaply from my local Indian store. If you don't have it, you may be able to add 1 to 2 tablespoons lemon juice instead. However I haven't tried this myself and therefore am not certain it won't cause curdling or other problems. Please do not try to convert this recipe to volume measurements if you don't have a scale (I use and love this one). This recipe is very sensitive and will not work if the measurements are not exact. Please also note that every oven is different and you'll figure out what works best for yours over time (see this post for great information on ovens and macarons). Since mine has major hot spots, I bake on 2 stacked pans for insulation if using parchment paper. If you're uncertain of your ability to pipe uniformly-sized macarons, like me, simply trace 1 1/4-inch circles on your parchment paper, flip the paper over, and pipe on the other side, using the outlines as your guide OR print (choose "fit to page") and slide this template under your parchment as a guide but don't forget to remove before baking! Macarons are best after having been refrigerated for 24 to 48 hours, according to French pastry master, Pierre Herme, "An osmosis takes place between the garnish and the biscuit. When freshly baked this is hard and crisp, but it absorbs some humidity from the filling and its inside becomes more tender while the crust on the surface stays intact" (quote via Not So Humble Pie). So even if you accidentally overbake the shells by a few minutes, maturing the macarons in the fridge for at least 48 hours should undo most of the damage =). See my first macaron post for helpful videos of the whole macaron-making process!
125 g almonds [not roasted or salted]
160 g powdered sugar
2 Tbsp lemon zest, air-dried at least 1 hour
Large pinch of salt
35 g granulated sugar
2 g egg white powder [optional, to stabilize batter in humid weather]
90 to 95 g egg whites [about 3 large egg whites]
Pinch of citric acid [optional, to stabilize meringue and add subtle tart flavor]
Tart White Chocolate Lemon Ganache (Recipe below)
Microwave fresh egg whites 10 to 15 seconds in the microwave on medium-low heat (I set my microwave to 40%).
Combine the almonds, powdered sugar, dried zest, and salt in a food processor, and pulse on and off until the nuts are finely ground (about 1 to 2 minutes). Sift the powder to remove any large chunks that remain. Put those chunks back into the food processor and pulse again for another 30 to 60 seconds. Sift again. You will probably have some slightly chunkier almond bits. Hopefully they're no more than a tablespoon or so, in which case you can throw them out.
Weigh out and mix your granulated sugar and egg white powder in a small bowl until uniform; set aside. Using a handheld or stand mixer, whip the egg whites on medium-low speed with citric acid until foamy, then turn the speed up to medium to medium-high and gradually add the sugar mixture until you obtain a glossy meringue (it'll look like shaving cream, hold stiff peaks, and stay in place if you turn the bowl upside-down; but don't overbeat your meringue or it will be too dry).
Add all of the nut mixture to the meringue and fold together. Use both a folding motion that scrapes the bottom of the bowl (to incorporate the dry ingredients) and a gentle pressing motion, to deflate the meringue against the side of the bowl. Slow down after all the dry ingredients have been incorporated, and continue folding the mass carefully until you obtain a batter that looks somewhat glossy and flows from the spatula in a thick ribbon. Test the batter by spooning a small amount of the batter on a plate: if the top flattens on its own within about 20 seconds, it’s ready to pipe. If there is a small peak, give the batter 2 to 3 more folds and test again. The peak shouldn’t disappear immediately either or it’s already overmixed.
Fill a pastry bag fitted with a 1/3 to 1/2-inch wide plain tip (I like Ateco #805 or 806) with half of the batter. (When your bag is too full, the pressure causes the batter to rush out in a way that’s difficult to control, making for sloppy macarons.) Pipe tiny blobs of batter onto the 4 corners and center of 2 baking sheets, then line baking sheets with parchment paper OR line with silicone mats. Pipe small rounds (slightly larger than 1 inch wide) straight down and about 1 inch apart onto the baking sheets. Immediately use a toothpick to pull out points on opposite sides of each round to create the lemon shapes. Then pick up each sheet with both hands and slam it firmly straight downward on the counter 2 to 3 times. This will to force out any large air bubbles. Immediately pop any bubbles that rise up but don't break with a toothpick. Do NOT do this once a few minutes have passed because you'll mess up the shell that's forming.
Preheat the oven to 285 to 300 degrees F. Let the macarons sit out for 25 to 90 minutes to harden their shells a bit (to prevent tops from cracking during baking). Test if they're ready by touching the top and side of one shell lightly. It should feel dry and not stick to your finger at all. Bake one pan at a time for 15 to 25 minutes, depending on the size of the macarons. After the first 10 minutes of baking, rotate the pan and place a large piece of foil loosely over the macarons to prevent browning (If I’m baking on 2 stacked pans, I also remove the bottom pan at this point to make sure the macarons will be completely cooked on the bottom and not sticky). Let cool completely before trying to move the shells.
Once cool, remove the shells from the silicone mat or parchment and flip them over. If you have trouble removing them from parchment paper, freeze the macarons for about 10 minutes, then quickly peel them off before they have a chance to warm up and get sticky again.
Fill the shells (spooning or piping) with 1 1/2 to 2 teaspoons of filling and top with a similarly-sized top shell. For the best flavor and texture, store in the refrigerator for 24 to 48 hours before eating (see notes above for detailed explanation) but they are best if eaten within 6 days. Bring to room temperature before eating.
Tart White Chocolate Lemon Ganache
6 Tbsp heavy cream
1 tsp lemon zest
6 oz. white chocolate, coarsely chopped
1/2 to 3/4 tsp citric acid
Pinch of salt
Heat cream and lemon zest in a small saucepan, and bring to a boil. Slowly pour the cream into a heatproof bowl containing the chopped white chocolate and let sit for 3 to 5 minutes. Stir gently until all of the chocolate is melted and you've obtained a smooth ganache. Sprinkle the citric acid and salt over the ganache and stir in thoroughly. Let cool to a cool room temperature until thickened before filling macarons. (It's fine to speed up the cooling by popping the ganache in the fridge but make sure it doesn't get too hard to pipe/spoon on.)
Fortunately, despite my meekness in dealing with certain issues in life, that's not a problem I have with baking! I simply take each imperfect batch (still delicious, thankfully) as a challenge to improve myself. And whether you've yet to try your hand at macarons or have failed a few times, let me assure you that the satisfaction of getting them right is so worth it in the end!
As I mentioned before, a lot of my macaron issues have been the result of reducing the sugar in the shells. Because sugar stabilizes the batter, decreasing it compromises the cookie's structure. So if you're new to them, I'd definitely recommend starting with a full sugar recipe. In the continuing evolution of my own shell recipe, I've also decided to add some (but not all) the customary sugar back in, while making other tweaks to reduce the experience of sweetness instead of just the actual amount of sugar.
What do I mean? Based on personal experience, perception of sweetness is based both on the objective amount of sugar present AND on the relative strength of salty and sour flavors also present. So how do we use this to our mac-vantage? Well first, we add a healthy pinch of salt to the shells as suggested by my friend/macaron authority, Stella of Bravetart. Other than that there's not too much we can do without upsetting the delicate balance of the batter, so let's turn our attention inward...
The sweetness of the shells can be countered with fillings that can be only mildly sweetened with out losing structural integrity (like Swiss meringue buttercream, mascarpone, or whipped cream). Or why not try a tart fruit curd (like rhubarb raspberry) or dark chocolate ganache with a bitter edge? Plenty of great options there...but being stubborn as I am I was stuck on the idea a lemon white chocolate ganache. So how did I turn an ingredient infamous for being tooth-achingly sweet into a treat even the sugar-shunners in my life loved? I gave it a good sour kick in the arse with a liberal dose of citric acid (a natural powder often used to add sourness to food/drinks)!
Do you have your own way of showing those overly sweet macs who's boss that I haven't mentioned above? Lemme hear 'em, please! =D
Lemon Party Macarons [Printable Recipe]
Lemon-shaping method adapted from Macarons by Erica
Makes 25 to 30 macarons
XIAOLU'S NOTES: I purchased citric acid fairly cheaply from my local Indian store. If you don't have it, you may be able to add 1 to 2 tablespoons lemon juice instead. However I haven't tried this myself and therefore am not certain it won't cause curdling or other problems. Please do not try to convert this recipe to volume measurements if you don't have a scale (I use and love this one). This recipe is very sensitive and will not work if the measurements are not exact. Please also note that every oven is different and you'll figure out what works best for yours over time (see this post for great information on ovens and macarons). Since mine has major hot spots, I bake on 2 stacked pans for insulation if using parchment paper. If you're uncertain of your ability to pipe uniformly-sized macarons, like me, simply trace 1 1/4-inch circles on your parchment paper, flip the paper over, and pipe on the other side, using the outlines as your guide OR print (choose "fit to page") and slide this template under your parchment as a guide but don't forget to remove before baking! Macarons are best after having been refrigerated for 24 to 48 hours, according to French pastry master, Pierre Herme, "An osmosis takes place between the garnish and the biscuit. When freshly baked this is hard and crisp, but it absorbs some humidity from the filling and its inside becomes more tender while the crust on the surface stays intact" (quote via Not So Humble Pie). So even if you accidentally overbake the shells by a few minutes, maturing the macarons in the fridge for at least 48 hours should undo most of the damage =). See my first macaron post for helpful videos of the whole macaron-making process!
125 g almonds [not roasted or salted]
160 g powdered sugar
2 Tbsp lemon zest, air-dried at least 1 hour
Large pinch of salt
35 g granulated sugar
2 g egg white powder [optional, to stabilize batter in humid weather]
90 to 95 g egg whites [about 3 large egg whites]
Pinch of citric acid [optional, to stabilize meringue and add subtle tart flavor]
Tart White Chocolate Lemon Ganache (Recipe below)
Microwave fresh egg whites 10 to 15 seconds in the microwave on medium-low heat (I set my microwave to 40%).
Combine the almonds, powdered sugar, dried zest, and salt in a food processor, and pulse on and off until the nuts are finely ground (about 1 to 2 minutes). Sift the powder to remove any large chunks that remain. Put those chunks back into the food processor and pulse again for another 30 to 60 seconds. Sift again. You will probably have some slightly chunkier almond bits. Hopefully they're no more than a tablespoon or so, in which case you can throw them out.
Weigh out and mix your granulated sugar and egg white powder in a small bowl until uniform; set aside. Using a handheld or stand mixer, whip the egg whites on medium-low speed with citric acid until foamy, then turn the speed up to medium to medium-high and gradually add the sugar mixture until you obtain a glossy meringue (it'll look like shaving cream, hold stiff peaks, and stay in place if you turn the bowl upside-down; but don't overbeat your meringue or it will be too dry).
Add all of the nut mixture to the meringue and fold together. Use both a folding motion that scrapes the bottom of the bowl (to incorporate the dry ingredients) and a gentle pressing motion, to deflate the meringue against the side of the bowl. Slow down after all the dry ingredients have been incorporated, and continue folding the mass carefully until you obtain a batter that looks somewhat glossy and flows from the spatula in a thick ribbon. Test the batter by spooning a small amount of the batter on a plate: if the top flattens on its own within about 20 seconds, it’s ready to pipe. If there is a small peak, give the batter 2 to 3 more folds and test again. The peak shouldn’t disappear immediately either or it’s already overmixed.
Fill a pastry bag fitted with a 1/3 to 1/2-inch wide plain tip (I like Ateco #805 or 806) with half of the batter. (When your bag is too full, the pressure causes the batter to rush out in a way that’s difficult to control, making for sloppy macarons.) Pipe tiny blobs of batter onto the 4 corners and center of 2 baking sheets, then line baking sheets with parchment paper OR line with silicone mats. Pipe small rounds (slightly larger than 1 inch wide) straight down and about 1 inch apart onto the baking sheets. Immediately use a toothpick to pull out points on opposite sides of each round to create the lemon shapes. Then pick up each sheet with both hands and slam it firmly straight downward on the counter 2 to 3 times. This will to force out any large air bubbles. Immediately pop any bubbles that rise up but don't break with a toothpick. Do NOT do this once a few minutes have passed because you'll mess up the shell that's forming.
Preheat the oven to 285 to 300 degrees F. Let the macarons sit out for 25 to 90 minutes to harden their shells a bit (to prevent tops from cracking during baking). Test if they're ready by touching the top and side of one shell lightly. It should feel dry and not stick to your finger at all. Bake one pan at a time for 15 to 25 minutes, depending on the size of the macarons. After the first 10 minutes of baking, rotate the pan and place a large piece of foil loosely over the macarons to prevent browning (If I’m baking on 2 stacked pans, I also remove the bottom pan at this point to make sure the macarons will be completely cooked on the bottom and not sticky). Let cool completely before trying to move the shells.
Once cool, remove the shells from the silicone mat or parchment and flip them over. If you have trouble removing them from parchment paper, freeze the macarons for about 10 minutes, then quickly peel them off before they have a chance to warm up and get sticky again.
Fill the shells (spooning or piping) with 1 1/2 to 2 teaspoons of filling and top with a similarly-sized top shell. For the best flavor and texture, store in the refrigerator for 24 to 48 hours before eating (see notes above for detailed explanation) but they are best if eaten within 6 days. Bring to room temperature before eating.
Tart White Chocolate Lemon Ganache
6 Tbsp heavy cream
1 tsp lemon zest
6 oz. white chocolate, coarsely chopped
1/2 to 3/4 tsp citric acid
Pinch of salt
Heat cream and lemon zest in a small saucepan, and bring to a boil. Slowly pour the cream into a heatproof bowl containing the chopped white chocolate and let sit for 3 to 5 minutes. Stir gently until all of the chocolate is melted and you've obtained a smooth ganache. Sprinkle the citric acid and salt over the ganache and stir in thoroughly. Let cool to a cool room temperature until thickened before filling macarons. (It's fine to speed up the cooling by popping the ganache in the fridge but make sure it doesn't get too hard to pipe/spoon on.)
Labels:
almond,
citric acid,
citrus,
cookie/cracker,
ganache,
lemon,
macaron,
vegetarian,
white chocolate
Friday, May 6, 2011
You Might Call Me Hooked... (Black Sesame Macaron Pops with Mochi Filling)
I think anyone who knows me well would tell you that I have what some would call an "addictive personality." No, thankfully I don't mean any illegal substances or alcohol! But I can become intensely interested (let's not use the O-word here...;p) with things very quickly and often develop an unlimited capacity to read or watch about that thing. For example, my boyfriend P will often walk in on me completely engrossed in a TV show and ask what it is. My reply? "Oh I'm not sure I just came across it 5 minutes ago," which of course leaves him totally perplexed. Or in middle school when I discovered that the huge company Proctor & Gamble made so many of our household products, I became so curious in them that I read a 300+ page book about the history of the company.
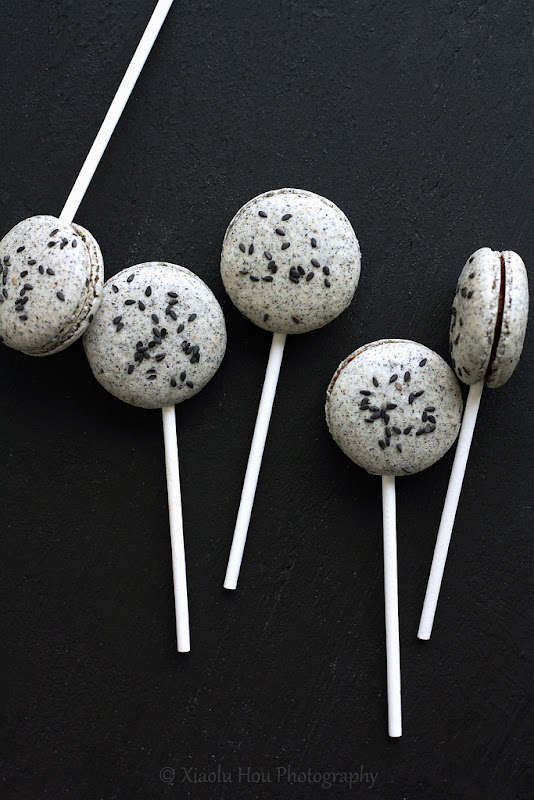
But anyway, the real point here is that no one should be surprised that after finally baking my first successful macarons, I caught the Mac Bug bigtime ^_^. Both before and after that batch, I've poured over countless tutorials from fellow bloggers, YouTube videos, and basically any piece of helpful information on the process that I could get my hungry eyes and greedy hands on hehe. But as I learned in my previous attempts, there's no education like rolling up your sleeves and getting in the kitchen. Especially after I remembered the black sesame seeds still stashed in my freezer, it didn't take long for another mac creation to materialize.
Since I already gushed over the addictive flavor and health benefits of black sesame in my black sesame matcha cupcake post, I'll spare you this time and just send you over there for the details. It delights me that the sesame in these macarons is impossible to miss with respect to appearance, flavor, and fragrance -- as it should be! Still, I couldn't help adding a bit of sesame powder to even the chocolate filling for a double dose of deliciousness (even if it upset the Chinese traditionalist in me just a tad ;p). Finally I had one more Asian twist up my sleeve: a chewy mochi center!
This unusual mix of French and Asian flavors, of crisp, moist, and chewy textures was definitely a risk for me. Especially for what was only my second date with lovely Mr. Macaron, but it definitely paid off! These have been a real hit with my friends, both Chinese and not. Some found them so addictive that my pleas to wait 24 hours before eating them were beyond futile. But that's really not something to complain about =D!
Lastly, many of you left comments to my Snickers Macarons post saying you were still afraid to try these persnickety French treats (I may be paraphrasing haha). I just want to encourage you all to just take the leap! I was just like you for years, thinking that if I just read another post or watched another video I'd finally be ready. But honestly you just have to jump in and do it, and it's not nearly as scary as you think. Yes, there will be imperfect batches (or you may be one of those lucky people who get it on the first try!) but they will still be delicious and impress your friend I promise. In fact I actually underbaked this batch a smidge and got shorter "feet" than I'd have liked, but now I see it as a valuable lesson and look forward to improving the next batch! I hope more of you will join me in my macaron explorations and can't wait to hear about your successes!
Black Sesame Macaron Pops with Mochi Filling and Ganache [Printable Recipe]
Fillings adapted from Bonbini and Evan’s Kitchen Ramblings
Makes about 25 to 35 macarons
XIAOLU'S NOTES: Please do not try to convert this recipe to volume measurements if you don't have a scale (I use and love this one). This recipe is very sensitive and will not work if the measurements are not exact. Please also note that every oven is different and you'll figure out what works best for yours over time. Since mine has major hot spots, I bake on 2 stacked pans for insulation (see this post for great information on ovens and macarons). If you're uncertain of your ability to pipe uniformly-sized macarons, like me, simply trace 1 1/4-inch circles on your parchment paper, flip the paper over, and pipe on the other side, using the outlines as your guide OR print (choose "fit to page") and slide this template under your parchment as a guide but don't forget to remove before baking! Macarons are best after having been refrigerated for 24 to 48 hours, according to French pastry master, Pierre Herme, "An osmosis takes place between the garnish and the biscuit. When freshly baked this is hard and crisp, but it absorbs some humidity from the filling and its inside becomes more tender while the crust on the surface stays intact" (quote via Not So Humble Pie). So even if you accidentally overbake the shells by a few minutes, maturing the macarons in the fridge for at least 48 hours should undo most of the damage =). See my first macaron post for helpful videos of the whole macaron-making process!
85 g almonds [not roasted or salted]
40 g black sesame seeds
145 g powdered sugar
Pinch of salt
40 g granulated sugar
3 g egg white powder [optional, to stabilize batter in humid weather]
95 to 100 g egg whites [about 3 large egg whites]
1/8 tsp cream of tartar or 1/4 tsp lemon juice [optional, to stabilize meringue]
1/2 cup Black Sesame Ganache (Recipe below)
25 to 35 Pieces of Mochi Filling (Recipe below)
25 to 35 4-inch lollipop sticks
Microwave fresh egg whites 10 to 15 seconds in the microwave on medium heat.
Combine the almonds, sesame seeds, powdered sugar, and salt in a food processor, and pulse on and off until the nuts are finely ground (about 1 to 2 minutes). Sift the powder to remove any large chunks that remain. Put those chunks back into the food processor and pulse again for another 30 to 60 seconds. Sift again. You will probably have some slightly chunkier almond bits. Hopefully they're no more than a tablespoon or so, in which case you can throw them out.
Weigh out and mix your granulated sugar and egg white powder in a small bowl until uniform; set aside. Using a handheld or stand mixer, whip the egg whites on medium-low speed with cream of tartar until foamy, then turn the speed up to medium to medium-high and gradually add the sugar mixture until you obtain a glossy meringue (it'll look like shaving cream, hold stiff peaks, and stay in place if you turn the bowl upside-down; but don't overbeat your meringue or it will be too dry).
Add all of the nut mixture to the meringue and fold together. Use both a folding motion that scrapes the bottom of the bowl (to incorporate the dry ingredients) and a gentle pressing motion, to deflate the meringue against the side of the bowl. Slow down after all the dry ingredients have been incorporated, and continue folding the mass carefully until you obtain a batter that looks somewhat glossy and flows from the spatula in a thick ribbon. Test the batter by spooning a small amount of the batter up, then dropping it back down on itself. If it melts back into the rest of the batter within 30 seconds, it's ready for piping (this page has a nice photo of this test). If not, fold 2 more strokes and test again.
Fill a pastry bag fitted with a 1/3 to 1/2-inch wide plain tip (I like Ateco #804 or 806) with half of the batter. (When your bag is too full, the pressure causes the batter to rush out in a way that’s difficult to control, making for sloppy macarons.) Pipe tiny blobs of batter onto the 4 corners and center of 2 baking sheets, then line baking sheets with parchment paper OR line with silicone mats. Pipe small rounds (slightly larger than 1 inch wide) straight down and about 1 inch apart onto the baking sheets. Pick up each sheet with both hands and slam it firmly straight downward on the counter 2 to 3 times. This will to force out any large air bubbles. Immediately pop any bubbles that rise up but don't break with a toothpick. Do NOT do this once a few minutes have passed because you'll mess up the shell that's forming.
Preheat the oven to 320 degrees F. Let the macarons sit out for 25 to 90 minutes to harden their shells a bit (to prevent tops from cracking during baking). Test if they're ready by touching the top and side of one shell lightly. It should feel dry and not stick to your finger at all. Bake one pan at a time for 5 minutes in the middle shelf of your oven. Now lower the temperature to 300 degrees F and continue baking another 10 to 15 minutes, depending on the size of the macarons. Turn oven back up to 320 degrees F and let it come to temperature again before baking the next batch. Let cool completely before trying to move the shells.
Once cool, flip the shells over. If you have trouble removing them from parchment paper, pour a couple of drops of water under the paper while the sheet is still a bit warm, and the macarons will lift up more easily due to the moisture. Don't let them sit there in it too long or they will become soggy.
Fill the shells (spooning or piping) with 1 teaspoon of ganache, top with a mochi round, add another small dollop of ganache (just enough to cover the mochi because the macaron shell will cause the mochi to dry and harden if they touch directly), and a similarly-sized top shell. For the best flavor and texture, store in the refrigerator for 24 to 48 hours before eating (see notes above for detailed explanation) but they are best if eaten within 5 days. Bring to room temperature before eating.
Black Sesame Ganache
1/3 cup heavy cream
3 oz. semisweet chocolate, roughly chopped
2 tsp honey or light corn syrup
1 Tbsp ground black sesame powder
Pinch of salt
In a small saucepan over medium high heat, bring the cream to a boil. Meanwhile, place chopped chocolate into a small heatproof bowl. Remove cream from heat, pour over chocolate and let stand 5 minutes. Add honey or corn syrup, sesame powder, and salt, then stir everything together until smooth. Set aside until it cools down and thickens a bit (chilling in the fridge or freezer is fine).
Mochi Filling
2/3 cup glutinous rice flour [like Mochiko brand]
Slightly rounded 1/3 cup powdered sugar
2/3 cup PLUS 2 Tbsp water, divided
Cornstarch, for dusting
Put water and 1/4 cup powdered sugar in a microwave-safe bowl and mix well until sugar has dissolved. Add glutinous rice flour to the bowl and mix well until uniform. Put the bowl in the microwave and heat the dough on high heat for 2 minutes. Stir. If the dough pulls away from the side of the bowl, add the remaining 2 tablespoons of water until combined. If not, return bowl to the microwave and heat in 20-second intervals until the dough pulls away from the sides of the bowl, then mix with the remaining water.
Dust a flat pan and your hands with cornstarch. Carefully transfer the hot mochi from the bowl to the pan. Let cool slightly until you can handle the mochi with your hands. Keep your hands well dusted in cornstarch. Cut small pieces of mochi and roll them in your hands so that you end up with about 25 to 35 fairly flat 3/4-inch rounds.
But anyway, the real point here is that no one should be surprised that after finally baking my first successful macarons, I caught the Mac Bug bigtime ^_^. Both before and after that batch, I've poured over countless tutorials from fellow bloggers, YouTube videos, and basically any piece of helpful information on the process that I could get my hungry eyes and greedy hands on hehe. But as I learned in my previous attempts, there's no education like rolling up your sleeves and getting in the kitchen. Especially after I remembered the black sesame seeds still stashed in my freezer, it didn't take long for another mac creation to materialize.
Since I already gushed over the addictive flavor and health benefits of black sesame in my black sesame matcha cupcake post, I'll spare you this time and just send you over there for the details. It delights me that the sesame in these macarons is impossible to miss with respect to appearance, flavor, and fragrance -- as it should be! Still, I couldn't help adding a bit of sesame powder to even the chocolate filling for a double dose of deliciousness (even if it upset the Chinese traditionalist in me just a tad ;p). Finally I had one more Asian twist up my sleeve: a chewy mochi center!
This unusual mix of French and Asian flavors, of crisp, moist, and chewy textures was definitely a risk for me. Especially for what was only my second date with lovely Mr. Macaron, but it definitely paid off! These have been a real hit with my friends, both Chinese and not. Some found them so addictive that my pleas to wait 24 hours before eating them were beyond futile. But that's really not something to complain about =D!
Lastly, many of you left comments to my Snickers Macarons post saying you were still afraid to try these persnickety French treats (I may be paraphrasing haha). I just want to encourage you all to just take the leap! I was just like you for years, thinking that if I just read another post or watched another video I'd finally be ready. But honestly you just have to jump in and do it, and it's not nearly as scary as you think. Yes, there will be imperfect batches (or you may be one of those lucky people who get it on the first try!) but they will still be delicious and impress your friend I promise. In fact I actually underbaked this batch a smidge and got shorter "feet" than I'd have liked, but now I see it as a valuable lesson and look forward to improving the next batch! I hope more of you will join me in my macaron explorations and can't wait to hear about your successes!
Black Sesame Macaron Pops with Mochi Filling and Ganache [Printable Recipe]
Fillings adapted from Bonbini and Evan’s Kitchen Ramblings
Makes about 25 to 35 macarons
XIAOLU'S NOTES: Please do not try to convert this recipe to volume measurements if you don't have a scale (I use and love this one). This recipe is very sensitive and will not work if the measurements are not exact. Please also note that every oven is different and you'll figure out what works best for yours over time. Since mine has major hot spots, I bake on 2 stacked pans for insulation (see this post for great information on ovens and macarons). If you're uncertain of your ability to pipe uniformly-sized macarons, like me, simply trace 1 1/4-inch circles on your parchment paper, flip the paper over, and pipe on the other side, using the outlines as your guide OR print (choose "fit to page") and slide this template under your parchment as a guide but don't forget to remove before baking! Macarons are best after having been refrigerated for 24 to 48 hours, according to French pastry master, Pierre Herme, "An osmosis takes place between the garnish and the biscuit. When freshly baked this is hard and crisp, but it absorbs some humidity from the filling and its inside becomes more tender while the crust on the surface stays intact" (quote via Not So Humble Pie). So even if you accidentally overbake the shells by a few minutes, maturing the macarons in the fridge for at least 48 hours should undo most of the damage =). See my first macaron post for helpful videos of the whole macaron-making process!
85 g almonds [not roasted or salted]
40 g black sesame seeds
145 g powdered sugar
Pinch of salt
40 g granulated sugar
3 g egg white powder [optional, to stabilize batter in humid weather]
95 to 100 g egg whites [about 3 large egg whites]
1/8 tsp cream of tartar or 1/4 tsp lemon juice [optional, to stabilize meringue]
1/2 cup Black Sesame Ganache (Recipe below)
25 to 35 Pieces of Mochi Filling (Recipe below)
25 to 35 4-inch lollipop sticks
Microwave fresh egg whites 10 to 15 seconds in the microwave on medium heat.
Combine the almonds, sesame seeds, powdered sugar, and salt in a food processor, and pulse on and off until the nuts are finely ground (about 1 to 2 minutes). Sift the powder to remove any large chunks that remain. Put those chunks back into the food processor and pulse again for another 30 to 60 seconds. Sift again. You will probably have some slightly chunkier almond bits. Hopefully they're no more than a tablespoon or so, in which case you can throw them out.
Weigh out and mix your granulated sugar and egg white powder in a small bowl until uniform; set aside. Using a handheld or stand mixer, whip the egg whites on medium-low speed with cream of tartar until foamy, then turn the speed up to medium to medium-high and gradually add the sugar mixture until you obtain a glossy meringue (it'll look like shaving cream, hold stiff peaks, and stay in place if you turn the bowl upside-down; but don't overbeat your meringue or it will be too dry).
Add all of the nut mixture to the meringue and fold together. Use both a folding motion that scrapes the bottom of the bowl (to incorporate the dry ingredients) and a gentle pressing motion, to deflate the meringue against the side of the bowl. Slow down after all the dry ingredients have been incorporated, and continue folding the mass carefully until you obtain a batter that looks somewhat glossy and flows from the spatula in a thick ribbon. Test the batter by spooning a small amount of the batter up, then dropping it back down on itself. If it melts back into the rest of the batter within 30 seconds, it's ready for piping (this page has a nice photo of this test). If not, fold 2 more strokes and test again.
Fill a pastry bag fitted with a 1/3 to 1/2-inch wide plain tip (I like Ateco #804 or 806) with half of the batter. (When your bag is too full, the pressure causes the batter to rush out in a way that’s difficult to control, making for sloppy macarons.) Pipe tiny blobs of batter onto the 4 corners and center of 2 baking sheets, then line baking sheets with parchment paper OR line with silicone mats. Pipe small rounds (slightly larger than 1 inch wide) straight down and about 1 inch apart onto the baking sheets. Pick up each sheet with both hands and slam it firmly straight downward on the counter 2 to 3 times. This will to force out any large air bubbles. Immediately pop any bubbles that rise up but don't break with a toothpick. Do NOT do this once a few minutes have passed because you'll mess up the shell that's forming.
Preheat the oven to 320 degrees F. Let the macarons sit out for 25 to 90 minutes to harden their shells a bit (to prevent tops from cracking during baking). Test if they're ready by touching the top and side of one shell lightly. It should feel dry and not stick to your finger at all. Bake one pan at a time for 5 minutes in the middle shelf of your oven. Now lower the temperature to 300 degrees F and continue baking another 10 to 15 minutes, depending on the size of the macarons. Turn oven back up to 320 degrees F and let it come to temperature again before baking the next batch. Let cool completely before trying to move the shells.
Once cool, flip the shells over. If you have trouble removing them from parchment paper, pour a couple of drops of water under the paper while the sheet is still a bit warm, and the macarons will lift up more easily due to the moisture. Don't let them sit there in it too long or they will become soggy.
Fill the shells (spooning or piping) with 1 teaspoon of ganache, top with a mochi round, add another small dollop of ganache (just enough to cover the mochi because the macaron shell will cause the mochi to dry and harden if they touch directly), and a similarly-sized top shell. For the best flavor and texture, store in the refrigerator for 24 to 48 hours before eating (see notes above for detailed explanation) but they are best if eaten within 5 days. Bring to room temperature before eating.
Black Sesame Ganache
1/3 cup heavy cream
3 oz. semisweet chocolate, roughly chopped
2 tsp honey or light corn syrup
1 Tbsp ground black sesame powder
Pinch of salt
In a small saucepan over medium high heat, bring the cream to a boil. Meanwhile, place chopped chocolate into a small heatproof bowl. Remove cream from heat, pour over chocolate and let stand 5 minutes. Add honey or corn syrup, sesame powder, and salt, then stir everything together until smooth. Set aside until it cools down and thickens a bit (chilling in the fridge or freezer is fine).
Mochi Filling
2/3 cup glutinous rice flour [like Mochiko brand]
Slightly rounded 1/3 cup powdered sugar
2/3 cup PLUS 2 Tbsp water, divided
Cornstarch, for dusting
Put water and 1/4 cup powdered sugar in a microwave-safe bowl and mix well until sugar has dissolved. Add glutinous rice flour to the bowl and mix well until uniform. Put the bowl in the microwave and heat the dough on high heat for 2 minutes. Stir. If the dough pulls away from the side of the bowl, add the remaining 2 tablespoons of water until combined. If not, return bowl to the microwave and heat in 20-second intervals until the dough pulls away from the sides of the bowl, then mix with the remaining water.
Dust a flat pan and your hands with cornstarch. Carefully transfer the hot mochi from the bowl to the pan. Let cool slightly until you can handle the mochi with your hands. Keep your hands well dusted in cornstarch. Cut small pieces of mochi and roll them in your hands so that you end up with about 25 to 35 fairly flat 3/4-inch rounds.
Labels:
Asian,
baking,
chocolate,
cookie/cracker,
eggs,
ganache,
heavy cream,
lollipop,
macaron,
mochi,
nuts/seeds,
on-a-stick,
sesame,
vegetarian
Sunday, June 27, 2010
You Can't Go Wrong With Peanut Butter + Chocolate
Sometimes life is more like a bumpy roller-coaster than, say, a scenic country road or straight highway. Now would be one of those times :). During such periods, I like to turn to old favorites like peanut butter and chocolate. Whether paired with bananas or cream cheese, this duo has never failed to please. And it doesn't hurt either that my boyfriend is a huge fan.
I found these fun sandwich cookies in a gorgeous new baking book I got for Christmas (thanks, Nancy!). The cookies baked up with a delightfully crumbly texture and rich peanut-y flavor. Their size became quite the mystery, however. Even being generous with my "1/2 inch" diameter balls of cookie dough, I got nearly twice as many cookies as the recipe says. Making them took me so long that I went with a simple ganache instead of the filling in the book.
For you fellow bakers out there, what do you do when a recipe is wonderful in some respects but off in others? Remake and tweak it until you're satisfied or look for a completely different recipe for the same thing? The sizing issue, though vexing at the time, will be easy enough to remedy, so I'll definitely keep these yummy bites in my repertoire :).
Peanut Butter Sandwich Cookies with Milk Chocolate Filling [Printable Recipe]
From The Craft of Baking by Karen DeMasco and Mindy Fox via Leite's Culinaria
Supposedly makes about 2 dozen sandwich cookies
XIAOLU'S NOTES: Following the recipe, I got nearly 4 dozen sandwiches. So I'd recommend making larger balls (3/4 to 1-inch) or, if you like the look of these tiny bites, setting aside some extra time/patience to form the smaller balls! I've read that the filling is a winner, so I'm posting the original recipe below and plan to try it next time.
For the peanut butter cookies
1 3/4 cups unbleached all-purpose flour, plus more for rolling
1 teaspoon baking powder
1/2 teaspoon baking soda
1/2 teaspoon kosher salt
6 tablespoons unsalted butter, at room temperature
1/2 cup plus 1 tablespoon lightly packed dark brown sugar
3/4 cup plus 1 tablespoon confectioners’ sugar
1/2 cup creamy peanut butter
1/2 cup vegetable oil
1 1/2 teaspoons pure vanilla extract
1 large egg, room temperature
For the milk chocolate filling
6 ounces milk chocolate, roughly chopped
1/2 cup creamy peanut butter
1/4 cup powdered (confectioners') sugar
1/4 teaspoon kosher salt
3/4 cup heavy cream
Preheat the oven to 350 degrees F. Line two baking sheets with parchment paper.
In a large bowl, sift together the flour, baking powder, baking soda, and salt.
In the bowl of an electric mixer fitted with the paddle attachment, beat the butter, brown sugar, and confectioners’ sugar on medium-high speed until light and fluffy, about 2 minutes. Add the peanut butter and beat to combine, scraping down the sides of the bowl as needed. With the mixer on low speed, slowly add the oil, vanilla, and egg and beat until just combined, about 20 seconds. Add the flour mixture, beating just to combine.
Lightly flour the palms of your hands, and roll the dough into balls about 1/2 inch in diameter. Place them about 1 inch apart on the prepared baking sheets. Bake, rotating the sheets halfway through, until the cookies are golden brown on the edges, about 12 minutes.
Transfer the baking sheets to wire racks and let cool completely. (The peanut butter cookies can be stored, unfilled, in an airtight container at room temperature for up to 1 week.)
Combine the chocolate, peanut butter, confectioners’ sugar, and salt in a medium bowl. In a small saucepan, bring the cream to a boil. Remove the cream from the heat and pour it over the chocolate mixture. Stir with a spatula until the chocolate is completely melted.
Set the bowl in an ice bath, or chill it in the refrigerator, until the filling has cooled to room temperature and is thick enough to spread. Then use it immediately or transfer it to an airtight container and refrigerate it for up to 1 week (let it come to room temperature before using).
Using an offset spatula, spread 1 teaspoon of the milk chocolate filling [or ganache] over the flat sides of half of the cookies. Sandwich with the remaining cookies, flat sides together.
Once filled, the cookies are best eaten the same day, but they can be kept in an airtight container in the refrigerator for up to 3 days.
I found these fun sandwich cookies in a gorgeous new baking book I got for Christmas (thanks, Nancy!). The cookies baked up with a delightfully crumbly texture and rich peanut-y flavor. Their size became quite the mystery, however. Even being generous with my "1/2 inch" diameter balls of cookie dough, I got nearly twice as many cookies as the recipe says. Making them took me so long that I went with a simple ganache instead of the filling in the book.
For you fellow bakers out there, what do you do when a recipe is wonderful in some respects but off in others? Remake and tweak it until you're satisfied or look for a completely different recipe for the same thing? The sizing issue, though vexing at the time, will be easy enough to remedy, so I'll definitely keep these yummy bites in my repertoire :).
Peanut Butter Sandwich Cookies with Milk Chocolate Filling [Printable Recipe]
From The Craft of Baking by Karen DeMasco and Mindy Fox via Leite's Culinaria
Supposedly makes about 2 dozen sandwich cookies
XIAOLU'S NOTES: Following the recipe, I got nearly 4 dozen sandwiches. So I'd recommend making larger balls (3/4 to 1-inch) or, if you like the look of these tiny bites, setting aside some extra time/patience to form the smaller balls! I've read that the filling is a winner, so I'm posting the original recipe below and plan to try it next time.
For the peanut butter cookies
1 3/4 cups unbleached all-purpose flour, plus more for rolling
1 teaspoon baking powder
1/2 teaspoon baking soda
1/2 teaspoon kosher salt
6 tablespoons unsalted butter, at room temperature
1/2 cup plus 1 tablespoon lightly packed dark brown sugar
3/4 cup plus 1 tablespoon confectioners’ sugar
1/2 cup creamy peanut butter
1/2 cup vegetable oil
1 1/2 teaspoons pure vanilla extract
1 large egg, room temperature
For the milk chocolate filling
6 ounces milk chocolate, roughly chopped
1/2 cup creamy peanut butter
1/4 cup powdered (confectioners') sugar
1/4 teaspoon kosher salt
3/4 cup heavy cream
Preheat the oven to 350 degrees F. Line two baking sheets with parchment paper.
In a large bowl, sift together the flour, baking powder, baking soda, and salt.
In the bowl of an electric mixer fitted with the paddle attachment, beat the butter, brown sugar, and confectioners’ sugar on medium-high speed until light and fluffy, about 2 minutes. Add the peanut butter and beat to combine, scraping down the sides of the bowl as needed. With the mixer on low speed, slowly add the oil, vanilla, and egg and beat until just combined, about 20 seconds. Add the flour mixture, beating just to combine.
Lightly flour the palms of your hands, and roll the dough into balls about 1/2 inch in diameter. Place them about 1 inch apart on the prepared baking sheets. Bake, rotating the sheets halfway through, until the cookies are golden brown on the edges, about 12 minutes.
Transfer the baking sheets to wire racks and let cool completely. (The peanut butter cookies can be stored, unfilled, in an airtight container at room temperature for up to 1 week.)
Combine the chocolate, peanut butter, confectioners’ sugar, and salt in a medium bowl. In a small saucepan, bring the cream to a boil. Remove the cream from the heat and pour it over the chocolate mixture. Stir with a spatula until the chocolate is completely melted.
Set the bowl in an ice bath, or chill it in the refrigerator, until the filling has cooled to room temperature and is thick enough to spread. Then use it immediately or transfer it to an airtight container and refrigerate it for up to 1 week (let it come to room temperature before using).
Using an offset spatula, spread 1 teaspoon of the milk chocolate filling [or ganache] over the flat sides of half of the cookies. Sandwich with the remaining cookies, flat sides together.
Once filled, the cookies are best eaten the same day, but they can be kept in an airtight container in the refrigerator for up to 3 days.
Labels:
baking,
chocolate,
cookie/cracker,
ganache,
nuts/seeds,
peanut butter,
vegetarian
Saturday, April 17, 2010
Hootin' for Cupcakes (and late for Cupcake Hero)
Oh my...it's less than 24 hours until I have to get on a plane to China and I have yet to start packing. You might say I like to do things last minute ;p. With that in mind, you shouldn't be surprised when I tell you next that I'm tardy for this month's Cupcake Hero challenge, which asked us to take our baking inspiration from either of 2 wonderfully creative cupcake decorating books by Karen Tack and Alan Richardson, Hello, Cupcake! or What's New, Cupcake?.
The design for my halloween pumpkin cupcakes last fall came from Hello, Cupcake!, so I already knew this as a treasure trove of unique ideas. After then eying (har har ^_^) their owl cupcakes for months, it took but an instant for me to decide on them for this challenge. I did put my own spin on their recipe and re-tooled the directions, so be sure to read on if you want my version.
Since I already had to buy Oreo cookies for the owl "eyes," I figured I might as well step it up another notch by adding them to the batter. On the other hand, I saw no need to pipe frosting on these already-darling ears, so I (gladly, since it was 2 a.m. by that point) dropped that part with no ill effect that I can tell.
My friend Kelly, upon discovering what the cupcake fairy had left in her office, even exclaimed this was "seriously the cutest thing" she'd ever seen and that she enjoyed its adorable stare. Cupcake.Win XD. To balance out tootin' my own horn hehe and because they're truly charming and creative, I recommend you check out this round-up I found of other owl cupcakes.
Cookies N' Cream Owl Cupcakes [Printable Recipe]
Adapted from VCTOTW via CHOW and Hello, Cupcake! via Duncan Hines
Makes 15-17 cupcakes
XIAOLU'S NOTES: The number of cookies listed below for decoration is if you split and cut the cookies perfectly every time. It's tougher than it looks, but gets easier the more you do it. Even so, I'd have more on hand just in case. An entire regular-sized package of Oreo cookies was enough for me for the batter AND decorations. Splitting the cookies is the most time-consuming part of the recipe but is most important to the final appearance. Since the ganache frosting can set fairly quickly, I recommend having all the toppings ready when you begin frosting, then decorating each cupcake right after frosting rather than going back once you've frosted the batch.
Cookies N' Cream Cupcakes (Recipe below)
Chocolate Ganache Frosting (Recipe below)
30-34 Oreo, Newman-O, or other chocolate cream-filled cookies
30-34 chocolate-covered mints (Junior Mints)
15-17 candy-coated chocolates (M&Ms)
Split the sandwich cookies in half crosswise, keeping the cream side hole (microwaving 5 cookies at a time for 3-5 seconds helps to keep the cream side solid). [I found my frosting spatula split the cookies most cleanly.] Use the dull side of a paring knife to remove any excess crumbs from cream filling and to smooth the sides of filling that has shifted during splitting.
Collect the remaining sides of the cookies without cream to use for the ears. Make 2 parallel cuts with a serrated knife in these cookies 1/2 inch from each rounded side, discarding the 1/2 inch strip that remains from the center of the cookie.
Pair up the cream sided cookie halves so that those with similar amounts of cream are together. Gently push Junior Mints into the cream of each, but don't push too hard or you'll squish the mint. [Play around with different positions to give each "owl" its own expression and personality :).]
Use a small spoon or spatula to smooth chocolate ganache frosting onto the tops of the cooled cupcakes. Place the cream sided cookies, cream side up, on the middle of the cupcakes, making sure that the eyes are oriented the way you want. Push gently to make sure they've adhered to the frosting.
To make the ears, attach the cut cream-less cookies to the cupcakes above the "eyes", textured side facing up and round edges inward. These should hang over the edge of the cupcakes, but be sure to press them into the frosting where possible to make sure they adhere well.
Lastly, press M&M candies [standing them up on their sides] between and slightly below the cookie "eyes" as beaks. Show them off to everyone XD!
Cookies N' Cream Cupcakes
1 cup soy milk [or regular milk]
1 teaspoon apple cider vinegar
3/4 cup granulated sugar
1/3 cup canola oil
1 teaspoon vanilla extract
1/2 teaspoon almond extract, or more vanilla extract
1 cup all-purpose flour
1/3 cup cocoa powder, Dutch-processed or regular
3/4 teaspoon baking soda
1/2 teaspoon baking powder
1/4 teaspoon salt
1 cup chopped Oreo, Newman-O, or other chocolate cream-filled cookies
(about 8-10 cookies)
Preheat oven to 350 degrees F and line 2 muffin pans (or use 1 pan plus as many free-standing paper souffle cups as needed) with baking liners.
Whisk together the soy milk and vinegar in a large bowl, and set aside for a few minutes to curdle. Add the sugar, oil, vanilla extract, and almond extract, if using, to the soy milk mixture and beat until foamy. In a separate bowl, sift together the flour, cocoa powder, baking soda, baking powder, and salt. Add in two batches to wet ingredients and beat until no large lumps remain (a few tiny lumps are OK). Gently fold in chopped cookies.
Fill liners 3/4 full with batter. Bake 18 to 20 minutes, until a toothpick inserted into the center comes out clean. Transfer to a cooling rack and let cool completely.
Chocolate Ganache Frosting
1/2 cup heavy cream
5 ounces semisweet chocolate, finely chopped
[or use a combination of semisweet and bittersweet]
1-2 tablespoons corn syrup
Combine the chocolate and cream in a medium, microwave-safe bowl. Try to submerge the chocolate as much as possible, but it's okay to have some above the cream. Microwave the mixture on medium for 1 minute. Stir and heat again in 15-second increments, stirring thoroughly each time, until fully melted. Stir in corn syrup. Let this cool and thicken (in the fridge if needed) before using. If it cools too much, reheat in the microwave at 5-second intervals until it softens to the consistency you want.
Labels:
baking,
chocolate,
cookie/cracker,
cupcake,
eggless,
ganache,
group/contest,
Halloween,
holiday,
Oreo,
vegetarian
Subscribe to:
Posts (Atom)