Showing posts with label group/contest. Show all posts

Saturday, April 16, 2011

International Incident Party! (Boston Cream Pie Cake Pops)

Boston Cream Pie Cake Pops...
This has a "vintage" feel mostly because I ran low on light! 8)
Is anyone else sick of hearing that this or that treat is going to be "the next cupcake"? The sweets I've heard mentioned most are cake pops, French macarons, whoopie pies, and now even regular pies. I mean I know what what people mean when they say it (i.e., "the next big thing"), but please just let each treat have it's own identity! Plus I'm pretty sure actual cupcakes ain't goin' away anytime soon 8).

Partly due to my aversion to fads plus just plain lack of interest, I'd neither tasted nor made cake pops until last month. Then one rainy night right after a particularly painful chemistry exam, I really needed some sugary cheer. Thats when I caved to the adorable pink "birthday cake pops" at Starbucks. Big mistake...after struggling to even bite through the overly thick candy coating, my taste buds balked to be assuaged with greasy, tooth-achingly sweet mush that had long lost any resemblance to real cake.

Boston Cream Pie Cake Pops In Progress...
Was this what all the fuss was about? was my first thought. But the funny thing is (and this will tell you something of my personality) rather than put me off from cake pops forever, this experience made me suddenly determined to redeem what was actually a pretty great idea for parties and/or for using leftover cake. I was on a mission, ladies and gentlemen, to save the cake pop from my own worst judgment! It seemed to be fated, then, when Penny of Jeroxie announced her latest blog event, the International Incident Cake Pops Party, the very next week. Now I had some serious motivation to try my own cake pops at home.

So it's nearly impossible to mention cake pops without mentioning Bakerella. While I'm not certain she "invented" the treat, she's the one person most responsible for their ever-increasing popularity as far as I can tell. My first stops in formulating my own recipe were naturally her blog and very helpful video tutorial.

Other than the usual goal of creating cute n' tasty treats, I had several others in mind: to avoid (1) an overly mushy/greasy/sweet filling, (2) flavorless cake, and (3) excessive coating. My solution was to make cake and frosting from scratch and only dip my pops once in each coating. By going homemade, I held more control over the flavor and sweetness of my filling. While the appeal of storebought mix and frosting is understandable, you can't expect great taste from such ingredients. The last and trickiest part of cake pops for me was the texture. Too little frosting and the pop falls apart, too much and it's got the mouthfeel of gooey paste. Considering the variation of moistness in cakes, I highly recommend adding a little frosting at a time until it feels right over dumping in a whole can.

Fail Pops =p
Fail Pops: before I figured out the best dipping method =p
Now for the fun part...the flavor! My inspiration for these pops was Boston Cream Pie, which is not a pie but a yellow cake with pastry cream and chocolate glaze. I had a lot of fun figuring out how to incorporate a soft filling into the pop. While you obviously won't get the same lovely texture contrasts as in the original cake (which I highly recommend you try), I'm really pleased with how my cake pops turned out. The filling is creamy, not too sweet, and as flavorful as the yellow cake that went into it. The chocolate coating is a ganache and thus a little softer than melted chocolate, which makes it a bit more reminiscent of glaze. And the pastry cream filling adds a bonus surprise, allowing you to experience 3 textures in one bite-size treat.

Lastly, please don't forget to check out the cake pops of all the other International Incident partyers by clicking on the thumbnails at the bottom of this post below the recipe.
Also remember to nominate your favorite blogs for Saveur Magazine's 2011 Best Food Blog Awards (nominations close April 22; finalists to be announced April 26)!


P.S. - I finally created a Facebook page for my little blog. I'd be honored if you'd check it out and "like" it =D

Boston Cream Pie Cake Pops [Printable Recipe]
General procedure adapted from Bakerella
Makes 45 to 50 lollipops

XIAOLU'S NOTES: Honestly it's fastest and easiest to use your hands to work with the cake mixture, so wash 'em up and dig in! =D Though I was hoping to achieve a more cake-like texture to these pops, I eventually realized that a certain amount of "mushing" is required to make the pop adhere to the stick and itself. If you've never tried cake pops before, please be prepared for a creamy, truffle-like consistency inside. Do NOT use water-based liquid or gel coloring as this will cause the chocolate to clump up.

Moist Yellow Cake (Recipe below or use your favorite)
1/2 cup (1 stick) unsalted butter, room temperature, as needed
1/2 cup powdered sugar, sifted and as needed

Pastry Cream Filling (Recipe below)
1 lb. white chocolate chips
1 Tbsp trans fat-free shortening (such as Earth Balance)
1 tsp canola or vegetable oil
Cream/brown/yellow oil-based or powder food coloring (optional)
6 oz. semisweet chocolate, roughly chopped
1/4 cup heavy cream
1 tsp unsalted butter
1 Tbsp light corn syrup

About 45 to 50 lollipop sticks
Styrofoam block, to hold cake pops upright while drying

Transfer pastry cream to freezer. After cake has cooled completely, crumble it into a large bowl, removing any overcooked/crusty pieces. Try to roll the mixture into a quarter-size ball. If the ball isn't moist enough to hold together, you'll need to add some buttercream. Make the buttercream by beating the butter with an electric mixer until light and fluffy. Add the powdered sugar and mix in thoroughly. Now add buttercream 1 to 2 tablespoons at a time to the cake mixture, incorporating it into the crumbs completely between each addition, until the mixture is moist enough to hold together in a ball.

Line 2 large baking pans with parchment paper, and take the pastry cream out of the freezer. Make round "bowls" out of about 1 tablespoon of the cake mixture (make the middle hole with your fingertip) and fill the middle with a scant teaspoon of cold pastry cream. Press another 1/2 tablespoon of cake mixture to make a "lid" for the "bowl." Cover the cream-filled cake ball with the cake piece, press edges together, and roll/press the cake ball to make an approximately 1 1/2-inch diameter cake ball. Repeat until the remaining cake mixture has been used up.

Place white chocolate chips and shortening into a heatproof bowl and microwave at 30-second intervals, stirring between each, until it's completely melted. Add cream/brown and yellow food coloring a little at a time, mixing thoroughly between each, until you have a light yellowish-tan cake color. Mix in the vegetable oil. Dip the tip of your lollipop sticks in a little melted chocolate and insert into the cake balls (about halfway in). Place in the freezer for 15 to 20 minutes to firm up so they won't melt when dipped in the hot chocolate.

Once firm, carefully hold a cake pop sideways (but angled slightly upward) just above the melted chocolate, and quickly pour 3 large spoonfuls of melted chocolate over the ball, then rotate the ball to the opposite side and do the same. Now check if any spots are still uncoated and pour large spoons of chocolate over them. Once covered, softly tap the stick against the edge of the bowl for about 10 to 15 seconds until the excess chocolate drips off. Don’t tap too hard or the cake ball will fall off, too! And do NOT rotate the stick or the coating won't be as smooth anymore. Stick cake pops straight down into a styrofoam block to dry or place down onto a parchment-lined pan with the sticks pointing straight up. Do NOT refrigerate as this will lead to condensation on the coating (freezing is fine).

Meanwhile, place heavy cream in a small saucepan and bring to a boil. Place chopped semisweet chocolate in a heatproof bowl. Pour boiling cream over the chocolate and let stand 5 minutes. Stir the mixture until smooth and shiny. Add butter and corn syrup and mix well. Allow to cool for 10 to 15 minutes. Dip the cake pops diagonally into the chocolate, then hold over the bowl for a few seconds to allow excess to drip off. Place cake pops back in styrofoam block or on parchment-lined pan. Let cake pops cool completely or freeze, then enjoy at cool room temperature with friends!

Moist Yellow Cake
Makes a 2-layer 9-inch cake

2 1/4 cups all purpose flour
1 1/2 cups sugar
3 1/2 tsp baking powder
1 tsp salt
1 cup PLUS 1 Tbsp milk
1 tsp apple cider vinegar
1 1/2 Tbsp canola or vegetable oil
1/2 cup (1 stick) unsalted butter, softened
1 3/4 tsp pure vanilla extract
3 large eggs, room temperature
3 large egg yolks, room temperature

Preheat oven to 350 degrees F. Cut parchment paper to fit the bottom of two 9 x 1 1/2-inch round pans. Grease the pans lightly with oil or cooking spray, then place the paper in the pans and grease the paper.

Sift the flour, sugar, baking powder, and salt into a large mixing bowl. Add the milk, vinegar, oil, butter, and vanilla to the flour mixture and beat with on medium to medium-high speed for 1 to 2 minutes, scraping the sides of the bowl as needed. Add the eggs and yolks and continue beating an additional 2 minutes. Divide batter evenly between the prepared pans.

Bake for 22 to 30 minutes or until a toothpick inserted near the center of a cake comes out clean, or until cake springs back when touched lightly in the center. Cool cakes on wire racks for 15 minutes; remove from pans and cool completely.

Pastry Cream Filling
Adapted from Bakewise
Makes about 1 cup

2/3 cup milk [not skim]
1/4 cup heavy cream
3 1/2 Tbsp sugar
1/8 tsp salt
2 Tbsp PLUS 1 tsp cornstarch
2 large egg yolks
3/4 tsp pure vanilla extract
1 Tbsp unsalted butter

Add milk and cream to a medium saucepan. Heat over medium heat until the liquid starts to produce steam. In medium heatproof bowl, combine the sugar, salt, and cornstarch and stir until evenly combined. Drizzle the hot liquid mixture into the sugar mixture, whisking immediately and continuously. Return to the saucepan and cook over medium heat until the mixture thickens, stirring constantly.

In a medium bowl, stir together the egg yolks. Whisk about 1/4 cup of the hot mixture into the yolks, then add the yolks to the saucepan. Bring everything to a boil, stirring continuously and scraping the bottom, until the custard thickens and becomes smooth. Make sure to bring the entire mixture to a good boil; otherwise, the enzymes in the egg yolks will break apart the starch and the custard will become soupy instead of thick.

Pour the custard into a bowl and cover. Stir in vanilla and butter, mixing until butter is completely melted and mixed in. Once it has cooled to room temperature, transfer to the refrigerator and chill for at least 2 hours.

Friday, April 1, 2011

DMBLGIT March 2011: Judges and Awards

Wow, you guys! Can I just start off by saying what an unadulterated pleasure it's been to host this month's DMBLGIT photography event? Can you all please just pretend it's still March and keep delivering lovely food photos to my inbox? The other judges and I had a lot of fun drooling over your entries and a heck of a time picking out just a few for awards. Without further ado, let me introduce you to the wonderful judges of this month's contest.

MEET THE JUDGES:


Sala Kannan is a software services entrepreneur by day and food blogger/photographer at Veggie Belly by night. Her site features a wide array of vegetarian recipes reflecting the varied cuisines she's enjoyed throughout the world. Originally from India, she has traveled and eaten her way through over 36 countries, and currently resides near Washington, D.C.


Kris Ngoei is a graphic designer in Bangkok who has also unearthed a great talent and passion for baking as well as food decoration, styling, and photography. Having won a total of 8 awards to date, I can't imagine anyone more qualified to be a DMBLGIT judge. Please check out his stunning works of edible art on his blog, Bake in Paris.


Patricia Scarpin, of Technicolor Kitchen, has been baking since before her teens and blogs from Brazil in both English and Portuguese. She's a cookbook fanatic like me, and her comforting treats are always just the thing you wish were coming out of your own oven. Her lovely photos and sweet styling are also not to be missed.


Ashley Colbourne is the Canadian author of Butterflyfood, a blog featuring gorgeous edibles and photography that bursts with rustic charm. She has a love for old movies, vintage mystery radio, and taking photos of all things food. It's downright impossible to peruse her work without wanting to plop down at her table =p.


OVERALL WINNERS:

After careful evaluation of all 55 entries this month, the judges scored each photo according to edibility, originality, and aesthetics. The entries with the 3 highest scores when all categories were combined were chosen as the overall winners.

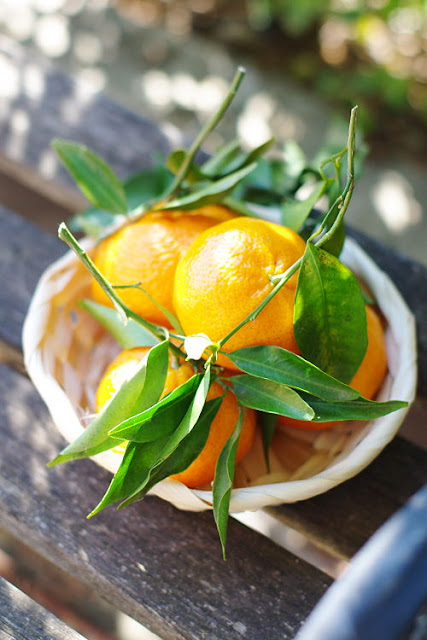
Citrus from my garden

First Place: Citrus from my garden by Edda of Un déjeuner de soleil. Taken with a Pentax K-m and 50 mm f 1.4 lens.

Comments
“I'm absolutely captivated with the play of light in this. The colors are natural yet wonderfully vibrant, and the styling of the stems/leaves adds just the right amount of playfulness.”

*************************

Brunch Bruschetta

Second Place: Brunch Bruschetta by Asha Pagdiwalla of Fork Spoon Knife. Taken with a Nikon D5000.

Comments
“Love the gloss on those egg yolks! I almost feel like I could grab one right out of the screen and take a bite.”

*************************

Crepes with apple and raspberries

Third Place: Crepes with apple and raspberries by Pamela Rodríguez in Bilbao, Vizcaya, Spain, of Uno de Dos. Taken with a Canon EOS 350D and 50 mm f/1.8 lens.

Comments
“Beautiful styling.”
“So beautiful, almost ethereal.”

INDIVIDUAL CATEGORY WINNERS:

Excluding the overall winners, these are the highest scoring photos for each category.

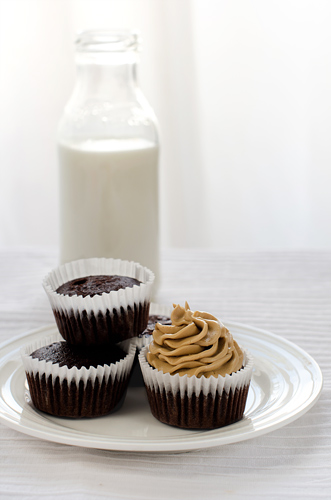
Chocolate Cupcakes

Edibility Category Winner (TIE): Chocolate Cupcakes by Asri of Food and Story. Taken with a Nikon D700.

Comments
“Nice color theme.”

*************************

Raspberry and Pistachio Baked Cheesecake

Edibility Category Winner (TIE): Raspberry and Pistachio Baked Cheesecake by Emma of Poires au Chocolat. Taken with a Sony Alpha A580 and 2.8/50mm Macro lens.

Comments
“Nice use of complimentary colors. Those glossy raspberries are really mouth-watering!”

*************************

 Mac-candy apple in the snow

Originality Category Winner: Mac-candy apple in the snow by Mardi Michels of eat. live. travel. write. Taken with a Nikon D40 and 40mm lens, ISO 200, f/6.3, 1/160.

Comments
“Quirky and fun shot.”

*************************

Chicken salad (tonno di cappone)

Aesthetics Category Winner: Chicken salad (tonno di cappone) by Virginia Spilucchino of Lo Spilucchino. Taken with a Canon EOS 500D and 60mm lens.

Comments
“Nice styling and choice of depth of field and textured background.”
“Lovely styling including the basket, folded cloth, and placement of the utensils.”

HOST'S AWARD:

As the host this month, I'm allowed to choose one winner that I think deserves an award but was not named winner in the other categories.

The art of Vietnamese coffee

The art of Vietnamese coffee by Anh of A Food Lover's Journey. Taken with a Canon 30D and kit lens.

Comments
“Lovely capture of the human element.”
“I like the unique setting that includes prominent human presence but still keeps the focus on the drinks. It creates a lovely sense of human connection.”

THANKS FOR ENTERING!

You all were the ones who made this event a feast for the eyes and a joy to take part in. We only wish there were more awards to give out to the many beautiful photos we saw this month. Please do check out all the wonderful entries in this month's gallery!

The April 2011 edition of DMBLGIT will be hosted by Magpie of Magpies Recipes. If anyone is interested in hosting a future edition of DMBLGiT, please email Andrew with "DMBLGIT Host" as the subject.

Thursday, March 3, 2011

Does My Blog Look Good in This: March 2011

DMBLGIT Logo

I'm delighted to be hosting this month's "Does My Blog Look Good in This?" event. DMBLGIT was started in 2005 by Andrew of SpittoonExtra. It's best described as a monthly food and drink photography event open to all bloggers who have posted a food photograph on their blogs during the previous month. At least 6 awards are given each month based on scoring of photographs in the 3 categories of edibility, aesthetics, and originality by 5 judges. To check out the winners from last month’s DMBLGIT event, please stop by Simplicious.

General DMBLGIT Rules:

  • Only one food/drink photograph may be entered per person.
  • The photograph must have been taken by you.
  • The photograph must have been posted on your blog between February 1 through 28, 2011.
  • The deadline to submit your entry is March 20, 2011 at midnight, whenever that is in your part of the world.

Scoring:

A panel of 5 judges, to be introduced later this month, will choose 6 winners based on the following criteria:

Aesthetics: composition, food styling, lighting, focus, etc.
Edibility: does the photo make us want to take a big bite out of our computer monitor while drooling on our keyboard?
Originality: a photo that makes you stop, look twice, and think “Wow! I never thought of photographing it like that before.”

Three overall winners will be selected plus one in each of the 3 categories. As host I have the privilege of choosing one photo that I think stands out, but wasn’t chosen as a winner. My post announcing the winners for this month will be published by April 1, 2011 (I promise not to play any pranks ^_^).

How to Enter DMBLGIT:

Send an e-mail with "DMBLGIT Entry" as the subject line to me at xiaolu6 [at] gmail [dot] com. In your email, please include:

  • An attachment of a single qualifying food or drink photo you'd like to enter. It should be without text and no more than 500 pixels in width.
  • Your name
  • Your blog URL
  • The title of the image/what it is
  • The URL of the post containing the photograph
  • The camera and lens you used

Photographs will be loaded into this gallery in Picasa as I receive them. If you don't get an acknowledgment from me within 72 hours of sending your entry, please leave a message in the comments section of this post. By submitting a photo, entrants agree to their photo being redisplayed and altered in size on the host’s page and on the SpittoonExtra DMBLGiT page.

If you have any questions about this month's event, please feel free to email me. Anyone with interest in hosting a future edition of DMBLGiT should email Andrew with "DMBLGIT Host" as the subject. I can't wait to see each and every one of your beautiful entries!

Tuesday, January 18, 2011

Caramel Popcorn Cupcakes (Mystery Box Challenge)

UPDATE: I was in the top 5 entries based on total votes, but did not win the random drawing. Thanks so much for everyone who supported me by voting! XD

Now let's chat about these cupcakes. I tell ya, I never expected popcorn to show up at all on this blog, much less in a cupcake. Taking inspiration from unexpected sources is not uncommon here (remember the apple and brie, mojito, or Ferrero Rocher cupcakes?), but I just happen to hate popcorn. I mean, toss me on a deserted island with nothing but and I will munch. Or...simply have the new cupcake contest I've joined name popcorn as its latest challenge. Suddenly, popcorn was on my mind -- morning, noon, and night!

Caramel Popcorn Cupcakes

Eventually I assembled a recipe for caramel popcorn cupcakes and checked it twice. Then I baked it up and tasted it thrice (yes, 3 times ^_^). And it was...both a success and a failure. Despite infusing the liquid for my caramel with fresh popcorn, its flavor didn't come through in the frosting (which is why I've omitted that step below). Popcorn enthusiast that I am not, this "failure" wasn't that disappointing. Especially when I managed to "salvage" 20 tasty cakes that were sweet and moist due to creamed corn puree, with a nice crunch from the cornmeal, and swirled with silky smooth caramel buttercream. To top things off, even I couldn't resist tossing on some caramel popcorn. Bon appetit!

I’m submitting this to Mystery Box Cupcake Challenge: Popcorn. The winner of this challenge will receive prizes from:

Thank you to all our prize sponsors!

Caramel Popcorn Cupcakes [Printable Recipe]
Makes 18 to 20 cupcakes

XIAOLU'S NOTES: I simply pureed canned creamed corn using a handheld immersion blender; you could also use a standard blender or food processor. Homemade creamed corn should work, too; the puree should have a consistency similar to applesauce. I'd recommend making the caramel sauce for the frosting in advance to give it plenty of time to cool before being added to the frosting. The recipe below makes a LOT of caramel sauce, much more than the 1/2 cup maximum you'll use for the frosting. I figure if you're gonna go through the trouble of making homemade caramel sauce, you might as well have extra to use on sundaes, bread pudding, whatever you fancy! But feel free to halve or even quarter this recipe if you'd prefer.

1 3/4 cups all purpose flour
1/4 cup cornmeal
2 tsp baking powder
1/2 tsp baking soda
1/2 tsp salt
1/2 cup (1 stick) unsalted butter, room temperature
1 cup packed brown sugar
1 tsp pure vanilla extract
2 large eggs, room temperature
1 1/2 cups pureed creamed corn
Caramel Buttercream Frosting (Recipe below)
Caramel Popcorn, to garnish

Preheat oven to 350 degrees F. Line 2 muffin pans with paper liners (or use 1 pan and use 6 standalone baking cups). In a medium bowl, stir together flour, cornmeal, baking powder, and baking soda; set aside.

With an electric mixer on medium high speed, cream butter and brown sugar until fluffy. Add vanilla then eggs, one at a time, beating between each addition and scraping down sides of bowl as needed. Reduce speed to low. Add 1/3 flour mixture, 1/2 creamed corn puree, another 1/3 flour mixture, the remaining creamed corn, and finally the remaining flour mixture -- beating until just combined after each addition.

Divide batter evenly among lined cups, filling each 3/4 full. Bake until a toothpick inserted in centers comes out clean, 16 to 20 minutes. Let cool 1 minute in pan, then transfer cupcakes to wire rack to cool completely. Unfrosted cupcakes can be stored overnight at room temperature, or frozen up to 2 months, in airtight containers.

To serve, fill a piping bag fitted with a large round tip (like Ateco #808) and pipe caramel frosting swirls atop each cupcake. Right before serving, top with pieces of caramel popcorn.

Caramel Swiss Meringue Buttercream Frosting
Adapted from A Sweet Spoonful

1 1/2 cups whole milk
3 cups sugar, divided
3 Tbsp light corn syrup
1/2 cup (1 stick) unsalted butter, softened
1 tsp pure vanilla extract
1/4 cup heavy cream

3 large egg whites, room temperature
1/4 cup sugar
14 Tbsp unsalted butter, cool room temperature and cut into 14 pieces

In a medium saucepan, combine milk, corn syrup, and 2 1/2 cups of the sugar. Cook over moderate heat, stirring until the sugar dissolves. Keep warm.

Sprinkle the remaining 1/2 cup of sugar in a deep, heavy saucepan. Cook the sugar over moderate heat, swirling occasionally, until an amber caramel forms. Carefully pour the warm milk mixture over the caramel. It will bubble very strongly. Keep stirring -- this is normal. Cook over moderately high heat, stirring until the caramel dissolves.

Stop stirring and cook until the caramel registers 235 degrees F on a candy thermometer -- this will take 5 to 8 minutes. Remove from the heat. Stir in the butter, vanilla, and 1/4 cup of heavy cream. Strain the caramel into the bowl of a stand mixer. Let cool 15 minutes, then freeze for 10 minute intervals, stirring between each, until sauce has thickened. Transfer caramel to an airtight storage container; set aside. Wash the stand mixer bowl.

Combine the sugar and egg whites in the clean stand mixer bowl. Place the bowl over a pot of boiling water making sure the bottom does not actually touch the water. Whisk constantly until the mixture reaches 160 degrees on an instant-read thermometer (I just whisked by hand and cooked it until the sugar was completely dissolved and the top became foamy). Be careful not to curdle the egg whites, remove from heat if this starts happening.

Remove the bowl to your stand mixer and beat on high speed with the whisk attachment for at least 3 minutes, until the mixture holds glossy, marshmallow-esque peaks and the bowl is completely cool (Very important - the frosting's consistency will be off otherwise).

With mixer on medium-low, add butter 1 tablespoon at a time, beating well after each addition (about 10 seconds between each addition). Increase speed to medium-high; continue beating until frosting appears thick, at least 3 minutes. (You'll hear a distinct slapping sound and visibly see the buttercream go from soupy to a cohesive, pipeable consistency.)

Reduce speed to low and slowly add 1/4 to 1/2 cup of the cooled caramel. Mix until fully incorporated. Store remaining caramel in the refrigerator.

Sunday, January 16, 2011

A Small Request =)

Salted Caramel Chocolate Cake

Perhaps you remember this decadent chocolate salted caramel cake I posted around Thanksgiving? Well, Recipe4Living is holding a cake contest for its 5th birthday, and the winner with the most votes will get an amazing Scharffen Berger gift basket. I'd love to have all that chocolate to use in treats for my friends, family, and all of you. If you have a few minutes, please vote for my cake HERE. Thanks a million! =)

Friday, December 3, 2010

My First Photography Award!

DMBLGiT
No new photos or recipes today...but I simply could not resist sharing my good news with you all :). It was just announced that the following photo of my s'mores cupcakes won 1st place in the latest Does My Blog Look Good in This? (DMBLGiT?) contest! This is my first award for photography, and it's especially meaningful to me because I'm self-taught.

S'mores Cupcake

I hope this encourages any of you who might be struggling as new food bloggers/photographers. I've had my baby (my Canon DSLR) for almost a year and a half, yet have just recently found my stride. The learning curve can be steep at first. But the satisfaction and, yes, exhilaration of getting the shots you imagine are worth it in the end. Happy clicking!

Sunday, September 19, 2010

Open (Your Mouth To) Sesame (Matcha Cupcakes)

Black Sesame Matcha Cupcakes
Some days it feels like my head's not screwed on all the way. I seem to muck up all sorts of tasks, even the ones that usually bring comfort through their familiarity. Like baking up a batch of cupcakes. This time they were to be black sesame matcha (green tea) flavored for September's caffeine-themed Cupcake Hero challenge. The first wave of trouble hit when I attempted an ambitious photo of the ingredients. As you'll see below, it turned out to require balancing skills beyond what I possess -- oops!

Well I cleaned up the mess and forged onward. So determined was I, in fact, that I ignored the fact that my batter looked thin enough for crepes... Only after pulling a gooey mess (yep, another one) out of the oven did it dawn on me that I'd forgotten to decrease the liquid when I halved the original recipe. As I dumped my rawcakes into the garbage, I couldn't help but wonder if my mind had gone on vacation without the rest of me. Have you guys had days like this, too?

Oops
It took 2 days for the shame to wear off, but I did try again and apparently second time's the charm. The cakes rose high and fluffy and were filled with the distinct nuttiness of sesame. The matcha cream cheese frosting was also a success. Tangy and just sweet enough to offset the bitter edge of green tea but firm enough to pipe, thanks to a new method using cold cream cheese. What a relief it'll be not to choose anymore between flavorful but goopy or thicker but tooth-ache inducing frosting!

Some of you may not be familiar with black sesame, so I'll leave you with a lil' background info. Personally, I don't feel it's very different from white sesame as whole seeds. Both are used primarily for their look and crunchiness. But when ground, black sesame has a richer and slightly more bitter flavor that I find delicious. I was introduced to it early on in Chinese treats like sweet rice dumplings (tang yuan) with a sesame filling and a pudding-like soup (zi ma hu) many Chinese believe to prevent gray hair (I doubt that works, but the seed is high in calcium, iron, copper, magnesium, phosphorus.). Now that I've also found these cupcakes and other creative uses for it (e.g., in panna cotta or macarons with nutella), black sesame will definitely be appearing frequently in my kitchen.

Black Sesame Matcha Cupcakes
Black Sesame Matcha Cupcakes [Printable Recipe]
Adapted from Delicious Coma
Makes 12 cupcakes

XIAOLU'S NOTES: I actually used 36 g of a pre-ground black sesame powder but still followed the same toasting and grinding process. Both whole and ground seeds are available at well-stocked Asian grocers. If you're able to find and use the powder, be sure to keep a close eye on it in the pan. The frosting recipe below made a little more than needed to frost the cupcakes you see in the photos. Scale the recipe up or down, if you usually prefer more or less frosting. This method makes for a firmer cream cheese frosting than is common and should be pipeable.

6 Tbsp (3/4 stick) unsalted butter, room temperature
3/4 cup sugar
1/4 cup black sesame seeds PLUS extra for garnish
1 large egg, room temperature
1/2 tsp pure vanilla extract
1/4 tsp salt
1 1/4 tsp baking powder
1 1/4 cups (155 g) all purpose flour
1/2 cup PLUS 3 Tbsp milk

Matcha Cream Cheese Frosting (Recipe below)

Preheat the oven to 375 degrees F. Line a standard muffin pan with 12 baking liners.

Toast the sesame seeds in a dry pan on the stove over medium heat, stirring them constantly, until they are fragrant (about 2 minutes). Crush toasted seeds with a mortar and pestle OR spice grinder until they are the texture of damp sand and set aside. Separately, sift the dry ingredients into a medium bowl; set aside.

Cream the butter and sugar in a large bowl until light and fluffy. Add the ground sesame seeds, egg, and vanilla and beat until combined. Gradually beat in half the dry ingredients. Add the milk and mix well. Lastly, add the remaining dry ingredients and mix until batter is well-combined and smooth.

Fill cupcake liners until they are about 2/3 full (I like to use my large cookie scoop for this). Lift the pan 1-inch above the kitchen counter and carefully slam it down to expel any large air bubbles in the batter. Bake for 14 to 18 minutes, or until a skewer inserted in the center comes out clean. Remove cupcakes from pan as soon as safely possible. Cool completely before frosting as desired. Sprinkle the top of each cupcake with extra sesame seeds.

Matcha Cream Cheese Frosting
1/2 cup unsalted butter (1 stick), room temperature
1 to 2 cups (4 to 8 ounces) powdered sugar, sifted (more if needed)
10 ounces cream cheese, cold and cut into small pieces
1/2 tsp pure vanilla extract
2 to 4 tsp matcha (green tea) powder, or to taste

Sift powdered sugar and matcha together into a small bowl. In a larger mixing bowl, cream the butter, powdered sugar mixture, and vanilla until thoroughly blended. Add the cream cheese, a chunk at a time, beating after each addition (just enough to work it in).

Tuesday, August 31, 2010

Browned. Butter. Pizzzzookie (Need I Say More?)

Browned Butter Chocolate Pecan Pizzookie
Are you acquainted with The Pizzookie? Or are you giving me/your monitor a funny look right now? You're in good company if you are. When I offered P a pizzookie, his initial response was a raised eyebrow and "what is that? sounds dirty..." Well one bite was all it took to make him a believer (plus it's hard to maintain a smirk when your mouth is full of cookie dough ^_^).

Messy Bite
I think of pizzookies as cookies on steroids. You simply start with almost any cookie dough, press it into some oven-safe dishes, bake just long enough to set the edges, then hit 'em with the best vanilla ice cream ya got. It sounds simple enough, but when you experience your first mouthful of warm n' gooey meets cool n' creamy, it's like arriving in a brave new (cookie) world. The take-home message is: If you like cookies, ice cream and all that's good on this green earth, you need some pizookie in your life. XD

Browned is Better 8)
And while we're aiming for the ultimate cookie experience, let's talk butter. No ordinary "room temperature" butter will do for the true cookie connoisseur. What we want, need is warm, aromatic browned butter. Despite being a self-proclaimed "foodie" for years, I'd somehow missed this amazing ingredient! Never imagining that a few minutes of stove time could give my cookies such complex, nutty flavor. Trust you me, I'll be playing with this butter in all sorts of sweet and salty dishes going forward. With gratitude for inspiring me to discover a new ingredient, I'm sending these pizzookies over to Elissa of 17 and Baking, our lovely host, for the browned butter edition of Sugar High Fridays.

Ready for a Close-up
Browned Butter Chocolate Chunk Pecan Pizzookie [Printable Recipe]
Adapted from the amazing blog The Little Red House
Makes 6 to 8 pizzookies or about 24 regular cookies

XIAOLU'S NOTES: Not that it's rocket science =D, but it never hurts to have some visual guidelines when you're cooking with precious buttah in a new way. Elise over at Simply Recipes has a nifty tutorial for browning butter with lotsa purdy photos.

1 1/2 cup all purpose flour
1/4 tsp baking soda
1/4 tsp salt
3/4 cup brown sugar [or white sugar plus 1 tsp molasses]
1/2 cup (1 stick) unsalted butter, cut into 8 slices
1 large egg, room temperature
1 tsp pure vanilla extract
3/4 cup chocolate chips or 4.5 ounce bar, chopped
1/3 cup pecans, lightly toasted and roughly chopped

Preheat oven to 350 degrees F. Mix flour, baking soda, and salt together in a medium bowl and set aside.

Heat a pan on medium heat. Add butter slices and melt in pan. Stir continuously. Butter will foam up. After foam subsides, small brown flecks will start to appear in bottom of pan. Continue stirring, until butter has reached a nice brown color, and nutty aroma. Remove from heat at this point. Don't heat it any more or it may burn.

Add browned butter and sugar to your stand mixer bowl. Mix well. Add in egg and vanilla, and mix them in thoroughly. Slowly stir in the flour mixture. Finally, add and evenly distribute the chocolate chips by mixing.

Scoop dough into individual ramekins. Sprinkle some pecans on top (they get toasty in the oven!). Bake for 8-10 minutes. Your pizzookies are ready when the edges are cooked, but the center is still gooey. Top with vanilla ice cream and gobble it up!

If you want to make these as normal cookies, just roll them into 1" balls and bake about 10-13 minutes until the edges are just set.

Tuesday, August 17, 2010

Inspired By Ispahan (Raspberry Rose Lychee Cupcakes)

Ispahan Cupcakes

My friend Mar's birthday and the deadline for Cupcake Hero's raspberry challenge were just days apart this month. And she even gave me free reign over what treat to make her. Call me silly, but I took this a sign from the baking powers that be. It was finally my time to try the trio of flavors (raspberry, rose, and lychee) made famous by Pierre Herme's Ispahan macaron cookie. Not too innovative on my part. But one could do worse than to trust the signature of one of the greatest pastry chefs alive =p. After perusing my favorite blogs for their renditions, I combined a few elements from each and added some touches of my own.

The birthday girl, some friends and I were actually heading up to NYC to celebrate. Baking was left until departure day for the sake of freshness, but what a tight schedule it turned out to be! I ended up packing the cupcakes with one hand while slinging my bags over the other shoulder then running to my friend's car. As soon as we arrived in New York, we went on an insane but fun food/bar-hop until 5 am.

Needless to say, we didn't get to the cupcakes that night. But they're sturdier than their delicate appearance suggests. Even over a day later, they remained quite delicious. At first bite, my brain was pretty confused to be tasting something it's more used to smelling. But once we got over that small hurdle, I understood the popularity of this combination. Juicy lychees and tart raspberries act as a delectable foil to the fragrant rose flavor. While the cool custard tames the sweetness. If you have extra filling, please try spooning it over the cakes as you eat them. Take my word for it, you won't regret it.

Lychee Rose Cupcakes with Raspberry Filling [Printable Recipe]
Adapted from Tartelette, Une-deux Senses, and The Baker's Dozen Cookbook
Makes 12 cupcakes

XIAOLU'S NOTES: The raspberry custard filling can be made up to 1 week in advance and refrigerated covered until ready for use. The recipe below makes extra, which would be delicious to serve alongside the cupcakes, use in a parfait, or use to fill some other baked good. Alternately, you can halve the recipe.

3/4 cup self-rising flour
1/2 cup all purpose flour
2 Tbsp ground almonds
1/2 cup (1 stick) unsalted butter, softened
3/4 cup PLUS 2 Tbsp sugar
2 large eggs, room temperature
6 Tbsp milk
1 1/2 Tbsp rosewater
12 whole lychees or 24 halves if big (canned is fine)

Raspberry Custard Filling (Recipe below)
Buttercream Frosting (Recipe below)
Fresh raspberries, to garnish

Preheat oven to 350 degrees F. Line a standard muffin pan with 12 baking liners. In a small bowl, combine the flours and set aside.

In a large bowl, on medium speed using an electric mixer, cream butter until smooth. Add the sugar gradually and beat until fluffy, about 3 minutes. Add the eggs, one at a time, beating well after each addition.

Add the dry ingredients in 3 parts, alternating with the milk and rose water. Do not overbeat. Using a flexible spatula, scrape down the batter in the bowl to make sure the ingredients are well blended.

Carefully spoon half the batter into the liners, place one lychee in the center of each and top with the remaining batter, leaving a 1/2-inch space to the top for the cupcake to rise. Bake for 20–25 minutes, or until a cake tester inserted in the center of the cupcake comes out clean. Cool completely.

Once cool, cut a cone in each cupcake and spoon in 2-3 teaspoons of the raspberry custard filling. Replace the cone and spread or pipe on buttercream frosting. Kick back and enjoy!

Raspberry Custard Filling
Makes about 1 3/4 cups

1 1/4 cups milk
3 large egg yolks [save whites for the frosting]
4 to 6 Tbsp sugar
1/4 cup all purpose flour
3/4 tsp pure vanilla extract
1/2 cup fresh raspberries, mashed

In a non-reactive medium saucepan, heat the milk over medium just until bubbles form around the edges but it's not yet boiling.

In a medium bowl, beat the egg yolks (or whole egg and yolk) and sugar until pale yellow. Beat in the flour. On low speed, gradually add in half of the hot milk, beating constantly. Pour the mixture into the saucepan.

Cook over medium heat, stirring constantly, until the pastry cream comes to a full boil, making sure it doesn't scorch. Remove from heat.

Strain the pastry cream through a wire sieve into a medium bowl (to get rid of any egg or flour lumps). Press plastic wrap directly on the surface of the pastry cream and poke a few holes in the plastic for steam to escape. Refrigerate until chilled, at least 2 hours. Fold the mashed raspberries through the pastry cream just before filling the cupcakes.

Swiss Meringue Buttercream Frosting
3 large egg whites, room temperature
3/4 cup sugar
1 tsp pure vanilla extract
14 Tbsp unsalted butter, cool room temperature and cut into 10 pieces
1- 2 drops of food coloring (optional)

Combine the sugar and egg whites in the stainless steel bowl of an electric mixer. Place the bowl over a pot of boiling water making sure the bottom does not actually touch the water. Whisk constantly until the mixture reaches 160 degrees on an instant-read thermometer (I just whisked by hand and cooked it until the sugar was completely dissolved and the top became foamy). Be careful not to curdle the egg whites, remove from heat if this starts happening.

Remove the bowl to your stand mixer and beat on high speed with the whisk attachment for at least 3 minutes, until the mixture holds glossy, marshmallow-esque peaks and the bowl is completely cool (Very important - the frosting's consistency will be off otherwise).

With mixer on medium-low, add butter 1 tablespoon at a time, beating well after each addition (about 10 seconds between each addition). Increase speed to medium-high; continue beating until frosting appears thick, at least 3 minutes. (You'll hear a distinct slapping sound and visibly see the buttercream go from soupy to a cohesive, pipeable consistency.) Reduce speed to low, add the vanilla and food coloring (if using), and continue beating 1 minute to incorporate the additions and reduce air bubbles.

Sunday, July 18, 2010

Procrastinators Anonymous (Coconut Cupcakes with Pineapple Curd)

Coconut Pineapple Cupcakes
I can't believe I'm saying this again, but I missed yesterday's Cupcake Hero deadline! (Check out the round-up here) It makes no sense, but sometimes I'm a naughty procrastinator even about things that make me happy (cupcakes being high on the list ^_^). I think I'm ready to make a change. Anyone got any tricks for kicking this habit?

Meanwhile, I'm pleased to report tardy cupcakes taste just as yummy as on-time ones. This month's theme was coconut. Pineapple and coconut share a tropical vibe, right? So I subtly flavored my babycakes with coconut milk, then injected them with a luscious pineapple curd.

Coconut is supposed to be the star here. I know. But the pineapple filling simply stole the show. It's a great alternative to its tangy lemon cousin (and leftovers are delicious on toast or in a fruit parfait). Next time, I'll pipe the frosting around the edge only and pile on even more curd in the middle (mm mm mm).

Coconut Pineapple Cupcakes [Printable Recipe]
Adapted from Simply Recipes and The Craving Chronicles
Makes 20 cupcakes

XIAOLU'S NOTES: The pineapple curd recipe makes about twice what you need to fill the cupcakes. But it's so good you should have no trouble gobbling the rest up within 2 weeks. Halve the recipe if you want just enough for the cupcakes.

3/4 cup unsalted butter, room temperature
1 1/4 cup sugar
3 large eggs, room temperature
1 cup canned coconut milk [shake well before opening & measuring]
1 teaspoon pure vanilla extract
2 1/4 cups all purpose flour
1 teaspoon salt
1 teaspoon baking powder
Pineapple Curd Filling (Recipe below)
Coconut Cream Cheese Frosting (Recipe below)
1/2 to 1 cup coconut flakes, for garnish [you can use sweetened or not]

Preheat the oven to 350 degrees F. Line 2 standard muffin tins with 20 paper liners. In a large bowl, sift together the flour, salt, and baking powder.

In another larger bowl, cream the butter until light and fluffy. Add sugar and cream till light and fluffy again, scraping down the sides halfway through to ensure even mixing. Add the eggs, one at a time, beating for 30 seconds each to ensure mixing. Be sure to scrape down the sides after each egg to ensure even mixing.

Add half of flour mixture; mix on low speed just until blended. Add 1 cup coconut milk; mix just until blended. Add remaining flour mixture and mix on low speed [or by hand] just until blended; do not overbeat.

Fill liners about 1/2 to 3/4 full. Bake for 18-22 minutes, rotating the pan after the first 15 to ensure even baking. Check with a toothpick to see if the cupcakes are done. If the toothpick comes out of the cupcake clean, they're ready. Allow the cupcakes to cool for 1-2 minutes in the pan, then transfer to a wire rack to cool completely.

Transfer pineapple curd to a piping bag fitted with a long pointed tip OR a squeeze bottle. Insert tip into each cupcake and squeeze out a small amount of filling. [One sign when the cupcake is full and to stop is when the filling oozes from the top.] Finally, spread cream cheese frosting on top of the cupcakes, sprinkle with coconut flakes, and enjoy!

Pineapple Curd
Makes approximately 2 1/2 cups

NOTES: The mixture may seem like it’s not thickening as you whisk over heat, but don’t stop – it thickens very quickly right at the end. For a smoother curd, push through a fine mesh strainer before storing. Press plastic wrap against the top of the curd to prevent a film from forming in the fridge.

2 large eggs plus 2 yolks [or 6 yolks for a richer curd]
2 1/4 cups pineapple juice [I used canned]
3/4 cup sugar
5 Tablespoons cornstarch

Combine all of the ingredients in a saucepan. Cook over medium heat for about 5-10 minutes, whisking constantly, until mixture thickens. Remove from heat and cool. Store in an airtight container in the refrigerator for up to 2 weeks.

Cream Cheese Frosting
1/2 cup unsalted butter (1 stick), room temperature
8 ounces cream cheese, room temperature
a pinch of salt
1 1/2 to 3 cups powdered sugar, sifted

Cream the butter, cream cheese, and salt together, about 2-3 minutes. Scrape down the sides and bottom of the bowl to ensure even mixing.

Slowly add the powdered sugar; taste as you go adding more sugar until you have reached the desired sweetness and consistency.

Saturday, April 17, 2010

Hootin' for Cupcakes (and late for Cupcake Hero)

Oreo Cookies

Oh my...it's less than 24 hours until I have to get on a plane to China and I have yet to start packing. You might say I like to do things last minute ;p. With that in mind, you shouldn't be surprised when I tell you next that I'm tardy for this month's Cupcake Hero challenge, which asked us to take our baking inspiration from either of 2 wonderfully creative cupcake decorating books by Karen Tack and Alan Richardson, Hello, Cupcake! or What's New, Cupcake?.

The design for my halloween pumpkin cupcakes last fall came from Hello, Cupcake!, so I already knew this as a treasure trove of unique ideas. After then eying (har har ^_^) their owl cupcakes for months, it took but an instant for me to decide on them for this challenge. I did put my own spin on their recipe and re-tooled the directions, so be sure to read on if you want my version.

Since I already had to buy Oreo cookies for the owl "eyes," I figured I might as well step it up another notch by adding them to the batter. On the other hand, I saw no need to pipe frosting on these already-darling ears, so I (gladly, since it was 2 a.m. by that point) dropped that part with no ill effect that I can tell.

My friend Kelly, upon discovering what the cupcake fairy had left in her office, even exclaimed this was "seriously the cutest thing" she'd ever seen and that she enjoyed its adorable stare. Cupcake.Win XD. To balance out tootin' my own horn hehe and because they're truly charming and creative, I recommend you check out this round-up I found of other owl cupcakes.

Oreo Cookies & Cream Owl Cupcakes
Cookies N' Cream Owl Cupcakes [Printable Recipe]
Adapted from VCTOTW via CHOW and Hello, Cupcake! via Duncan Hines
Makes 15-17 cupcakes

XIAOLU'S NOTES: The number of cookies listed below for decoration is if you split and cut the cookies perfectly every time. It's tougher than it looks, but gets easier the more you do it. Even so, I'd have more on hand just in case. An entire regular-sized package of Oreo cookies was enough for me for the batter AND decorations. Splitting the cookies is the most time-consuming part of the recipe but is most important to the final appearance. Since the ganache frosting can set fairly quickly, I recommend having all the toppings ready when you begin frosting, then decorating each cupcake right after frosting rather than going back once you've frosted the batch.

Cookies N' Cream Cupcakes (Recipe below)
Chocolate Ganache Frosting (Recipe below)
30-34 Oreo, Newman-O, or other chocolate cream-filled cookies
30-34 chocolate-covered mints (Junior Mints)
15-17 candy-coated chocolates (M&Ms)

Split the sandwich cookies in half crosswise, keeping the cream side hole (microwaving 5 cookies at a time for 3-5 seconds helps to keep the cream side solid). [I found my frosting spatula split the cookies most cleanly.] Use the dull side of a paring knife to remove any excess crumbs from cream filling and to smooth the sides of filling that has shifted during splitting.

Collect the remaining sides of the cookies without cream to use for the ears. Make 2 parallel cuts with a serrated knife in these cookies 1/2 inch from each rounded side, discarding the 1/2 inch strip that remains from the center of the cookie.

Pair up the cream sided cookie halves so that those with similar amounts of cream are together. Gently push Junior Mints into the cream of each, but don't push too hard or you'll squish the mint. [Play around with different positions to give each "owl" its own expression and personality :).]

Use a small spoon or spatula to smooth chocolate ganache frosting onto the tops of the cooled cupcakes. Place the cream sided cookies, cream side up, on the middle of the cupcakes, making sure that the eyes are oriented the way you want. Push gently to make sure they've adhered to the frosting.

To make the ears, attach the cut cream-less cookies to the cupcakes above the "eyes", textured side facing up and round edges inward. These should hang over the edge of the cupcakes, but be sure to press them into the frosting where possible to make sure they adhere well.

Lastly, press M&M candies [standing them up on their sides] between and slightly below the cookie "eyes" as beaks. Show them off to everyone XD!

Cookies N' Cream Cupcakes
1 cup soy milk [or regular milk]
1 teaspoon apple cider vinegar
3/4 cup granulated sugar
1/3 cup canola oil
1 teaspoon vanilla extract
1/2 teaspoon almond extract, or more vanilla extract
1 cup all-purpose flour
1/3 cup cocoa powder, Dutch-processed or regular
3/4 teaspoon baking soda
1/2 teaspoon baking powder
1/4 teaspoon salt
1 cup chopped Oreo, Newman-O, or other chocolate cream-filled cookies
(about 8-10 cookies)

Preheat oven to 350 degrees F and line 2 muffin pans (or use 1 pan plus as many free-standing paper souffle cups as needed) with baking liners.

Whisk together the soy milk and vinegar in a large bowl, and set aside for a few minutes to curdle. Add the sugar, oil, vanilla extract, and almond extract, if using, to the soy milk mixture and beat until foamy. In a separate bowl, sift together the flour, cocoa powder, baking soda, baking powder, and salt. Add in two batches to wet ingredients and beat until no large lumps remain (a few tiny lumps are OK). Gently fold in chopped cookies.

Fill liners 3/4 full with batter. Bake 18 to 20 minutes, until a toothpick inserted into the center comes out clean. Transfer to a cooling rack and let cool completely.

Chocolate Ganache Frosting
1/2 cup heavy cream
5 ounces semisweet chocolate, finely chopped
[or use a combination of semisweet and bittersweet]
1-2 tablespoons corn syrup

Combine the chocolate and cream in a medium, microwave-safe bowl. Try to submerge the chocolate as much as possible, but it's okay to have some above the cream. Microwave the mixture on medium for 1 minute. Stir and heat again in 15-second increments, stirring thoroughly each time, until fully melted. Stir in corn syrup. Let this cool and thicken (in the fridge if needed) before using. If it cools too much, reheat in the microwave at 5-second intervals until it softens to the consistency you want.

Tuesday, November 24, 2009

Spiced Apple Cupcakes with Brie Frosting

UPDATE: Iron Cupcake voting is now open HERE through Friday, December 4 at noon. Please go check out all the wonderful apple cupcake creations and vote for your 3 favorites!

2009.11.22 Spiced Apple Cupcakes with Brie Frosting (Iron Cupcake)

Most days during the fall, I love nothing better than to bite into the sweet, crisp flavor of a fresh apple. We've all heard the old adage: "An apple a day keeps the doctor away." As it turns out, apples are quite full of heart-healthy antioxidants, fiber, and flavonoids (WHFoods). In Norse mythology there was even a magic apple said to bestow eternal youth. Now I wouldn't bet on that last bit. But I can at least pat myself on the back whenever I enjoy my daily snack. With such a love of the fruit and new found appreciation for its benefits, I was excited (though not really surprised) to hear that the November Iron Cupcake challenge ingredient was apple.

Pairing apples with sweet, warm spices like cinnamon, nutmeg, and cloves just feels right for fall. Like diving into a big pile of leaves feels right...or putting on your favorite mittens. I used an apple-carrot cake as my point of departure. The carrots in the original were quickly replaced by more grated apples to maintain the purest apple flavor and out-of-this-world moistness. Throw in a few grinds of fresh black pepper and my base was complete.

2009.11.22 Spiced Apple Cupcakes with Brie Frosting (Iron Cupcake) [Collage]

Now came the subtle twist: brie and cream cheese frosting. Odd-sounding at first, this pairing really isn't surprising when you consider all the fruit and cheese appetizers we enjoy. I actually added about half the brie specified in the recipe below. Its flavor was barely distinguishable but added that "something special" that made people take notice. In fact this creation produced one of the nicest compliments I've ever received for my baking: a friend told me the day after eating one that she couldn't get it out of her mind.

I loves me some brie though, so I'll up the amount next time. Has anyone else tried frostings made with unconventional cheeses (not cream cheese or mascarpone)? I'd love to hear about them. =)

Spiced Apple Cupcakes with Brie Frosting (Iron Cupcake)

Voting for Iron Cupcake will begin at this site no later than Friday, November 27th at 8 p.m. and will be open through Thursday, December 3 at 12 noon. And please show some love to our generous IronCupcake:Earth prize providers by visiting their sites!

The Demy™ by Key Ingredient
Hello, Cupcake by Karen Tack & Alan Richardson
Bella Cupcake Couture
Cupcake Stackers by Gourmac
The Cake Mix Doctor Returns! by Anne Byrne

Spiced Apple Cupcakes with Brie Frosting
[Printable Recipe]
Adapted from Sunset Magazine
Makes 12 to 15 cupcakes

XIAOLU'S NOTES: I found that I could grate the apples with the skin on using my box grater. The McIntosh apples I used became quite juicy and mushy when I grated them, so I drained off some of the excess juice before using. This amount of brie resulted in a fairly mild-flavored frosting that still tasted much like regular cream cheese frosting. If you want a stronger brie flavor, you should be able to increase the ratio of brie to cream cheese up to 1:1 with good results.

1 cup all-purpose flour
3/4 cup sugar
1 teaspoon baking soda
3/4 teaspoon baking powder
3/4 teaspoon cinnamon
1/8 teaspoon ground cloves
1/8 teaspoon ground nutmeg
1/8 teaspoon freshly ground black pepper
1/8 teaspoon salt
6 tablespoons vegetable oil
2 tablespoons apple juice concentrate, defrosted (optional, increase oil to 1/2 cup if not using)
1 teaspoon vanilla extract
2 large eggs, room temperature
1 generous cup packed coarsely grated tart apples (about 2 medium-large)
1/2 cup coarsely chopped toasted walnuts
Brie and Cream Cheese Frosting (Recipe below)

Preheat oven to 350 degrees F. Line a standard muffin tin with 12 paper liners and set aside. Sift flour, sugar, baking soda, baking powder, spices, pepper, and salt together into a large bowl. Whisk to ensure they are combined.

In a separate bowl, combine the oil, apple juice concentrate, vanilla, and eggs. Add the liquid ingredients into the dry ingredients, and stir until almost combined. Stir the apples and walnuts into the batter.

Divide batter among cupcake liners and bake until a toothpick or thin knife inserted in the center of a cupcake comes out mostly clean, about 16 to 20 minutes. Let cakes cool in the pan for 5 minutes. Transfer them to wire racks and let cool completely before frosting. Frost cupcakes as desired.

Brie and Cream Cheese Frosting
6 ounces (1 cup) cream cheese (low-fat is fine), cool room temperature
4 ounces (about 1/2 cup) brie, softened and with rind removed
1/4 cup (2 ounces or 1/2 stick) unsalted butter, room temperature
1 teaspoon pure vanilla extract
1 1/2 to 2 1/2 cups sifted powdered (confectioner's) sugar

In a large bowl beat the brie, cream cheese, and butter until softened and smooth (but do not overbeat). On low speed beat in the vanilla and powdered sugar. Start with 1 1/2 cups of sugar and add more to achieve desired sweetness and stiffness. Finally, beat on high speed for a few moments until smooth.

Tuesday, November 17, 2009

Invasion of the Cute Cupcake Paraphernalia

Phew! Now that I've made the latest Cupcake Hero entry deadline, I can finally get some other unfinished business outta the way. You may recall that I won Cupcake Hero waaaay back in September for my Caramelized Banana Creme Brulee Cupcakes. Well you'll think me silly (the host sure seemed to =p) but I didn't even know what the prizes were at that point.

Does CB have the most adorable signature or what?

Cupcake Hero Prizes [Collage]

Now picture my delight when a BUNCH of wonderful prizes arrived at my doorstep a few weeks ago. I loved it all and started using everything right away. My favorites so far are the amazingly realistic cupcake magnets and rockin' leather cupcake keychain. To current and potential (you can join us anytime!) Cupcake Hero-ers, isn't it amazing that one of us wins all this every month?! Please also check out our host CB's in-depth descriptions and up-close photos of all the prizes here!

Front: Kitchen towels from StitchesAPlenty
2nd Row (left to right): cupcake-flavored lip balm from KupcakeNaturals,
magnets from ThreeRabbits, and earrings from TinyTokenDesigns
3rd Row (left to right): Card from CB, Stationary from Liz Sage, LLC,
phone/iPod case from GadgetGear, Akinosie chocolate and cocoa powder,
and keychain from Leather Prince
Cupcake Hero Prizes

I also won these adorable oven mitts from
Sygnet Creations.
(but other items pictured below are my own)
2009.10.20 Redless Velvet Cupcakes

Sunday, November 15, 2009

Coconut Coffee Cupcakes with Peanut Butter Frosting

Coconut Coffee Cupcake with Peanut Butter Buttercream (Cupcake Hero::November)

Just when I thought cupcakes would be scarce around here for a while, the deadline (eek - today!) for November's peanut butter themed Cupcake Hero challenge crept up on me all ninja-like. Talk about squeaking by last-minute. I suppose I’ve always worked better under pressure anyway. So let's get started already!

First things first, you should know that we have a theme song this month: the net-(in)famous and ridiculously silly "It's Peanut Butter Jelly Time!" If you haven't seen the video yet, I (respectfully) demand that you go watch it now.

Coconut Coffee Cupcake with Peanut Butter Buttercream (Cupcake Hero::November)

A PB & J pairing was the first idea to spring to mind when CB announced peanut butter as the theme. Yet as much as I love that childhood classic, the time was ripe for a more sophisticated way to satisfy our PB (and cupcake) cravings. Of course the few days I gave myself to find an idea dragged into weeks. But lo and beyond, while mulling things over during lunch break, I only had to look down for inspiration to smack me in the face. Why not coffee?

Thus this coconut coffee cupcake with peanut butter swiss meringue buttercream frosting (SMBC) was born. I threw some coconut milk into the cake batter to add richness and complexity of taste that enhances without overpowering, like any good supporting actress. The real star here, though, is the peanut butter buttercream. It's silky smooth, not too sweet, and perfect for piping those beautiful swirls (which we all know get the most oohs and aahs).

This frosting was, in a word, amazing, and I can't wrap up this post without thanking Judy of Judy in Her Natural Habitat: The Kitchen for invaluable guidance about making SMBC. If you haven't already, please swing by her blog to see all the impressive creations. Some of my favorite posts of hers are the photo tutorial for making swiss meringue buttercream, her many flavors of SMBC, and especially her homemade cupcake wrappers which look cooler than any I've ever seen for sale. Thanks so much, Judy! And I hope these photos reveal me to be a dedicated student.

Coconut Coffee Cupcake with Peanut Butter Buttercream (Cupcake Hero::November)

Coconut Coffee Cupcakes with Peanut Butter Swiss Meringue Buttercream Frosting
[Printable Recipe]
Makes 11 to 12 cupcakes

6 tablespoons unsalted butter, room temperature
3/4 cup sugar
1 large egg and 1 large egg yolk
1 teaspoons pure vanilla extract
1 1/4 cups all purpose flour
1 1/4 teaspoons baking powder
1/8 teaspoon salt
1/2 cup coconut milk
1/4 cup milk
2 teaspoons instant coffee powder
Peanut Butter Swiss Meringue Buttercream (Recipe below)
Peanut brittle, to garnish (optional)

Preheat oven to 350 degrees F. Line a standard muffin tin with 12 paper liners. Heat the coconut and dairy milks gently on the stove or in the microwave, then add the instant coffee powder, making sure that it's completely dissolved. Set aside.

In a medium bowl, sift together the flour, baking powder, and salt. Set aside.

In a different larger bowl, cream butter and sugar together until light and fluffy. Add the egg and yolk and mix until combined into the batter. Then add the vanilla and mix again. Finally alternately beat in dry ingredients and milk mixture. Fill cupcake liners until they are about 2/3 full (I like to use my large cookie scoop for this). Bake for 16 to 20 minutes or until golden brown. Let cool completely. Frost the cupcakes as desired and top each with a small piece of peanut brittle, if desired.

2009.11.14 Coconut Coffee Cupcake with Peanut Butter Buttercream (Cupcake Hero::November) [Collage]

Peanut Butter Swiss Meringue Buttercream
Adapted from Crispy Waffle via Judy in Her Natural Habitat: The Kitchen
Makes enough to generously frost 12 cupcakes

XIAOLU'S NOTES: I used a natural, dark-roasted peanut butter, so I didn't need much for either color or flavor. But if you use a milder, lighter PB, feel free to add a couple tablespoons more. This technique of combining the meringue with butter was very successful, but I'm curious if dividing the meringue is really necessary. Next time I make SMBC, I'll try the simpler method of adding butter by the tablespoon to the entire meringue to see if the difference is worth the extra steps.

2 egg whites
6 to 8 tablespoons granulated sugar (according to how sweet you like things)
1 teaspoon molasses
1/8 teaspoon cream of tartar (optional)
10 tablespoons unsalted butter, cool room temperature
1/2 teaspoon pure vanilla extract
3 to 4 tablespoons peanut butter

Combine the sugar, egg whites, molasses, and cream of tartar in the stainless steel bowl of an electric mixer.

Bring a large pan of water to simmer, making sure that the water is at the same height as the egg whites in your stainless bowl. Set the bowl in the pan of simmering water and whisk constantly until the mixture reaches 160 degrees on an instant-read thermometer (I just whisked by hand and cooked it until the sugar was completely dissolved and the top became foamy). Be careful not to curdle the egg whites, remove from heat if this starts happening.

Remove the bowl to your stand mixer and beat on high speed for at least 3 minutes, until the mixture holds glossy, marshmallow-esque peaks and the bowl is completely cool (Very important - the frosting's consistency will be off otherwise). Remove the meringue to another bowl.

Switch to the paddle attachment and beat half the butter and one-third of the meringue until well combined. Continue to add the remaining two-thirds of the meringue a dollop at a time. The mixture may look scarily curdled at this point; adding the remaining butter a tablespoon at a time and beating well after each addition will smooth things out. With the mixer on low, add the vanilla and peanut butter, and continue beating 1 minute to incorporate the additions and reduce air bubbles.