Showing posts with label coffee. Show all posts

Saturday, March 10, 2012

Rediscovering "Booze Cake" (Black Russian Bundt Cake with Homemade Kahlua)

Phew, I've done it -- I've jumped back onto the blog-wagon! Alright...so maybe it's a bit premature to celebrate when it's my first recipe post in weeks. But I'm the kind of writer who considers the first page the hardest. So let's just say I have good reason to expect smoother sailing from here on out 8).


Part of the delay lay in the history behind this unassuming cake. It was, in fact, the first cake I fell in love with. We met freshman year of college, when my roommate brought her mom's famous "booze cake" back to our dorm. Dense and unbelievably moist, every bite of it brought a warm kick of coffee liqueur against a milder backdrop of chocolate. It was pure heaven. But alas, this was before I started baking, blogging, or even drinking alcohol [legally at least *cough* haha], so I didn't think to ask for the recipe.

Seven (yes, seven) years and countless Google searches for "booze cake" later, I asked my friend on a whim if her mom still had the recipe. Within a few days, there it was! Just sitting in my inbox (like magic)! I suppose that was my rather drawn-out lesson that I should just try to ask when I really want something ^_^.


My work wasn't done yet, though. It turned out that the (ultimately not that) elusive "booze cake," better known online as "Black Russian Cake," required not only a lot of the "good stuff" (i.e., coffee liqueur and vodka), but also cake mix and instant pudding mix. It's a personal commitment of mine to make my desserts from scratch whenever possible. Thus, with the virtual guidance of like-minded bakers, I successfully reverse-engineered a from-scratch version of my First (Cake) Love. I hope you'll find it as unforgettable as I did!

Black Russian Chocolate Kahlua Cake (From Scratch!) [Printable Recipe]
Cake adapted from Rum Cake from Always Order Dessert

XIAOLU'S NOTES: I actually made a 1/2 batch of this recipe using an 8-inch wide Bundt pan. Aside from halving all the ingredients, the only change I made was to reduce the baking time to 35 to 45 minutes, or just until a toothpick inserted in the cake comes out mostly clean (a few moist crumbs are fine).

1 3/4 cup all purpose flour
1/2 cup cornstarch
1/3 cup dry milk powder
6 Tbsp Dutch-process (dark) cocoa powder
Scant 1 Tbsp baking powder
1 tsp salt
2 cups granulated sugar
1/4 cup (1/2 stick) unsalted butter, softened
3/4 cup PLUS 2 Tbsp canola OR vegetable oil
3/4 cup milk [NOT skim]
1 Tbsp pure vanilla extract
4 large eggs, room temperature
1/4 cup vodka
1/3 cup coffee-flavored liqueur (such as Kahlua OR Homemade Recipe below)

3 Tbsp unsalted butter
2 Tbsp water
6 Tbsp granulated sugar
Pinch of salt
6 Tbsp coffee-flavored liqueur (such as Kahlua OR Homemade Recipe below)
***you can use up to 1/2 cup liqueur if you like your booze cakes to be well-soaked
Sifted powdered sugar, to garnish


Preheat oven to 325 degrees F. Grease a 10 to 15-cup Bundt pan and dust with cocoa powder; set aside.

In a large bowl, sift together the flour, cornstarch, dry milk powder, cocoa powder, baking powder, salt, and white sugar. Add the butter, oil, milk, and vanilla to the dry ingredients and beat with an electric mixer on medium the batter is smooth and uniform. Add the eggs, and continue beating until well incorporated (no more than 1 minute). Finally, add the vodka and coffee liqueur, then mix until evenly combined.

Pour into the prepared Bundt pan and bake for 50 to 60 minutes, or until a tester inserted in the cake comes out clean. Let cool in pan for 25 minutes, then invert onto a wire rack. Let cool for 30 more minutes.

While the cake cools, wash and thoroughly dry the Bundt pan then prepare the syrup. In a large saucepan with high sides, combine the butter, water, granulated sugar, and salt. Cook over medium heat until the butter completely melts and the sugar dissolves. Let reduce slightly, keeping an eye on it so it doesn’t boil over. Remove from the heat and stir in the coffee liqueur (it may bubble).

Quickly place the clean pan over the cool cake and invert the cake back into the pan. While the syrup is still warm, poke holes across the top of the cake with a toothpick or fork and brush/pour the syrup evenly over the cake. Let soak for at least 4 hours (ideally, overnight), then invert the cake back onto a serving platter, sift powdered sugar on top (if desired), and dig in! Keeps covered for about 1 week at room temperature.

Homemade Coffee Liqueur
Adapted from Liv Life
Makes about 5 1/2 cups

2 cups water
3 1/4 cups granulated sugar
1 tsp molasses
3/4 cup instant coffee OR espresso powder
1 split vanilla bean OR 2 1/2 tsp pure vanilla extract
2 1/4 cups good quality vodka

Stir water, sugar, molasses, and coffee powder together in a medium to large saucepan. Bring to a boil and boil for 5 minutes, stirring frequently to ensure the sugar and instant coffee powder dissolve completely. Remove from heat and let cool to room temperature, being careful to stir as it’s cooling to avoid crystallization of the sugar. Add vanilla and vodka. If you notice any grains of undissolved sugar, you can strain them out using a fine-mesh strainer. Bottle and cap tightly, then store in a cool, dry place. If using the vanilla bean, allow the liqueur to develop for 3 to 5 weeks, then strain out the bean, re-bottle, and enjoy straight or in recipes calling for coffee liqueurs such as Kahlua. If using vanilla extract, let the liqueur rest for at least 1 full day to allow the flavors to meld before drinking.

Thursday, July 21, 2011

A Lotta Chocolate Part 5: Bruléed Mocha Crepe Cake with Chocolate Liqueur Sauce

First of all, this is completely unrelated to food, but my friend R just took me to see the musical, Wicked, as a belated birthday gift, and it was AMAZING! I'd always found the idea of approaching the Wizard of Oz story from a different perspective intriguing. But I'm pretty sure I'd never have taken the initiative to see it where it not for my friend. Wicked was funny, exciting, and heart-warming throughout its 2 1/2 hours. And when it ended I could swear only 15 minutes had passed (I'd been so engrossed). If this show comes near you or vice versa, I strongly recommend getting tickets!

Now let's return to our regularly scheduled programming... Today's post is the 5th and last in my A Lotta Chocolate series. When we started down this road I promised you chocolate treats that would be less conventional, though no less delicious. A French toast, macaron, chestnut cake roll, and couscous salad later, it's my hope that you consider that promise fulfilled. For our last outing I decided to also make good on another promise. One that I made to myself when I started this site: to make my own crepe cake one day! (Is it just me or is this series getting a bit French food-centric? 8p)

Bruleed Chocolate Mocha Crepe Cake
Well folks, I made it! And not just any crepe cake, but a bruléed mocha crepe cake with homemade chocolate liqueur sauce! There's no getting around the fact that all these delicate crepes take time to cook and layer up. Yet you'd be hard-pressed to find any cake that slices as prettily or embraces chocolate as thoroughly as this one. Not only is dark mocha ganache spread between 15+ crepe layers, each slice of this cake is served with a generous pouring of chocolate liqueur sauce.

A rich and decadent chocolate treat worthy of closing out a chocolate series? Check! Thanks for joining me on this ride -- I sure hope you had as much fun as I did! If you missed any of the previous stops, you can still check them out right here: Chocolate Chunk Challah Bread French Toast, Snickers Macarons, Chocolate Cake Roll with Chestnut Cream, and Cherry Pistachio Orange Cocoa Couscous.

Bruléed Mocha Crepe Cake [Printable Recipe]
Adapted from Homelife and The Essence of Chocolate
Serves 8

XIAOLU'S NOTES: The chocolate liqueur recipe obviously makes much more than you need for the crepe cake, but it's so easy to make and so delicious in cocktails or sipped with whipped cream that I'd just go ahead and make the whole batch :).

For crepes
5 large eggs, lightly whisked
1 cup all purpose flour
1 1/2 cups milk
3 Tbsp white sugar [preferably fine/caster]
2 tsp vanilla bean paste OR pure vanilla extract
2 Tbsp melted butter, plus more to grease

For filling and topping
8 oz. dark chocolate, coarsely chopped
3/4 cup light cream
1/3 cup espresso
6 to 8 Tbsp white sugar [preferably fine/caster], divided

For sauce
4 oz. dark chocolate, chopped
3 Tbsp light cream or half and half
3 Tbsp espresso
3 Tbsp chocolate liqueur (Recipe below)
3 Tbsp brown sugar
2 tsp honey (optional)

Blend all the crepe ingredients just until smooth. Set aside for 30 minutes to rest.

Heat an 8-inch non-stick frying pan over medium heat. Brush with melted butter. Pour in enough batter to coat the base of the pan (swirl the pan to coat it evenly with batter immediately). Cook for 1 minute or until lightly golden and just set. Use a spatula to turn and cook for a further 30 seconds or until golden. Transfer to a plate. Repeat with remaining batter, reheating and greasing pan between batches.

To make filling, place chocolate, cream, coffee, and 4 tablespoons of sugar in a heatproof bowl over a small saucepan of simmering water. Use a spatula or heatproof spoon to stir for 5 minutes or until chocolate melts and mixture is smooth. Taste a tiny bit and add up to 2 more tablespoons of sugar if desired. If more sugar was added, heat the mixture until new sugar has dissolved. Remove from heat; cover with plastic wrap. Place in the fridge, stirring occasionally, for 30 minutes or until mixture cools and thickens.

Line a 6 to 7-inch springform pan with plastic wrap. Place a crêpe in the pan. Spread with a little filling. Continue layering with crêpes and filling, finishing with a crêpe. Cover with plastic wrap and place in the fridge until chilled and set (at least 3 hours and up to 1 day).

To make chocolate mocha sauce, combine chocolate, cream, coffee, liqueur, sugar, and honey in a heatproof bowl over a small saucepan of simmering water. Stir for 5 minutes or until sauce is smooth.

Turn the cake out onto a clean serving platter. Sprinkle the top of the cake evenly with the remaining 2 tablespoons of white sugar. Then melt the sugar evenly with a kitchen torch to form a crisp caramel topping. Allow to sit at least 5 minutes before serving. Use a sharp knife to cut into wedges. Place on serving plates and drizzle with hot sauce.

Chocolate Liqueur
Makes 3 1/2 cups

5 Tbsp unsweetened cocoa powder
1 cup boiling water
1 cup sugar
3/4 cup water
1 cup vodka
3/4 cup heavy cream, for optional topping
Cocoa nibs or chocolate shavings, for optional garnish

In a bowl, dissolve cocoa powder in boiling water. In a saucepan, bring sugar and 3/4 cup of water to a simmer, stirring until sugar is dissolved. Add sugar syrup to cocoa syrup. Strain through a fine-mesh sieve into a jar with a lid. Add the vodka, cover and refrigerate overnight. (It will keep up to 1 month, but will lose potency over time.).

If serving on its own, stir well and strain again through a fine-mesh sieve into a glass until 2/3 full. Top with lightly-sweetened whipped cream, or float heavy cream on top (by holding a spoon with the bowl down and the edge almost touching the liqueur in the glass then pouring cream slowly over the back of the spoon until a layer (1/8 to 1/4-inch deep) floats on top of the liqueur). Garnish with cocoa nibs or chocolate shavings.

Saturday, March 12, 2011

Baileys, Baileys, Baileys...Oh! (Homemade Irish Cream Liqueur)

Homemade Irish Cream

My plan had been to start this post with an explanation of its silly title, inspired by the Justin Bieber song "Baby" that inexplicably got stuck in my head this week. But in light of the devastating natural disasters that have struck and continue to threaten those in Japan, I think it's more appropriate to instead take a minute of silence and also entreat you to help those affected in any way you can, small or large.

I don't know many people personally in Japan, but I immediately thought of my blogger friend E and casual college buddies J and H. Fortunately, they all communicated they were safe via email or Facebook. Isn't technology wonderful at times like these? My boyfriend P had taught English in Japan for a year and also had friends/students he was concerned about but who all turned out to be okay, thankfully.

To be honest, with all the natural disasters that have been in the news in recent years, the impact of this one didn't hit me for at least a few hours. It wasn't until I saw footage of the rising water swallowing up whole towns, cars and people being swept away like little toys, and other people trapped on rooftops, that the reality of it all flooded in. I honestly have no idea and can't even imagine what it's like to be in Japan right now. But I'll definitely be keeping all of those affected by this disaster close in my thoughts and in my heart.

Homemade Irish Cream

On a lighter note, I do still want to share my latest Irish-themed treat just in time for St. Patrick's Day (March 17) festivities. Now I'm not a big alcohol drinker (not even beer) but man do I love Baileys Irish Cream. Let's keep this just between you and me ;p but my dad actually let me try it in my early teens. Immediately I was mesmerized by its smooth creamy texture, well-balanced coffee and chocolate flavors, and gentle whiskey kick.

What I haven't loved as much is the hefty price tag on the store-bought version. Until recently, this factor alone limited my enjoyment of Irish cream to maybe twice a year only. Well those days are at an end, my friends. Would you believe you can make a delicious and less expensive homemade version in 5 minutes? Not only can I enjoy sipping on Irish cream on the rocks more often, this discovery is also inspiring all sorts of Irish cream-based recipes from cupcakes to cheesecakes and beyond. And homemade liqueur is even great to give as gifts. If you or your friends are Baileys-lovers like me, you simply must try this recipe =D.

Homemade Irish Cream Liqueur [Printable Recipe]
Adapted from Allrecipes
Makes about 1 quart (4 cups)

XIAOLU'S NOTES: I decreased the amount of whiskey from the original recipe because I made it and the alcoholic burn was a bit much for me (though still tasty). Feel free to reduce it even more, or increase it as high as 1 2/3 cups depending on your taste preference. I also substituted half the cream with milk with no ill effect on taste. For a super rich version, use all cream. Some recipes I've come across use up to 4 raw eggs per quart of cream liqueur. I've left that out, but feel free to experiment and tell me how it turns out!

1 tsp instant coffee granules
2 tsp unsweetened natural cocoa powder
3/4 cup heavy cream, divided
3/4 cup milk
1 (14 oz.) can sweetened condensed milk
1 Tbsp honey
1 to 1 1/2 cups Irish whiskey
1 tsp vanilla extract
1/4 tsp almond extract (optional)

In a small bowl or cup, mix together instant coffee, cocoa powder, and 2 tablespoons of heavy cream until smooth. Using a conventional or hand-held immersion blender, combine the coffee cocoa mixture, remaining heavy cream, milk, sweetened condensed milk, honey, Irish whiskey, vanilla extract, and almond extract and blend on high for 20 to 30 seconds. Transfer to a container, seal tightly, and store in the refrigerator. For the best flavor, let chill at least overnight to allow the flavors to meld together. Shake well before using. This should keep for up to 2 months.

Friday, November 20, 2009

Month of Vegan Cookies: Espresso Chip Oatmeal Cookies (Continuing Giveaway)

2009.11.18 Espresso Chip Oatmeal Cookies

Do you, like me, often need a swift kick in the behind to jump start the morning? Now come on, be honest… Well if you do tend to be more zombie than human at the start of the day, the double jolt of caffeine in these cookies should fix you right up. In contrast to my last coffee-flavored creation, these babies -- which contain a whopping 2 tablespoons of instant espresso powder -- make absolutely no effort at subtlety.

***A quick note for anyone tempted to substitute: the espresso powder called for is worth tracking down. The smoothness and intensity of flavor in these cookies is easily distinguishable from anything I’ve baked using instant coffee granules. For the same reason, though, I’d recommend the caffeine-sensitive among you to halve the espresso powder in this recipe.***

2009.11.18 Espresso Chip Oatmeal Cookies

Stimulating discussions about stimulants aside (I see you cringing =p), these espresso chocolate oatmeal cookies are quite the treat. Crispy edges hug a center that’s slightly soft but still chewy from the oats. Two forms of chocolate and (as I might’ve mentioned) all that espresso powder give each bite a wonderfully rich, roasted flavor and aroma. And their bittersweet edge is reined in by both white and brown sugars.

FLAVOR: 4.5/5
TEXTURE: 4/5
EASE OF PREPARATION: 4.5/5
OVERALL: 4.5/5

2009.11.18 Espresso Chip Oatmeal Cookies

Lastly, may I remind you that all this deliciousness is achieved without eggs or dairy? This is the second cookie I’ve tried from Vegan Cookies Invade Your Cookie Jar and my favorite yet! I’ve been loving the simple ingredients and prep (no mixer required) called for by the recipes so far and can’t wait to test 2 more for my Vegan Month of Cookies series. Just a friendly reminder that if you'd like to win one of 3 copies of this book, simply leave a comment (including your e-mail) on this or any other post in this series. I'll pick the winners at random and let you know in my review post.

2009.11.18 Espresso Chip Oatmeal Cookies [Collage 2]


Espresso Chip Oatmeal Cookies
[Printable Recipe]
Reproduced with permission from Vegan Cookies Invade Your Cookie Jar with my comments/changes in brackets
Makes 2 dozen cookies

XIAOLU’S NOTES: I only had old-fashioned oats, not quick-cooking, so I went at 'em with my pastry blender and all was well! Also, my batter distribution wasn't "generous" enough in the first batch so the second batch was extra large (and thus extra delicious).

1/2 cup nondairy milk [I used soymilk]
1/2 cup canola oil
2 tablespoons ground flax seeds
1/3 cup brown sugar
1/2 cup sugar
1 teaspoon pure vanilla extract
2/3 cups all-purpose flour
1/8 teaspoon ground cinnamon
2 tablepoons instant espresso powder
1 tablespoon cocoa powder
3/4 teaspoon baking powder
1/4 teaspoon salt
1 3/4 cups quick-cooking oats
3/4 cup chocolate chips

Preheat oven to 350 degrees F. Line two baking sheets with parchment paper.

In a large bowl, mix together non-dairy milk, oil, flax seeds, brown sugar, sugar, and vanilla until smooth. Sift in flour, cinnamon, espresso powder, cocoa powder, baking powder, and salt. Add quick-cooking oats and chocolate chips and stir until all ingredients are moistened.

2009.11.18 Espresso Chip Oatmeal Cookies

Drop generous tablespoons of dough about 2 inches apart onto baking sheets [Please note this batter is very runny and I spread them out even more so they'd bake up flatter.]. Bake for 14 minutes [I needed to bake 2-3 minutes longer], until cookies are slightly puffed and the edges appear dry.

Let the cookies cool on baking sheets for 5 minutes [I let them sit for 10 minutes to ensure the bottoms were set.], then transfer them to wire racks to cool completely. Store in a loosely covered container.

MORSELS: Look for instant Italian espresso powder at gourmet markets in the coffee aisle or even in the baking aisles at fancy supermarkets. Instant espresso powder has a rich, concentrated flavor that’s magical in baked goods. If you can’t find it, it’s okay to substitute instant coffee granules; the flavor will just not be as intense.

PREVIOUSLY: Sweet Potato Blondies
NEXT UP IN THIS SERIES: Pignoli Almond Cookies

Sunday, November 15, 2009

Coconut Coffee Cupcakes with Peanut Butter Frosting

Coconut Coffee Cupcake with Peanut Butter Buttercream (Cupcake Hero::November)

Just when I thought cupcakes would be scarce around here for a while, the deadline (eek - today!) for November's peanut butter themed Cupcake Hero challenge crept up on me all ninja-like. Talk about squeaking by last-minute. I suppose I’ve always worked better under pressure anyway. So let's get started already!

First things first, you should know that we have a theme song this month: the net-(in)famous and ridiculously silly "It's Peanut Butter Jelly Time!" If you haven't seen the video yet, I (respectfully) demand that you go watch it now.

Coconut Coffee Cupcake with Peanut Butter Buttercream (Cupcake Hero::November)

A PB & J pairing was the first idea to spring to mind when CB announced peanut butter as the theme. Yet as much as I love that childhood classic, the time was ripe for a more sophisticated way to satisfy our PB (and cupcake) cravings. Of course the few days I gave myself to find an idea dragged into weeks. But lo and beyond, while mulling things over during lunch break, I only had to look down for inspiration to smack me in the face. Why not coffee?

Thus this coconut coffee cupcake with peanut butter swiss meringue buttercream frosting (SMBC) was born. I threw some coconut milk into the cake batter to add richness and complexity of taste that enhances without overpowering, like any good supporting actress. The real star here, though, is the peanut butter buttercream. It's silky smooth, not too sweet, and perfect for piping those beautiful swirls (which we all know get the most oohs and aahs).

This frosting was, in a word, amazing, and I can't wrap up this post without thanking Judy of Judy in Her Natural Habitat: The Kitchen for invaluable guidance about making SMBC. If you haven't already, please swing by her blog to see all the impressive creations. Some of my favorite posts of hers are the photo tutorial for making swiss meringue buttercream, her many flavors of SMBC, and especially her homemade cupcake wrappers which look cooler than any I've ever seen for sale. Thanks so much, Judy! And I hope these photos reveal me to be a dedicated student.

Coconut Coffee Cupcake with Peanut Butter Buttercream (Cupcake Hero::November)

Coconut Coffee Cupcakes with Peanut Butter Swiss Meringue Buttercream Frosting
[Printable Recipe]
Makes 11 to 12 cupcakes

6 tablespoons unsalted butter, room temperature
3/4 cup sugar
1 large egg and 1 large egg yolk
1 teaspoons pure vanilla extract
1 1/4 cups all purpose flour
1 1/4 teaspoons baking powder
1/8 teaspoon salt
1/2 cup coconut milk
1/4 cup milk
2 teaspoons instant coffee powder
Peanut Butter Swiss Meringue Buttercream (Recipe below)
Peanut brittle, to garnish (optional)

Preheat oven to 350 degrees F. Line a standard muffin tin with 12 paper liners. Heat the coconut and dairy milks gently on the stove or in the microwave, then add the instant coffee powder, making sure that it's completely dissolved. Set aside.

In a medium bowl, sift together the flour, baking powder, and salt. Set aside.

In a different larger bowl, cream butter and sugar together until light and fluffy. Add the egg and yolk and mix until combined into the batter. Then add the vanilla and mix again. Finally alternately beat in dry ingredients and milk mixture. Fill cupcake liners until they are about 2/3 full (I like to use my large cookie scoop for this). Bake for 16 to 20 minutes or until golden brown. Let cool completely. Frost the cupcakes as desired and top each with a small piece of peanut brittle, if desired.

2009.11.14 Coconut Coffee Cupcake with Peanut Butter Buttercream (Cupcake Hero::November) [Collage]

Peanut Butter Swiss Meringue Buttercream
Adapted from Crispy Waffle via Judy in Her Natural Habitat: The Kitchen
Makes enough to generously frost 12 cupcakes

XIAOLU'S NOTES: I used a natural, dark-roasted peanut butter, so I didn't need much for either color or flavor. But if you use a milder, lighter PB, feel free to add a couple tablespoons more. This technique of combining the meringue with butter was very successful, but I'm curious if dividing the meringue is really necessary. Next time I make SMBC, I'll try the simpler method of adding butter by the tablespoon to the entire meringue to see if the difference is worth the extra steps.

2 egg whites
6 to 8 tablespoons granulated sugar (according to how sweet you like things)
1 teaspoon molasses
1/8 teaspoon cream of tartar (optional)
10 tablespoons unsalted butter, cool room temperature
1/2 teaspoon pure vanilla extract
3 to 4 tablespoons peanut butter

Combine the sugar, egg whites, molasses, and cream of tartar in the stainless steel bowl of an electric mixer.

Bring a large pan of water to simmer, making sure that the water is at the same height as the egg whites in your stainless bowl. Set the bowl in the pan of simmering water and whisk constantly until the mixture reaches 160 degrees on an instant-read thermometer (I just whisked by hand and cooked it until the sugar was completely dissolved and the top became foamy). Be careful not to curdle the egg whites, remove from heat if this starts happening.

Remove the bowl to your stand mixer and beat on high speed for at least 3 minutes, until the mixture holds glossy, marshmallow-esque peaks and the bowl is completely cool (Very important - the frosting's consistency will be off otherwise). Remove the meringue to another bowl.

Switch to the paddle attachment and beat half the butter and one-third of the meringue until well combined. Continue to add the remaining two-thirds of the meringue a dollop at a time. The mixture may look scarily curdled at this point; adding the remaining butter a tablespoon at a time and beating well after each addition will smooth things out. With the mixer on low, add the vanilla and peanut butter, and continue beating 1 minute to incorporate the additions and reduce air bubbles.

Sunday, October 18, 2009

Sasha's Favorite Banana Bread and Giveaway Winners

01/14/14 UPDATE: I recently remade this and realized that it still tastes great with much less sugar. Thus, I've edited the recipe below to reduce the sugar as well as to make some of the instructions clearer and more detailed. This is always a crowd pleaser whenever I make it, so I do hope you'll try it and let me know how you like it!


First I'd like to thank everyone who participated in my very first giveaway. It was really fun reading about your favorite things about Halloween! So much fun, in fact, that I wanted to spread the cupcake joy even more than I'd planned. I'm happy to announce that the 2 winners (chosen randomly) of Vegan Cupcakes Take Over the World are Joanne (comment #2) and Snulfers (comment #26). I'll be emailing you both shortly - congrats! For the rest of you, stayed tuned 'cause I'll be giving away more stuff for sure.

Now with the gray wet weather currently blanketing the D.C. area, this just felt like the right time to share my simple and beloved recipe for classic banana bread. Though I wrote earlier about a delightful twist on banana bread that added coconut, citrus, and rum flavors, today's recipe is the one I return to time after time for it's unbeatable moist texture and pure banana flavor. The simplicity of one-bowl mixing can't be beat. Plus the recipe is so flexible that I've made many versions with different nuts, chocolates, flavorings, and grains.

All this playing around took place in my last year of college, when I regularly made this bread for my friends. One in particular, Sasha, would always get adorably excited when presented with a slice (or 2 ^_^). That was years ago and despite the fact that she's since moved out of the U.S., we've all stayed friends. When I learned earlier this week that Sasha would be in town, I immediately pulled out this recipe. As I'd hoped she still loved the bread, and we had a wonderful weekend catching up with college friends.

I've recently grown conscious that each passing year scatters our group further apart across the country and the globe. But it's comforting to know that the bonds of friendship remain. And with this recipe carefully stowed away, I'll always know just the thing to bring to our reunions.

Sasha's Favorite Banana Bread [Printable Recipe]
Loosely adapted from Food.com
Makes 16 to 20 servings (1 large bundt cake or 2 loaves)

XIAOLU'S NOTES: If your bananas aren’t quite ripe enough (should be nearly black and soft to the touch), peel and microwave them for 1 to 2 minutes before mashing and increase sugar by 2 tablespoons (50 g). You can omit the oats and cornmeal and just use 2 1/3 cups (10.4 oz./294 g) of all-purpose flour instead, but I enjoy the textural contrast provided by the other grains. If you don’t have applesauce, simply replace it with 1/3 cup buttermilk or thinned plain yogurt. Also try substituting 3/4 cup (3 oz./85 g) of white whole wheat flour in place of 3/4 cup (3.35 oz./95 g) of all-purpose flour.

1 Tbsp unsalted butter, melted
2 1/2 tsp (7 g) all-purpose flour

3 large eggs, room temperature

Slightly over 2 cups (16.6 oz./471 g) very ripe mashed bananas (from 4 to 5 mostly black-brown bananas)
2/3 cup (1.9 oz./53 g) rolled oats
1/4 cup (1.1 oz./32 g) cornmeal
1 1/4 to 1 1/3 cups (8.9 to 9.4 oz./252 to 267 g) sugar
1/2 tsp salt
1 1/4 tsp baking soda
1 tsp baking powder
1 tsp ground cinnamon
1/4 tsp ground nutmeg
Large pinch of ground cloves
1 tsp instant coffee OR espresso powder, broken up by rubbing between your fingertips
1/3 cup canola OR vegetable oil
1/3 cup plain yogurt OR sour cream
1/3 cup unsweetened applesauce
2 tsp unsulphured molasses
1 tsp pure vanilla extract
1 Tbsp dark OR gold rum (optional)
1 3/4 cups (7.8 oz./221 g) all-purpose flour
1/2 cup (3 oz./85 g) semisweet chocolate, coarsely chopped
2/3 cup (2.3 oz./66 g) pecans OR walnuts, toasted and chopped (optional)

Preheat the oven to 350 degrees F. In a small bowl, mix 1 tablespoons of melted butter with 2 1/2 teaspoons of flour into a uniform paste. Thoroughly brush the inside of a 10 to 12-cup bundt pan OR two 8 1/2 x 4 1/2-inch loaf pans with a layer of this paste (it will help the cake come cleanly out of the pan after baking).

In a large mixing bowl, beat the eggs until whites and yolks are well combined. Add the remaining ingredients EXCEPT for flour, chocolate, and nuts; whisk until well incorporated. Add the flour and immediately mix just until evenly combined (no more than 2 minutes and a few small lumps are fine). Gently stir in chopped chocolate and nuts. Pour the batter into the prepared bundt pan, or divide evenly between loaf pans. If using the bundt pan, use a spatula to push the batter slightly up the outside walls of the pan; this will help the cake climb up the sides, giving you greater detail on the outside of the cake. Now slam the pan(s) evenly and firmly downward from 3 inches above the counter to force out any large air bubbles.


Bake until a toothpick comes out with a few moist crumbs but NO wet batter, about 45 to 65 minutes. If not yet done at 45 minutes, gently tent a piece of aluminum foil across the top of the pan(s) to prevent over-browning. After removing from the oven, let cool for 15 minutes in pan(s) then turn out onto a wire rack and allow to cool completely. If you don’t plan to eat the banana bread within a few days, cover with foil, slide into freezer bag(s), and freeze for up to several months.

Sunday, September 6, 2009

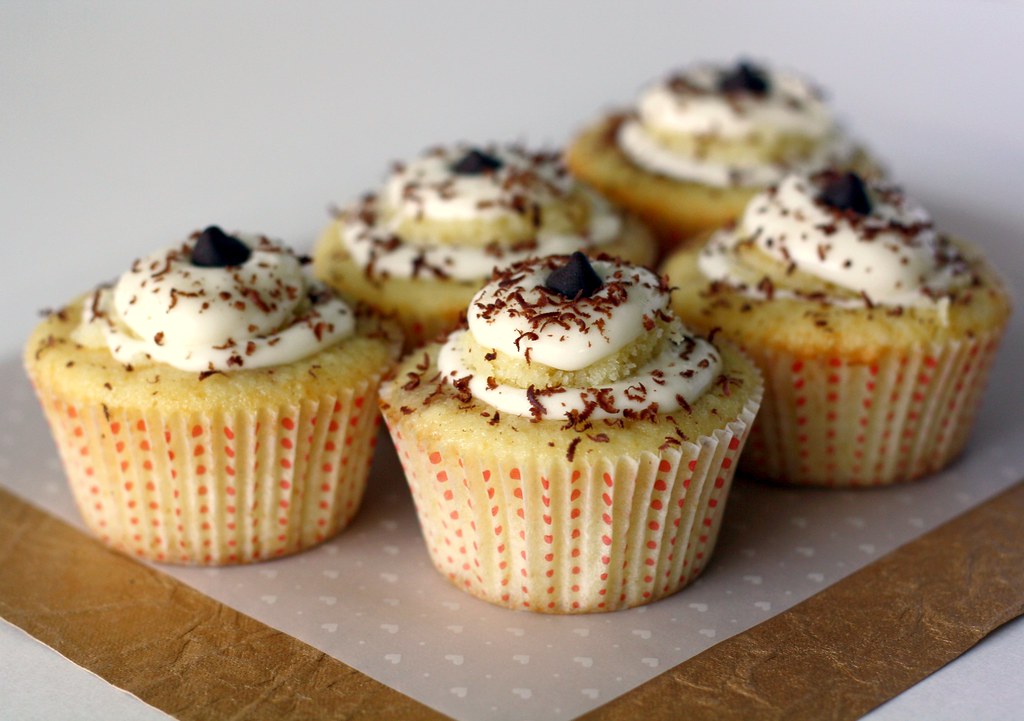
Tiramisu Cupcakes


Tiramisu is an amazing dessert that combines layers of contrasting - but all extremely delicious - tastes and textures into each indulgent bite. The espresso (and alcohol)-kissed sponge biscuits meld perfectly in your mouth with the egg-rich mascarpone cream, all tied together by a hint of cocoa. Remember that eye-rolling I wrote about earlier? Well, a good tiramisu will set me off every.single.time. And I'm not the only one enamored with it. There's an entire website dedicated to tiramisu, and you can read about one woman's research into its origins here.

As much as I (clearly) love the original, I was recently in need of a version more suitable for work. That is, something less messy to serve and without raw egg yolks. And since I was throwing tradition to the wind, I swapped out mascarpone for cream cheese to save myself an extra trip to the store. To avoid offending any tiramisu snobs out there (myself included haha), I call these cupcakes "tiramisu-inspired." This was also my first time trying the famous Amy Sedaris vanilla cupcakes, and everything turned out great! The recipe I came up with, drawing inspiration from a bunch of blogs and cookbooks, can be found after the jump.

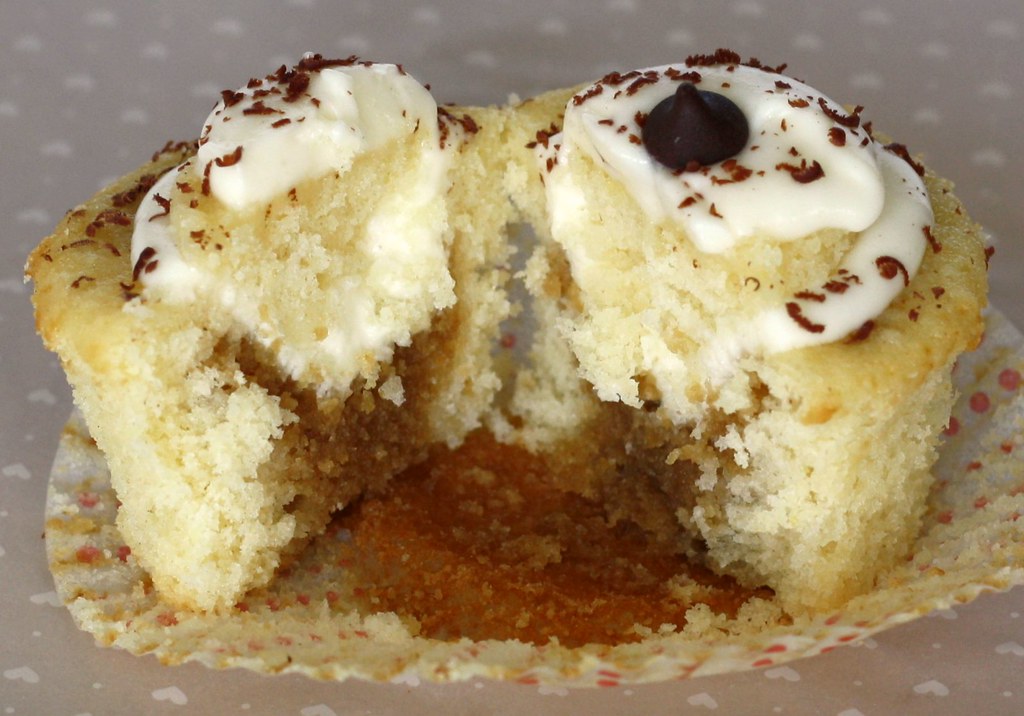
A peek inside...

Tiramisu-Inspired Cupcakes [Printable Recipe]
Makes 10 to 12 cupcakes

Vanilla Cupcakes (Recipe below)
Coffee Soaking Syrup (Recipe below)
Cream Cheese Filling/Frosting (Recipe below)
Cocoa powder OR semi-sweet chocolate shavings, for garnish
Chocolate-covered coffee beans OR chocolate chips, for garnish

Cut a cone out of the top of each cupcake and set it to the side. Using a spoon or pastry brush, coat the sides and bottom of the opening with coffee syrup. (You don't want the cake to be soggy, but you can be fairly generous here - up to 2 tablespoons)

Fill the opening with the cream cheese mixture, brush the bottom of the cone with a little coffee syrup, then place it back onto each cupcake. (There should be enough filling that some of it oozes up and attractively frames the cone) Top each cupcake with another small dollop of frosting. Garnish the tops with cocoa powder or chocolate shavings. Crown every cupcake with a chocolate coffee bean or chip and you're all set!

It's best to let these hang out for at least an hour so that all the caffeinated goodness of the syrup can soak in.


Vanilla Cupcakes

1 cup PLUS 2 Tbsp all purpose flour
1 1/2 tsp baking powder
1/4 tsp salt
5 tablespoons unsalted butter, softened
2 Tbsp canola or vegetable oil
1/2 cup plus 2 Tbsp milk
1 tsp pure vanilla extract
3/4 cup sugar
1 large egg, room temperature
1 large egg yolk, room temperature

Preheat oven to 350 degrees F. Line a standard muffin tin with 12 paper liners.

In a large bowl, sift together the flour, baking powder, and salt. Add the butter, oil, milk, and vanilla to the dry ingredients and beat with an electric mixer on medium until the batter is smooth and uniform (no more than 2 minutes). Add the egg and yolk, then continue beating an additional minute.

Fill cupcake liners until they are about 2/3 full (I like to use my large cookie scoop for this). Bake for 16 to 20 minutes or until golden brown. Transfer cupcakes from the pan to a cooling rack within 5 minutes of removing from the oven. Let cool completely.

Coffee Soaking Syrup
1 Tbsp instant coffee or espresso powder
1/2 cup water
3 Tbsp sugar
2 Tbsp dark rum, amaretto, Kahlua, or brandy

Stir the coffee powder, water, and sugar together in a small saucepan and bring just to a boil. Pour the syrup into a small heatproof bowl and stir in your alcohol of choice; set aside.

Cream Cheese Filling/Frosting
6 oz. (3/4 cup) cream cheese, room temperature
3 Tbsp heavy cream, cold
1 Tbsp dark rum
1/2 tsp pure vanilla extract
1 to 1 1/2 cups powdered sugar

Beat cream cheese until smooth with a mixer on low. Add in the heavy cream and continue beating until incorporated. Sift the powdered sugar then add it slowly, starting with the lowest amount and adding more as required to reach your desired sweetness and consistency. Add vanilla and increase mixer to medium. Beat 1-2 minutes. Set aside (in the fridge if you'd like the frosting to be firmer).