Saturday, October 31, 2009

Redless Velvet Cupcakes with PINK Frosting

UPDATE: I have since come up with a MUCH BETTER recipe for red (or not) velvet cupcakes. Please see this post!

2009.10.20 Redless Velvet Cupcakes

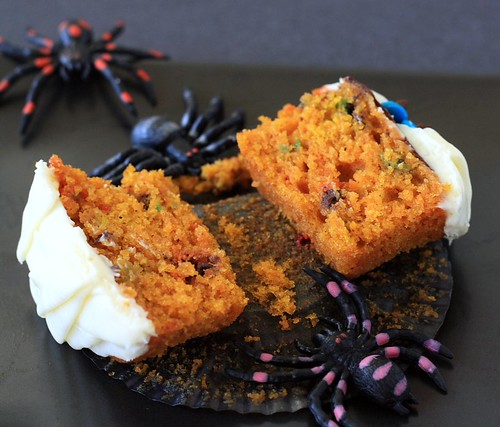
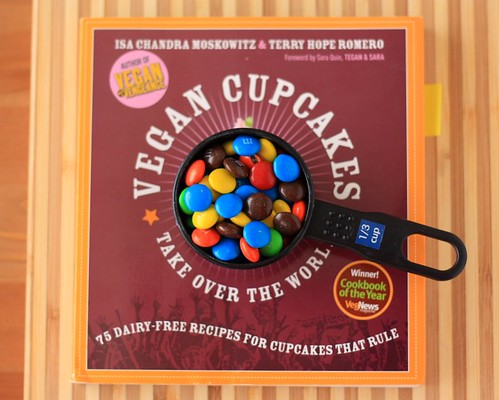
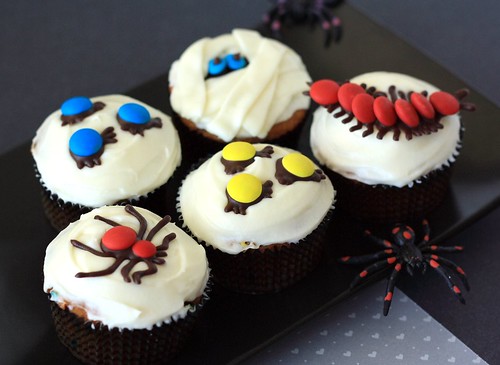
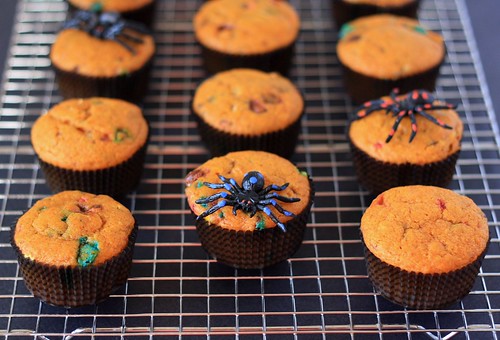
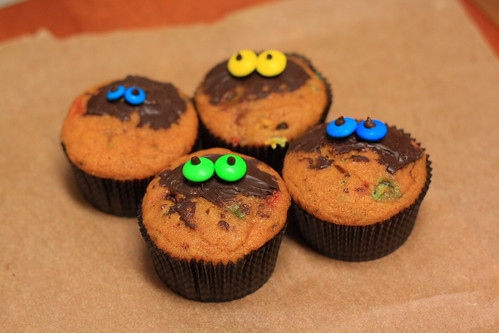
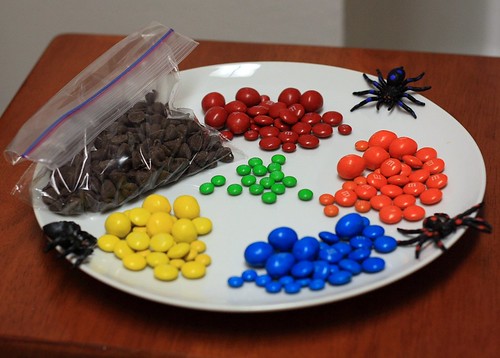
Happy Happy Halloween! This has GOT to be one of my favorite holidays and I've been LOVING all of the great food (and decoration) ideas popping up on blogs and all over the 'net. If you're looking for something festive to bake, might I recommend the "creepy" cupcakes I posted earlier this month? ^_^
Align Center

Now let's talk about cupcakes with PINK frosting (which are admittedly not at all spooky hehe). You see, since October is National Breast Cancer Awareness Month, Jen of Beantown Baker announced The Power of Pink Challenge for bloggers to draw attention to a great cause by making pink-colored food. I've been fortunate not to have any history of breast cancer in my own family, but many friends have not been as lucky and one even lost her mother to it at an early age. So please join me in honoring the people in our lives whom breast cancer has affected. On top of that, remember to have regular self and doctor's examinations as early detection is crucial.

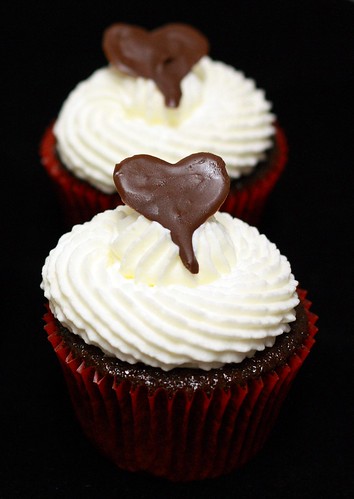
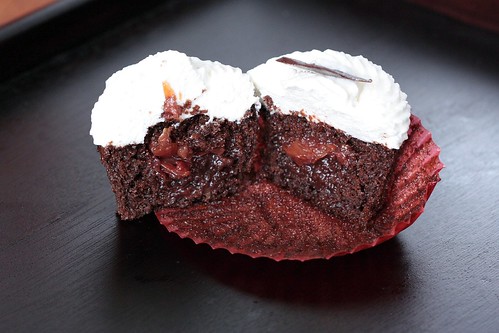
I picked red velvet cupcakes but...minus the red. Yea, the idea of dumping a bottle of food coloring into a few cupcakes disturbed me so much that I didn't add a single drop! Ironically I allowed a smidgen into the frosting since it's for a good cause after all. While my "redless" velvet cuppin' cakes are more awkwardly named (;p) and not as show-stoppingly photogenic as the usual ones, I'm quite pleased with the subtle ginger color and slightly tangy and chocolate-y flavor. The texture was a tad dry due to a series of kitchen mishaps that included setting the oven temperature too high. Still despite my clumsiness, we enjoyed them greatly and I hope Jen does too!

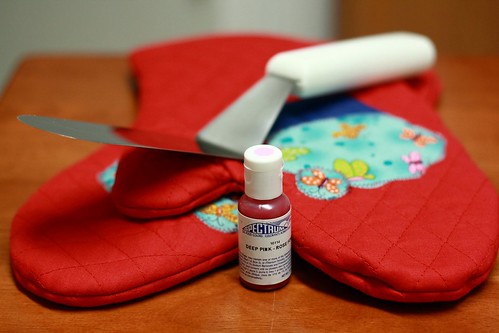
Check out these adorable cupcake oven mittens I won!

Redless Velvet Cupcakes [Printable Recipe]
Adapted from Nutrition to Kitchen
Makes about 16 cupcakes

XIAOLU'S NOTES: I omitted the food coloring but you can add 1 1/2 Tbsp red food coloring if you want. Be careful not to overfill or overbake the cupcakes like I did! And don't let the cream cheese get too soft or over-beat the frosting or it will get goop-y and difficult to manage.

1 1/2 cup granulated sugar
6 Tbsp unsalted butter, room temperature
2 large eggs, room temperature
2 1/3 cups cake flour (or 1 3/4 cup all-purpose + 5 Tbsp cornstarch)
2 Tbsp cocoa
1 tsp baking soda
1 tsp baking powder
1/2 tsp salt
1 cup + 1 Tbsp plain, lowfat yogurt
1 tsp pure vanilla extract
1 tsp apple cider vinegar
Pink Cream Cheese Frosting (Recipe below)

Preheat the oven to 350 degrees F and line standard muffin pans with 16 paper liners. In a medium bowl, sift together the cake flour, cocoa, baking soda, baking powder, and salt. Set aside. In a measuring cup, combine yogurt, vanilla, and vinegar. Set aside.

Say hello to my homemade vanilla extract.
She's been there all along but a bit camera-shy.


With a hand-held or stand mixer, cream the sugar and butter on medium speed until light and fluffy. Add the eggs, one at a time, until well-beaten.

Add 1/3 of the dry ingredients. Beat on low speed. Scrape down the sides of the bowl, then increase to medium speed until all ingredients are combined. Add 1/2 of the wet ingredients and mix until combined. Repeat the same process until all the ingredients have been added, making sure to end with the dry ingredients. Beat just until batter is smooth.

Bake for about 20 minutes until a toothpick inserted in the middle of a cupcake comes out clean. Let the cupcakes sit in their pans for 5 minutes, then move them to wire racks to cool completely. Frost cupcakes as desired.

Pink Cream Cheese Frosting
8 ounces (1 cup) cream cheese (low-fat is fine), cool room temperature
1/4 cup (2 ounces or 1/2 stick) unsalted butter, room temperature
1 teaspoon pure vanilla extract
1/8 teaspoon salt
1 1/2 to 2 1/2 cups sifted powdered (confectioner's) sugar
Red or pink food coloring

In a large bowl beat the cream cheese and butter until soft and smooth. Add food coloring, a drop at a time, until you get the desired color. Note that the color will intensity somewhat with mixing. On low speed beat in the vanilla, salt, and sugar. Start with 1 1/2 cups of sugar and add more to achieve desired sweetness and stiffness. Finally, beat on high speed for a few moments until smooth.

Saturday, October 24, 2009

Black Black (Forest) Heart Cupcakes (Iron Cupcake)


As if participating in one cupcake group/contest weren't enough (it's so addicting!), I've gone and joined another one (mmmhm). IronCupcake:Earth has just entered it's second year. And clearly, these bakers know how to start a party 'cause the very first theme is music, inspired by our favorite boogie-ing talkshow host, Ellen.


Black black heart why would you offer more?
Why would you make it easier on me to satisfy...I'm on fire
I'm rotting to the core
I'm eating all your kings and queens
All your sex and your diamonds

So which lucky song (=p) was my muse? Well I've gushed before about the talented and sexy Canadian singer, David Usher. The dark and sensuous song quoted above, "Black Black Heart", was my unforgettable introduction to his music and inspired me to make these equally luscious and deeply flavored Black Forest-inspired chocolate cupcakes with brandied cherry filling, whipped cream frosting, and homemade chocolate hearts. Check out the music video after the jump to get the full experience. Voting for Iron Cupcake will begin at this site Friday, October 30th at 8 p.m. (central) and will be open through Thursday, November 5th. And please show some love to our generous IronCupcake:Earth prize providers by visiting their sites!

The Demy™ by Key Ingredient
Hello, Cupcake by Karen Tack & Alan Richardson
Bella Cupcake Couture
Cupcake Stackers by Gourmac
The Cake Mix Doctor Returns! by Anne Byrne


Black Black (Forest) Heart Cupcakes [Printable Recipe]
Cake adapted from Hershey's
Makes about 14 cupcakes

1 cup minus 2 tablespoons all-purpose flour
1 cup white sugar
6 tablespoons unsweetened cocoa powder
1 teaspoons baking soda
1/2 teaspoon baking powder
1/2 teaspoon salt
1 large egg, room temperature
1/2 teaspoon instant coffee powder dissolved in 1/2 cup hot water (or 1/2 cup black coffee)
1/2 tablespoon apple cider vinegar plus milk to equal 1/2 cup
1/4 cup vegetable oil
1 teaspoons pure vanilla extract
2 teaspoons Kirschwasser (cherry brandy)
Cherry Filling (Recipe Below)
Kirsch Whipped Cream (Recipe Below)
Chocolate Hearts (Recipe Below)

Preheat the oven to 350 degrees F and line standard muffin pans with paper liners.

In large bowl, stir together the sugar, flour, cocoa, baking soda, baking powder, and salt. Add the egg, milk, coffee (or reconstituted coffee mixture), oil, Kirsch and vanilla extract. Beat by hand or with an electric mixer on medium speed until well combined.

Pour the batter, which will be thin, to fill the paper liners about 2/3 full. Tap the pan firmly against the counter one time to remove any air bubbles. Bake for 20 to 25 minutes or just until a toothpick inserted into the middle of a cupcake comes out clean. Let cupcakes cool in the pan for 5 minutes, then remove them to a wire rack and let them cool completely there.

Once cool, cut a cone in each cupcake and spoon in 2-3 teaspoons of the cherry filling. Replace the cone and frost with Kirsch-flavored whipped cream. Finally, top each cupcake with a chocolate heart. Due to the cream, these must be stored in the fridge if not eating right away.


Cherry Filling
1 15-ounce can of tart cherries, drained
2 tablespoons water
4 tablespoons sugar
4 tablespoons cherry preserves
4 tablespoons Kirschwasser (cherry brandy)

In a saucepan over medium heat, combine the cherries, water, sugar, and preserves. The mixture should start simmering. Stir frequently until it begins to thicken. Remove from heat, stir in the kirsch, and let the filling cool completely.


Kirsch Whipped Cream

XIAOLU'S NOTE: Chill the bowl and beaters/whisk in the freezer (if metal) or fridge for best results.

1 envelope (¼ oz.) unflavored gelatin (optional)
3 Tablespoons Kirsch (cherry brandy)
2 cups heavy whipping cream, chilled
1 cup powdered (confectioner's) sugar, sifted

Combine the gelatin and Kirsch in a small bowl and let it sit for several minutes to soften the gelatin. Microwave the bowl for 1 minute and set aside to cool. Using a mixer, beat the heavy cream in a chilled bowl until it holds soft peaks. Add powdered sugar and beat until combined. Finally, slowly add in the gelatin mixture while beating until the mixture holds stiff peaks. It's best to use this immediately or if you are using it fairly soon, keep it chilled in the refrigerator until ready to pipe.

Chocolate Hearts
1/3 cup semisweet chocolate chips

Using a fairly thick and dark pen or marker, draw outlines of hearts on light-colored paper.

Place chocolate chips in a plastic zipper-lock bag and microwave at 10-second intervals, massaging the bag in between, until the chocolate is fully melted. Press as much air as possible out of the bag then close the top. Let the chocolate cool for about 10 minutes until it's still fluid enough to pipe smoothly but not so melted that it'll ooze out uncontrollably.

Lay a piece of parchment or wax paper over the outlines you made earlier. Use scissors to cut off a 1/16-inch corner (very tiny!) of the plastic bag and pipe the chocolate onto the parchment paper along the outlines underneath, filling in the hearts completely. Chill all piped chocolate in the refrigerator or freezer until firm, at least 5 minutes.

Tuesday, October 20, 2009

Indian Night - Eggplant Curry and Easy Dal


Have you heard this month is the 3rd annual Vegan Month of Food, more commonly referred to as Vegan Mofo? For all of October, a whole buncha bloggers (most vegan but some not) have pledged to write to their heart's content about vegan food and related topics. If you're interested, you'll find additional details and a list of participants here. While I'm not participating this year (or a vegan), I love the creativity exhibited by vegan chefs. And there's no doubt in my mind that vegan food can be every bit as exciting and satisfying as any other.

Indian cuisine illustrates this point beautifully, so I dubbed last Sunday "Vegan Indian Night" in honor of Vegan Mofo. Craving one of my favorite restaurant dishes -- a mashed roasted eggplant curry -- I immediately turned to Manjula for guidance. This sweet Indian lady is known for her fail-proof vegetarian recipes and step-by-step videos to go with each one. The result? My eggplant curry held all the complex flavors of the restaurant version without the inch of oil to weigh them down.

I know pita bread ain't Indian, but humor me and pretend it's naan, k?

Rounding out this meal was a simple dal which gets a major boost from my secret weapon spice mix: panch phoran (more info and links in this post). Just one lovely whiff of these spices as they crackle and infuse the oil, and you'll swear you've been transported from your kitchen to some exotic locale. And that's just what a great meal can be: a mini-vacation right in your own home.

Baingan Bharta (Roasted Eggplant Curry) [Printable Recipes]
Adapted from Manjula's Kitchen
Serves 2 to 4

1 large eggplant
2 medium or 1 large tomato
1/2 cup red bell pepper, chopped
1 jalapeno pepper
1/4 inch piece of ginger, minced
2 tablespoons oil
Pinch of asafetida (optional)
1 teaspoon cumin seed
1 teaspoon coriander powder
1/2 teaspoon turmeric
1/2 teaspoon red chili powder
1 teaspoon salt or to taste
1/4 teaspoon garam masala
2 tablespoons cilantro, for garnish (optional)


Prick the eggplant all over with a fork or the tip of a knife. Cook the whole eggplant either in the microwave (8 to 10 minutes until tender) or in the oven or even toaster oven (425 degrees F for about 45 minutes, rotating once or twice). Let it cool, peel off the skin, chop the eggplant in approximately 3/4" cubes and set aside.


Blend the tomatoes, ginger, and jalapeno in a blender or food processor (I heart my immersion blender for things like this!).

Heat one tablespoon of oil in a frying pan on medium high and stir fry the bell pepper for about a minute. Add the remaining oil to the pan. Once this oil is hot, add the asafetida and cumin seed. Once you hear the seeds crackle, add the tomato mixture, coriander powder, turmeric, red chili powder, and salt. Let this cook for a few minutes until tomato puree starts visibly separating from the oil.

Add the cooked eggplant pieces and let it cook on medium heat. Continue to stir and mash the eggplant as it cooks for about 8 to 10 minutes total. Lastly, add the cilantro and garam masala and gently mix it in. Serve hot with rice or bread.


Easy Panch Phoron Dal
Serves 3 to 4

1 tablespoon vegetable oil
2 to 3 teaspoons panch phoron
2 dried red chilies
1/2 cup tomatoes, chopped
1/2 cup onions, chopped
2 to 3 cloves garlic, minced
1 cup toor (tuvar) dal, rinsed and drained
(You could substitute red lentils or even split yellow peas)
5 cups water plus more if needed
Salt to taste

Heat the oil in a medium to large saucepan over medium heat. When hot, put in the dry chilies and panch phoron. Let them cook until the spices begin to pop. Now add in the garlic, onions, and tomatoes. Cook the mixture for 5 to 10 minutes or until it begins to break down and separate from the oil.

Add the cleaned lentils and water to the saucepan and bring everything to a boil. Decrease the heat to medium-low and let simmer for 30 minutes or longer, adding more water if necessary. Use a spoon or masher to break down the lentils. (You can make the dal as chunky or smooth as you want). Season with salt to taste, adding a little at a time. Serve hot with rice or bread.

Sunday, October 18, 2009

Cupcake Hero::October Roundup - Please Vote!


The roundup of entries for Cupcake Hero::October [Pumpkin/Halloween theme] is up! Thanks to CB of I Heart Cuppycakes for putting this together so quickly despite a power outage. VOTING IS OPEN from now through October 21st @ 11:59pm EST.

I entered my Creepy Pumpkin Bug and Mummy-Cakes, which were loads of fun to make. Everyone really stepped it up with the creativity this month to come up with festive Halloween decorations. Please visit I Heart Cuppycakes to see all the spo0o0oky entries and to VOTE for your favorite! =D

Sasha's Favorite Banana Bread and Giveaway Winners

01/14/14 UPDATE: I recently remade this and realized that it still tastes great with much less sugar. Thus, I've edited the recipe below to reduce the sugar as well as to make some of the instructions clearer and more detailed. This is always a crowd pleaser whenever I make it, so I do hope you'll try it and let me know how you like it!


First I'd like to thank everyone who participated in my very first giveaway. It was really fun reading about your favorite things about Halloween! So much fun, in fact, that I wanted to spread the cupcake joy even more than I'd planned. I'm happy to announce that the 2 winners (chosen randomly) of Vegan Cupcakes Take Over the World are Joanne (comment #2) and Snulfers (comment #26). I'll be emailing you both shortly - congrats! For the rest of you, stayed tuned 'cause I'll be giving away more stuff for sure.

Now with the gray wet weather currently blanketing the D.C. area, this just felt like the right time to share my simple and beloved recipe for classic banana bread. Though I wrote earlier about a delightful twist on banana bread that added coconut, citrus, and rum flavors, today's recipe is the one I return to time after time for it's unbeatable moist texture and pure banana flavor. The simplicity of one-bowl mixing can't be beat. Plus the recipe is so flexible that I've made many versions with different nuts, chocolates, flavorings, and grains.

All this playing around took place in my last year of college, when I regularly made this bread for my friends. One in particular, Sasha, would always get adorably excited when presented with a slice (or 2 ^_^). That was years ago and despite the fact that she's since moved out of the U.S., we've all stayed friends. When I learned earlier this week that Sasha would be in town, I immediately pulled out this recipe. As I'd hoped she still loved the bread, and we had a wonderful weekend catching up with college friends.

I've recently grown conscious that each passing year scatters our group further apart across the country and the globe. But it's comforting to know that the bonds of friendship remain. And with this recipe carefully stowed away, I'll always know just the thing to bring to our reunions.

Sasha's Favorite Banana Bread [Printable Recipe]
Loosely adapted from Food.com
Makes 16 to 20 servings (1 large bundt cake or 2 loaves)

XIAOLU'S NOTES: If your bananas aren’t quite ripe enough (should be nearly black and soft to the touch), peel and microwave them for 1 to 2 minutes before mashing and increase sugar by 2 tablespoons (50 g). You can omit the oats and cornmeal and just use 2 1/3 cups (10.4 oz./294 g) of all-purpose flour instead, but I enjoy the textural contrast provided by the other grains. If you don’t have applesauce, simply replace it with 1/3 cup buttermilk or thinned plain yogurt. Also try substituting 3/4 cup (3 oz./85 g) of white whole wheat flour in place of 3/4 cup (3.35 oz./95 g) of all-purpose flour.

1 Tbsp unsalted butter, melted
2 1/2 tsp (7 g) all-purpose flour

3 large eggs, room temperature

Slightly over 2 cups (16.6 oz./471 g) very ripe mashed bananas (from 4 to 5 mostly black-brown bananas)
2/3 cup (1.9 oz./53 g) rolled oats
1/4 cup (1.1 oz./32 g) cornmeal
1 1/4 to 1 1/3 cups (8.9 to 9.4 oz./252 to 267 g) sugar
1/2 tsp salt
1 1/4 tsp baking soda
1 tsp baking powder
1 tsp ground cinnamon
1/4 tsp ground nutmeg
Large pinch of ground cloves
1 tsp instant coffee OR espresso powder, broken up by rubbing between your fingertips
1/3 cup canola OR vegetable oil
1/3 cup plain yogurt OR sour cream
1/3 cup unsweetened applesauce
2 tsp unsulphured molasses
1 tsp pure vanilla extract
1 Tbsp dark OR gold rum (optional)
1 3/4 cups (7.8 oz./221 g) all-purpose flour
1/2 cup (3 oz./85 g) semisweet chocolate, coarsely chopped
2/3 cup (2.3 oz./66 g) pecans OR walnuts, toasted and chopped (optional)

Preheat the oven to 350 degrees F. In a small bowl, mix 1 tablespoons of melted butter with 2 1/2 teaspoons of flour into a uniform paste. Thoroughly brush the inside of a 10 to 12-cup bundt pan OR two 8 1/2 x 4 1/2-inch loaf pans with a layer of this paste (it will help the cake come cleanly out of the pan after baking).

In a large mixing bowl, beat the eggs until whites and yolks are well combined. Add the remaining ingredients EXCEPT for flour, chocolate, and nuts; whisk until well incorporated. Add the flour and immediately mix just until evenly combined (no more than 2 minutes and a few small lumps are fine). Gently stir in chopped chocolate and nuts. Pour the batter into the prepared bundt pan, or divide evenly between loaf pans. If using the bundt pan, use a spatula to push the batter slightly up the outside walls of the pan; this will help the cake climb up the sides, giving you greater detail on the outside of the cake. Now slam the pan(s) evenly and firmly downward from 3 inches above the counter to force out any large air bubbles.


Bake until a toothpick comes out with a few moist crumbs but NO wet batter, about 45 to 65 minutes. If not yet done at 45 minutes, gently tent a piece of aluminum foil across the top of the pan(s) to prevent over-browning. After removing from the oven, let cool for 15 minutes in pan(s) then turn out onto a wire rack and allow to cool completely. If you don’t plan to eat the banana bread within a few days, cover with foil, slide into freezer bag(s), and freeze for up to several months.

Thursday, October 15, 2009

Blog Action Day 2009: Climate Change

I just found out from this excellent, thought-provoking post at Daily Musings that today is Blog Action Day '09 Climate Change. While I care deeply about this issue, I simply don't have the energy (I'm home sick) to write a proper post on short notice about the topic. But please visit the website to read all about this blog event, find links to all the participating blogs, and even join in yourself if you'd like. This is such a critical time and we owe it to ourselves and future generations to do all we can to turn things around.

Wednesday, October 14, 2009

Dad's Potato Jalapeno Carrot Stirfry

2009.10.14 Potato Jalapeno Stirfry

This may be the first thing I ever learned to cook. I remember Dad making these potatoes for me in middle school as I eagerly watched at his side. I started cooking it for myself in high school. And it makes frequent appearances at dinner to this day when I need something super fast and easy, that's also fresh and flavorful. Only 5 (count 'em) ingredients. You can certainly add other seasonings (minced garlic would be nice, for example), but I like how this preparation really highlights the flavor of the jalapenos.

I confess it's not the most photogenic. As you can see above, the peppers get pretty soft. You could add them more toward the end of cooking so they maintain their shape, but I really love that they infuse the oil with their subtle spiciness so I add them first.

Do these carrots look like legs to anyone else or am I just delirious?

Lastly, I just need to vent for a second. So a bunch of us at work have been killing ourselves getting ready for our November trial. Two of us even worked ALL night on Monday to prepare for a big deadline...only to find out the next day that our trial was delayed to the spring. This is the fourth continuance of this trial, and I'm physically at the end of my rope. But at least I get to see my boyfriend during his waking hours again so YAY! Ultimately I know this is for the best and will allow us to be even better prepared when trial does come, it's just frustrating at times. Thanks for letting me get it off my chest =). On to the recipe...

Potato Jalapeno Carrot Stirfry [Printable Recipe]
Serves 2-4

2 medium to large potatoes, peeled and thinly sliced
2 carrots, peeled and sliced
(I always get organic and like to freeze the peels for making stock)
2 jalapeno peppers, seeded and sliced
1 tablespoon vegetable oil
salt to taste

Heat oil over a large deep nonstick frying pan over medium-high heat. Add sliced jalapenos to the pan and fry until fragrant (about 30 seconds). Add the carrot and potato slices along with a few dashes of salt. Spread the vegetables evenly in the pan and continue cooking, stirring only every few minutes. Once the vegetables begin to soften, you can decide how much longer to cook them based on how crunchy or soft you like them. When the vegetables have the texture you want, add more salt to taste and you're done. Serve immediately with rice.

Friday, October 9, 2009

15 Lovely Blogs


What a wonderful week it's been for this newbie blogger! First I was dubbed Cupcake Hero and then I was surprised to receive this One Lovely Blog award from Michelle at One Ordinary Day. She's a true sweetheart with a wonderful little blog that you simply must see. Please go pay her a visit!

So the fun of this award is that you pass it on to 15 more blogs that you like! Now I read so many blogs that my browser often freezes up when I try to manage my subscriptions (oops). It's a bit embarrassing in fact, and my boyfriend likes to tease me about my incessant blog "scrolling." The point though is that I had plenty of beautiful and inspirational sites to select from and had a haaard time keeping the list to just 15! Keep reading to see which ones made my list...

1. 17 and Baking - I don't know how Elissa keeps up with high school, learning to drive, plus baking n' blogging but it's super impressive and fun to read about to boot.
2. Carmen Cooks - Carmen used to be a coworker and made me feel so welcome on the first day of work with her bright personality. It was just a matter of time before I discovered her awesome blog too.
3. Eat Me, Delicious - I found my amazing birthday cake and loads of other great vegetarian recipes here.
4. Eats Well with Others - Joanne's blog is chock-full of healthy but satisfying recipes. Her pumpkin and pine nut linguine is exactly what a hearty fall meal should be.
5. Evan's Kitchen Ramblings - A beautiful marriage of food and photography. I can only hope to make macarons as creative and camera-ready as hers one day.
6. Fuzzykoala's Caketastic Adventures - I discovered Dorothy's blog through Cupcake Hero. Don't miss her "Peeptastic" entry for October's contest!
7. Herbivoracious - While I'm not 100% vegetarian, I do frequent a lot of meat-free blogs and this is one of my favorites. Michael's recent post about a savory onion and aged Gouda dutch baby had me salivating for real...
8. Judy in Her Natural Habitat: The Kitchen - Judy's done us all a huge favor by figuring out how to make her own cupcake wrappers. Visit her site for the details.
9. Koko's Kitchen - Miso-baked halibut? Roasted butternut squash with curry sauce? Need I say more? Go there now.
10. Melanger :: to mix - Hands down, one of the most beautiful blogs I've ever seen. I'm dying to know how Julia makes those photo collages. She's doing a series of posts on caramel this month that are all sure to impress.
11. Paris Pastry - I love that she lets her readers choose what she bakes next. Her hazelnut blondies really speak to me, and loudly =).
12. The Red Deer - A blog I discovered just this week but am already totally hooked on. She just posted her pumpkin graveyard cupcakes with fondant bone toppers. Don't even pretend those aren't the most wicked Halloween treat you've ever seen.
13. Seven Spoons - Everything about this site reminds me of the beauty of simplicity. Her writing captivates me as much as the food (See the October 1st post, for example).
14. Tofu and Cupcakes - I love this title as these are 2 of my favorite foods! Plus Aubrey made her own fresh grated coconut recently. Now that deserves major props!
15. Une-duex senses - Michelle really sets herself apart by incorporating her loves of fashion and music, both of which I'm also passionate about, into her food blog. Plus, I'm pretty tickled that she made my ferrero rocher cupcakes O:-).

Tuesday, October 6, 2009

Halloween Pumpkin M&M Cupcakes and Cookbook GIVEAWAY

UPDATE: Yay I WON Cupcake Hero::September with my caramelized banana creme brulee cupcakes. It was a super close contest and Christy's PB banana sandwich cupcakes look amazing too. This was so much fun, I can't wait to see the next roundup!


Can you guess what time it is again?! IT'S CUPCAKE HERO TIME!! Okay now I know you're thinking this girl needs to cut back on the sugar / coffee / Red Bull, and maybe I do...but with Halloween coming up we all know how likely that's gonna be (mwahaha). Returning to the ever-important topic of cupcakes, I've been plotting a while now for October's challenge (partly to distract myself while waiting for the results of September's throwdown including one of my entries).


The theme this month, Booo-tiful Pumpkin Cupcakes, had both flavor and decorative components. We were told to use pumpkin in some part of the cupcake plus to make the top "Halloween-y." Aye aye, Captain CB! Our awesome hostess was even so kind as to point us to this goldmine of ideas. I went in search of a cool-lookin' design that wouldn't require anything too fussy (like fondant or food coloring) and found these fun chocolate M&M insect and mummy toppings. All the instructions on how to make these yourself are below and know that I love questions =).

Let's not be shallow though and forget what's on the inside (I'll be here all night, folks 8p): unbelievably moist pumpkin cake with a hint of spice, punctuated by chocolate candy bits. I de-veganized the original recipe by cookbook goddesses Isa and Terry (which they'll hopefully forgive), but that can be easily reversed using vegan versions of the candies, cream cheese, etc.


Vegan or not, the recipes in their cookbook Vegan Cupcakes Take Over the World (VCTOTW) are some of the best in existence. There are so many unique flavors, like green tea, Boston cream pie, rum raisin, and margarita cupcakes. This book would rock anyone's socks off, so I want to give a free copy to one of you! To enter this giveaway, simply leave a comment by next Friday, October 16, telling me your favorite thing about Halloween. Please make sure to leave your email address so I can contact you if you win.


Creepy Pumpkin M&M Cupcakes [Printable Recipe]
Adapted from VCTOTW and Hello, Cupcake!
Makes 12 cupcakes

XIAOLU'S NOTES: I had work in the afternoon, so I baked the cupcakes midday and refrigerated them until I had time to prepare the rest at night. This worked out great so don't be intimated if you can't do all this at once!

1 cup canned pumpkin (NOT pumpkin pie filling)
1/3 cup vegetable oil
3/4 cup plus 2 tablespoons sugar
1/4 cup soy milk (I used regular milk)
1 teaspoon pure vanilla extract
1 1/4 cups all purpose flour
1/2 teaspoon baking powder
1/2 teaspoon baking soda
1/2 teaspoon ground cinnamon
1/8 teaspoon ground nutmeg
1/4 teaspoon salt
1/3 cup M&M candies, roughly chopped up
Cream Cheese Frosting (Recipe below)
Chocolate and M&M Insects and Eyes (Recipe below)

Preheat the oven to 350 degrees F and line a standard muffin pan with paper liners. Sift the flour, baking powder, baking soda, spices, and salt together into a small bowl. Set aside.

In a medium bowl, stir the pumpkin, oil, sugar, milk, and vanilla together until thoroughly mixed. Add in the dry ingredients and stir into the wet ingredients until just combined. Fold in the chopped M&M candies.


Fill paper liners about 2/3 full with batter. Tap the pan firmly against the counter one time to remove any air bubbles. Bake for 20 to 25 minutes or just until a toothpick inserted into the middle of a cupcake comes out clean. Let cupcakes cool in the pan for 5 minutes, then remove them to a wire rack and let them cool completely there.


To assemble insect cupcakes: spread an even layer of cream cheese frosting onto the cupcakes using a knife or spatula. Gently peel the chocolate candy insects from the parchment paper, place one or more on each cupcake, and press slightly to secure. That's it!

To assemble mummy cupcakes: if you have melted chocolate leftover from making the insects and eyes, squeeze 1-2 teaspoons on the top center of each cupcake then spread and and smooth it out with a spatula. Place a pair of M&M eyes on top of the chocolate (or directly on the cupcake). Next, fit a piping bag with an Ateco #48 tip (or other rectangular basketweave tip) and fill it with cream cheese frosting. Make the "bandages" by piping flat strips of frosting at different angles across each cupcake, leaving only a strip right around the eyes.

Mummycakes caught in the buff (orange?) - how embarrassing!

Cream Cheese Frosting
8 ounces (1 cup) cream cheese (low-fat is fine), room temperature
1/4 cup (2 ounces or 1/2 stick) unsalted butter, room temperature
1/2 teaspoon pure vanilla extract
1/8 teaspoon salt
1 1/2 to 2 1/2 cups sifted powdered (confectioner's) sugar

In a large bowl beat the cream cheese and butter until soft and smooth. On low speed beat in the vanilla, salt, and sugar. Start with 1 1/2 cups of sugar and add more to achieve desired sweetness and stiffness. Finally, beat on high speed for a few moments until smooth.

Chocolate and M&M Insects and Eyes
Regular, mini, and peanut M&M candies
3/4 cup semisweet chocolate chips

XIAOLU'S NOTE: I roughly followed the templates from Hello, Cupcake! If you'd like to try them, just leave a comment with your email and I'll send it right over.

Using a fairly thick and dark pen or marker, draw outlines of insects or whatever creepy design you want on light-colored paper. Separate your candies by color.

Gotta confess, the OCD part of me kinda relished this part.

Place chocolate chips in a plastic zipper-lock bag and microwave at 10-second intervals, massaging the bag in between, until the chocolate is fully melted. Press as much air as possible out of the bag then close the top.

Lay a piece of parchment or wax paper over the outlines you made earlier. Use scissors to cut off a 1/16-inch corner of the plastic bag and pipe the chocolate onto the parchment paper along the outlines underneath, making sure to connect all the parts to each insect. Before the chocolate hardens, place the M&M candies on top.


If making mummy cupcakes, spread out pairs (one for each cupcake) of mini or regular M&M candies in matching bright colors. Use the same bag of melted chocolate to pipe dots on the candies to make pupils.

Chill all piped chocolate in the refrigerator until firm, at least 5 minutes.

XIAOLU'S NOTE: If the chocolate starts to solidify as you're working with it, you can microwave it again at 10-second intervals until it softens again.

Saturday, October 3, 2009

Dragon's Almond Apple Cake


It seems like apple recipes have been popping up everywhere these days! And with the colder weather (finally) making a return around here, I had a very particular craving for a fruit and spice-filled snack cake. The first time I saw this beauty on Dragon's Kitchen I was struck by its simple elegance. Now that I've made it almost a year later, I'm impressed by the balance of flavors and can think of few better ways to kick off the apple season. Apple and almond are definitely partners that I will match up again and again from now on.

The original cake is surely amazing (Dragon's made it over 100 times so it's gotta be!) but I couldn't resist sprinkling some spices into the batter itself and not just the topping. This extra boost is still subtle and doesn't overpower the almond flavor. Next time I also plan to add 1/4 cup applesauce for an additional layer of flavor, plus super moistness. Thanks so much for sharing your recipe, Dragon. Your home is definitely not the only one this cake is well-loved in!


Almond Apple Cake [Printable Recipe]
Adapted from Dragon's Kitchen

XIAOLU'S NOTE: My apples were pretty large, so I was afraid to weigh down the cake with the whole mountain of slices and left some off. But I shouldn't have because they totally shrunk down during baking, so don't be be afraid to pile it all on there!

1 1/2 cups all purpose flour
3/4 cup granulated sugar
1 1/2 teaspoon baking powder
1/2 teaspoon baking soda
1/4 teaspoon salt
1/4 teaspoon ground cinnamon
1/8 teaspoon ground nutmeg
2 large eggs, room temperature
2/3 cup plain yogurt
1/4 cup butter, melted
1/2 teaspoon almond extract
1/2 teaspoon vanilla extract
2-3 apples, peeled and thinly sliced
1/4 cup almonds, sliced
3 tablespoons granulated sugar
3/4 teaspoon ground cinnamon

Preheat the oven to 350 degrees F. Butter and flour a 9-inch springform pan (I lined the bottom with parchment paper and only buttered the sides). In a bowl, stir together flour, sugar, baking powder, baking soda, ground spices, and salt.

In a separate bowl, beat the eggs. Mix in the yogurt, butter, and extracts. Stir wet ingredients into the flour mixture until just combined. Pour batter into the prepared pan and arrange the apple slices over top of the batter.

About to go into the oven

For the topping, combine the almonds, sugar, and cinnamon. Sprinkle the topping over apples. Bake for 45 to 55 minutes or until a toothpick (or very thin knife in my case) inserted in the center comes out clean.

Thursday, October 1, 2009

American Samoa Tsunami

Photograph from WHEC-TV

While I happen to have a lot of random knowledge about the U.S. territory of American Samoa, most Americans probably weren't aware of its existence and location until this week. The news coming out about the aftermath of the tsunami seems to get worse by the day. Here is one recent article from the Australian news. My thoughts and best wishes go out to the people of Samoa and American Samoa, especially those who have lost or are still searching for friends and family, during this terrible time and as they begin a long journey of recovery and rebuilding.