

Showing posts with label candy. Show all posts
Showing posts with label candy. Show all posts
Wednesday, February 13, 2013
A Day Late OR 364 Days Early? (King Cake Cake Pops!)


Monday, October 31, 2011
Happy Halloween!
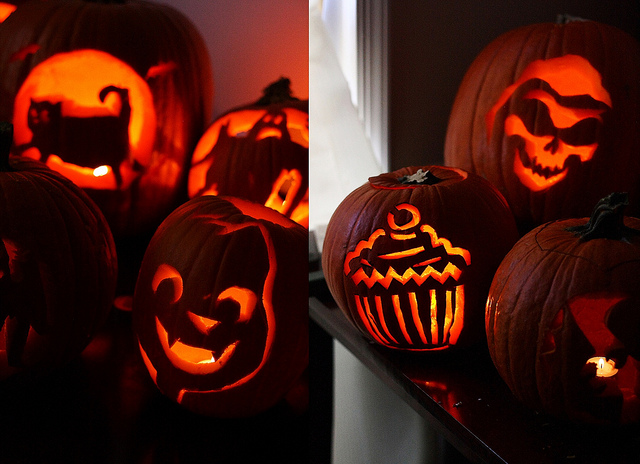
Wishing everyone a safe and happy Halloween today!
P and I went to a friend's pumpkin-carving party this weekend, and here's what everyone made =D. I was joking on our way to the party about carving a cutesy cupcake pumpkin. Then I was distracted chatting with some people at the party, and next thing I know he's well on his way to making my cupcake pumpkin a reality! Is he the sweetest or what?! Sorry, ladies...he's all mine ^____^. Below are some more photos of the party, including my Pumpkin Cupcakes with M&M Creepy Crawly Bugs and Mummy Faces!


Wednesday, October 26, 2011
Halloween Candy Giveaway Winner!
Thanks to everyone who entered my Halloween Candy Giveaway sponsored by Oh Nuts! The randomly selected winner is Cass (comment #11) -- congrats and enjoy eating and/or giving away your sour worms =D.
Tuesday, July 26, 2011
Sew Sweet! Spools of Thread Cake Pops (Guest Post for Pure Joy Events)

Sunday, April 3, 2011
For My Love: Moist Yellow Caramel Cake and Chocolate Baileys Cupcakes with Liqueur Shots
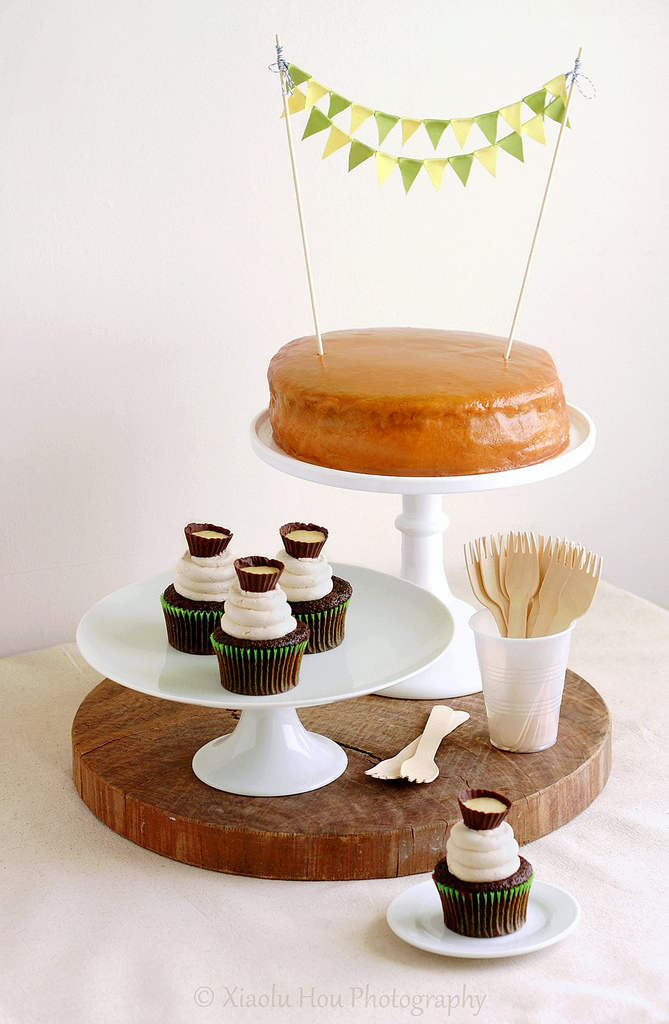
Just by looking at this site, you can tell I've changed a bit, no? What started as a subtle shift became a landslide, though, when I discovered some amazing party/style blogs, especially My Sweet & Saucy and Kara's Party Ideas. They're so inspiring I started planning how I'd break the news of my career change to "party planning/catering" to my dad before I knew it. That was just a daydream but with my boyfriend's birthday coming up I had the perfect opportunity to translate all that inspiration into a real party for the love of my life and our friends =).

We offered our guests a lot to fill their bellies at the party. After munchin' on some store-bought chips and dips, they got to sample P's favorite spiked pasta and customized homemade pizzas at the toppings "bar." There was also plenty to satisfy their sweet tooths. The Boy's favorite cake in the world is his aunt's yellow cake with an amazing caramel frosting. Having tried to recreate it for his last 3 birthdays, I'm happy that's it's finally good enough to be shared! If you've ever had caramel or penuche frosting, you're probably used to it being hard. The beauty of this version is that it stays soft and buttery, a perfect compliment to the oh-so-moist yellow cake.

Photos from my friend Mimi =D
- Hold the cupcake around its wrapper between your thumb and index finger, then bring it up and toward you so you can drink the Irish cream shot out of the chocolate cup.
- Now pick up the empty chocolate cup and gobble it up like a proper chocoholic!
- Now eat the remaining cupcake any ole way you want.
Moist (Really!) Yellow Layer Cake with Soft Caramel Frosting [Printable Recipe]
Adapted from ChefTalk and from My Yellow Bluff
Makes a 2-layer 9-inch cake (about 10 to 12 servings)
XIAOLU'S NOTES: I think part of the compromise of such a moist, tender cake is that it's quite delicate to handle. I definitely recommend chilling the cakes at least an hour before frosting to firm it up so crumbs won't come off easily. Especially since this frosting is really good at pulling cake bits off hehe. You can't tell in my photo (or at least I hope not!) but a small section of the edge of the cake actually got pulled off by the frosting entirely. So, again, handle with care! Or, if not, it'll be delicious just the same =D.
2 1/4 cups all purpose flour
1 1/2 cups sugar
3 1/2 tsp baking powder
1 tsp salt
1 cup PLUS 1 Tbsp milk
1 tsp apple cider vinegar
1 1/2 Tbsp canola or vegetable oil
1/2 cup (1 stick) unsalted butter, softened
1 3/4 tsp pure vanilla extract
3 large eggs, room temperature
3 large egg yolks, room temperature
Soft Caramel Frosting (Recipe below)
Preheat oven to 350 degrees F. Cut parchment paper to fit the bottom of two 9 x 1 1/2-inch round pans. Grease the pans lightly with oil or cooking spray, then place the paper in the pans and grease the paper.
Sift the flour, sugar, baking powder, and salt into a large mixing bowl. Add the milk, vinegar, oil, butter, and vanilla to the flour mixture and beat with on medium to medium-high speed for 1 to 2 minutes, scraping the sides of the bowl as needed. Add the eggs and yolks and continue beating an additional 2 minutes. Divide batter evenly between the prepared pans.
Bake for 22 to 30 minutes or until a toothpick inserted near the center of a cake comes out clean, or until cake springs back when touched lightly in the center. Cool cakes on wire racks for 15 minutes; remove from pans and cool completely. Frost as desired.
Soft Caramel Frosting
Makes enough to frost a 2-layer cake
XIAOLU'S NOTES: Steph of Cupcake Project also posted an adaptation of this frosting. Though our measurements are different, the technique remains the same. Check out her post for some useful photos of the caramelization process. This frosting doesn’t crust up like many other caramel frostings and retains wonderfully creamy, buttery, and soft. However, it does still become harder to spread as it cools, so you’ll want to have the cake(s) baked, cooled, and ready to frost before making the frosting.
3 cups sugar, divided [save 1/2 cup to brown]
3/4 cup (1 1/2 sticks) unsalted butter
1/2 tsp salt
1 1/4 cups (10 oz.) canned evaporated milk
1 tsp pure vanilla extract
Pinch of baking soda
Mix 2 1/2 cups sugar, 4 tablespoons (1/2 stick) butter, salt, and evaporated milk in a heavy-bottom medium saucepan (at least 3-qt. capacity). Cook over medium heat, stirring periodically until all of the sugar dissolves. Reduce heat to low.
Melt the remaining 1/2 cup of sugar in a small iron skillet, stirring constantly until it turns an even light to medium amber brown color.
Add this caramelized sugar and the remaining stick of butter into the mixture in the pot. Quickly stir everything together thoroughly and continue to cook until “soft ball” stage is reached (about 235 degrees F or when a bit of caramel dropped into cold water forms a soft, malleable ball) – this may take up to 30 minutes. Remove from heat, and let cool and thicken slightly. Add vanilla and baking soda. Use immediately, as the frosting will continue to thicken as it cools.
Chocolate Baileys Cupcakes with Irish Cream Liqueur Shots [Printable Recipe]
Makes 12 cupcakes
1 cup MINUS 1 Tbsp all-purpose flour
3/4 cup PLUS 2 Tbsp sugar
6 Tbsp unsweetened cocoa powder
3/4 tsp baking soda
1/2 tsp baking powder
1/2 tsp salt
1 large egg, room temperature
3/4 tsp instant coffee powder dissolved in 1/2 cup hot water (or 1/2 cup espresso)
1/2 cup Irish cream liqueur (homemade or storebought, like Baileys)
1/4 cup vegetable oil
1 tsp pure vanilla extract
Baileys Swiss Meringue Buttercream (Recipe below)
Irish Cream-Filled Chocolate Shots (Recipe below)
Preheat the oven to 350 degrees F and line a standard muffin pan with paper liners.
In large bowl, stir together the sugar, flour, cocoa, baking soda, baking powder, and salt. Add the egg, Irish cream, coffee (or reconstituted coffee mixture), oil, and vanilla extract. Beat by hand or with an electric mixer on medium speed until well combined (no more than 1 minute).
Pour the batter, which will be thin, to fill the paper liners about 2/3 full. Tap the pan firmly against the counter one time to remove any air bubbles. Bake for 20 to 25 minutes or just until a toothpick inserted into the middle of a cupcake comes out clean. Let cupcakes cool in the pan for 2 minutes, then remove them to a wire rack and let them cool completely there.
Once cupcakes are completely cool, pipe or spread buttercream onto cupcakes and top with Irish cream-filled chocolate shots (be careful to position them securely so they don’t spill). Enjoy!
Irish Cream Swiss Meringue Buttercream
Makes enough to generously frost 12 cupcakes
3 large egg whites
3/4 cup PLUS 2 Tbsp sugar
15 Tbsp unsalted butter, cool room temperature and cut into 10 pieces
1 tsp pure vanilla extract
1/3 to 2/3 cup Irish cream (homemade or storebought, like Baileys)
Combine the sugar and egg whites in the stainless steel bowl of an electric mixer. Bring a large pan of water to a simmer, making sure that the water isn’t high enough that it will not touch the bowl. Set the bowl in the pan of simmering water and whisk constantly until the sugar is completely dissolved and the top becomes foamy. Be careful not to curdle the egg whites. Remove bowl from heat.
Transfer bowl to your mixer and beat on high speed for at least 3 minutes, until the mixture holds glossy, marshmallow-like peaks and the bowl is completely cool (very important -- the frosting's consistency will be off otherwise). If using a stand mixer, switch to the paddle attachment, and add butter to the meringue a tablespoon at a time, beating well after each addition (at least 5 seconds in between). With the mixer on low, add the vanilla and Irish cream, and continue beating 1 minute to incorporate the additions and reduce air bubbles.
Irish Cream-Filled Chocolate Shots
XIAOLU'S NOTES: If you have extra chocolate leftover, you can simply spread it in a layer (about 1/4-inch thick) over some parchment paper or other non-stick flat surface and let it cool completely. Once hard, chop it up to use for chocolate chunks in chocolate chip cookie or other recipes calling for chocolate chips/chunks!
5 to 6 oz. semisweet chocolate, roughly chopped or chipped
1/3 cup Irish cream (homemade or storebought, like Baileys)
I used a mini-sized silicone mold, but mini foil cupcake liners inside of a mini pan should work as well. If using foil liners, be sure to spray the insides with oil first. Bring a small pan of water to a simmer, and set a small heatproof bowl filled with the chopped chocolate on top of the pan. Stir until the chocolate is completely melted. Turn off heat but keep bowl on top of the warm pan. Another option is to microwave the bowl of chocolate at 30 second intervals, stirring in between each, until fully melted and shiny.
Using a small pastry brush, brush the inside of the molds or liners with an even layer of chocolate. Freeze mold or pan for 5 minutes, then brush another layer of chocolate over the first layer. Repeat the previous step one more time (for a total of 3 chocolate layers). Freeze for 20 minutes, then unmold the cups by peeling of one side of the silicone (or foil liner) carefully. Keep cool until ready to use. Fill with 1 teaspoon of Irish cream to serve.
1 1/2 Tbsp canola or vegetable oil
1/2 cup (1 stick) unsalted butter, softened
1 3/4 tsp pure vanilla extract
3 large eggs, room temperature
3 large egg yolks, room temperature
Soft Caramel Frosting (Recipe below)
Preheat oven to 350 degrees F. Cut parchment paper to fit the bottom of two 9 x 1 1/2-inch round pans. Grease the pans lightly with oil or cooking spray, then place the paper in the pans and grease the paper.
Sift the flour, sugar, baking powder, and salt into a large mixing bowl. Add the milk, vinegar, oil, butter, and vanilla to the flour mixture and beat with on medium to medium-high speed for 1 to 2 minutes, scraping the sides of the bowl as needed. Add the eggs and yolks and continue beating an additional 2 minutes. Divide batter evenly between the prepared pans.
Bake for 22 to 30 minutes or until a toothpick inserted near the center of a cake comes out clean, or until cake springs back when touched lightly in the center. Cool cakes on wire racks for 15 minutes; remove from pans and cool completely. Frost as desired.
Soft Caramel Frosting
Makes enough to frost a 2-layer cake
XIAOLU'S NOTES: Steph of Cupcake Project also posted an adaptation of this frosting. Though our measurements are different, the technique remains the same. Check out her post for some useful photos of the caramelization process. This frosting doesn’t crust up like many other caramel frostings and retains wonderfully creamy, buttery, and soft. However, it does still become harder to spread as it cools, so you’ll want to have the cake(s) baked, cooled, and ready to frost before making the frosting.
3 cups sugar, divided [save 1/2 cup to brown]
3/4 cup (1 1/2 sticks) unsalted butter
1/2 tsp salt
1 1/4 cups (10 oz.) canned evaporated milk
1 tsp pure vanilla extract
Pinch of baking soda
Mix 2 1/2 cups sugar, 4 tablespoons (1/2 stick) butter, salt, and evaporated milk in a heavy-bottom medium saucepan (at least 3-qt. capacity). Cook over medium heat, stirring periodically until all of the sugar dissolves. Reduce heat to low.
Melt the remaining 1/2 cup of sugar in a small iron skillet, stirring constantly until it turns an even light to medium amber brown color.
Add this caramelized sugar and the remaining stick of butter into the mixture in the pot. Quickly stir everything together thoroughly and continue to cook until “soft ball” stage is reached (about 235 degrees F or when a bit of caramel dropped into cold water forms a soft, malleable ball) – this may take up to 30 minutes. Remove from heat, and let cool and thicken slightly. Add vanilla and baking soda. Use immediately, as the frosting will continue to thicken as it cools.
Chocolate Baileys Cupcakes with Irish Cream Liqueur Shots [Printable Recipe]
Makes 12 cupcakes
1 cup MINUS 1 Tbsp all-purpose flour
3/4 cup PLUS 2 Tbsp sugar
6 Tbsp unsweetened cocoa powder
3/4 tsp baking soda
1/2 tsp baking powder
1/2 tsp salt
1 large egg, room temperature
3/4 tsp instant coffee powder dissolved in 1/2 cup hot water (or 1/2 cup espresso)
1/2 cup Irish cream liqueur (homemade or storebought, like Baileys)
1/4 cup vegetable oil
1 tsp pure vanilla extract
Baileys Swiss Meringue Buttercream (Recipe below)
Irish Cream-Filled Chocolate Shots (Recipe below)
Preheat the oven to 350 degrees F and line a standard muffin pan with paper liners.
In large bowl, stir together the sugar, flour, cocoa, baking soda, baking powder, and salt. Add the egg, Irish cream, coffee (or reconstituted coffee mixture), oil, and vanilla extract. Beat by hand or with an electric mixer on medium speed until well combined (no more than 1 minute).
Pour the batter, which will be thin, to fill the paper liners about 2/3 full. Tap the pan firmly against the counter one time to remove any air bubbles. Bake for 20 to 25 minutes or just until a toothpick inserted into the middle of a cupcake comes out clean. Let cupcakes cool in the pan for 2 minutes, then remove them to a wire rack and let them cool completely there.
Once cupcakes are completely cool, pipe or spread buttercream onto cupcakes and top with Irish cream-filled chocolate shots (be careful to position them securely so they don’t spill). Enjoy!
Irish Cream Swiss Meringue Buttercream
Makes enough to generously frost 12 cupcakes
3 large egg whites
3/4 cup PLUS 2 Tbsp sugar
15 Tbsp unsalted butter, cool room temperature and cut into 10 pieces
1 tsp pure vanilla extract
1/3 to 2/3 cup Irish cream (homemade or storebought, like Baileys)
Combine the sugar and egg whites in the stainless steel bowl of an electric mixer. Bring a large pan of water to a simmer, making sure that the water isn’t high enough that it will not touch the bowl. Set the bowl in the pan of simmering water and whisk constantly until the sugar is completely dissolved and the top becomes foamy. Be careful not to curdle the egg whites. Remove bowl from heat.
Transfer bowl to your mixer and beat on high speed for at least 3 minutes, until the mixture holds glossy, marshmallow-like peaks and the bowl is completely cool (very important -- the frosting's consistency will be off otherwise). If using a stand mixer, switch to the paddle attachment, and add butter to the meringue a tablespoon at a time, beating well after each addition (at least 5 seconds in between). With the mixer on low, add the vanilla and Irish cream, and continue beating 1 minute to incorporate the additions and reduce air bubbles.
Irish Cream-Filled Chocolate Shots
XIAOLU'S NOTES: If you have extra chocolate leftover, you can simply spread it in a layer (about 1/4-inch thick) over some parchment paper or other non-stick flat surface and let it cool completely. Once hard, chop it up to use for chocolate chunks in chocolate chip cookie or other recipes calling for chocolate chips/chunks!
5 to 6 oz. semisweet chocolate, roughly chopped or chipped
1/3 cup Irish cream (homemade or storebought, like Baileys)
I used a mini-sized silicone mold, but mini foil cupcake liners inside of a mini pan should work as well. If using foil liners, be sure to spray the insides with oil first. Bring a small pan of water to a simmer, and set a small heatproof bowl filled with the chopped chocolate on top of the pan. Stir until the chocolate is completely melted. Turn off heat but keep bowl on top of the warm pan. Another option is to microwave the bowl of chocolate at 30 second intervals, stirring in between each, until fully melted and shiny.
Using a small pastry brush, brush the inside of the molds or liners with an even layer of chocolate. Freeze mold or pan for 5 minutes, then brush another layer of chocolate over the first layer. Repeat the previous step one more time (for a total of 3 chocolate layers). Freeze for 20 minutes, then unmold the cups by peeling of one side of the silicone (or foil liner) carefully. Keep cool until ready to use. Fill with 1 teaspoon of Irish cream to serve.
Tuesday, January 18, 2011
Caramel Popcorn Cupcakes (Mystery Box Challenge)
UPDATE: I was in the top 5 entries based on total votes, but did not win the random drawing. Thanks so much for everyone who supported me by voting! XD
Now let's chat about these cupcakes. I tell ya, I never expected popcorn to show up at all on this blog, much less in a cupcake. Taking inspiration from unexpected sources is not uncommon here (remember the apple and brie, mojito, or Ferrero Rocher cupcakes?), but I just happen to hate popcorn. I mean, toss me on a deserted island with nothing but and I will munch. Or...simply have the new cupcake contest I've joined name popcorn as its latest challenge. Suddenly, popcorn was on my mind -- morning, noon, and night!

Eventually I assembled a recipe for caramel popcorn cupcakes and checked it twice. Then I baked it up and tasted it thrice (yes, 3 times ^_^). And it was...both a success and a failure. Despite infusing the liquid for my caramel with fresh popcorn, its flavor didn't come through in the frosting (which is why I've omitted that step below). Popcorn enthusiast that I am not, this "failure" wasn't that disappointing. Especially when I managed to "salvage" 20 tasty cakes that were sweet and moist due to creamed corn puree, with a nice crunch from the cornmeal, and swirled with silky smooth caramel buttercream. To top things off, even I couldn't resist tossing on some caramel popcorn. Bon appetit!
I’m submitting this to Mystery Box Cupcake Challenge: Popcorn. The winner of this challenge will receive prizes from:
Now let's chat about these cupcakes. I tell ya, I never expected popcorn to show up at all on this blog, much less in a cupcake. Taking inspiration from unexpected sources is not uncommon here (remember the apple and brie, mojito, or Ferrero Rocher cupcakes?), but I just happen to hate popcorn. I mean, toss me on a deserted island with nothing but and I will munch. Or...simply have the new cupcake contest I've joined name popcorn as its latest challenge. Suddenly, popcorn was on my mind -- morning, noon, and night!
Eventually I assembled a recipe for caramel popcorn cupcakes and checked it twice. Then I baked it up and tasted it thrice (yes, 3 times ^_^). And it was...both a success and a failure. Despite infusing the liquid for my caramel with fresh popcorn, its flavor didn't come through in the frosting (which is why I've omitted that step below). Popcorn enthusiast that I am not, this "failure" wasn't that disappointing. Especially when I managed to "salvage" 20 tasty cakes that were sweet and moist due to creamed corn puree, with a nice crunch from the cornmeal, and swirled with silky smooth caramel buttercream. To top things off, even I couldn't resist tossing on some caramel popcorn. Bon appetit!
I’m submitting this to Mystery Box Cupcake Challenge: Popcorn. The winner of this challenge will receive prizes from:
- Bake It Pretty; a $5 electronic gift card
- Beanilla; 3 Madagascar, 3 Mexican & 3 Indian vanilla beans
- ExoDesign; a wire whisk charm necklace
- Hello Hanna; a pack of Sweet Stands cupcake stands
- Miss Kitty Creations; a handmade cupcake charm of your choice
- Simply Caked; 600 brown greaseproof cupcake liners
- Sweet Cuppin Cakes; a prize pack worth $25
- Tundra Books; a selection 3 very sweet children’s books
Thank you to all our prize sponsors!
Caramel Popcorn Cupcakes [Printable Recipe]
Makes 18 to 20 cupcakes
XIAOLU'S NOTES: I simply pureed canned creamed corn using a handheld immersion blender; you could also use a standard blender or food processor. Homemade creamed corn should work, too; the puree should have a consistency similar to applesauce. I'd recommend making the caramel sauce for the frosting in advance to give it plenty of time to cool before being added to the frosting. The recipe below makes a LOT of caramel sauce, much more than the 1/2 cup maximum you'll use for the frosting. I figure if you're gonna go through the trouble of making homemade caramel sauce, you might as well have extra to use on sundaes, bread pudding, whatever you fancy! But feel free to halve or even quarter this recipe if you'd prefer.
1 3/4 cups all purpose flour
1/4 cup cornmeal
2 tsp baking powder
1/2 tsp baking soda
1/2 tsp salt
1/2 cup (1 stick) unsalted butter, room temperature
1 cup packed brown sugar
1 tsp pure vanilla extract
2 large eggs, room temperature
1 1/2 cups pureed creamed corn
Caramel Buttercream Frosting (Recipe below)
Caramel Popcorn, to garnish
Preheat oven to 350 degrees F. Line 2 muffin pans with paper liners (or use 1 pan and use 6 standalone baking cups). In a medium bowl, stir together flour, cornmeal, baking powder, and baking soda; set aside.
With an electric mixer on medium high speed, cream butter and brown sugar until fluffy. Add vanilla then eggs, one at a time, beating between each addition and scraping down sides of bowl as needed. Reduce speed to low. Add 1/3 flour mixture, 1/2 creamed corn puree, another 1/3 flour mixture, the remaining creamed corn, and finally the remaining flour mixture -- beating until just combined after each addition.
Divide batter evenly among lined cups, filling each 3/4 full. Bake until a toothpick inserted in centers comes out clean, 16 to 20 minutes. Let cool 1 minute in pan, then transfer cupcakes to wire rack to cool completely. Unfrosted cupcakes can be stored overnight at room temperature, or frozen up to 2 months, in airtight containers.
To serve, fill a piping bag fitted with a large round tip (like Ateco #808) and pipe caramel frosting swirls atop each cupcake. Right before serving, top with pieces of caramel popcorn.
Caramel Swiss Meringue Buttercream Frosting
Adapted from A Sweet Spoonful
1 1/2 cups whole milk
3 cups sugar, divided
3 Tbsp light corn syrup
1/2 cup (1 stick) unsalted butter, softened
1 tsp pure vanilla extract
1/4 cup heavy cream
3 large egg whites, room temperature
1/4 cup sugar
14 Tbsp unsalted butter, cool room temperature and cut into 14 pieces
In a medium saucepan, combine milk, corn syrup, and 2 1/2 cups of the sugar. Cook over moderate heat, stirring until the sugar dissolves. Keep warm.
Sprinkle the remaining 1/2 cup of sugar in a deep, heavy saucepan. Cook the sugar over moderate heat, swirling occasionally, until an amber caramel forms. Carefully pour the warm milk mixture over the caramel. It will bubble very strongly. Keep stirring -- this is normal. Cook over moderately high heat, stirring until the caramel dissolves.
Stop stirring and cook until the caramel registers 235 degrees F on a candy thermometer -- this will take 5 to 8 minutes. Remove from the heat. Stir in the butter, vanilla, and 1/4 cup of heavy cream. Strain the caramel into the bowl of a stand mixer. Let cool 15 minutes, then freeze for 10 minute intervals, stirring between each, until sauce has thickened. Transfer caramel to an airtight storage container; set aside. Wash the stand mixer bowl.
Combine the sugar and egg whites in the clean stand mixer bowl. Place the bowl over a pot of boiling water making sure the bottom does not actually touch the water. Whisk constantly until the mixture reaches 160 degrees on an instant-read thermometer (I just whisked by hand and cooked it until the sugar was completely dissolved and the top became foamy). Be careful not to curdle the egg whites, remove from heat if this starts happening.
Remove the bowl to your stand mixer and beat on high speed with the whisk attachment for at least 3 minutes, until the mixture holds glossy, marshmallow-esque peaks and the bowl is completely cool (Very important - the frosting's consistency will be off otherwise).
With mixer on medium-low, add butter 1 tablespoon at a time, beating well after each addition (about 10 seconds between each addition). Increase speed to medium-high; continue beating until frosting appears thick, at least 3 minutes. (You'll hear a distinct slapping sound and visibly see the buttercream go from soupy to a cohesive, pipeable consistency.)
Reduce speed to low and slowly add 1/4 to 1/2 cup of the cooled caramel. Mix until fully incorporated. Store remaining caramel in the refrigerator.
Saturday, October 30, 2010
That Bloody Rat's Got My Cupcake! (Red Berry Chocolate Cupcakes)

It's the first time I've filled cupcakes simply with jam, and I quite enjoyed the taste. The "bloody" color and oozy consistency also make any red berry jam or preserve a good topping for this time of year. To be frank, these chocolate strawberry rats take a bit of time and effort to make. So I really didn't have the time/patience left to mix up a frosting anyway ;p.

It takes a few tries to get used to the rat-assembly procedure, so don't worry if you feel clumsy at first. I was impressed with the results, both the appearance -- I certainly had never associated strawberries with rats before! -- and the taste -- chocolate-coated things are generally yummy.
Of course I do realize I'm posting this the day before Halloween (my bad!), and some of these ingredients may take time to track down. If you're looking for some equally impressive Halloween cupcakes with only easy-to-find ingredients, be sure to check out the creepy crawly, mummy, and owl cupcakes from my previous posts.
So do you have big plans for this Sunday? I'd love to hear all about your creative costumes and treats. Happy early Halloween, everyone!
Bloody Red Berry Chocolate Rat Cupcakes [Printable Recipe]
Adapted from VCTOTW via CHOW and Karen Tack via Redbook
Makes 12 cupcakes
XIAOLU'S NOTES: I recommend having extra sliced and slivered almonds for the rats so that you can pick the best-shaped ones.
1 cup soy milk [or regular milk]
1 teaspoon apple cider vinegar
3/4 cup granulated sugar
1/3 cup canola oil
1 teaspoon vanilla extract
1/2 teaspoon almond extract, or more vanilla extract
1 cup all-purpose flour
1/3 cup cocoa powder, regular or Dutch-processed
3/4 teaspoon baking soda
1/2 teaspoon baking powder
1/4 teaspoon salt
3/4 cup strawberry or raspberry jam/preserves
Strawberry Chocolate Rats (Recipe below)
12 4-inch pieces of black licorice lace
Preheat oven to 350 degrees F and line a muffin pan with baking liners.
Whisk together the soy milk and vinegar in a large bowl, and set aside for a few minutes to curdle. Add the sugar, oil, vanilla extract, and almond extract, if using, to the soy milk mixture and beat until foamy. In a separate bowl, sift together the flour, cocoa powder, baking soda, baking powder, and salt. Add in two batches to wet ingredients and beat until no large lumps remain (a few tiny lumps are OK).
Fill liners 3/4 full with batter. Bake 18 to 20 minutes, until a toothpick inserted into the center comes out clean. Transfer to a cooling rack and let cool completely.
Stir berry jam well, and heat in the microwave for 5 to 10 seconds. Transfer jam to a piping bag fitted with a long pointed tip OR a squeeze bottle. Insert tip into each cupcake and squeeze out a small amount of jam into the cupcake. Then pull the tip out of the frosting and squeeze a little more on top of the cupcake in several (bloody XD) blobs. Place a strawberry chocolate rat on top of each cupcake. Insert one end of a 4-inch piece of black licorice into the cupcake directly behind the rat, then insert the other end into the cupcake on one side of the rat. Lastly and most importantly, enjoy sharing your creepy creations!
Strawberry Chocolate Rats
12 large strawberries, stems removed
1 cup (6 oz.) chocolate chips
2 tsp shortening (use a brand without trans fat like Spectrum)
15 chocolate wafer cookies (1 package of Nabisco brand is 40 cookies)
24 sliced almonds
24 slivered almonds
24 red/yellow and 12 brown candy-coated chocolate-covered sunflower seeds
Place chocolate wafer cookies in a food processor fitted with steel blade, and process until cookies are finely ground. Transfer crumbs to a small bowl and set aside.
Line a cookie sheet with parchment or wax paper. Trim a small piece from one side of each strawberry so they can rest horizontally on the paper. Insert 2 sliced almonds -- about 1 inch from pointed end of strawberry and about 1 inch apart -- to make the ears of the rat.
Place chocolate chips into a heatproof bowl, and microwave for 30-second intervals, stirring well after each interval, until the chocolate is completely smooth. Be careful not to burn the chocolate! Stir in the shortening and mix until smooth.
Insert a fork into the large end of a strawberry (Angle the fork upwards into the strawberry so it won't slip off when you're tapping the fork later.). Holding strawberry on the fork over the bowl of melted chocolate, spoon chocolate over strawberry to coat. Allow excess chocolate to drip off, tapping fork lightly. Sprinkle with chocolate wafer cookies crumbs to coat. Tap fork lightly again to remove excess crumbs. While still holding the strawberry up on the fork, add red/yellow candies for the eyes, slivered almonds for the teeth, and brown candies for the nose. Use another fork or spoon to transfer strawberry to prepared cookie sheet. Repeat with the remaining 11 strawberries. If the chocolate starts to solidify as you're working with it, you can microwave it again at 10-second intervals until it softens again. Refrigerate (or freeze at least 5 minutes if you're in a hurry to use them) rats until ready to serve.
Tuesday, October 6, 2009
Halloween Pumpkin M&M Cupcakes and Cookbook GIVEAWAY
UPDATE: Yay I WON Cupcake Hero::September with my caramelized banana creme brulee cupcakes. It was a super close contest and Christy's PB banana sandwich cupcakes look amazing too. This was so much fun, I can't wait to see the next roundup!

Can you guess what time it is again?! IT'S CUPCAKE HERO TIME!! Okay now I know you're thinking this girl needs to cut back on the sugar / coffee / Red Bull, and maybe I do...but with Halloween coming up we all know how likely that's gonna be (mwahaha). Returning to the ever-important topic of cupcakes, I've been plotting a while now for October's challenge (partly to distract myself while waiting for the results of September's throwdown including one of my entries).

The theme this month, Booo-tiful Pumpkin Cupcakes, had both flavor and decorative components. We were told to use pumpkin in some part of the cupcake plus to make the top "Halloween-y." Aye aye, Captain CB! Our awesome hostess was even so kind as to point us to this goldmine of ideas. I went in search of a cool-lookin' design that wouldn't require anything too fussy (like fondant or food coloring) and found these fun chocolate M&M insect and mummy toppings. All the instructions on how to make these yourself are below and know that I love questions =).
Let's not be shallow though and forget what's on the inside (I'll be here all night, folks 8p): unbelievably moist pumpkin cake with a hint of spice, punctuated by chocolate candy bits. I de-veganized the original recipe by cookbook goddesses Isa and Terry (which they'll hopefully forgive), but that can be easily reversed using vegan versions of the candies, cream cheese, etc.

Vegan or not, the recipes in their cookbook Vegan Cupcakes Take Over the World (VCTOTW) are some of the best in existence. There are so many unique flavors, like green tea, Boston cream pie, rum raisin, and margarita cupcakes. This book would rock anyone's socks off, so I want to give a free copy to one of you! To enter this giveaway, simply leave a comment by next Friday, October 16, telling me your favorite thing about Halloween. Please make sure to leave your email address so I can contact you if you win.

Creepy Pumpkin M&M Cupcakes [Printable Recipe]
Adapted from VCTOTW and Hello, Cupcake!
Makes 12 cupcakes
XIAOLU'S NOTES: I had work in the afternoon, so I baked the cupcakes midday and refrigerated them until I had time to prepare the rest at night. This worked out great so don't be intimated if you can't do all this at once!
1 cup canned pumpkin (NOT pumpkin pie filling)
1/3 cup vegetable oil
3/4 cup plus 2 tablespoons sugar
1/4 cup soy milk (I used regular milk)
1 teaspoon pure vanilla extract
1 1/4 cups all purpose flour
1/2 teaspoon baking powder
1/2 teaspoon baking soda
1/2 teaspoon ground cinnamon
1/8 teaspoon ground nutmeg
1/4 teaspoon salt
1/3 cup M&M candies, roughly chopped up
Cream Cheese Frosting (Recipe below)
Chocolate and M&M Insects and Eyes (Recipe below)
Preheat the oven to 350 degrees F and line a standard muffin pan with paper liners. Sift the flour, baking powder, baking soda, spices, and salt together into a small bowl. Set aside.
In a medium bowl, stir the pumpkin, oil, sugar, milk, and vanilla together until thoroughly mixed. Add in the dry ingredients and stir into the wet ingredients until just combined. Fold in the chopped M&M candies.

Fill paper liners about 2/3 full with batter. Tap the pan firmly against the counter one time to remove any air bubbles. Bake for 20 to 25 minutes or just until a toothpick inserted into the middle of a cupcake comes out clean. Let cupcakes cool in the pan for 5 minutes, then remove them to a wire rack and let them cool completely there.

To assemble insect cupcakes: spread an even layer of cream cheese frosting onto the cupcakes using a knife or spatula. Gently peel the chocolate candy insects from the parchment paper, place one or more on each cupcake, and press slightly to secure. That's it!
To assemble mummy cupcakes: if you have melted chocolate leftover from making the insects and eyes, squeeze 1-2 teaspoons on the top center of each cupcake then spread and and smooth it out with a spatula. Place a pair of M&M eyes on top of the chocolate (or directly on the cupcake). Next, fit a piping bag with an Ateco #48 tip (or other rectangular basketweave tip) and fill it with cream cheese frosting. Make the "bandages" by piping flat strips of frosting at different angles across each cupcake, leaving only a strip right around the eyes.

Cream Cheese Frosting
8 ounces (1 cup) cream cheese (low-fat is fine), room temperature
1/4 cup (2 ounces or 1/2 stick) unsalted butter, room temperature
1/2 teaspoon pure vanilla extract
1/8 teaspoon salt
1 1/2 to 2 1/2 cups sifted powdered (confectioner's) sugar
In a large bowl beat the cream cheese and butter until soft and smooth. On low speed beat in the vanilla, salt, and sugar. Start with 1 1/2 cups of sugar and add more to achieve desired sweetness and stiffness. Finally, beat on high speed for a few moments until smooth.
Chocolate and M&M Insects and Eyes
Regular, mini, and peanut M&M candies
3/4 cup semisweet chocolate chips
XIAOLU'S NOTE: I roughly followed the templates from Hello, Cupcake! If you'd like to try them, just leave a comment with your email and I'll send it right over.
Using a fairly thick and dark pen or marker, draw outlines of insects or whatever creepy design you want on light-colored paper. Separate your candies by color.

Place chocolate chips in a plastic zipper-lock bag and microwave at 10-second intervals, massaging the bag in between, until the chocolate is fully melted. Press as much air as possible out of the bag then close the top.
Lay a piece of parchment or wax paper over the outlines you made earlier. Use scissors to cut off a 1/16-inch corner of the plastic bag and pipe the chocolate onto the parchment paper along the outlines underneath, making sure to connect all the parts to each insect. Before the chocolate hardens, place the M&M candies on top.

If making mummy cupcakes, spread out pairs (one for each cupcake) of mini or regular M&M candies in matching bright colors. Use the same bag of melted chocolate to pipe dots on the candies to make pupils.
Chill all piped chocolate in the refrigerator until firm, at least 5 minutes.
XIAOLU'S NOTE: If the chocolate starts to solidify as you're working with it, you can microwave it again at 10-second intervals until it softens again.
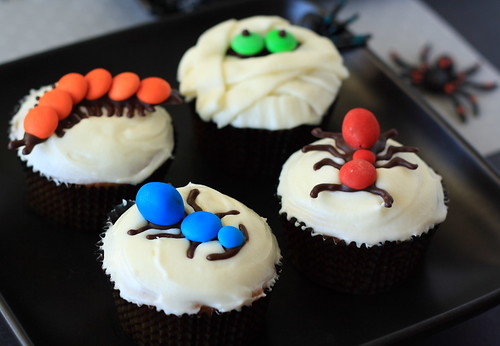
Can you guess what time it is again?! IT'S CUPCAKE HERO TIME!! Okay now I know you're thinking this girl needs to cut back on the sugar / coffee / Red Bull, and maybe I do...but with Halloween coming up we all know how likely that's gonna be (mwahaha). Returning to the ever-important topic of cupcakes, I've been plotting a while now for October's challenge (partly to distract myself while waiting for the results of September's throwdown including one of my entries).
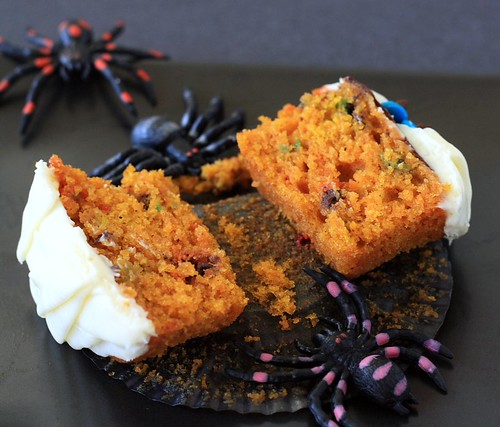
The theme this month, Booo-tiful Pumpkin Cupcakes, had both flavor and decorative components. We were told to use pumpkin in some part of the cupcake plus to make the top "Halloween-y." Aye aye, Captain CB! Our awesome hostess was even so kind as to point us to this goldmine of ideas. I went in search of a cool-lookin' design that wouldn't require anything too fussy (like fondant or food coloring) and found these fun chocolate M&M insect and mummy toppings. All the instructions on how to make these yourself are below and know that I love questions =).
Let's not be shallow though and forget what's on the inside (I'll be here all night, folks 8p): unbelievably moist pumpkin cake with a hint of spice, punctuated by chocolate candy bits. I de-veganized the original recipe by cookbook goddesses Isa and Terry (which they'll hopefully forgive), but that can be easily reversed using vegan versions of the candies, cream cheese, etc.
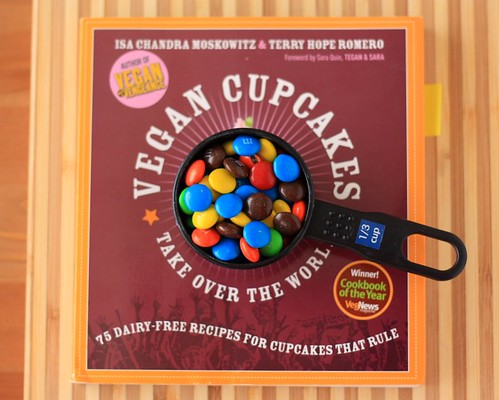
Vegan or not, the recipes in their cookbook Vegan Cupcakes Take Over the World (VCTOTW) are some of the best in existence. There are so many unique flavors, like green tea, Boston cream pie, rum raisin, and margarita cupcakes. This book would rock anyone's socks off, so I want to give a free copy to one of you! To enter this giveaway, simply leave a comment by next Friday, October 16, telling me your favorite thing about Halloween. Please make sure to leave your email address so I can contact you if you win.
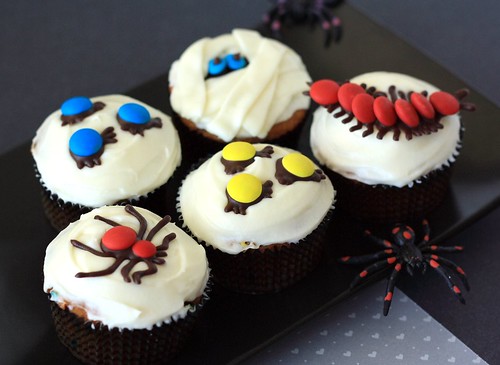
Creepy Pumpkin M&M Cupcakes [Printable Recipe]
Adapted from VCTOTW and Hello, Cupcake!
Makes 12 cupcakes
XIAOLU'S NOTES: I had work in the afternoon, so I baked the cupcakes midday and refrigerated them until I had time to prepare the rest at night. This worked out great so don't be intimated if you can't do all this at once!
1 cup canned pumpkin (NOT pumpkin pie filling)
1/3 cup vegetable oil
3/4 cup plus 2 tablespoons sugar
1/4 cup soy milk (I used regular milk)
1 teaspoon pure vanilla extract
1 1/4 cups all purpose flour
1/2 teaspoon baking powder
1/2 teaspoon baking soda
1/2 teaspoon ground cinnamon
1/8 teaspoon ground nutmeg
1/4 teaspoon salt
1/3 cup M&M candies, roughly chopped up
Cream Cheese Frosting (Recipe below)
Chocolate and M&M Insects and Eyes (Recipe below)
Preheat the oven to 350 degrees F and line a standard muffin pan with paper liners. Sift the flour, baking powder, baking soda, spices, and salt together into a small bowl. Set aside.
In a medium bowl, stir the pumpkin, oil, sugar, milk, and vanilla together until thoroughly mixed. Add in the dry ingredients and stir into the wet ingredients until just combined. Fold in the chopped M&M candies.
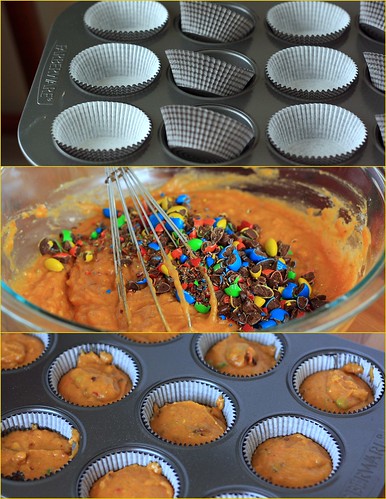
Fill paper liners about 2/3 full with batter. Tap the pan firmly against the counter one time to remove any air bubbles. Bake for 20 to 25 minutes or just until a toothpick inserted into the middle of a cupcake comes out clean. Let cupcakes cool in the pan for 5 minutes, then remove them to a wire rack and let them cool completely there.
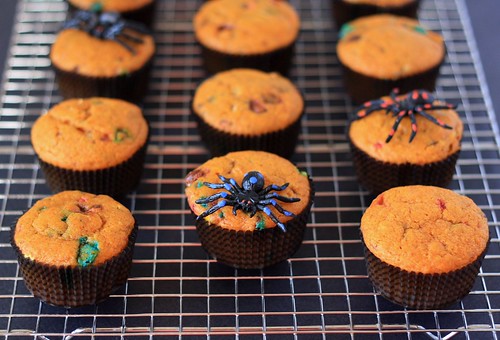
To assemble insect cupcakes: spread an even layer of cream cheese frosting onto the cupcakes using a knife or spatula. Gently peel the chocolate candy insects from the parchment paper, place one or more on each cupcake, and press slightly to secure. That's it!
To assemble mummy cupcakes: if you have melted chocolate leftover from making the insects and eyes, squeeze 1-2 teaspoons on the top center of each cupcake then spread and and smooth it out with a spatula. Place a pair of M&M eyes on top of the chocolate (or directly on the cupcake). Next, fit a piping bag with an Ateco #48 tip (or other rectangular basketweave tip) and fill it with cream cheese frosting. Make the "bandages" by piping flat strips of frosting at different angles across each cupcake, leaving only a strip right around the eyes.
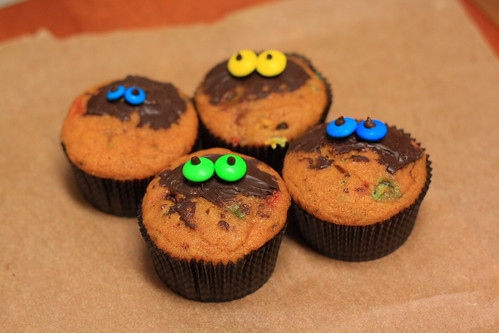
Mummycakes caught in the buff (orange?) - how embarrassing!
Cream Cheese Frosting
8 ounces (1 cup) cream cheese (low-fat is fine), room temperature
1/4 cup (2 ounces or 1/2 stick) unsalted butter, room temperature
1/2 teaspoon pure vanilla extract
1/8 teaspoon salt
1 1/2 to 2 1/2 cups sifted powdered (confectioner's) sugar
In a large bowl beat the cream cheese and butter until soft and smooth. On low speed beat in the vanilla, salt, and sugar. Start with 1 1/2 cups of sugar and add more to achieve desired sweetness and stiffness. Finally, beat on high speed for a few moments until smooth.
Chocolate and M&M Insects and Eyes
Regular, mini, and peanut M&M candies
3/4 cup semisweet chocolate chips
XIAOLU'S NOTE: I roughly followed the templates from Hello, Cupcake! If you'd like to try them, just leave a comment with your email and I'll send it right over.
Using a fairly thick and dark pen or marker, draw outlines of insects or whatever creepy design you want on light-colored paper. Separate your candies by color.
Gotta confess, the OCD part of me kinda relished this part.
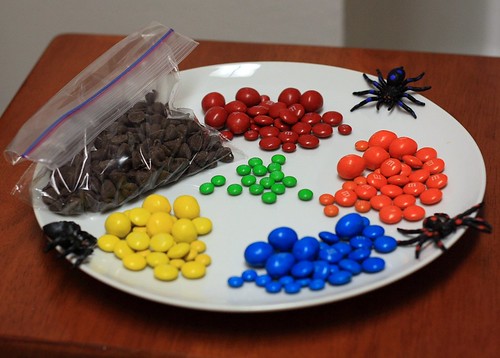
Place chocolate chips in a plastic zipper-lock bag and microwave at 10-second intervals, massaging the bag in between, until the chocolate is fully melted. Press as much air as possible out of the bag then close the top.
Lay a piece of parchment or wax paper over the outlines you made earlier. Use scissors to cut off a 1/16-inch corner of the plastic bag and pipe the chocolate onto the parchment paper along the outlines underneath, making sure to connect all the parts to each insect. Before the chocolate hardens, place the M&M candies on top.
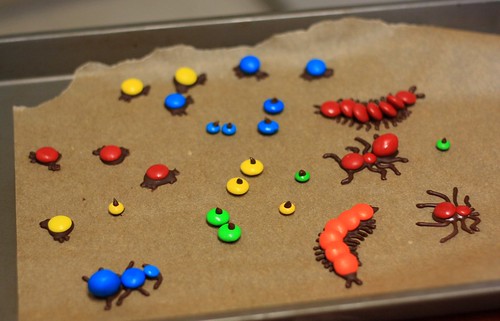
If making mummy cupcakes, spread out pairs (one for each cupcake) of mini or regular M&M candies in matching bright colors. Use the same bag of melted chocolate to pipe dots on the candies to make pupils.
Chill all piped chocolate in the refrigerator until firm, at least 5 minutes.
XIAOLU'S NOTE: If the chocolate starts to solidify as you're working with it, you can microwave it again at 10-second intervals until it softens again.
Subscribe to:
Posts (Atom)



