Showing posts with label decorations. Show all posts
Showing posts with label decorations. Show all posts
Wednesday, May 2, 2012
Urban Chic Boutique Shoshanna Trunk Show


Friday, April 6, 2012
A Work of (Edible) Art: Monet's Water Lilies Cupcakes (Plus Cookbook Review and GIVEAWAY)
If you've seen my previous cute owl or creepy critter cupcake posts, both adapted from Hello, Cupcake!, you already know that I'm a huge fan of Karen Tack and Alan Richardson. Sure I love to make most treats from scratch, but I also love that their projects allow everyone from first-time bakers to professional decorators to create works of edible art from easy-to-find ingredients. I was delighted at the news that this unbeatable duo was coming out with another book and even more excited to accept a free advance copy of Cupcakes, Cookies, & Pie, Oh My! to review!
 Although Cupcakes, Cookies, & Pie, Oh My! is Karen and Alan's 3rd book together, it stands apart from Hello, Cupcake! and What's New, Cupcake? as their first to include cookies, pie, and
 oh my other treats in addition to cupcakes. If there's one thing I've learned about their books, it's that it is never easy to pick just one project to make. Stiletto Shoe Cupcakes, Chocolate-dipped Tea Bag Cookies, Nacho Cheesecake, and Hen House Mini Pies all beckoned to me as I flipped through CC&P. But the opportunity to literally "make art edible" with Monet's Water Lilies Cupcakes turned out to be the one I couldn't resist.
 I realize I picked one of the more technically challenging recipes to test out, but I hope you'll agree the results are worth it and worth-y of a special occasion. One of my pet peeves is when dessert decorating books are stingy with photos, so I was glad to see that CC&P continues the pair's tradition of including photos of every recipe. Some particularly tricky steps even get their own photos. Even though I have some experience with baking and decorating, I still found the visual guidance extremely helpful when paired with the book's consistently clear and concise written directions.

Photograph © Alan Richardson
In short, I think that Cupcakes, Cookies, & Pie, Oh My! would make a great addition to any imaginative baker's bookshelf. Its projects are accessible for beginners but fun and unique enough to interest more experienced bakers. As with Karen and Alan's previous outings, CC&P contains ideas for specific holidays -- such as Father's Day, Thanksgiving, and Halloween -- as well as more versatile party ideas -- such as cake pops on plastic forks. There's really something for everyone, which is why I'm giving away a copy of Cupcakes, Cookies, & Pie, Oh My! by Karen Tack and Alan Richardson to one lucky reader! This giveaway is open to anyone with a US or Canadian shipping address. To enter, simply do as many of the following as you want and leave a separate comment for each thing you do! Please also make sure to leave a way for me to contact you if you win. The giveaway will close on April 12 at midnight, and the winner will be announced shortly thereafter. Good luck! This giveaway has ended -- thanks to all who entered!
Photograph © Alan Richardson
- Leave a comment below telling me what you look forward to making from this book.
- Like 6 Bittersweets on Facebook, then leave a comment telling me you did or already do.
- Subscribe to this blog, then leave a comment telling me you did or already do.
- Follow 6 Bittersweets on Twitter, then leave a comment telling me you did or already do and including your Twitter name.
- Link to this giveaway on Facebook, then leave a comment telling me and including a link to this post.
- Tweet about this giveaway, tagging me @6bittersweets and linking this giveaway, then leave a comment telling me and including a link to this post.
Sunday, March 25, 2012
November Wedding Photo Shoot with Janice Cui

Today it's my delight to finally be able to share a few of the gorgeous photos from a wedding photo shoot to which I contributed desserts. I'm always trying to expand my repertoire, so I jumped at this chance to make ruffled gumpaste flower cake/cupcake toppers inspired by My Cake School. Thanks to wedding photographer Janice Cui for capturing everything wonderfully (I can't get over the bokeh in that first photo of the bride, can you?) and for getting me involved with this project to begin with. All the vendors involved did a splendid job, and I encourage you to check out their sites (linked below). Hope everyone had a nice weekend!

VENDOR CREDITS
Event Coordinator: Elegant Party Plans
Photographer: Janice C Photography
Flowers: J. Morris Flowers
Bridal Gown and Accessories: Layne Corban Bridal
Cake and Cupcakes: 6 Bittersweets
Hairstyle: A Cut To Dye For
Event Coordinator: Elegant Party Plans
Photographer: Janice C Photography
Flowers: J. Morris Flowers
Bridal Gown and Accessories: Layne Corban Bridal
Cake and Cupcakes: 6 Bittersweets
Hairstyle: A Cut To Dye For
Monday, January 16, 2012
Monday Favorites and Baby Shower Cupcakes!
Phew! I can finally say that the GREs are fully behind me. I took them last Wednesday, and *knock on wood* but I feel fairly good about how I did. Of course now the hardest part lies ahead: writing my application essay! If any of you have tips for me, I'm all ears!
 I've still been able to find some time to bake, even if it was for an order. Last week a good friend from high school called to share the news that his sister-in-law was pregnant with a little boy! What's more, he asked me to make an assortment of cupcakes for the shower. Inspired by a photo I'd seen online, I even made little baby footprints out of marzipan as toppers. You can see the results above. Congrats, Pyi and Julia! I can already tell that you 2 will make wonderful parents!
P.S. - If anyone in the DC/Northern Virginia area is interested in ordering desserts for a baby shower or any other party, please check out my offerings and/or contact me via email.


P.S. - If anyone in the DC/Northern Virginia area is interested in ordering desserts for a baby shower or any other party, please check out my offerings and/or contact me via email.
Photograph of Eggs from Food and Story
Simmered Soybeans with Ginger and Soy Sauce from Anh's Food Blog
Photograph of Lemon Meringue Cake from Matt Bites
Wednesday, November 16, 2011
Ruff(le)'s Up, Doc? (Carrot Cupcakes with Ruffled Frosting and Marzipan Carrots)
A few months back, P's cousin K asked me if I'd be willing to bake the cupcakes for her wedding (!!). This was the first time I'd been asked to contribute to someone's Big Day, and I was really touched by the request. And agreed right away, of course! K had her sights set on carrot cake from the start, which worked great for me. I loves me a client who knows what she wants =D. K's wedding doesn't actually take place until next October, but is it really ever too early to test run delicious carrot cupcakes? (Hint: the answer is "no!")
The weird thing about this carrot cupcake recipe is that I converted it into an all-apple recipe the first time I made it (that's just what I happened to need at the time). And I tell you what, the apple-fied version was so darn good that I couldn't resist re-converting it back to experience it in its full beta-carotene glory ^_^.
 I also couldn't resist just a few tweaks here and there (swapping out some oil for the more flavorful melted coconut oil/butter, amping the spices up a touch, and so on...). What came out of the oven was to my mind the perfect basic carrot cupcake: delightfully moist but with no oily mouthfeel, packed with flavor from a balanced medley of spices, and boasting a subtle nuttiness and crunch from the toasted walnuts. Feel free to adapt this to your personal carrot-cake preferences! Like your carrot cake to have more nuts, no nuts, other nuts, coconut flakes, raisins, chocolate chips, whatever else? Go for it!
The only popular add-in that I'd expect any trouble from is pineapple chunks, since they'd add significant moisture to the batter. But I'm on a quest here, folks...I won't rest until I've found the perfect carrot cupcake for K's wedding day! And on the chance that the very best carrot cake contains pineapple, I'll be trying a recipe with pineapple in it next. Right now I'm eying this one, but please don't hesitate to speak up if you wanna share one better!
The weird thing about this carrot cupcake recipe is that I converted it into an all-apple recipe the first time I made it (that's just what I happened to need at the time). And I tell you what, the apple-fied version was so darn good that I couldn't resist re-converting it back to experience it in its full beta-carotene glory ^_^.
The only popular add-in that I'd expect any trouble from is pineapple chunks, since they'd add significant moisture to the batter. But I'm on a quest here, folks...I won't rest until I've found the perfect carrot cupcake for K's wedding day! And on the chance that the very best carrot cake contains pineapple, I'll be trying a recipe with pineapple in it next. Right now I'm eying this one, but please don't hesitate to speak up if you wanna share one better!
Friday, November 11, 2011
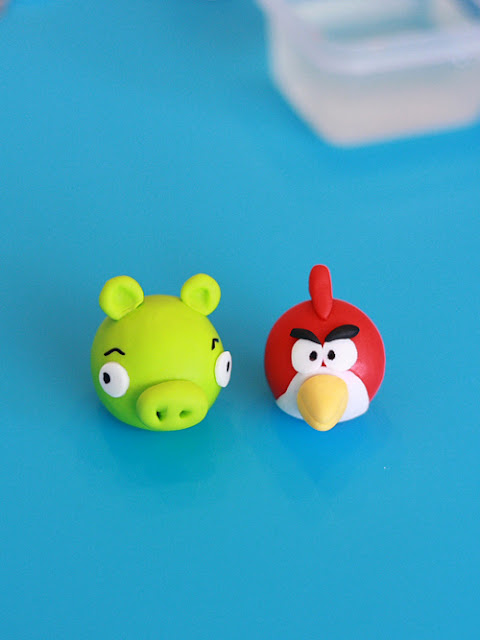
Angry Birds! Fondant Cupcake Topper Tutorial!
Thursday, November 3, 2011
Tips on Using Edible Ink to Decorate Cakes
I've been getting a few requests for guest posting on 6 Bittersweets recently from writers unknown to me. My general policy is to only invite guest posts from friends/bloggers whose work I admire and follow personally, so I've turned most of those offers down. However, Melissa of Clickinks.com happened to make a very specific offer that I couldn't resist 8). As you may have noticed, I've been getting more into cake decorating in the last few weeks and found myself wondering about edible ink printing on many occasions. Thus when Melissa offered to share the basics about edible ink cake decoration, I made an exception and accepted. I hope you'll find these ideas as fun and exciting as I do. Please give a warm welcome to Melissa!

Cake by The Caketress (decorated by hand but a similar effect could be achieved with edible ink sheets)
Have you ever marvelled at wonderfully intricate cake decorations and the steady hands that created them? Perhaps you’ve seen mouth watering treats in bakery windows featuring images of superheroes, wedding celebrations or portraits. Well we’re going to let you into a secret. These designs are not the handiwork of highly skilled artists, they are in fact printed images created using edible inks and wafer thin edible paper. Edible ink is a relatively new concept that has been around since 2003 and has taken the hassle and hard work out of producing stunning sweet treats. Here’s a quick look at how you can use edible inks to transform your home baking and wow your friends and family with your cake-decorating creativity!
Getting Started
You can print using edible ink if you have a HP, Canon or Epson printer. You’ll need to buy edible ink cartridges and special edible paper, which can also be called icing sheets. Edible inks are formulated using food coloring that matches standard printer inks – so the colors from your photo or image should be the same as when you print it using standard inks and paper. You can buy refills for your cartridges, which keeps the cost of replacing your colors down. It’s also a good idea to purchase a non-toxic cleaner to keep your printer in tip-top condition.
 Choosing Your Design
Once you’ve got your inks and paper, you can start to get creative. You can use any kind of design software to create your images, download pictures online, or use some of your favorite photographs as inspiration; the only limit is your own imagination.
Celebration Cakes
If you’re planning a birthday, anniversary or christening celebration why not add a personal touch to your cake? You can print your favorite photographs and place them directly onto your cake, creating a uniquely individual effect that’s sure to become a talking point at any party.
Stencils
You can use your computer to create your own edible stencils. Simply create a template of your design on your pc, print it using edible inks and paper and place it onto your cake. You can use frosting, ink pens or icing to fill in your design, creating a precise outline – steady hands not required!
Edible Ink Pens
To add text or carry out detailed decorations, an edible ink pen is the best tool for the job. These are available in a variety of colors and can also be used to create edible gift cards or decorate plates and glasses too, the perfect way to showcase your culinary masterpiece.
Cute Cupcakes
You could also try adding miniature edible prints to cupcakes, muffins and cookies. This is a much less fiddly way of integrating intricate designs to your baking than free-hand icing. All you have to do is print off your design, no matter how complicated, and trace over the image using your favourite frosting or icing. Why not try printing a variety of photos or designs and turn your cookies or cup cake collection into a creative collage?
 Bijou Biscuits
The image below shows just how intricate and creative you can get using edible inks. These delicious looking morsels feature old fashioned Christmas card designs with an astonishing level of detail. Leave them out for Father Christmas, use them as stocking fillers or hang them on the tree. Miniature works of art like these deserve to be shown off!
Edible Tattoos
Finally, there’s more fun to be had with edible inks than just baking cakes. As edible ink pens are water based, you can use them to draw temporary tattoos on your little ones (or even on yourself!). You can use edible paper to print off a tattoo design and try it out before going for deciding to go under the needle for real. And the really good news? If you don’t like your tattoo or get a little bit carried away, it can be removed with just a few licks!
Author Bio: This post comes from Clickinks, an online distributor of printer ink cartridges that carries a full range of products for the top 25 printer brands on the market.
Cake by The Caketress (decorated by hand but a similar effect could be achieved with edible ink sheets)
Getting Started
You can print using edible ink if you have a HP, Canon or Epson printer. You’ll need to buy edible ink cartridges and special edible paper, which can also be called icing sheets. Edible inks are formulated using food coloring that matches standard printer inks – so the colors from your photo or image should be the same as when you print it using standard inks and paper. You can buy refills for your cartridges, which keeps the cost of replacing your colors down. It’s also a good idea to purchase a non-toxic cleaner to keep your printer in tip-top condition.

Once you’ve got your inks and paper, you can start to get creative. You can use any kind of design software to create your images, download pictures online, or use some of your favorite photographs as inspiration; the only limit is your own imagination.
Celebration Cakes

If you’re planning a birthday, anniversary or christening celebration why not add a personal touch to your cake? You can print your favorite photographs and place them directly onto your cake, creating a uniquely individual effect that’s sure to become a talking point at any party.
Stencils

You can use your computer to create your own edible stencils. Simply create a template of your design on your pc, print it using edible inks and paper and place it onto your cake. You can use frosting, ink pens or icing to fill in your design, creating a precise outline – steady hands not required!
Edible Ink Pens

To add text or carry out detailed decorations, an edible ink pen is the best tool for the job. These are available in a variety of colors and can also be used to create edible gift cards or decorate plates and glasses too, the perfect way to showcase your culinary masterpiece.
Cute Cupcakes

You could also try adding miniature edible prints to cupcakes, muffins and cookies. This is a much less fiddly way of integrating intricate designs to your baking than free-hand icing. All you have to do is print off your design, no matter how complicated, and trace over the image using your favourite frosting or icing. Why not try printing a variety of photos or designs and turn your cookies or cup cake collection into a creative collage?

The image below shows just how intricate and creative you can get using edible inks. These delicious looking morsels feature old fashioned Christmas card designs with an astonishing level of detail. Leave them out for Father Christmas, use them as stocking fillers or hang them on the tree. Miniature works of art like these deserve to be shown off!
Edible Tattoos

Finally, there’s more fun to be had with edible inks than just baking cakes. As edible ink pens are water based, you can use them to draw temporary tattoos on your little ones (or even on yourself!). You can use edible paper to print off a tattoo design and try it out before going for deciding to go under the needle for real. And the really good news? If you don’t like your tattoo or get a little bit carried away, it can be removed with just a few licks!
Author Bio: This post comes from Clickinks, an online distributor of printer ink cartridges that carries a full range of products for the top 25 printer brands on the market.
Saturday, October 29, 2011
My Tips for Great (Cupcake) Success and Halloween Recipes Round-up!

Though I'm no expert, I take a lot of pride in everything I do and wouldn't want to share anything less than the best with you guys. So instead of my original post, I'm going to share some general cupcake tips which have helped make most of my other cupcake experiments successful. Plus a quick round-up of all my Halloween recipes for you last-minute planners =p.
XIAOLU'S CUPCAKE TIPS:
- Use a good muffin pan. I recommend one that's nonstick and has some weight (like this one). A sturdier pan will be less likely to warp (become misshapen) easily. I recall using my new pan for the first time 3 years ago and noticing an immediate difference. My cupcakes rose at least 1/4 inch higher and baked more evenly.
- Buy an oven thermometer (or even 2!) and always preheat at least 25 minutes, ovens (even brand new ones) are notorious for being inaccurate as to temperature. Buy your own thermometer and rely on it rather than your oven's. If your oven tells you that it's up to 400 degrees F only 5 minutes after you turned it on...it's lying...
- If it's your first time making a recipe, try to read it a few days in advance in case you need to buy/prepare anything ahead of time. At the very least, try to read it before you start making the cupcakes.
- Lightly grease the top of your cupcake pan BEFORE putting in liners. Especially if you overfill the cups with batter later, this will make it much easier to lift the cupcakes out later. I've found that the grease seems to reduce the "muffin-top" effect and encourages the cakes to rise up and not outward.
- Use good-quality baking liners. Especially if you bake cupcakes/muffins a lot, this should be a no-brainer. I usually buy basic solid liners (white, brown, black) in bulk online so that I'm never low -- I usually search for the lowest prices on Etsy. Cupcake Social is one seller I've had a good experience with. If you're a fan of those paper souffle standalone baking cups (similar to those Wilton nut cups except that those aren't oven-safe), you can get a LOT of them for cheap here. Unsuitable liners can take a lot away from your final product. For example, I bought white liners at the grocery store when I was nearly out of my usual liners. Luckily I didn't need to use them because when I placed one into the pan, it wouldn't even fit without a big fold forming along the top. Liners can also differ in their non-stick coating. Some are so non-stick that they tend to pull away from the cupcake. Trust me, this is NOT a good look!
- When measuring flour for cakes, it's best to go by weight OR to stir the flour, spoon it into the measuring cup, then level it with a knife or other straight edge. The method of measurement can make a big difference. Scooping up the flour with your measuring cup will compact the flour, result in you using too much flour, and the cake being too dry.
- Sift dry ingredients together, it helps minimize the formation of clumps of dry ingredients when they're being mixed into the batter later.
- Unless the recipe specifies otherwise, use room temperature eggs and butter. Obviously if you'll be heating up the butter or eggs as part of the recipe, you don't need to worry about the starting temperature. But if you'll be creaming the butter with sugar, you'll need it to be warm enough to properly incorporate the air that will make your cake fluffy. Room temperature eggs are also important if the eggs are to mix in evenly in the batter. You can speed up their warming by placing them in a bowl of lukewarm water. Once the water becomes cool, replace it with more warm water. Do this until the eggs no longer feel cool to the touch.
- If whisking by hand, beat eggs separately (or with other wet ingredients) before adding to batter. I always pre-beat my eggs even for one-bowl recipes because of one incident. When crumbling up my favorite chocolate cake to make cake pops one time, I noticed there were chunks of something rubbery in the cake. I realized these were from streaks of egg white that didn't get totally mixed into the batter. Referring back to the bullet point above, it's important to use room temperature eggs as well to avoid these streaks.
- If whisking by hand, whisk in one direction only when first combining wet and dry ingredients. Once the 2 are fairly combined, you can change directions, but I find that changing directions before the dry ingredients are mixed in results in more clumping.
- Unless the recipe instructs otherwise, always stop mixing as soon as the added ingredients have been mixed in. Overmixing will result in developing the gluten (proteins that make bread chewy) in the batter too much = tough cake!
- For even and clean distribution of batter, use a cookie/ice cream scoop. I love love LOVE this scoop -- it makes dividing up batter a cinch and is also great for cookies and ice cream, of course.
- Don't overfill your baking liners. I've rarely seen a recipe that calls for filling more than 3/4 full. Most cupcakes recommend somewhere between 2/3 and 3/4 full. A few batters rise exceptionally high, so if the recipe says to only fill 1/2 full, follow the directions!
- After filling pan with batter, slam pan directly down on counter from a height of 2 inches. Don't do this though if the batter is exceptionally delicate. Otherwise, it helps push any big air bubbles to the top and out. This way you won't have big holes and tunnels in your finished cakes.
- Don't open the oven door before the last 5 minutes of baking. Cakes can be very sensitive to temperature changes and drafts. Especially opening the door during the first 1/2 of baking can have big consequences such as the cake collapsing.
- Always check in on your cupcakes about 5 minutes before the baking time listed in the recipe. Due to variations in ovens, pans, altitude, and whatever else, it's a good idea to check your goods a little early. Better that than dry, overbaked cakes (ew). For most cakes the toothpick test is fairly accurate; the cupcakes are ready as soon as a toothpick stuck into the middle of the cupcake comes out mostly clean (a few moist crumbs are usually ok; wet batter or a lot of crumbs are not).
- Regardless of what the recipe says, move cupcakes from pan to cooling rack no more than 5 minutes after they come out of the oven (but be careful not to burn yourself!). After persistent issues with cupcake liners separating from the sides of the cake (as mentioned above), I did some research and found 2 main culprits. First was the type of baking liner used, and second was steam formed when cupcakes sat cooling in their pans for too long. After figuring these out, I haven't had this problem again.
- Let cupcakes cool on racks COMPLETELY before frosting unless the recipe says otherwise. Even if your cupcakes feel just barely warm, that bit of heat is probably going to be enough to melt your frosting if you try to put it on too early.
- To fill cupcakes, I prefer the "cone method" or using a cookie cutter. The cone method simply means using a paring knife to cut a cone about halfway down into the cupcake, then using the tip of the knife to help pop the cone out. Or you can use a 1-inch wide round cookie cutter. Press the cutter down into the center of the cupcake, left it up and out, then use the tip of a knife to help you pull out the round of cake you just cut. With either method, you can spoon/pipe in the filling at this point. Now you can either put back the cone/round of cake on top of the filling or frost directly on top of the filling.
- Cupcakes with any perishable ingredients (like whipped cream or cream cheese frosting) should be stored in the fridge. Other cupcakes can be stored, well-covered, at room temperature. They are usually good for several days this way.
- If you make cupcakes ahead of time and want to keep them fresh/moist, wrap or place them in an airtight container and freeze them. Defrost before frosting and serving.
- Share the joy of cupcakes with friends and family. I promise, they taste better when enjoyed together ;p.
Well, that's all I can think of for now. Please feel free to add your own tips or any questions you may have for me in the comments! In the meantime, if you're still looking for a fun and tasty Halloween treat, I've gathered all of mine in one convenient locations (...in Africa...brownie point if you get this reference ^-^).


Wednesday, October 19, 2011
If You Want To Live and Thrive, Let the Spider Run Alive (Black Widow Chocolate Rum Cupcakes)
If you're wondering what the post title's all about, it's just a quote I found while searching for a spider-related saying for these cupcakes. This one caught my eye right away...heck if I saw a Black Widow, I certainly wouldn't mess with it! There's just something extra creepy about that red hourglass marking, don't you think?

One thing that I failed to foresee was that the semisweet chocolate I used wouldn't be dark enough to match the black modeling fondant. That's why I've replaced semisweet with dark chocolate in the recipe below and also suggested that you even add a bit of black food coloring to make these truly black widows rather than "brown widows" as my boyfriend called mine hehe. Hope that you like these and you're having as much fun preparing for All Hallow's Eve as I am! And be sure to stay tuned for the next cupcake in my Halloween series -- it's so good you might even call it deadly...8p.
Black Widow Chocolate Rum Cupcakes [Printable Recipe]
Makes 12 to 14 cupcakes
XIAOLU'S NOTES: These can easily be converted into kid-friendly moist chocolate cupcakes by substituting the 3 tablespoons of rum with boiling water and simply omitting the rum from the ganache. The ganache needs to be used shortly after it's made. Toppers can be made in advance and stored at room temperature, but you should re-freeze the toppers for 10 to 15 minutes before moving them to the cupcakes since they (especially the spiders) are quite delicate. I made my spider toppers with semisweet chocolate and they turned out a bit too brown, so I definitely recommend using dark chocolate and even adding some black food coloring.
1 cup sugar
3/4 cup PLUS 2 Tbsp all purpose flour
6 1/2 Tbsp unsweetened Dutch-process cocoa powder
3/4 tsp baking powder
3/4 tsp baking soda
1/2 tsp salt
1 large egg, room temperature
1/2 cup milk [NOT skim]
1/4 cup vegetable oil
1 tsp pure vanilla extract
5 Tbsp boiling water [OR 1/2 cup IF omitting rum]
3 Tbsp dark rum
Rum Chocolate Ganache (Recipe below)
White Chocolate Spiderwebs (Recipe below)
Chocolate Spiders (Recipe below)
Heat oven to 350 degrees F. Grease tops of a cupcake pan and then line it with baking liners.
In a large bowl, sift together sugar, flour, cocoa, baking powder, baking soda and salt. Add egg, milk, oil and vanilla; beat on medium speed for about 2 minutes. Stir in boiling water and rum (batter will be thin). Pour batter into prepared cupcake liners, filling no more than 3/4 full. If there is batter left over, fill an additional 1 to 2 liners in another baking pan OR standalone baking cups with the remaining batter. Bake 18 to 23 minutes or until a toothpick or thin knife inserted into the center of one comes out clean. Cool 5 minutes, then remove from pans to wire racks to finish cooling. Make the ganache as you wait for the cupcakes to cool.
Dip each cupcake upside-down into the ganache up to the liner, lift cake out of chocolate, and let excess ganache drip off. Next, turn cupcake right-side up and place on wire rack to let ganache set. (If ganache begins to harden before all of the cupcakes are dipped you may heat for 5-second intervals in a microwave until chocolate is smooth again).
After 30 minutes, once ganache has partially set, center a white chocolate spiderweb and then a chocolate spider atop each cupcake. Enjoy!
Rum Chocolate Ganache
3 oz. bittersweet chocolate (chips or finely chopped bar)
1/3 cup heavy cream
1 tsp unsalted butter
2 tsp dark rum
Make ganache after cupcakes are mostly cooled off. Place chocolate in a small to medium bowl. Bring heavy cream and butter just to a boil. Pour hot cream mixture over chocolate and let sit for about 5 minutes. Begin stirring mixture and continue stirring until the mixture is uniform and smooth (may take about 5 minutes of stirring). Stir in rum. Use immediately.
White Chocolate Spiderwebs
Slightly adapted from Country Living
3/4 cup white chocolate chips
Microwave white chocolate chips in a bowl for 30 seconds and stir. Continue to microwave in 20-second intervals until almost melted. Stir again until chocolate is completely melted. Pour inside a zipper-lock bag with one tip snipped off to create an opening for piping.
Line a cookie sheet with parchment or wax paper. Slide the spiderweb template underneath paper. To make each web, use piping opening to trace white chocolate along design, making sure to connect all lines. Repeat process until you've created 12 to 14 toppers (depending on the number of cupcakes). Chill them in refrigerator for 10 minutes. Then, using a spatula, carefully remove webs from parchment.
Chocolate Spiders
Modeling Chocolate (Recipe below)
1/2 cup roughly chopped dark chocolate
Black oil-based or powder food coloring (optional)
Red royal icing or melted candy melts
Microwave chopped dark chocolate in a bowl for 30 seconds and stir. Continue to microwave in 20-second intervals until almost melted. Stir again until chocolate is completely melted. If desired, add black oil-based or powder food coloring (do NOT use liquid/gel coloring; if you do, the chocolate will clump together and you'll have to toss it!) a little at a time, stirring well in between additions, until the chocolate is the desired shade of black. Pour inside a zipper-lock bag with one tip snipped off to create an opening for piping.
Line a cookie sheet with parchment or wax paper. Slide a spider template [I simply printed out some cartoony images of black widow spiders I found online; here's what I used] underneath paper OR you could pipe freehand IF you trust yourself to do this. To make each spider, first roll modeling chocolate into 12 to 14 balls about the size of large green peas. Pipe a small dot of melted chocolate on the parchment above the round area of a spider on the template, and press ball of modeling chocolate onto it to secure. Now pipe chocolate to trace along the rest of the design, forming the spider head and legs. Make sure to connect all lines. Repeat process until you've created 12 to 14 spider toppers (depending on the number of cupcakes). Now place red royal icing or red candy melts (melted the same way as the chocolate chips above) into a zipper-lock bag. Snip off a tiny bit of the tip for piping, then trace and fill in an hourglass shape on each modeling chocolate spider "abdomen." Chill spiders in refrigerator for at least 15 minutes. Then remove carefully from parchment just before transferring to cupcakes.
Modeling Chocolate
10 oz. semisweet chocolate (coarsely chopped chunks or chips)
1/3 cup light corn syrup
Black food coloring, as needed (such as McCormick Black Food Color)
In a shallow bowl, melt the chocolate in microwave (be careful so that the temperature does not exceed 100 degrees F) for 2 minutes; stir. If chocolate is not completely melted, return to microwave for 30 seconds at a time and stir until smooth. Add corn syrup to the chocolate and mix well (scrape all the corn syrup into the chocolate with a rubber spatula). Using a rubber spatula, stir and fold mixture, scraping the sides and bottom of the bowl well, until no shiny syrup is visible and the mixture forms a thick ball. Pour mixture onto a large sheet of wax or parchment paper and spread with the spatula until it’s about 1/2-inch thick; let it sit and stiffen, uncovered, for about 2 hours.
After that, knead black food coloring into the modeling chocolate 1 to 2 drops at a time until you get the desired shade. Use at once or store in an airtight container at room temperature for up to 1 month.
I'm submitting these Black Widow Spider Cupcakes to McCormick's Kitchen PLAY Contest as a conceptual adaptation of My Baking Heart's Spider Cupcakes. They're giving away ten $50 prizes to those who recreate any of the recipes in this month's Halloween-themed Progressive Party. If you're interested in entering, you can review the complete contest rules here. Deadline is October 31, 2011. Good luck!
Thursday, October 6, 2011
Devilishly Delicious! (The Best Red Velvet Cupcakes)
Can you guys believe that Halloween is less than a month away?! I hope you all are as excited as me because I've got lots of spooky cupcakes coming up in the next few weeks! We've got some creepin' crawlies, a couple a' brainiacs, and even a few cuppies workin' the graveyard shift...if ya know what I mean =p. But for those of you who're feelin' a might devilish this All Hallow's Eve, I've got just the treat you need...Devilishly Delicious Red Velvet Cupcakes!
Some of you may remember that I set out on The Great Quest for The Perfect Red Velvet Recipe back in the spring (has it really been that long already...). When I posted about it, I was just veering off into unexplored territory after finding none of the famous recipes to my taste. Well I'm happy to finally make it known that I've found The One! After 8 attempts and much tweaking, I've combined several inspirations and some crazy add-ins of my own to bring a new and hopefully well-loved red velvet recipe into the world =D.
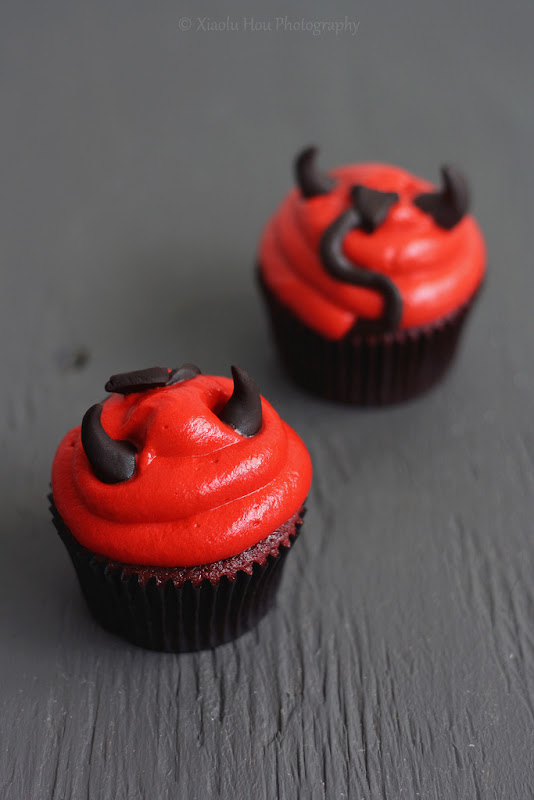 This recipe has been tested frequently for over half a year and has won the approval of dozens of tasters. One friend liked my red velvet cupcakes so much, in fact, that she just asked me to make 140 of them for her wedding =D. I really do hope you'll give these cupcakes (and their Halloween costume) a try. The ingredient list is longer than your usual RV recipe, but they're all ingredients that you probably already have in your pantry. And if you do make them, please send me your feedback and, even better, a photo along with it!
Lastly, I want tell you about a really awesome surprise I got earlier this week. A while ago I left a comment on my friend Angie's blog. She'd just been visited by the Fairy Hobmother, and to my delight the Fairy stopped here next and gifted me with a fabulous Amazon gift card! Then when I was offered the chance to share the joy, of course I said yes! Now if you want a visit from the Fairy, just make your wish and comment below. Best of luck and thanks again, Fairy Hobmother!
6 Bittersweets' Best Red Velvet Cupcakes [Printable Recipe]
Makes 12 cupcakes
XIAOLU’S NOTES: It can be hard to get a strong red color when coloring white frosting. Making the frosting 24 hours ahead of time may help, since the color will darken over time. Do NOT use liquid food coloring since it will add too much moisture to the frosting. The modeling clay recipe below will make more than you'll need. You can store any extra for up to 1 month. If you don’t have buttermilk, you can use the following substitution. For this recipe, use 1 1/2 teaspoons of apple cider vinegar with enough milk added to total 1/2 cup PLUS 1 tablespoon. Stir well and let sit for at least 5 minutes before using. Do NOT substitute the cake flour in this recipe.
1 cup (4 oz.) cake flour [stirred, spooned, and leveled to measure]
1/4 cup (1.12 oz.) all purpose flour [stirred, spooned, and leveled to measure]
1 1/2 Tbsp (0.32 oz.) unsweetened natural cocoa powder
Slightly rounded 1/2 tsp baking soda
Scant 1/2 tsp salt
3/4 cup sugar
1/4 cup unsalted butter, melted and cooled slightly
1 Tbsp red GEL food coloring [I use Wilton No-Taste but you may need more or less depending on brand]
1/2 cup PLUS 1 Tbsp buttermilk, room temperature
3 Tbsp vegetable or canola oil
2 Tbsp mayonnaise (NOT fat-free or olive oil; low-fat is fine)
1 large egg, room temperature
1 tsp apple cider vinegar
1 tsp pure vanilla extract
Cream Cheese Frosting (Recipe below)
24 Modeling Chocolate Horns AND 12 Fondant Horned Tails (Recipe below)
If making the devil decorations, remember to make and color your frosting red ahead of time as well as to make the modeling chocolate ahead of time! I recommend making the horns and tails before baking the cupcakes. You can let them sit out to dry slightly as you bake, cool, and frost the cupcakes.
Preheat the oven to 350 degrees F. Grease the top of a standard 12-cup muffin pan (in case you get some “muffin top” action). Line pan with 12 baking liners.
Sift the flours, cocoa powder, baking soda, salt, and sugar into a large bowl; stir to ensure even distribution and set aside. In a separate bowl or measuring cup, whisk together the melted butter and gel coloring until blended. Then add the buttermilk, oil, mayonnaise, egg, vinegar, and vanilla until well combined. Now add the wet ingredients to the dry, and mix until the batter is mostly smooth (no more than 2 minutes and small lumps are fine).
Distribute batter evenly among baking cups, filling each about 2/3 full. When finished, slam the pan evenly and firmly downward from 2 inches above the counter to force out any large bubbles. Bake for 16 to 23 minutes, or until a toothpick inserted into the center of a cupcake comes out clean. Remove from oven right away, let cool for 2 minutes, then transfer cupcakes to a wire rack to finish cooling.
Once cupcakes have cooled completely, use a piping bag fitted with a medium round tip to pipe swirls from the outside edge inward and upward on each cake. Just before serving (condensation may form on the modeling chocolate if stored in a container with the moist/warm cupcakes), insert 2 chocolate horns directly opposite to each other near the top of a cupcake's frosting. Insert the non-pointed end of a chocolate tail at the base of the frosting between the 2 horns. Carefully place the rest of the tail up the side of the frosting, curving it in an "S" shape. Press the tail, including the point, gently into the frosting to secure it. Now you're looking at a devilish "behind." Add tails to all the other little devil-cakes in the same way. By now I just know you'll be feeling a little sinful. Go ahead...give in to it and take a bite...I won't tell =p.
Pipeable and Not-too-sweet Cream Cheese Frosting
1 cup (2 sticks) unsalted butter, room temperature
2 cups powdered sugar
1 tsp pure vanilla extract
Red gel/paste/powdered food coloring, as much as needed to reach desired shade
8 oz. (1 block) cream cheese, cold and cut into 6 to 8 chunks
Sift powdered sugar into a small bowl. [If using powdered food coloring, sift a small amount in with the powdered sugar.] In a larger mixing bowl, cream the butter, 1 1/2 cups of powdered sugar, vanilla, and a few drops of food coloring until thoroughly blended and fluffy. Add more food coloring, if needed, until you reach something close to the shade you want. Add the cream cheese, a chunk at a time, beating after each addition (just enough to work it in until it’s smooth). If needed, add more powdered or gel food coloring until the desired shade is achieved. Be careful to avoid overbeating or the cream cheese may start to break down and become gloppy. Chill for 24 hours (ideally) to allow the red color to deepen. Then beat again until smooth just before using.
Modeling Chocolate Devil Horns and Tail
Chocolate adapted from Cake Central
10 oz. semisweet chocolate (coarsely chopped chunks or chips)
1/3 cup light corn syrup
Some of you may remember that I set out on The Great Quest for The Perfect Red Velvet Recipe back in the spring (has it really been that long already...). When I posted about it, I was just veering off into unexplored territory after finding none of the famous recipes to my taste. Well I'm happy to finally make it known that I've found The One! After 8 attempts and much tweaking, I've combined several inspirations and some crazy add-ins of my own to bring a new and hopefully well-loved red velvet recipe into the world =D.
Lastly, I want tell you about a really awesome surprise I got earlier this week. A while ago I left a comment on my friend Angie's blog. She'd just been visited by the Fairy Hobmother, and to my delight the Fairy stopped here next and gifted me with a fabulous Amazon gift card! Then when I was offered the chance to share the joy, of course I said yes! Now if you want a visit from the Fairy, just make your wish and comment below. Best of luck and thanks again, Fairy Hobmother!
6 Bittersweets' Best Red Velvet Cupcakes [Printable Recipe]
Makes 12 cupcakes
XIAOLU’S NOTES: It can be hard to get a strong red color when coloring white frosting. Making the frosting 24 hours ahead of time may help, since the color will darken over time. Do NOT use liquid food coloring since it will add too much moisture to the frosting. The modeling clay recipe below will make more than you'll need. You can store any extra for up to 1 month. If you don’t have buttermilk, you can use the following substitution. For this recipe, use 1 1/2 teaspoons of apple cider vinegar with enough milk added to total 1/2 cup PLUS 1 tablespoon. Stir well and let sit for at least 5 minutes before using. Do NOT substitute the cake flour in this recipe.
1 cup (4 oz.) cake flour [stirred, spooned, and leveled to measure]
1/4 cup (1.12 oz.) all purpose flour [stirred, spooned, and leveled to measure]
1 1/2 Tbsp (0.32 oz.) unsweetened natural cocoa powder
Slightly rounded 1/2 tsp baking soda
Scant 1/2 tsp salt
3/4 cup sugar
1/4 cup unsalted butter, melted and cooled slightly
1 Tbsp red GEL food coloring [I use Wilton No-Taste but you may need more or less depending on brand]
1/2 cup PLUS 1 Tbsp buttermilk, room temperature
3 Tbsp vegetable or canola oil
2 Tbsp mayonnaise (NOT fat-free or olive oil; low-fat is fine)
1 large egg, room temperature
1 tsp apple cider vinegar
1 tsp pure vanilla extract
Cream Cheese Frosting (Recipe below)
24 Modeling Chocolate Horns AND 12 Fondant Horned Tails (Recipe below)
If making the devil decorations, remember to make and color your frosting red ahead of time as well as to make the modeling chocolate ahead of time! I recommend making the horns and tails before baking the cupcakes. You can let them sit out to dry slightly as you bake, cool, and frost the cupcakes.
Preheat the oven to 350 degrees F. Grease the top of a standard 12-cup muffin pan (in case you get some “muffin top” action). Line pan with 12 baking liners.
Sift the flours, cocoa powder, baking soda, salt, and sugar into a large bowl; stir to ensure even distribution and set aside. In a separate bowl or measuring cup, whisk together the melted butter and gel coloring until blended. Then add the buttermilk, oil, mayonnaise, egg, vinegar, and vanilla until well combined. Now add the wet ingredients to the dry, and mix until the batter is mostly smooth (no more than 2 minutes and small lumps are fine).
Distribute batter evenly among baking cups, filling each about 2/3 full. When finished, slam the pan evenly and firmly downward from 2 inches above the counter to force out any large bubbles. Bake for 16 to 23 minutes, or until a toothpick inserted into the center of a cupcake comes out clean. Remove from oven right away, let cool for 2 minutes, then transfer cupcakes to a wire rack to finish cooling.
Once cupcakes have cooled completely, use a piping bag fitted with a medium round tip to pipe swirls from the outside edge inward and upward on each cake. Just before serving (condensation may form on the modeling chocolate if stored in a container with the moist/warm cupcakes), insert 2 chocolate horns directly opposite to each other near the top of a cupcake's frosting. Insert the non-pointed end of a chocolate tail at the base of the frosting between the 2 horns. Carefully place the rest of the tail up the side of the frosting, curving it in an "S" shape. Press the tail, including the point, gently into the frosting to secure it. Now you're looking at a devilish "behind." Add tails to all the other little devil-cakes in the same way. By now I just know you'll be feeling a little sinful. Go ahead...give in to it and take a bite...I won't tell =p.
Pipeable and Not-too-sweet Cream Cheese Frosting
1 cup (2 sticks) unsalted butter, room temperature
2 cups powdered sugar
1 tsp pure vanilla extract
Red gel/paste/powdered food coloring, as much as needed to reach desired shade
8 oz. (1 block) cream cheese, cold and cut into 6 to 8 chunks
Sift powdered sugar into a small bowl. [If using powdered food coloring, sift a small amount in with the powdered sugar.] In a larger mixing bowl, cream the butter, 1 1/2 cups of powdered sugar, vanilla, and a few drops of food coloring until thoroughly blended and fluffy. Add more food coloring, if needed, until you reach something close to the shade you want. Add the cream cheese, a chunk at a time, beating after each addition (just enough to work it in until it’s smooth). If needed, add more powdered or gel food coloring until the desired shade is achieved. Be careful to avoid overbeating or the cream cheese may start to break down and become gloppy. Chill for 24 hours (ideally) to allow the red color to deepen. Then beat again until smooth just before using.
Modeling Chocolate Devil Horns and Tail
Chocolate adapted from Cake Central
10 oz. semisweet chocolate (coarsely chopped chunks or chips)
1/3 cup light corn syrup
Black gel or paste food coloring, as needed
Making the modeling chocolate: In a shallow bowl, melt the chocolate in microwave (be careful so that the temperature does not exceed 100 degrees F) for 2 minutes; stir. If chocolate is not completely melted, return to microwave for 30 seconds at a time and stir until smooth.
Add corn syrup to the chocolate and mix well (scrape all the corn syrup into the chocolate with a rubber spatula). Using a rubber spatula, stir and fold mixture, scraping the sides and bottom of the bowl well, until no shiny syrup is visible and the mixture forms a thick ball.
Pour mixture onto a large sheet of wax or parchment paper and spread with the spatula until it’s about 1/2-inch thick; let it sit and stiffen, uncovered, for about 2 hours. After that, knead black food coloring into the modeling chocolate 1 to 2 drops at a time until you get the desired shade. Use at once or store in an airtight container at room temperature for up to 1 month.
Shaping the horns: Make 24 balls about 1/2 inch across with the modeling chocolate. Flatten one side of each ball against your working surface. Use your index fingers to roll the other end down to a point. Smooth and flatten the the chocolate, curving the points to one side until it looks like a horn. Set the finished horn down on its flattened end, and repeat until you have made 24 horns.
Shaping the pointed tails: Roll modeling chocolate into 12 ropes about 2 1/2 inches long and 1/6-inch thick each; set aside. Shape 12 small pieces of modeling chocolate into flat triangles that are each about 1/8 inch thick and and 1/2 inch on all 3 sides. Join each triangle to one of the ropes made earlier by pressing one end of the rope into a triangle.
Making the modeling chocolate: In a shallow bowl, melt the chocolate in microwave (be careful so that the temperature does not exceed 100 degrees F) for 2 minutes; stir. If chocolate is not completely melted, return to microwave for 30 seconds at a time and stir until smooth.
Add corn syrup to the chocolate and mix well (scrape all the corn syrup into the chocolate with a rubber spatula). Using a rubber spatula, stir and fold mixture, scraping the sides and bottom of the bowl well, until no shiny syrup is visible and the mixture forms a thick ball.
Pour mixture onto a large sheet of wax or parchment paper and spread with the spatula until it’s about 1/2-inch thick; let it sit and stiffen, uncovered, for about 2 hours. After that, knead black food coloring into the modeling chocolate 1 to 2 drops at a time until you get the desired shade. Use at once or store in an airtight container at room temperature for up to 1 month.
Shaping the horns: Make 24 balls about 1/2 inch across with the modeling chocolate. Flatten one side of each ball against your working surface. Use your index fingers to roll the other end down to a point. Smooth and flatten the the chocolate, curving the points to one side until it looks like a horn. Set the finished horn down on its flattened end, and repeat until you have made 24 horns.
Shaping the pointed tails: Roll modeling chocolate into 12 ropes about 2 1/2 inches long and 1/6-inch thick each; set aside. Shape 12 small pieces of modeling chocolate into flat triangles that are each about 1/8 inch thick and and 1/2 inch on all 3 sides. Join each triangle to one of the ropes made earlier by pressing one end of the rope into a triangle.
Sunday, September 25, 2011
Under the Sea! (Little Mermaid Birthday Treats)


Photos of Entire Dessert Tower Taken by My Mom =)
Tuesday, July 26, 2011
Sew Sweet! Spools of Thread Cake Pops (Guest Post for Pure Joy Events)

Sunday, April 3, 2011
For My Love: Moist Yellow Caramel Cake and Chocolate Baileys Cupcakes with Liqueur Shots
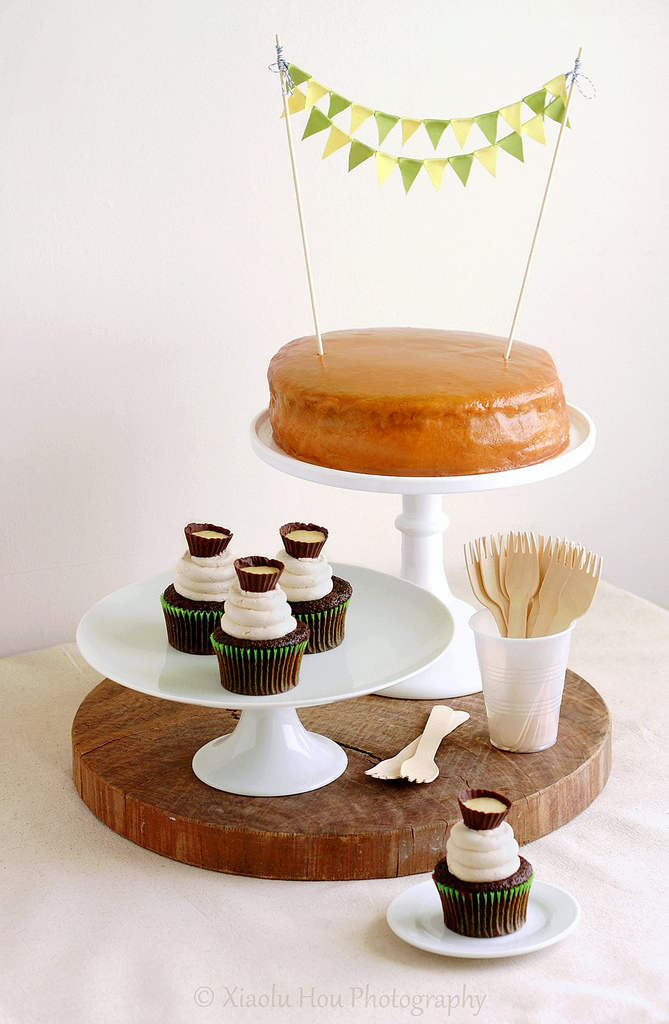
Just by looking at this site, you can tell I've changed a bit, no? What started as a subtle shift became a landslide, though, when I discovered some amazing party/style blogs, especially My Sweet & Saucy and Kara's Party Ideas. They're so inspiring I started planning how I'd break the news of my career change to "party planning/catering" to my dad before I knew it. That was just a daydream but with my boyfriend's birthday coming up I had the perfect opportunity to translate all that inspiration into a real party for the love of my life and our friends =).

We offered our guests a lot to fill their bellies at the party. After munchin' on some store-bought chips and dips, they got to sample P's favorite spiked pasta and customized homemade pizzas at the toppings "bar." There was also plenty to satisfy their sweet tooths. The Boy's favorite cake in the world is his aunt's yellow cake with an amazing caramel frosting. Having tried to recreate it for his last 3 birthdays, I'm happy that's it's finally good enough to be shared! If you've ever had caramel or penuche frosting, you're probably used to it being hard. The beauty of this version is that it stays soft and buttery, a perfect compliment to the oh-so-moist yellow cake.

Photos from my friend Mimi =D
- Hold the cupcake around its wrapper between your thumb and index finger, then bring it up and toward you so you can drink the Irish cream shot out of the chocolate cup.
- Now pick up the empty chocolate cup and gobble it up like a proper chocoholic!
- Now eat the remaining cupcake any ole way you want.
Moist (Really!) Yellow Layer Cake with Soft Caramel Frosting [Printable Recipe]
Adapted from ChefTalk and from My Yellow Bluff
Makes a 2-layer 9-inch cake (about 10 to 12 servings)
XIAOLU'S NOTES: I think part of the compromise of such a moist, tender cake is that it's quite delicate to handle. I definitely recommend chilling the cakes at least an hour before frosting to firm it up so crumbs won't come off easily. Especially since this frosting is really good at pulling cake bits off hehe. You can't tell in my photo (or at least I hope not!) but a small section of the edge of the cake actually got pulled off by the frosting entirely. So, again, handle with care! Or, if not, it'll be delicious just the same =D.
2 1/4 cups all purpose flour
1 1/2 cups sugar
3 1/2 tsp baking powder
1 tsp salt
1 cup PLUS 1 Tbsp milk
1 tsp apple cider vinegar
1 1/2 Tbsp canola or vegetable oil
1/2 cup (1 stick) unsalted butter, softened
1 3/4 tsp pure vanilla extract
3 large eggs, room temperature
3 large egg yolks, room temperature
Soft Caramel Frosting (Recipe below)
Preheat oven to 350 degrees F. Cut parchment paper to fit the bottom of two 9 x 1 1/2-inch round pans. Grease the pans lightly with oil or cooking spray, then place the paper in the pans and grease the paper.
Sift the flour, sugar, baking powder, and salt into a large mixing bowl. Add the milk, vinegar, oil, butter, and vanilla to the flour mixture and beat with on medium to medium-high speed for 1 to 2 minutes, scraping the sides of the bowl as needed. Add the eggs and yolks and continue beating an additional 2 minutes. Divide batter evenly between the prepared pans.
Bake for 22 to 30 minutes or until a toothpick inserted near the center of a cake comes out clean, or until cake springs back when touched lightly in the center. Cool cakes on wire racks for 15 minutes; remove from pans and cool completely. Frost as desired.
Soft Caramel Frosting
Makes enough to frost a 2-layer cake
XIAOLU'S NOTES: Steph of Cupcake Project also posted an adaptation of this frosting. Though our measurements are different, the technique remains the same. Check out her post for some useful photos of the caramelization process. This frosting doesn’t crust up like many other caramel frostings and retains wonderfully creamy, buttery, and soft. However, it does still become harder to spread as it cools, so you’ll want to have the cake(s) baked, cooled, and ready to frost before making the frosting.
3 cups sugar, divided [save 1/2 cup to brown]
3/4 cup (1 1/2 sticks) unsalted butter
1/2 tsp salt
1 1/4 cups (10 oz.) canned evaporated milk
1 tsp pure vanilla extract
Pinch of baking soda
Mix 2 1/2 cups sugar, 4 tablespoons (1/2 stick) butter, salt, and evaporated milk in a heavy-bottom medium saucepan (at least 3-qt. capacity). Cook over medium heat, stirring periodically until all of the sugar dissolves. Reduce heat to low.
Melt the remaining 1/2 cup of sugar in a small iron skillet, stirring constantly until it turns an even light to medium amber brown color.
Add this caramelized sugar and the remaining stick of butter into the mixture in the pot. Quickly stir everything together thoroughly and continue to cook until “soft ball” stage is reached (about 235 degrees F or when a bit of caramel dropped into cold water forms a soft, malleable ball) – this may take up to 30 minutes. Remove from heat, and let cool and thicken slightly. Add vanilla and baking soda. Use immediately, as the frosting will continue to thicken as it cools.
Chocolate Baileys Cupcakes with Irish Cream Liqueur Shots [Printable Recipe]
Makes 12 cupcakes
1 cup MINUS 1 Tbsp all-purpose flour
3/4 cup PLUS 2 Tbsp sugar
6 Tbsp unsweetened cocoa powder
3/4 tsp baking soda
1/2 tsp baking powder
1/2 tsp salt
1 large egg, room temperature
3/4 tsp instant coffee powder dissolved in 1/2 cup hot water (or 1/2 cup espresso)
1/2 cup Irish cream liqueur (homemade or storebought, like Baileys)
1/4 cup vegetable oil
1 tsp pure vanilla extract
Baileys Swiss Meringue Buttercream (Recipe below)
Irish Cream-Filled Chocolate Shots (Recipe below)
Preheat the oven to 350 degrees F and line a standard muffin pan with paper liners.
In large bowl, stir together the sugar, flour, cocoa, baking soda, baking powder, and salt. Add the egg, Irish cream, coffee (or reconstituted coffee mixture), oil, and vanilla extract. Beat by hand or with an electric mixer on medium speed until well combined (no more than 1 minute).
Pour the batter, which will be thin, to fill the paper liners about 2/3 full. Tap the pan firmly against the counter one time to remove any air bubbles. Bake for 20 to 25 minutes or just until a toothpick inserted into the middle of a cupcake comes out clean. Let cupcakes cool in the pan for 2 minutes, then remove them to a wire rack and let them cool completely there.
Once cupcakes are completely cool, pipe or spread buttercream onto cupcakes and top with Irish cream-filled chocolate shots (be careful to position them securely so they don’t spill). Enjoy!
Irish Cream Swiss Meringue Buttercream
Makes enough to generously frost 12 cupcakes
3 large egg whites
3/4 cup PLUS 2 Tbsp sugar
15 Tbsp unsalted butter, cool room temperature and cut into 10 pieces
1 tsp pure vanilla extract
1/3 to 2/3 cup Irish cream (homemade or storebought, like Baileys)
Combine the sugar and egg whites in the stainless steel bowl of an electric mixer. Bring a large pan of water to a simmer, making sure that the water isn’t high enough that it will not touch the bowl. Set the bowl in the pan of simmering water and whisk constantly until the sugar is completely dissolved and the top becomes foamy. Be careful not to curdle the egg whites. Remove bowl from heat.
Transfer bowl to your mixer and beat on high speed for at least 3 minutes, until the mixture holds glossy, marshmallow-like peaks and the bowl is completely cool (very important -- the frosting's consistency will be off otherwise). If using a stand mixer, switch to the paddle attachment, and add butter to the meringue a tablespoon at a time, beating well after each addition (at least 5 seconds in between). With the mixer on low, add the vanilla and Irish cream, and continue beating 1 minute to incorporate the additions and reduce air bubbles.
Irish Cream-Filled Chocolate Shots
XIAOLU'S NOTES: If you have extra chocolate leftover, you can simply spread it in a layer (about 1/4-inch thick) over some parchment paper or other non-stick flat surface and let it cool completely. Once hard, chop it up to use for chocolate chunks in chocolate chip cookie or other recipes calling for chocolate chips/chunks!
5 to 6 oz. semisweet chocolate, roughly chopped or chipped
1/3 cup Irish cream (homemade or storebought, like Baileys)
I used a mini-sized silicone mold, but mini foil cupcake liners inside of a mini pan should work as well. If using foil liners, be sure to spray the insides with oil first. Bring a small pan of water to a simmer, and set a small heatproof bowl filled with the chopped chocolate on top of the pan. Stir until the chocolate is completely melted. Turn off heat but keep bowl on top of the warm pan. Another option is to microwave the bowl of chocolate at 30 second intervals, stirring in between each, until fully melted and shiny.
Using a small pastry brush, brush the inside of the molds or liners with an even layer of chocolate. Freeze mold or pan for 5 minutes, then brush another layer of chocolate over the first layer. Repeat the previous step one more time (for a total of 3 chocolate layers). Freeze for 20 minutes, then unmold the cups by peeling of one side of the silicone (or foil liner) carefully. Keep cool until ready to use. Fill with 1 teaspoon of Irish cream to serve.
1 1/2 Tbsp canola or vegetable oil
1/2 cup (1 stick) unsalted butter, softened
1 3/4 tsp pure vanilla extract
3 large eggs, room temperature
3 large egg yolks, room temperature
Soft Caramel Frosting (Recipe below)
Preheat oven to 350 degrees F. Cut parchment paper to fit the bottom of two 9 x 1 1/2-inch round pans. Grease the pans lightly with oil or cooking spray, then place the paper in the pans and grease the paper.
Sift the flour, sugar, baking powder, and salt into a large mixing bowl. Add the milk, vinegar, oil, butter, and vanilla to the flour mixture and beat with on medium to medium-high speed for 1 to 2 minutes, scraping the sides of the bowl as needed. Add the eggs and yolks and continue beating an additional 2 minutes. Divide batter evenly between the prepared pans.
Bake for 22 to 30 minutes or until a toothpick inserted near the center of a cake comes out clean, or until cake springs back when touched lightly in the center. Cool cakes on wire racks for 15 minutes; remove from pans and cool completely. Frost as desired.
Soft Caramel Frosting
Makes enough to frost a 2-layer cake
XIAOLU'S NOTES: Steph of Cupcake Project also posted an adaptation of this frosting. Though our measurements are different, the technique remains the same. Check out her post for some useful photos of the caramelization process. This frosting doesn’t crust up like many other caramel frostings and retains wonderfully creamy, buttery, and soft. However, it does still become harder to spread as it cools, so you’ll want to have the cake(s) baked, cooled, and ready to frost before making the frosting.
3 cups sugar, divided [save 1/2 cup to brown]
3/4 cup (1 1/2 sticks) unsalted butter
1/2 tsp salt
1 1/4 cups (10 oz.) canned evaporated milk
1 tsp pure vanilla extract
Pinch of baking soda
Mix 2 1/2 cups sugar, 4 tablespoons (1/2 stick) butter, salt, and evaporated milk in a heavy-bottom medium saucepan (at least 3-qt. capacity). Cook over medium heat, stirring periodically until all of the sugar dissolves. Reduce heat to low.
Melt the remaining 1/2 cup of sugar in a small iron skillet, stirring constantly until it turns an even light to medium amber brown color.
Add this caramelized sugar and the remaining stick of butter into the mixture in the pot. Quickly stir everything together thoroughly and continue to cook until “soft ball” stage is reached (about 235 degrees F or when a bit of caramel dropped into cold water forms a soft, malleable ball) – this may take up to 30 minutes. Remove from heat, and let cool and thicken slightly. Add vanilla and baking soda. Use immediately, as the frosting will continue to thicken as it cools.
Chocolate Baileys Cupcakes with Irish Cream Liqueur Shots [Printable Recipe]
Makes 12 cupcakes
1 cup MINUS 1 Tbsp all-purpose flour
3/4 cup PLUS 2 Tbsp sugar
6 Tbsp unsweetened cocoa powder
3/4 tsp baking soda
1/2 tsp baking powder
1/2 tsp salt
1 large egg, room temperature
3/4 tsp instant coffee powder dissolved in 1/2 cup hot water (or 1/2 cup espresso)
1/2 cup Irish cream liqueur (homemade or storebought, like Baileys)
1/4 cup vegetable oil
1 tsp pure vanilla extract
Baileys Swiss Meringue Buttercream (Recipe below)
Irish Cream-Filled Chocolate Shots (Recipe below)
Preheat the oven to 350 degrees F and line a standard muffin pan with paper liners.
In large bowl, stir together the sugar, flour, cocoa, baking soda, baking powder, and salt. Add the egg, Irish cream, coffee (or reconstituted coffee mixture), oil, and vanilla extract. Beat by hand or with an electric mixer on medium speed until well combined (no more than 1 minute).
Pour the batter, which will be thin, to fill the paper liners about 2/3 full. Tap the pan firmly against the counter one time to remove any air bubbles. Bake for 20 to 25 minutes or just until a toothpick inserted into the middle of a cupcake comes out clean. Let cupcakes cool in the pan for 2 minutes, then remove them to a wire rack and let them cool completely there.
Once cupcakes are completely cool, pipe or spread buttercream onto cupcakes and top with Irish cream-filled chocolate shots (be careful to position them securely so they don’t spill). Enjoy!
Irish Cream Swiss Meringue Buttercream
Makes enough to generously frost 12 cupcakes
3 large egg whites
3/4 cup PLUS 2 Tbsp sugar
15 Tbsp unsalted butter, cool room temperature and cut into 10 pieces
1 tsp pure vanilla extract
1/3 to 2/3 cup Irish cream (homemade or storebought, like Baileys)
Combine the sugar and egg whites in the stainless steel bowl of an electric mixer. Bring a large pan of water to a simmer, making sure that the water isn’t high enough that it will not touch the bowl. Set the bowl in the pan of simmering water and whisk constantly until the sugar is completely dissolved and the top becomes foamy. Be careful not to curdle the egg whites. Remove bowl from heat.
Transfer bowl to your mixer and beat on high speed for at least 3 minutes, until the mixture holds glossy, marshmallow-like peaks and the bowl is completely cool (very important -- the frosting's consistency will be off otherwise). If using a stand mixer, switch to the paddle attachment, and add butter to the meringue a tablespoon at a time, beating well after each addition (at least 5 seconds in between). With the mixer on low, add the vanilla and Irish cream, and continue beating 1 minute to incorporate the additions and reduce air bubbles.
Irish Cream-Filled Chocolate Shots
XIAOLU'S NOTES: If you have extra chocolate leftover, you can simply spread it in a layer (about 1/4-inch thick) over some parchment paper or other non-stick flat surface and let it cool completely. Once hard, chop it up to use for chocolate chunks in chocolate chip cookie or other recipes calling for chocolate chips/chunks!
5 to 6 oz. semisweet chocolate, roughly chopped or chipped
1/3 cup Irish cream (homemade or storebought, like Baileys)
I used a mini-sized silicone mold, but mini foil cupcake liners inside of a mini pan should work as well. If using foil liners, be sure to spray the insides with oil first. Bring a small pan of water to a simmer, and set a small heatproof bowl filled with the chopped chocolate on top of the pan. Stir until the chocolate is completely melted. Turn off heat but keep bowl on top of the warm pan. Another option is to microwave the bowl of chocolate at 30 second intervals, stirring in between each, until fully melted and shiny.
Using a small pastry brush, brush the inside of the molds or liners with an even layer of chocolate. Freeze mold or pan for 5 minutes, then brush another layer of chocolate over the first layer. Repeat the previous step one more time (for a total of 3 chocolate layers). Freeze for 20 minutes, then unmold the cups by peeling of one side of the silicone (or foil liner) carefully. Keep cool until ready to use. Fill with 1 teaspoon of Irish cream to serve.
Subscribe to:
Posts (Atom)