Showing posts with label dessert. Show all posts

Wednesday, September 11, 2013

Naturally Gluten-Free: Coconut Cassava Bars

Hello world! These are my baby steps back into the food blogging/photography world. A little scared...a lot clumsy (I swear I've somehow forgotten even the basics of how light works! =X)...and learning things again bit by bit (I hope) with each attempt!

Coconut Cassava Bars
For today's shoot, I chose coconut cassava bars inspired by one of my favorite nutrition blogs, Nutrition to Kitchen. Similar versions of this cake can be found in Vietnamese and Filipino cuisine. These bars are mildly sweet and just a little bit salty (partly due to the addition of cheddar cheese!); soft and chewy in a way that's reminiscent of mochi cake (not surprising once you learn cassava is used to make tapioca); rich with coconut flavor (from the milk as well as sweetened coconut strings known as macapuno); naturally gluten-free; and ab-so-lute-ly addicting to nibble on. Please do give it a go, and let me know what you think!

Monday, April 9, 2012

P's Birthday Treats (Chocolate Peanut Butter Rice Krispies Bars)

Chocolate Peanut Butter Rice Krispies Bars
My boyfriend P's attitude towards food is often, in his own words, "Yea well...it's a food...you can eat it..." -_-... So when he praises (or even remembers) any food past the day he consumes it, I take notice and usually try to recreate it. For years now P's expressed a fondness for a rice krispies bar he used to buy in college. But he wasn't referring to just any plain rice cereal bar...

The Jones' on Easter Sunday
Lexington, Virginia -- where P and I grew up and eventually met
The rice krispies layer was just one of 3 essential components in the treat P described -- the others being almighty chocolate and peanut butter ;p. It wasn't hard to see that a light, crunchy cereal base would be the perfect foil for rich layers of peanut butter and chocolate. If you love the combination of chocolate + PB as much as we do, you'll now understand our interest in recreating this heavenly slice.

Chocolate Peanut Butter Rice Krispies Bars 2
Speaking of recreating this bar of lore, I actually made one previous attempt over 3 years ago. Let's just say there was some yelling and a pan full of sweetened bricks where there should've been bars =X. Despite that, um, incident...I gave it another shot for P's birthday this year and they turned out much better this time. In fact P kept threatening to eat the entire tray, which is his special way of telling me I done good =).

I bet you guys have some beloved schoolgirl/boy treats of your own that you've been dying to bring back. I'd love to hear about them in the comments below!


Chocolate Peanut Butter Rice Krispies Bars 3

Friday, April 6, 2012

A Work of (Edible) Art: Monet's Water Lilies Cupcakes (Plus Cookbook Review and GIVEAWAY)

If you've seen my previous cute owl or creepy critter cupcake posts, both adapted from Hello, Cupcake!, you already know that I'm a huge fan of Karen Tack and Alan Richardson. Sure I love to make most treats from scratch, but I also love that their projects allow everyone from first-time bakers to professional decorators to create works of edible art from easy-to-find ingredients. I was delighted at the news that this unbeatable duo was coming out with another book and even more excited to accept a free advance copy of Cupcakes, Cookies, & Pie, Oh My! to review!

Monet's Water Lilies Cupcakes
Although Cupcakes, Cookies, & Pie, Oh My! is Karen and Alan's 3rd book together, it stands apart from Hello, Cupcake! and What's New, Cupcake? as their first to include cookies, pie, and oh my other treats in addition to cupcakes. If there's one thing I've learned about their books, it's that it is never easy to pick just one project to make. Stiletto Shoe Cupcakes, Chocolate-dipped Tea Bag Cookies, Nacho Cheesecake, and Hen House Mini Pies all beckoned to me as I flipped through CC&P. But the opportunity to literally "make art edible" with Monet's Water Lilies Cupcakes turned out to be the one I couldn't resist. 

Cupcakes Cookies & Pie Oh My
I realize I picked one of the more technically challenging recipes to test out, but I hope you'll agree the results are worth it and worth-y of a special occasion. One of my pet peeves is when dessert decorating books are stingy with photos, so I was glad to see that CC&P continues the pair's tradition of including photos of every recipe. Some particularly tricky steps even get their own photos. Even though I have some experience with baking and decorating, I still found the visual guidance extremely helpful when paired with the book's consistently clear and concise written directions.

Water Lilies Mini Cupcakes
Photograph © Alan Richardson
In short, I think that Cupcakes, Cookies, & Pie, Oh My! would make a great addition to any imaginative baker's bookshelf. Its projects are accessible for beginners but fun and unique enough to interest more experienced bakers. As with Karen and Alan's previous outings, CC&P contains ideas for specific holidays -- such as Father's Day, Thanksgiving, and Halloween -- as well as more versatile party ideas -- such as cake pops on plastic forks. There's really something for everyone, which is why I'm giving away a copy of Cupcakes, Cookies, & Pie, Oh My! by Karen Tack and Alan Richardson to one lucky reader! This giveaway is open to anyone with a US or Canadian shipping address. To enter, simply do as many of the following as you want and leave a separate comment for each thing you do! Please also make sure to leave a way for me to contact you if you win. The giveaway will close on April 12 at midnight, and the winner will be announced shortly thereafter. Good luck! This giveaway has ended -- thanks to all who entered!
  • Leave a comment below telling me what you look forward to making from this book.
  • Like 6 Bittersweets on Facebook, then leave a comment telling me you did or already do.
  • Subscribe to this blog, then leave a comment telling me you did or already do.
  • Follow 6 Bittersweets on Twitter, then leave a comment telling me you did or already do and including your Twitter name.
  • Link to this giveaway on Facebook, then leave a comment telling me and including a link to this post.
  • Tweet about this giveaway, tagging me @6bittersweets and linking this giveaway, then leave a comment telling me and including a link to this post.

Friday, March 30, 2012

My First VIDEO Post: How to Frost Cupcakes Using a Large Closed Star Tip


Cupcake Collage
I dunno if I've mentioned, but P got me a fabulous present for our 5-year anniversary back in February =). Right around that time I'd been coming across some helpful videos for everything from cake decorating to distressing metal and quickly became eager to try making videos of my own. P was sweet enough to get me the equipment to get started: an easy-to-use Flip Video Camera! I will confess to having some difficulty adjusting to automatic settings...I suppose the control freak in me got spoiled by all the manual controls on my dSLR ("What do you mean I can't adjust video exposure in-camera?!?" hehe, poor P). But in all seriousness, I'm delighted to have this new "toy" to take my first steps into becoming a multi-media blogger =D.

My first foray into the world of video is this simple demonstration of 3 basic ways to frost a cupcake using a large, closed star piping tip (my favorite is Ateco #849). One of the first lessons you learn when you frost a lot of cupcakes is that bigger is almost always better when it comes to piping tips for cupcake frosting! I believe the #849 tip is the largest closed star tip that Ateco makes, or you could use the Wilton equivalent if you'd prefer.

You'll probably recognize the first technique as my "signature swirl" of sorts. As the photos in this post illustrate, I've used this swirl time and time again for cupcakes on the blog (and off). It's easy, quick, and absolutely classic -- so I really hope you'll give it a try! Sometimes we all want a little variety, though, right? That's the reason I've also included 2 alternative techniques in the video using the same closed star piping tip. The drop star (probably not its real name ;p) method is especially useful for the times I'm asked to "go light" on the frosting, and the "ruffle wiggle" method is just plain fun to do.

I hope you enjoyed my first video and are as excited as I am for the others to come! I'm looking for ideas, so please leave a comment or shoot me an email if you've a topic in mind that you'd like to see me cover. And please subscribe to my Youtube channel to be notified when I post new videos!

Cupcake Collage 2

Sunday, January 29, 2012

Yuzu Mango Coconut Cake Shooters

What can I say, but that the generosity of my blogger friends continues to amaze me! Right now I'm speaking of Joyti of Darjeeling Dreams, one of the sweetest, brightest girls I know. Though we've been online buddies for a while, it wasn't until last August that I finally got to meet her (and her husband) while visiting San Francisco. Let me just tell you this, she's even sweeter in person than on her blog (and so pretty, too). Joyti blew me away again with her generosity when she recently sent me some fresh yuzu fruit after hearing my lament not having access to it. Not only that, she also sent me a bounty of other citrus, including Meyer lemons! We also decided it would be fun to post our yuzu recipes on the same day. Thanks for the lovely package, Joyti! I can't wait to see what you've made =D.

Yuzu Lemon Mango Cake Shooters
Lately I've been really into the idea of layered cake and other dessert shooters. They're such a lovely way to fit in multiple light desserts at the end of a party...even when you're mostly stuffed ;p. Especially having just added dessert shooters to my menu, I was excited to have this opportunity to test out a different flavor.

The results were delicious but I unfortunately didn't have enough juice to make the curd from entirely yuzu. Subbing in lemon juice to make up the remainder resulted in a curd that, while delicious, tasted as much of lemon as of yuzu. So if, unlike me, you have regular and abundant access to fresh yuzu, I recommend you use it and only it for the curd so that its delicate flavor and floral aroma is allowed to shine.

P.S. - I've finally submitted my graduate school application! Sorry for the long lull between new recipe posts -- I'm finding my way back slowly and surely =D.

Monday, January 23, 2012

Orange Passionfruit Curd Tartlets on Food Network UK Front Page!

My Orange Passionfruit Curd Tartlets on Food Network UK Front Page
Happy Year of the Dragon, my friends! And what a wonderful beginning it's been! When my friend Sanjana contacted me recently to share another recipe on Food Network UK's blog, Locally Sourced, I was certainly honored and excited. But never would I have expected to have my photo and recipe featured on their front page today in honor of Chinese New Year! Please head over to check out one of my favorite desserts, tangy Orange Passionfruit Curd and Poppyseed Tartlets -- a fun modern dessert that's perfect for a celebration!

I'd also like to wish my good friend Christine (of Pure Joy Events) a very happy birthday! It is just like her, of course, to generously offer up wonderful prizes to others as part of her 4th Party Tutorial Contest. Please head over to her blog to get all the details of the contest! Fabulous prizes include fondant cupcake toppers from the Lynlee's Petite Cakes, a $40 gift certificate to Piggy Bank Parties party supply store, and a fresh batch of decadent Oreo brownies, browned butter pecan chocolate chip cookies, or cranberry lemon polenta cookies from yours truly. Good luck!

Thursday, January 12, 2012

Tangerine Orange Mousse Recipe for Pure Joy Events!

Tangerine Mousse
Photography by Rebecca Watkins
A few months back I was lucky enough to contribute some Chinese New Year-themed desserts to a party shoot by Pure Joy Events for the online party magazine, Bird's Party. Christine liked my Tangerine Mousse so much that she asked me to share the recipe on her blog. Though this would be a great, simple dessert for any party, tangerines and oranges are especially suitable for CNY because their names in Chinese sound similar to the words for luck and wealth, respectively. They're thus are frequently given out around this time of year. Please head over to Pure Joy Events blog or if you're in a hurry, you can grab the printable recipe here!

Wednesday, November 16, 2011

Ruff(le)'s Up, Doc? (Carrot Cupcakes with Ruffled Frosting and Marzipan Carrots)

A few months back, P's cousin K asked me if I'd be willing to bake the cupcakes for her wedding (!!). This was the first time I'd been asked to contribute to someone's Big Day, and I was really touched by the request. And agreed right away, of course! K had her sights set on carrot cake from the start, which worked great for me. I loves me a client who knows what she wants =D. K's wedding doesn't actually take place until next October, but is it really ever too early to test run delicious carrot cupcakes? (Hint: the answer is "no!")

The weird thing about this carrot cupcake recipe is that I converted it into an all-apple recipe the first time I made it (that's just what I happened to need at the time). And I tell you what, the apple-fied version was so darn good that I couldn't resist re-converting it back to experience it in its full beta-carotene glory ^_^.

Carrot Cupcakes with Marzipan-Parsley Carrot Toppers
I also couldn't resist just a few tweaks here and there (swapping out some oil for the more flavorful melted coconut oil/butter, amping the spices up a touch, and so on...). What came out of the oven was to my mind the perfect basic carrot cupcake: delightfully moist but with no oily mouthfeel, packed with flavor from a balanced medley of spices, and boasting a subtle nuttiness and crunch from the toasted walnuts. Feel free to adapt this to your personal carrot-cake preferences! Like your carrot cake to have more nuts, no nuts, other nuts, coconut flakes, raisins, chocolate chips, whatever else? Go for it!

The only popular add-in that I'd expect any trouble from is pineapple chunks, since they'd add significant moisture to the batter. But I'm on a quest here, folks...I won't rest until I've found the perfect carrot cupcake for K's wedding day! And on the chance that the very best carrot cake contains pineapple, I'll be trying a recipe with pineapple in it next. Right now I'm eying this one, but please don't hesitate to speak up if you wanna share one better!

Sunday, September 25, 2011

Under the Sea! (Little Mermaid Birthday Treats)

Under the Sea!
Hey there! I'm taking a little break from studying to share these "Under the Sea" cupcakes I made for a birthday order. They're s'mores-flavored with a graham cracker crust, chunks of Hershey's milk chocolate, chocolate cake, toasted marshmallow frosting, graham cracker "sand", and sea creature marshmallow fondant toppers I made! I also made the cupcake wrapper using the shape I bought online, an image from the movie, card stock paper, and double-sided tape. The birthday girl, Alaina, is turning 6 and loves The Little Mermaid, so of course these and all other desserts were ocean and mermaid themed =). I had a lot of fun with this order -- so fun to get a chance to be creative!

A Little Mermaid Birthday!DSC_0011-e copy EDIT
Photos of Entire Dessert Tower Taken by My Mom =)

Saturday, September 10, 2011

Collaborative Post: Pink Macarons with Chocolate Ganache Filling

UPDATE: To further encourage those of you who want to try baking macarons but are still hesitating, I've decided to give away my good-as-new copy of i <3 macarons by Hisato Ogita to one lucky reader. This giveaway is open to anyone with a US or Canadian shipping address. To enter, simply leave a comment on this post including a way to contact you should you win. For additional entries, follow 6 Bittersweets or Heaven in a Wild Flower via email, reader, and/or Twitter (@6bittersweets or @heavenwildfleur). You must leave a separate comment for each entry for them to count. This giveaway closes at midnight on September 18 -- good luck! THIS GIVEAWAY HAS ENDED. THANKS TO ALL WHO ENTERED!

i heart macarons
I mentioned in my Singapore post that I was lucky enough to catch up with 2 groups of lovely bloggers during my trip. I say "lucky" not only because we managed to match up schedules on such short notice, but also because 4 of them had just returned from being overseas and also planned to stay in Singapore only briefly. Eunice of Heaven in a Wild Flower, having moved to London some years ago, was one of these globetrotters ^_^.

I'd discovered Eunice's blog through her gorgeous macaron posts, so it wasn't long after we met that we began gabbing about which patisserie made them best and the secrets to making good macs at home. At this point, hearing that I was already missing baking in Singapore, Eunice was sweet enough to invite me into her chocolatier friend's professional kitchen where she'd be making macarons for a wedding! She led the baking, while I put myself in charge of visually documenting the process. We really hope you enjoy the following step-by-step photo tutorial of macaron-making that is the fruit of our collaboration. Now please turn your full attention to our resident macaron master =).

Wedding Photography by Eunice; Tutorial Photography by me.


jwwedding73
I had the lovely fortune of meeting up with Xiaolu from 6 Bittersweets when she went to Singapore recently for a holiday. I too, was back in Singapore for a holiday as I'm usually based in London. The precise reason was for a good friend's wedding and I had promised her I'd make her a dessert table, as well as arrange some of her wedding flowers. Little did I know what a big undertaking that would be!

jwwedding72
So when a few of us met up over dinner and I mentioned this, Xiaolu gamely said she'd love to come and help out as I attempt to make 75 macarons, 12 meringues and 2 trays of rice krispies treats! Luckily for me, I also had the use of a proper commercial kitchen, courtesy of my friend E who owns the lovely chocolate shop Truffs, in return for showing his staff how macarons are made. This was the first time I had conducted a class of some sort, or made macarons in such a big batch, so I was fairly worried about everything working properly. I'm happy to report that all went well, and I was very lucky to have Xiaolu helping out as well as taking pictures.

Diptych 1+2
For the wedding, the bride wanted a whimsical fun garden theme. The colour palette she had picked was raspberry pink and lime green. I made green bouquets for the bridesmaids, and a pink one for her bridal bouquet, as well as the table flowers. We also placed apples all around as decor. I set up a dessert table using some vintage china I've been collecting, and decorated it with some of the leftover flowers. The macarons and other treats were laid out together with some luscious cupcakes baked by another friend. I must say that they looked really enticing and lovely. By the end of the lunch, all the desserts were gone!

I hope the visual recipe tutorial below helps you to recreate these little beauties!

Pink Macarons with Chocolate Ganache Filling [Printable Recipe]
Makes about 50 to 54 shells (about 25 macarons)

EUNICE'S NOTES: This basic recipe can be scaled up or down, I always use the egg whites as the base for proportioning the rest of the ingredients. So for every 1 part egg whites, use 1.3 parts almond flour, 1.6 parts icing sugar and 0.55 parts castor sugar.

XIAOLU'S NOTE: For additional tips on making French macarons at home as well as several very helpful videos of the mixing process, please check out my first macaron post!

100 g egg whites, aged for a day (equivalent to about 3 egg whites)
3 g egg white powder
130g almond flour (blitz in food processor together with icing sugar to get a finer texture)
160 g powdered sugar
55 g castor sugar
Pink gel food coloring (or other color)

Sift processed powdered sugar and almond flour together in a bowl. Set aside.

Diptych 3
Mix egg whites with egg white powder and whisk in electric mixer until soft peaks on medium high speed.

Lower speed on electric mixer and add in castor sugar slowly while still whisking until fully incorporated. Continue whisking on medium high speed until your egg white meringue mixture reaches stiff peak stage. Add in your food colouring when whisking.

IMG007
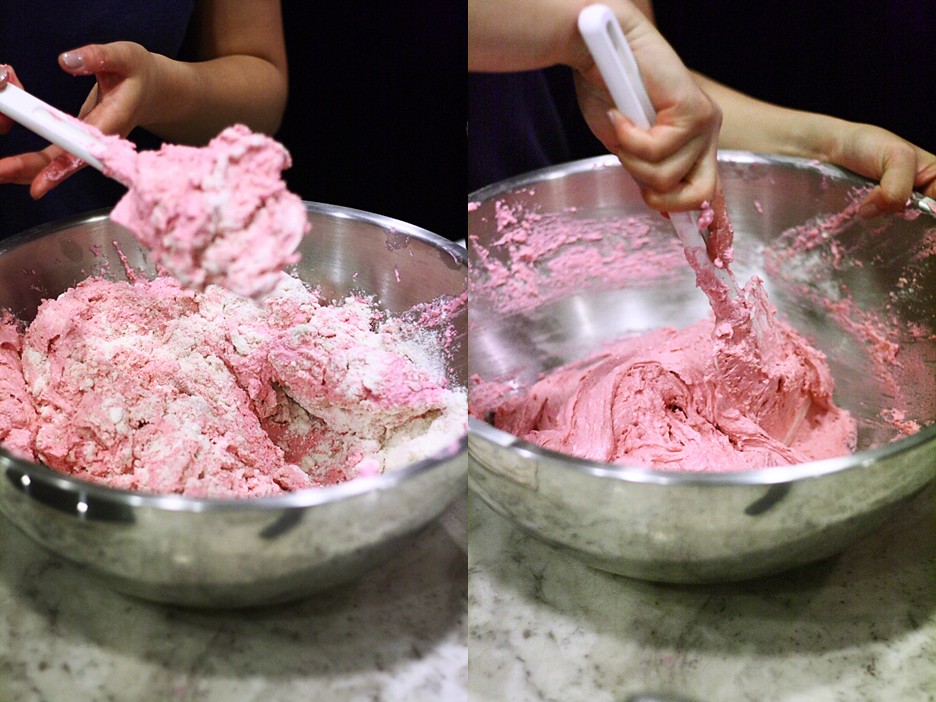
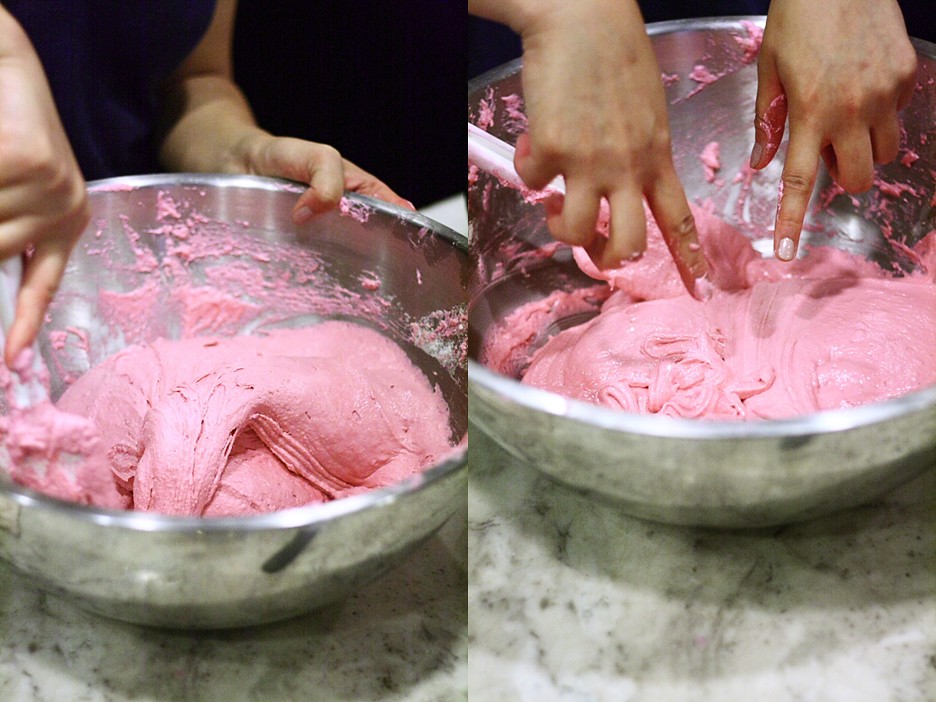
Fold in 1/3 of dry ingredients (icing sugar + almond flour) into meringue with a spatula gently. Add in 1/3 more and fold again before mixing in the last 1/3 of the dry ingredients.

Diptych 4
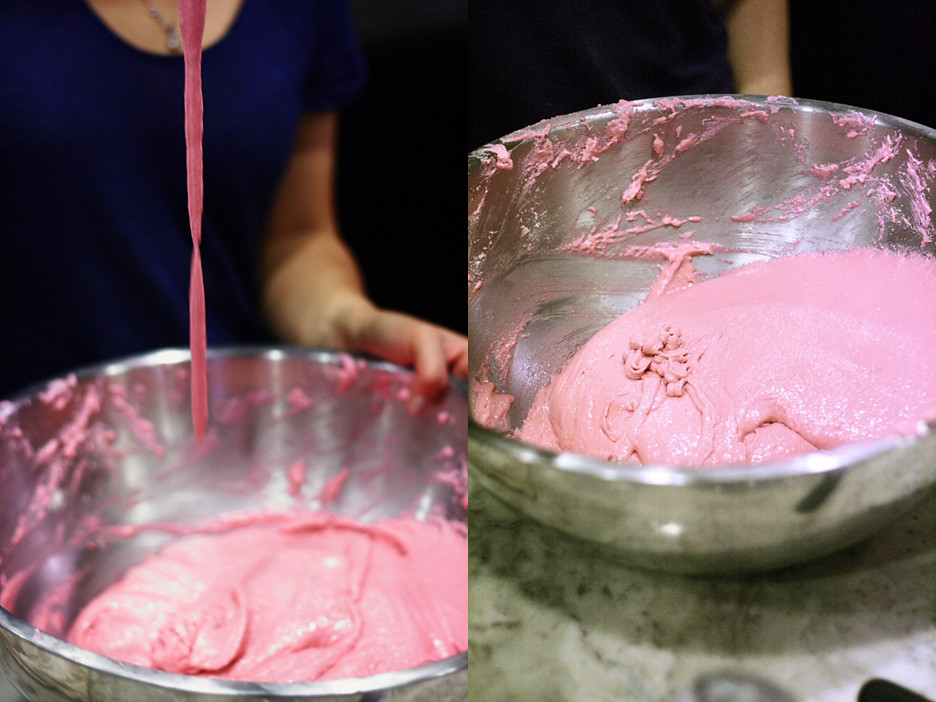
Make sure all dry ingredients are incorporated into the meringue and start folding mixture more vigorously to form a shiny batter with the consistency of flowing magma or drips down like ribbons.

Diptych 5
When you lift the batter up and let it drip down, it should slowly disappear into itself without leaving a peak. Be careful not to over mix as batter will spread too much when piped.

Diptych 6
Line 2 baking trays with non-stick parchment paper (or silpat). You can stick it down with bits of batter in the four corners.

Fill a piping bag fitted with a 1-cm (about 2/5-inch) round tip with the batter, and pipe even rounds of batter, about 3.5 cm (about 1 1/3 inches) across, onto the tray. If you've mixed the batter properly, it should not spread flatly out too much (overmixed) or leave a peak (undermixed).

Diptych 7
Let the batter dry for about 30 minutes. Preheat oven to 170 degrees C/335 degrees F (for convection ovens) OR 180 degrees C/350 degrees F (for regular ovens).

When batter is dry to touch (it forms a slight crust), turn the oven down to 140 deg C (or 150 deg C for conventional oven) and bake shells for 14-15 minutes, turning the trays halfway through baking.

Diptych 8
After baking, lift parchment onto wire rack to let shells cool and gently lift up from paper when cool.

Chocolate Ganache Filling
125 g dark chocolate, broken into small pieces
125 ml single [light] cream

Heat cream in saucepan until it comes to a boil.

Pour the cream over the chocolate and use a spatula or wooden spoon to stir in a circular motion from the centre of the bowl and slowly incorporate more and more of the cream until the chocolate and cream comes together into a smooth emulsion.

Let it cool at room temperature until it thickens, about 4 hours, or in a fridge for 2 hours.

Assembly

Match pairs of shells of even size.

Fit piping bag with plain round 1 to 1.5 cm tip [about 1/2 to 2/3 inch]. Fill piping bag with chocolate ganache. Pipe a small mound of chocolate ganache filling onto one half of each pair of shells. Top with the other shell.

jwwedding74

Sunday, July 31, 2011

Coconut Mung Bean Kaffir Lime Popsicles for MLLA Anniversary!
Mung Beans
I've long been a fan of my friend Susan and her gorgeous blog, The Well-Seasoned Cook, especially her elegant photography and her blog event, My Legume Love Affair (MLLA), which has done a great deal to popularize nutritious and delicious beans/legumes. MLLA recently had its 3rd anniversary, and I was honored to accept Susan's invitation to help celebrate this momentous occasion as well as help kick-start what's sure to be a fabulous 4th year! Inspired by Chinese mung bean popsicles as well as our Southeast Asian neighbors, I'm sharing these flavorful Coconut Mung Bean and Kaffir Lime Popsicles over on Susan's site. I'd love if you'd stop on by to check out my full guest post. But if you're in a hurry and just wanna grab the printable recipe, you'll find it right here.

Coconut Mung Bean Kaffir Lime Popsicles

Friday, May 27, 2011

Black Sesame Sweet Rice Dumplings 2 Ways (Guest Post on Fork Spoon Knife)

Making Black Sesame Rice Dumpling Skewers
Just as starting a food blog 2 years ago introduced me to friends around the globe, joining Twitter this year has enriched my life with even more talented, caring, and equally food-obsessed pals. Asha of Fork Spoon Knife was one of the first among these new friends. Her warm and cheerful spirit, exciting recipes, and wonderful photography were irresistible from the start. When she then invited me to contribute to the celebration of her 3-year blog anniversary, of course I said yes right away! Though the party's theme was Street Food, Asha let me share a Chinese dessert that is traditionally a soup, but which I made more "street-savvy" by borrowing an idea from our Japanese neighbors. Please stop by Asha's site to wish her a happy anniversary and read all about my Black Sesame Sweet Rice Dumplings. If you're in a rush and just want to grab the recipe, you can also find it here.
Dango-Style Black Sesame Rice Dumpling Skewers
I'm also submitting these skewers to Get Grillin’ with Family Fresh Cooking and Cookin’ Canuck, sponsored by Ile de France Cheese, Rösle, Emile Henry, ManPans and Rouxbe.

Monday, May 16, 2011

Birthday Rum N’ Raspberry Custard Cupcakes (Guest Post on Joylicious)

Rum N' Raspberry Custard Cupcakes for Joy!
When Joy of Joylicious emailed me some time ago to introduce herself and ask me to prepare a guest post for her birthday, I was beyond honored to accept her invitation. First, because she's an incredibly talented food photographer who's made her passion into a living! Second, because I had just fallen in love with her blog, which is brimming with recipes as fresh and healthy for you as they are delicious and pleasing to the eye. Now months later I'm proud to know Joy as a dear friend. Please join me in celebrating our birthday girl and gorgeous new bride with some Rum N' Raspberry Custard Cupcakes over on Joylicious! You can also get just the printable recipe here. My tutorial for the pom-pom cupcake toppers pictured is now available here.

Rum N' Raspberry Custard Cupcakes

Saturday, July 11, 2009

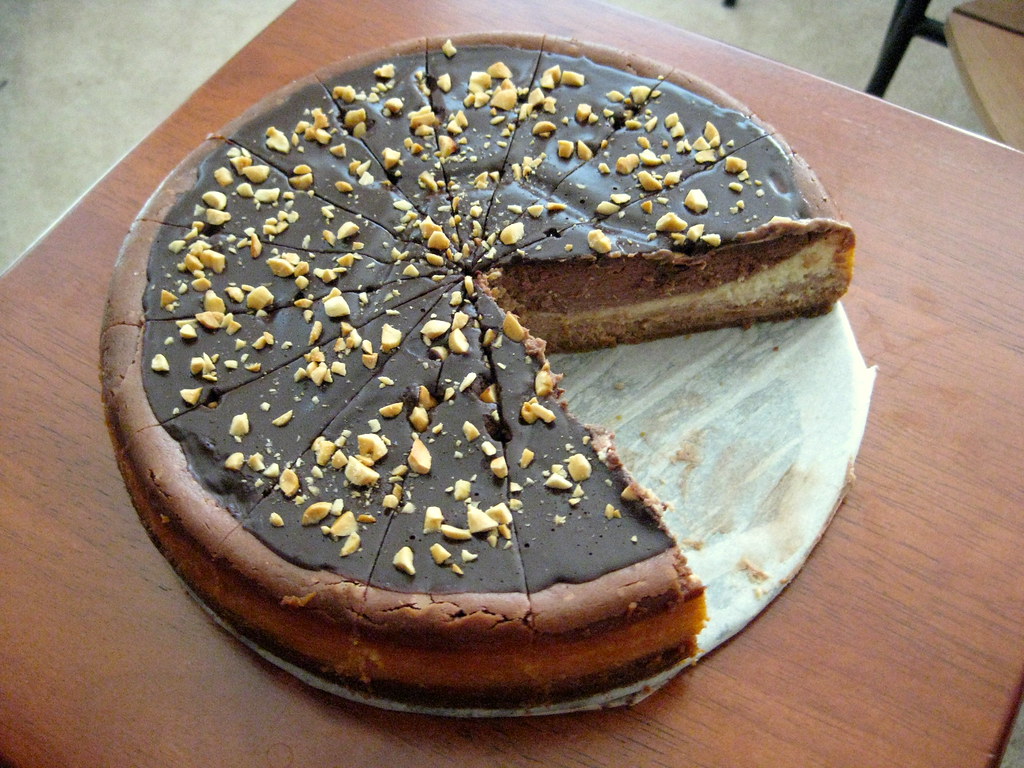
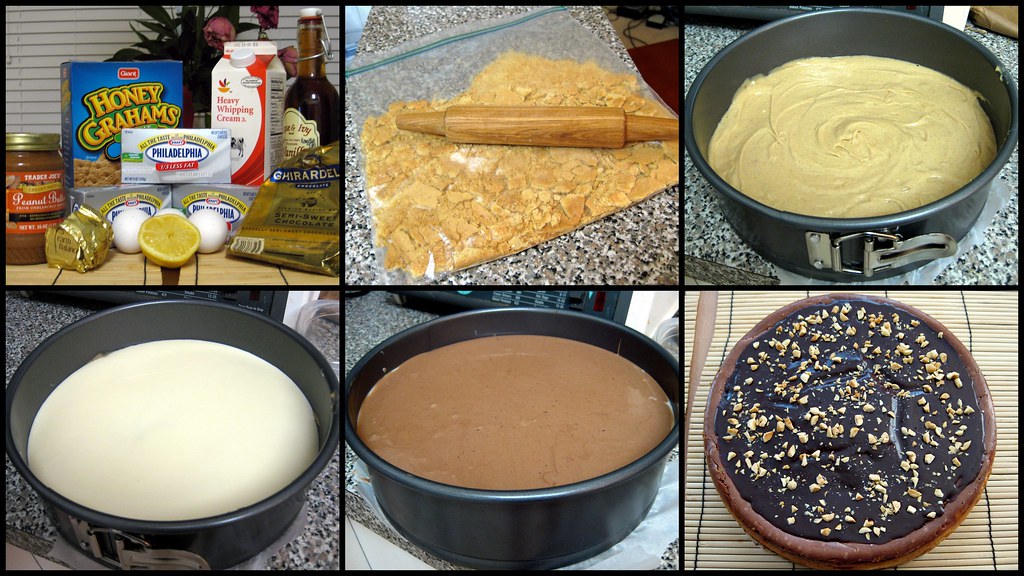
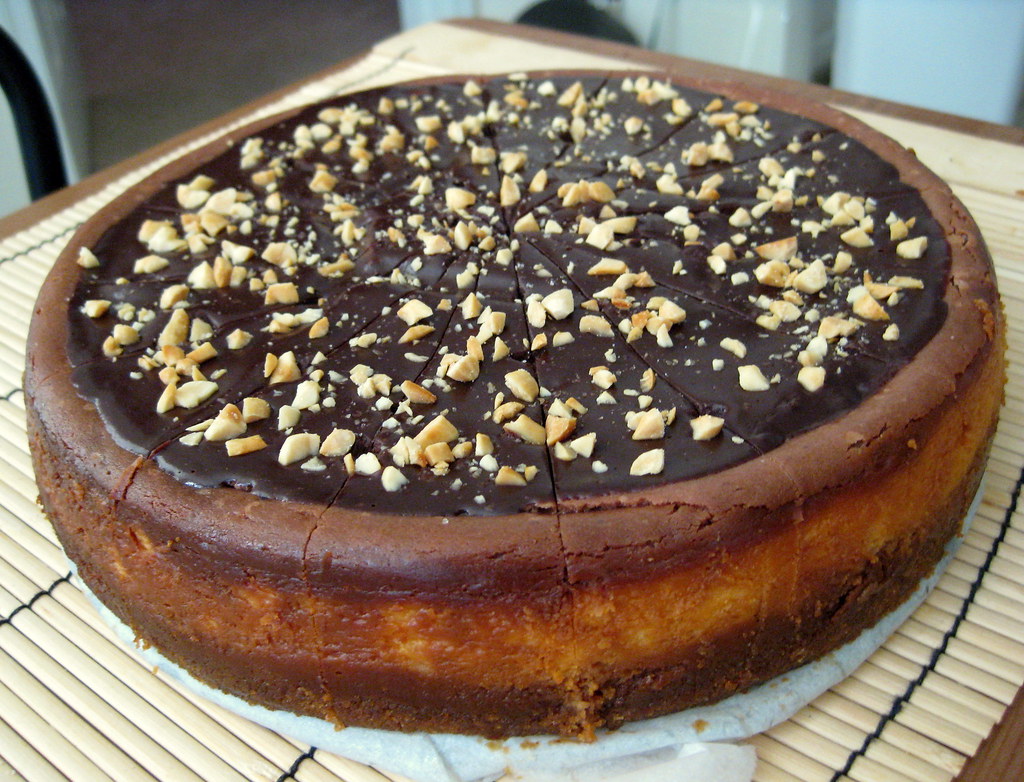
Crazy-overtime-makes-me-bake-til-3-AM Chocolate Peanut Butter Cheesecake


I'm constantly amazed by the cheer and sense of community that home-baked desserts can bring to people. And call me crazy, but I'm willing to go quite out of my way to provide them on a regular basis. Baking for work has even helped this shy girl come out a bit from her shell. Plus, being an unashamed people-pleaser (I've accepted that I am what I am), I'm truly just as happy bringing in the sweets as my suite-mates are to gobble them up. And that is why I began whipping up a cheesecake past 10 pm last Thursday night, having just come home from work...perfectly reasonable, no?

Chocolate with peanut butter is one of my boyfriend's FAVORITE combinations. I'm relieved to know a few things guaranteed to make his taste buds happy. See, he's not at all a foodie and avoids some of the novel pairings I invent (Mt Tam cheese and red currant vanilla rhubarb jam sandwich, anyone?). So when Mike posted this Chocolate Peanut Butter Cheesecake with all those delectable photos, I knew I HAD to lick the screen...I mean...bake it soon =D.

Being the dork that he is, my bf told me this reminded him of Pacman

You'll see below that I made quite a few changes. My only issues were that it turned out slightly softer than I like my cheesecake and deep cracks formed in the center. Mike's cake looks to have neither issue, so I expect my substitutions and technique were at fault. It was totally NOM-licious though! I do still prefer my cakes to be purdy (I'm so shallow 8p) so the following are some tips I gathered on how to minimize cracking for my next cheesecake adventure.

Harold McGee's awesome book, On Food and Cooking, explains that cracks "result when the [cheesecake batter] expands and rises during the cooking, then shrinks and falls as it cools down." So to avoid that, you'll want to 1) mix the ingredients slowly, gently, and as little as necessary to get an even consistency, 2) bake at a low temperature over a longer time, 3) don't bake too long though, the edges should be set but the middle should still jiggle, and 4) cool gradually in an open oven. But you know what? If all else fails, chocolate ganache (or any other topping) will make any cracks "disappear."


Chocolate Peanut Butter Cheesecake
[Printable Recipe]
Adapted from Mike's Table

*My changes in red italics

1 Graham cracker crust
24 oz cream cheese *I used all neufchatel cheese
1 cup sugar
3 eggs
1 cup heavy cream
juice of 1/2 lemon
1 Tbsp vanilla extract
3 oz bittersweet chocolate
1 Tbsp cocoa powder *I forgot to add this
1/3 cup peanut butter
1 Tbsp honey
*Ganache and toasted, chopped peanuts for topping

Crust
*Preheat the oven to 350°F. Crush about 7 graham crackers. As you can see from the collage above, I used the ziploc bag and rolling pin method. You can also use a food processor. Mix the crumbs with 1/4 cup sugar. Then pour in 3-4 T melted butter and toss together with a fork. Press this mixture into a greased or parchment-lined 9" springform pan and baked it for about 10 minutes at 350°F.

Filling
Let the cream cheese come to room temperature for about an hour. Then, in the bowl of a stand mixer, beat the cream cheese and sugar until lighter in texture. Add the eggs one at a time, beating in between each addition. Finally, add the cream, lemon juice, and vanilla, beating them all in. Scrape the sides of the bowl and beat some more. The batter should be silky smooth and reasonably thick.

Now, divide the batter evenly into three bowls. Leave one plain. In the second, the flavor is peanut butter. Add the batter, peanut butter, and honey to the bowl of the stand mixer. Beat it well and set aside. In the third, the flavor will be chocolate. Melt the bittersweet chocolate chunks (30 seconds in microwave, stir, repeat until melted) and give it 30 seconds to cool down a bit. Beat the melted chocolate and cocoa powder into the batter (in the bowl of the stand mixer, of course).

With all three flavors ready, now all that remains is to assemble the cheesecake. The order you choose, doesn’t matter, but into the graham cracker crust, I poured the chocolate batter, smoothed it out, then the plain, and finally, the peanut butter batter. *I reversed the order (peanut butter, plain, then chocolate on top). Give the pan a tap in case there’s any air bubbles trapped in there (you don’t want them).

Now, set a pan (larger than your cheesecake pan) in the oven (which is at 350°F) and fill it with water. You want to bake the cheesecake in the water bath for 45-55 minutes (you want the center to have some jiggle to it, still). The water bath tempers the heat of the oven, helping to prevent your cheesecake from cracking. *I didn't have a large enough pan so I put a 9"x13" pan filled with hot water underneath the cheesecake pan instead. Lack of a proper water bath may be why mine cracked. I also left the oven on 10 minutes longer because the whole cake seemed too wobbly at 55 minutes. Once time is up, kill the heat, but leave the cheesecake in the oven for an hour more before you remove it and let it cool down on the countertop. Once cooled down, let it sit in the fridge overnight before you grab your self a slice.

Optionally, now is a good time to top your cake with some ganache, but trust me, you’ll love it with or without. Enjoy! *I poured 1/2 cup of boiling heavy cream into a bowl containing 1/2 cup of finely chopped chocolate to make the ganache. After cooling a bit, this was poured on top of the cheesecake. I finished the top with a handful of toasted chopped peanuts.

Friday, July 3, 2009

Ugly is Beautiful


So I just found out that Canada Day was 2 days ago on July 1. I'm sad to admit that I don't actually know much about our neighbors up north. In fact, I've only entered Canada briefly when my parents got lost driving in NY many years back. But I do know a little more about music, and she's given us some great musicians! Just to name some of my favorites, there's Alanis Morissette, Neil Young, Leslie Feist (and the rest of Broken Social Scene), the band Stars, Emily Haines of Metric, and David Usher. I really encourage you to watch the music video above, which is for one of my favorite songs of David's. This guy is not only fantastically talented, but look at him! =p He's in his 40s but looks at least 10 years younger. Well happy belated Canada Day, everyone!


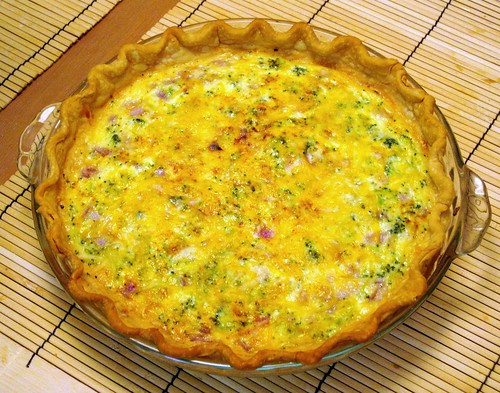
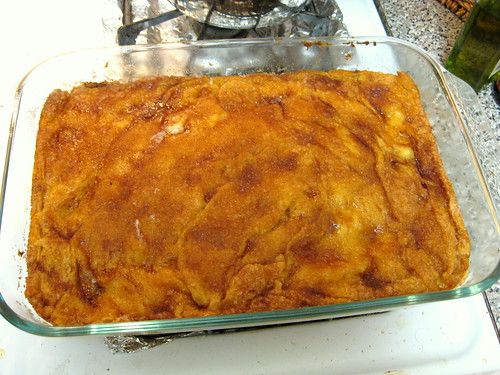
Other than being a music reference, the title of today's post is also applicable to the food I've made recently: broccoli quiche and sopapilla cheesecake bars. They won't win any beauty pageants, but were fairly tasty in my mouth!

This quiche is part of my latest effort to make more boyfriend-friendly food. You see, I've eaten mostly vegetarian (plus seafood) since middle school whereas Patrick was raised on a dairy and meat-laden diet. While I've no desire to impose my food preferences on him or vice versa, these combined with irregular work schedules mean that we've rarely eaten together though we've lived together almost a year. Making heartier dishes like quiche, lasagna, etc. will hopefully lure him to the dinner table when I do make it home, so we can be all domesticated-like ^_^. This broccoli quiche was delicious in flavor but very soft and eggy in texture (probably because the cookbook recipe is a variation of the original quiche Lorraine that didn't use cheese or onions). I'd add 1/2 C more cheese and more vegetables if I made it again.

Broccoli Quiche [Printable Recipe]
Adapted from Brilliant Food Tips and Cooking Tricks: 5,000 Ingenious Kitchen Hints, Secrets, Shortcuts, and Solutions

*My comments in italics

1 prebaked pie crust *I used storebought (the horror! =p) but want to try homemade soon
3 large eggs *I used a very small portion of an egg white to seal the crust
1 C total of milk, half-and-half, or cream *I used 1/4 C cream and 3/4 C milk
1/4 tsp salt
1/8 tsp ground black pepper
a few pinches of cayenne powder to taste
1 C broccoli florets*I'll increase this if I make this again
1/2 medium onion, chopped
1 clove garlic, minced
1-2 tsp olive oil *I used basil infused olive oil because that's what I had
1 C shredded cheddar or similar cheese, divided *I already increased this from the original recipe and will even more if I make this again
1/2 tsp paprika

Prebaking the Crust
Preheat your oven to 425 degrees F. You can prepare other components while you're waiting for it to heat up. Once the oven's ready, prebake your crust for 18-20 minutes. You can line the crust with foil and fill it with pie weights or dried rice/beans for prebaking, but I was lazy and just pressed down the bubbles with a fork afterward. While the crust is warm, glaze it with some egg white to prevent the filling from making it soggy. Lower the oven temperature to 350 degrees F.

Preparing the Filling
Steam or microwave the broccoli with some water under tender. Drain, coarsely chop, and spread in the bottom of the crust. Heat the olive oil in a small pan and saute the onion and garlic until soft. Scatter this over the broccoli. Sprinkle 3/4 C of the shredded cheese over the broccoli.

In a medium bowl, whisk together the eggs, milk/cream, salt, black pepper, and cayenne powder (optional). Pour this custard mixture into the crust. Sprinkle paprika on top and bake for 40-50 minutes until slightly puffy and a knife tip inserted near the center comes out clean. Let cool 15 minutes before serving.

Mine looks wrinkly because I let the crescent dough get too soft and thus difficult to unroll

That same night, I also made these Sopapilla Cheesecake bars, adapted from a Recipezaar recipe. I'm posting the link because I mostly stuck to the recipe. The only changes I made were to decrease the sugar in the filling by 1/4 C and to cut the melted butter in half. It took closer to 45-50 minutes for mine to bake through. My oven thermometer is pretty new, so I don't think that's the problem. This recipe uses store-bought crescent dough, which I admit annoys me a little since I'd rather my baking be from scratch. Nevertheless it tastes great for such minimal effort and my coworkers gobbled it up!

Last but not least, I want to thank my mom for the lovely roses she gave me on my birthday. They're still so pretty. In spite of a stressful week with at the office and lots of late work nights to come, I'm trying to appreciate the little pleasures in life...