
Sadly, I'm still trying to find time to set up my new camera, so no photos of tonight's cooking. I haven't had quality time in the kitchen in weeks on account of a crazy project at work. The foodie mojo's been slow in comin' back, which is why it felt so good to just cook by feel tonight. A little of this, a pinch of that...no recipes glaring disapprovingly over my shoulder every time I altered them (teehee), just a smooth progression from mind to hand to oven to mouth. It's a pretty basic healthy veggie lasagna, but for me, for this night, it was just perfect. You can find the recipe after the jump.
I also made these Chewy Cranberry Oatmeal Cookies to bring to the office. My coworkers have looked increasingly sad as my baking hiatus dragged on, and I'm such a sucker for fixing those long faces. My cookies took 4-6 minutes longer to bake than the recipe indicates. I can't leave any recipe alone (Recipe Editors Anonymous?) and soaked my craisins in a lil rummy rum before adding them in. I bet this threw off the wet-to-dry ingredients ratio. So they spread a lot and won't win any beauty pageants, but The Taster (aka, my boyfriend) said they're yummy after eating 3 of the ugliest ones in a row. Certainly good enough for me. And seriously, the flavor combination works. Give these cookies a try - with or without the alkie ^_^!
Simple Weeknight No-Recipe Lasagna [Printable Recipe]
6 sheets no-boil lasagna
26 oz. can of Hunt's Four Cheese spaghetti sauce (or any other pasta sauce)
1 small zucchini, sliced
2 medium carrots, sliced
1/2 medium onion (or one small onion), diced
2 tsp olive oil
salt to taste
1 1/2 cups low-fat cottage cheese
1 cup shredded part-skim mozzarella cheese, divided
1 large egg
4 oz. frozen chopped mustard greens (or whatever greens you have), defrosted
1/2 tsp italian seasoning
1/4 tsp cayenne powder
salt and pepper to taste
Sauce
Heat olive oil in a large pan over medium high heat. Add onions and carrots and saute until softened. Add zucchini to the pan and cook for another few minutes. Turn off the heat, then pour the pasta sauce into the pan. Mix everything together and taste the sauce, adding a little salt if needed. Set aside.
Cheese Mixture
Squeeze most of the liquid out of the defrosted greens using your hands. In a medium bowl, combine the cottage cheese, 1/2 cup of shredded mozzarella cheese, and the greens. Add salt and pepper to taste. Then add the egg and mix everything thoroughly.
Assembly and Baking
Spoon enough sauce into a 8" x 8" glass pan to cover the bottom. Place 2 lasagna pieces on top of the sauce. Dollop half of the cheese mixture on top of the pasta, then spread it evenly to cover the pan. Add 2 more lasagna pieces, more sauce to cover, and the rest of the cheese mixture. Top with the remaining 2 lasagna pieces and the rest of the sauce. If it becomes clear that there'll be too little sauce to submerge the pasta, you add more sauce or dilute the remaining sauce with a little water before pouring it on top. Sprinkle the top with the remaining 1/2 cup of mozzarella cheese. Cover the pan with foil and bake covered for 30 minutes in an oven set to 350 degrees Fahrenheit (no preheating necessary). Remove the foil, and continue baking for 15 minutes until the top is nicely browned. Let cool for 10 minutes before serving.
Thursday, July 30, 2009
Saturday, July 18, 2009
In Need of Some Muffin Lovin'

This post is a bit late, as I actually baked these strawberry muffins on Thursday night, but was sidetracked by a little security issue. Sorry too for the blurry (even more than usual!) photos. My boyfriend's Powershot (that naughty camera =p) went for a quick dip in the creek last week. So come Thursday night, I had to dust off my old Olympus D-590, which simply refused to take a decent close-up at night. There is a bright spot though (pun intended?): I bought a new camera! I'm gonna wait until it arrives to have some play time before posting more about it, but boy, am I excited!!
So how 'bout dem muffins? Well, I might be cursed when it comes to this style of baked good. My previous efforts can be summarized as gummy, dense, and not sweet enough. Despite all that, I just couldn't resist these beautifully domed blueberry muffins when I saw them on Cassie's blog, How to Eat a Cupcake. I still had some of my previous problems, but thankfully to a much smaller degree, perhaps due to creaming the butter and sugar instead of using the muffin method. Ironically, Cassie actually noted that these aren't very sweet, so I should've known to up the sugar to suit my personal tastes. I also used frozen strawberries and a cake flour substitute when I made these. These were a step in the right direction, but unlike Cassie, I haven't found my go-to recipe yet. I'd like to give the muffin method another try and have my eye on these fun lemon curd muffins.

Light Blueberry (or Strawberry) Muffins
Adapted from The America’s Test Kitchen Family Baking Book through How to Eat a Cupcake
Makes 12 muffins *I only filled the cups about 3/4 full and got 18
*My changes in italics
Vegetable oil spray
2 cups (10 oz) plus 1 tablespoon all-purpose flour
1 cup (4 oz) cake flour *I used 1 cup AP flour - 2 Tablespoons AP flour + 2 Tablespoons corn starch because I had no cake flour
1 cup (7 oz) sugar, plus 1 tablespoon for sprinkling *I left this out and regretted it
1 tablespoon baking powder
1/2 teaspoon baking soda
1/2 teaspoon salt
4 tablespoons (1/2 stick) unsalted butter, softened *I used Earth Balance margarine
2 large eggs
2 teaspoons fresh lemon juice
1 teaspoon grated fresh lemon zest
1 teaspoon vanilla extract
1 1/2 cups plain low-fat yogurt (Use low-fat yogurt here; nonfat yogurt will make dry, tasteless muffins)
2 cups fresh or frozen blueberries (ATK prefers frozen wild blueberries) *I used frozen strawberries
1. Adjust an oven rack to the middle position and heat the oven to 375 degrees. Spray a 12-cup muffin tin with vegetable oil spray *I just used paper liners.
2. Whisk 2 cups of the all-purpose flour, cake flour, 1/4 cup of the sugar, baking powder, baking soda, and salt together in a medium bowl. In a large bowl, beat 3/4 cup more sugar and butter together with an electric mixer on medium speed until light and fluffy, 3 to 6 minutes. Beat in the eggs, one at a time, until combined, about 30 seconds. Beat in the lemon juice, lemon zest, and vanilla until incorporated, scraping down the bowl and beaters as needed.
3. Reduce the mixer speed to low. Beat in one-third of the flour mixture and half of the yogurt. Repeat with half of the remaining flour mixture and the remaining yogurt. Beat in the remaining flour mixture until just incorporated. Do not overmix.
4. Toss the blueberries with the remaining tablespoon of all-purpose flour, then gently fold them into the batter with a rubber spatula. Using a 1/3-cup measuring cup sprayed with vegetable oil spray, portion the batter into each muffin cup, then portion any remaining batter evenly among the cups using a small spoon *My cups were about 3/4 full. Sprinkle the tops with the remaining tablespoon sugar. Bake until golden and a toothpick inserted in the center of a muffin comes out with just a few crumbs attached, 25 to 30 minutes, rotating the pan halfway through baking.
5. Let the muffins cool in the pan for 5 minutes, then flip out onto a wire rack and let cool for 10 minutes before serving.
Friday, July 17, 2009
Hacked!
UPDATE: I've gotten control of my account back, but still have no idea how they got in.
I'm SO ANGRY!! Some stupid low-life hacked into my Facebook account tonight and started asking my friends for money, pretending that I was stuck overseas. Now I know there's been things like that going around for a while, but my friend tells me that those were mostly automated emails. This hacker was actually messaging my friends in real time and seemed to know some personal information about me based on the conversations. Thankfully my friends are all very smart, figured it out, and even tried to warn others off. I can't even log in, so I've done all I could do (which is just to report to Facebook that my account's been hacked...).
Beyond the frustrations of this specific situation, tonight is also a long overdue reminder of just how much sensitive personal information most of us have on the internet (and which is probably incredibly easy to obtain for those with no morals who are so inclined). What's scary is that I have no idea what other information this hacker may have about me. For whatever good it may do me, I've started changing my passwords for all sorts of accounts, starting with the important ones. We'll have to see if my Facebook account even survives this episode. I'd definitely much rather disappear off Facebook than to put my friends at risk.
Saturday, July 11, 2009
Red Lentils With Cabbage and Panch Phoran

Don't you love when a quick and easy recipe is surprisingly bursting with flavor? When a meal reminds you just how delicious fresh and healthy vegetarian food can be? Saturday night's simple dinner was just the cleanser I needed after a week of cheesecake and unhealthy overtime delivery dinners. Admittedly I did finish up some leftover spinach and corn curry from Nirvana too, but the star of the meal was a cabbage and red lentil curry I found on Smitten Kitchen.
Like the amazing Deb, I'm a cumin junkie. But going one step further, I decided to invite some of his friends to the party, namely fenugreek, mustard, kalonji (nigella), and fennel. Together these 5 spices make up the Bengali spice blend, panch phoran, which I substituted for the cumin seeds in this recipe. You can learn more about this amazing spice blend over at Fatfree Vegan Kitchen and Tigers & Strawberries. A large bag of panch phoran from any Indian grocery will only set you back a few dollars. Of course, you could remain a cumin loyalist and stick to the original...but what would be the fun in that?
Red Split Lentils With Cabbage [Printable Recipe]
Adapted from Madhur Jaffrey, Indian Cooking through Smitten Kitchen
Serves 4 to 6
*My changes in italics
1 1/4 cups red split lentils (masoor dal), picked over, washed and drained
5 cups water
1/2 teaspoon ground turmeric
5 tablespoons vegetable oil *I reduced this to 2 teaspoons Earth Balance margarine and 2 teaspoons oil
1 teaspoon cumin seeds *I used panch phoran
2 to 4 cloves garlic, peeled and finely chopped
1 medium onion, peeled and cut into fine slices
1/2 pound cored and finely shredded cabbage
1 to 2 fresh, hot green chilies, finely sliced
1 1/2 teaspoons salt
1 medium tomato, peeled (This lazy Xiao also didn't peel her tomato) and finely chopped
1/2 teaspoon peeled, finely grated fresh ginger
Put the lentils and water into a heavy pot and bring to a boil. Remove any scum that collects at the top. Add the turmeric and stir to mix. Cover, leaving the lid very slightly ajar, turn heat down to low, and simmer gently for 1 1/4 hours. Stir a few times during the last 30 minutes.
When the lentils cook, heat the oil in a 8 to 9 inch frying pan over medium heat. When hot, put in the cumin seeds. Let them sizzle for 3 to 4 seconds. Now put in the garlic. As soon as the garlic pieces begin to brown, put in the onion, cabbage and green chilies. Stir and fry the cabbage mixture for about 10 minutes or until it begins to brown and turn slightly crisp. Stir in 1/4 teaspoon of the salt. Turn off the heat under the frying pan.
When the lentils have cooked for 1 1/4 hours, add the remaining 1 1/4 teaspoon salt, the tomato and ginger to the pot. Stir to mix. Cover and cook another 10 minutes. Add the cabbage mixture and any remaining oil in the frying pan. Stir to mix and bring to a simmer.
Simmer uncovered for 2 to 3 minutes or until the cabbage is heated through.
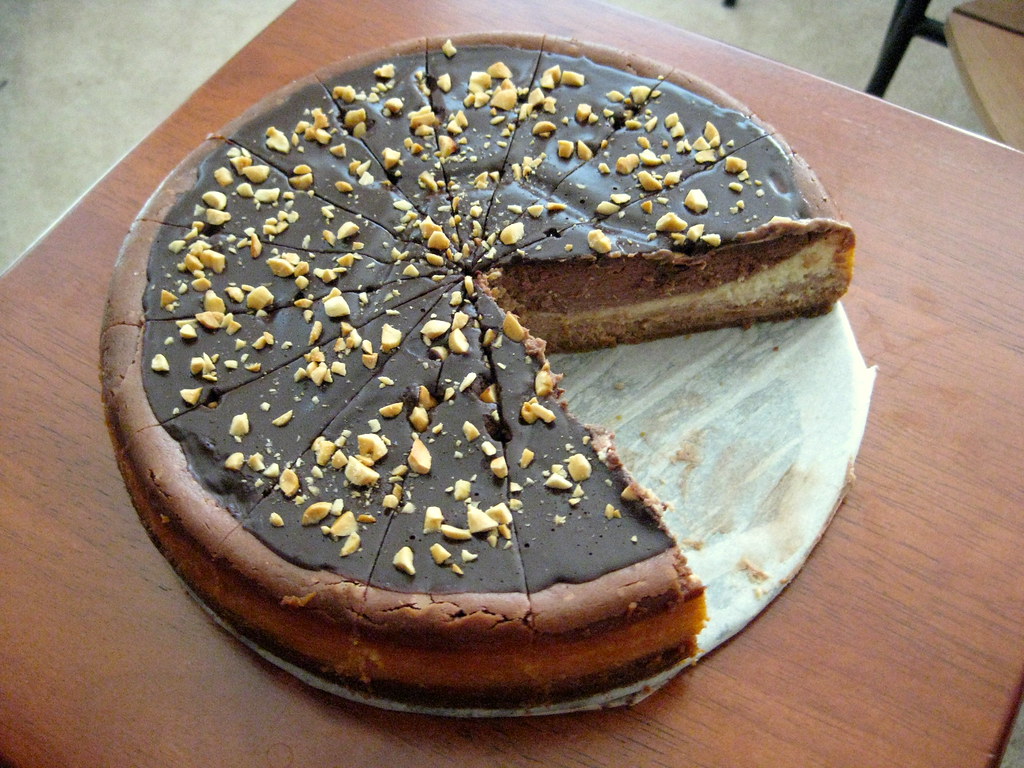
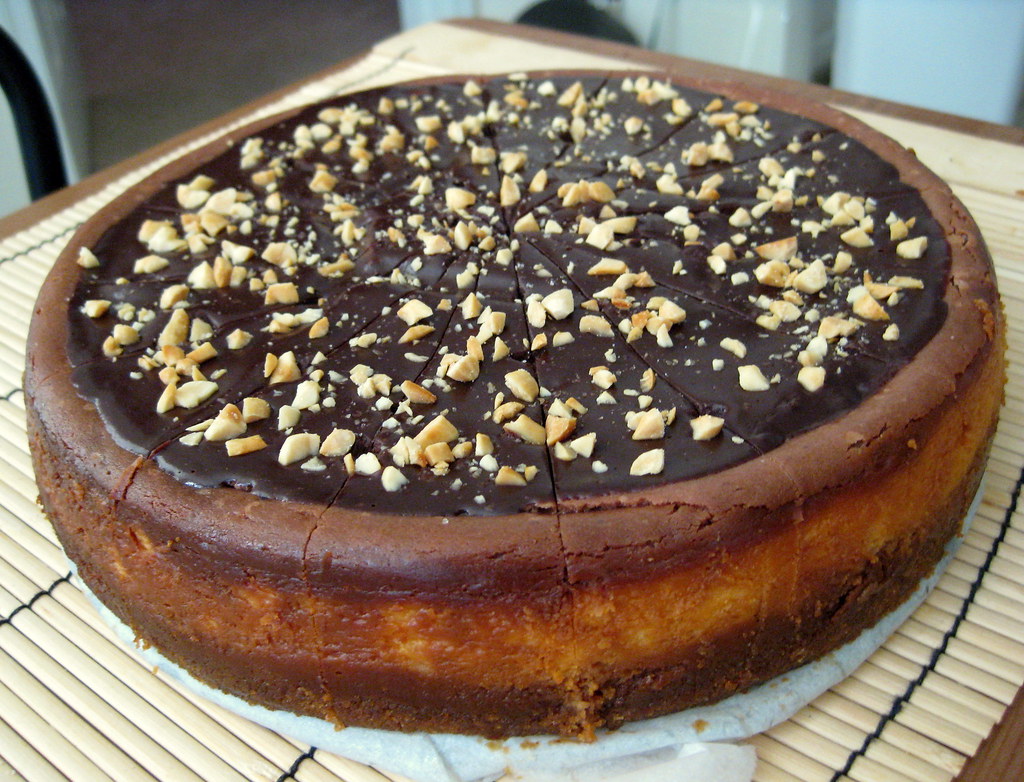
Crazy-overtime-makes-me-bake-til-3-AM Chocolate Peanut Butter Cheesecake

I'm constantly amazed by the cheer and sense of community that home-baked desserts can bring to people. And call me crazy, but I'm willing to go quite out of my way to provide them on a regular basis. Baking for work has even helped this shy girl come out a bit from her shell. Plus, being an unashamed people-pleaser (I've accepted that I am what I am), I'm truly just as happy bringing in the sweets as my suite-mates are to gobble them up. And that is why I began whipping up a cheesecake past 10 pm last Thursday night, having just come home from work...perfectly reasonable, no?
Chocolate with peanut butter is one of my boyfriend's FAVORITE combinations. I'm relieved to know a few things guaranteed to make his taste buds happy. See, he's not at all a foodie and avoids some of the novel pairings I invent (Mt Tam cheese and red currant vanilla rhubarb jam sandwich, anyone?). So when Mike posted this Chocolate Peanut Butter Cheesecake with all those delectable photos, I knew I HAD to lick the screen...I mean...bake it soon =D.
You'll see below that I made quite a few changes. My only issues were that it turned out slightly softer than I like my cheesecake and deep cracks formed in the center. Mike's cake looks to have neither issue, so I expect my substitutions and technique were at fault. It was totally NOM-licious though! I do still prefer my cakes to be purdy (I'm so shallow 8p) so the following are some tips I gathered on how to minimize cracking for my next cheesecake adventure.
Harold McGee's awesome book, On Food and Cooking, explains that cracks "result when the [cheesecake batter] expands and rises during the cooking, then shrinks and falls as it cools down." So to avoid that, you'll want to 1) mix the ingredients slowly, gently, and as little as necessary to get an even consistency, 2) bake at a low temperature over a longer time, 3) don't bake too long though, the edges should be set but the middle should still jiggle, and 4) cool gradually in an open oven. But you know what? If all else fails, chocolate ganache (or any other topping) will make any cracks "disappear."
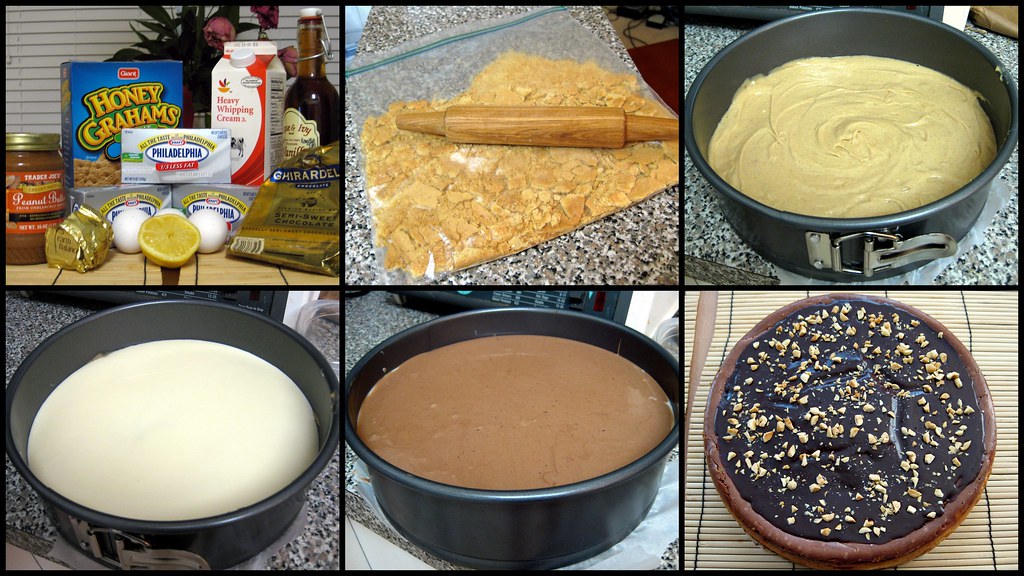
Chocolate Peanut Butter Cheesecake [Printable Recipe]
Adapted from Mike's Table
*My changes in red italics
1 Graham cracker crust
24 oz cream cheese *I used all neufchatel cheese
1 cup sugar
3 eggs
1 cup heavy cream
juice of 1/2 lemon
1 Tbsp vanilla extract
3 oz bittersweet chocolate
1 Tbsp cocoa powder *I forgot to add this
1/3 cup peanut butter
1 Tbsp honey
*Ganache and toasted, chopped peanuts for topping
Crust
*Preheat the oven to 350°F. Crush about 7 graham crackers. As you can see from the collage above, I used the ziploc bag and rolling pin method. You can also use a food processor. Mix the crumbs with 1/4 cup sugar. Then pour in 3-4 T melted butter and toss together with a fork. Press this mixture into a greased or parchment-lined 9" springform pan and baked it for about 10 minutes at 350°F.
Filling
Let the cream cheese come to room temperature for about an hour. Then, in the bowl of a stand mixer, beat the cream cheese and sugar until lighter in texture. Add the eggs one at a time, beating in between each addition. Finally, add the cream, lemon juice, and vanilla, beating them all in. Scrape the sides of the bowl and beat some more. The batter should be silky smooth and reasonably thick.
Now, divide the batter evenly into three bowls. Leave one plain. In the second, the flavor is peanut butter. Add the batter, peanut butter, and honey to the bowl of the stand mixer. Beat it well and set aside. In the third, the flavor will be chocolate. Melt the bittersweet chocolate chunks (30 seconds in microwave, stir, repeat until melted) and give it 30 seconds to cool down a bit. Beat the melted chocolate and cocoa powder into the batter (in the bowl of the stand mixer, of course).
With all three flavors ready, now all that remains is to assemble the cheesecake. The order you choose, doesn’t matter, but into the graham cracker crust, I poured the chocolate batter, smoothed it out, then the plain, and finally, the peanut butter batter. *I reversed the order (peanut butter, plain, then chocolate on top). Give the pan a tap in case there’s any air bubbles trapped in there (you don’t want them).
Now, set a pan (larger than your cheesecake pan) in the oven (which is at 350°F) and fill it with water. You want to bake the cheesecake in the water bath for 45-55 minutes (you want the center to have some jiggle to it, still). The water bath tempers the heat of the oven, helping to prevent your cheesecake from cracking. *I didn't have a large enough pan so I put a 9"x13" pan filled with hot water underneath the cheesecake pan instead. Lack of a proper water bath may be why mine cracked. I also left the oven on 10 minutes longer because the whole cake seemed too wobbly at 55 minutes. Once time is up, kill the heat, but leave the cheesecake in the oven for an hour more before you remove it and let it cool down on the countertop. Once cooled down, let it sit in the fridge overnight before you grab your self a slice.
Optionally, now is a good time to top your cake with some ganache, but trust me, you’ll love it with or without. Enjoy! *I poured 1/2 cup of boiling heavy cream into a bowl containing 1/2 cup of finely chopped chocolate to make the ganache. After cooling a bit, this was poured on top of the cheesecake. I finished the top with a handful of toasted chopped peanuts.
Friday, July 3, 2009
Ugly is Beautiful
So I just found out that Canada Day was 2 days ago on July 1. I'm sad to admit that I don't actually know much about our neighbors up north. In fact, I've only entered Canada briefly when my parents got lost driving in NY many years back. But I do know a little more about music, and she's given us some great musicians! Just to name some of my favorites, there's Alanis Morissette, Neil Young, Leslie Feist (and the rest of Broken Social Scene), the band Stars, Emily Haines of Metric, and David Usher. I really encourage you to watch the music video above, which is for one of my favorite songs of David's. This guy is not only fantastically talented, but look at him! =p He's in his 40s but looks at least 10 years younger. Well happy belated Canada Day, everyone!

Other than being a music reference, the title of today's post is also applicable to the food I've made recently: broccoli quiche and sopapilla cheesecake bars. They won't win any beauty pageants, but were fairly tasty in my mouth!
This quiche is part of my latest effort to make more boyfriend-friendly food. You see, I've eaten mostly vegetarian (plus seafood) since middle school whereas Patrick was raised on a dairy and meat-laden diet. While I've no desire to impose my food preferences on him or vice versa, these combined with irregular work schedules mean that we've rarely eaten together though we've lived together almost a year. Making heartier dishes like quiche, lasagna, etc. will hopefully lure him to the dinner table when I do make it home, so we can be all domesticated-like ^_^. This broccoli quiche was delicious in flavor but very soft and eggy in texture (probably because the cookbook recipe is a variation of the original quiche Lorraine that didn't use cheese or onions). I'd add 1/2 C more cheese and more vegetables if I made it again.
Broccoli Quiche [Printable Recipe]
Adapted from Brilliant Food Tips and Cooking Tricks: 5,000 Ingenious Kitchen Hints, Secrets, Shortcuts, and Solutions
*My comments in italics
1 prebaked pie crust *I used storebought (the horror! =p) but want to try homemade soon
3 large eggs *I used a very small portion of an egg white to seal the crust
1 C total of milk, half-and-half, or cream *I used 1/4 C cream and 3/4 C milk
1/4 tsp salt
1/8 tsp ground black pepper
a few pinches of cayenne powder to taste
1 C broccoli florets*I'll increase this if I make this again
1/2 medium onion, chopped
1 clove garlic, minced
1-2 tsp olive oil *I used basil infused olive oil because that's what I had
1 C shredded cheddar or similar cheese, divided *I already increased this from the original recipe and will even more if I make this again
1/2 tsp paprika
Prebaking the Crust
Preheat your oven to 425 degrees F. You can prepare other components while you're waiting for it to heat up. Once the oven's ready, prebake your crust for 18-20 minutes. You can line the crust with foil and fill it with pie weights or dried rice/beans for prebaking, but I was lazy and just pressed down the bubbles with a fork afterward. While the crust is warm, glaze it with some egg white to prevent the filling from making it soggy. Lower the oven temperature to 350 degrees F.
Preparing the Filling
Steam or microwave the broccoli with some water under tender. Drain, coarsely chop, and spread in the bottom of the crust. Heat the olive oil in a small pan and saute the onion and garlic until soft. Scatter this over the broccoli. Sprinkle 3/4 C of the shredded cheese over the broccoli.
In a medium bowl, whisk together the eggs, milk/cream, salt, black pepper, and cayenne powder (optional). Pour this custard mixture into the crust. Sprinkle paprika on top and bake for 40-50 minutes until slightly puffy and a knife tip inserted near the center comes out clean. Let cool 15 minutes before serving.
 Mine looks wrinkly because I let the crescent dough get too soft and thus difficult to unroll
That same night, I also made these Sopapilla Cheesecake bars, adapted from a Recipezaar recipe. I'm posting the link because I mostly stuck to the recipe. The only changes I made were to decrease the sugar in the filling by 1/4 C and to cut the melted butter in half. It took closer to 45-50 minutes for mine to bake through. My oven thermometer is pretty new, so I don't think that's the problem. This recipe uses store-bought crescent dough, which I admit annoys me a little since I'd rather my baking be from scratch. Nevertheless it tastes great for such minimal effort and my coworkers gobbled it up!
Last but not least, I want to thank my mom for the lovely roses she gave me on my birthday. They're still so pretty. In spite of a stressful week with at the office and lots of late work nights to come, I'm trying to appreciate the little pleasures in life...
Subscribe to:
Posts (Atom)


