

An early photo after realizing the value of food/prop styling
When I first picked up a DSLR camera and began photographing/blogging regularly, I never imagined I'd fall so head-over-heels in love with food photography and styling. Nor could I have predicted that less than 2 years later, I'd be getting such incredible support from my readers, and more recently, an increasing number of emails asking for photography advice. I have no idea if this comes across online, but I'm actually quite a shy person in real life. It's truly a testament to you all that I feel quite at ease writing this post today.
Please understand that I don't claim to be an expert in any of this (photography, styling, processing, etc.). What I do possess is a body of information collected through passionate observation, experimentation, and experience that will hopefully make the brave new world of food photography a lot more fun and less scary to you than it might otherwise be... So what are we waiting for? Let's get started!

Food Photography: At the Start
At this point you might be wondering why I chose to start a post about food photography with a collage of photos that are mediocre at best. The photos above are some of the first ones to have graced this blog. In fact the blurry shot of raspberry streusel bars at top left was the first food photo taken by yours truly to be posted here! The point of this collage is simply to emphasize that everyone starts photographing with no experience and little technical skill.
For me the importance of this is twofold. First, it makes the task of learning food photography or improving your photographs less daunting once you realize it's a skill to be mastered and honed through constant practice/study rather than some gift you have to be born with. Certainly some people are better at it like anything else. But to give an example, take a look at this early post by blogger/photographer/stylist Aran Goyoaga of Cannelle et Vanille. I bet her early photos are not so different from yours or mine. She had to learn the same basics as any other photographer in order to get where she is today.

Food Photography: 2 Years Later
Second, I think it's important to remember where we started off to maintain perspective on how we've grown. I've seen many bloggers complaining about how much they hate and hope to one day replace their early blog photos. If you're one of them, I hope you'll change your mind. There's no shame to showing the history of your development as a photographer, and at least for me, removing them would just feel like pretending to have been something I wasn't.
FOOD PHOTOGRAPHY
BASIC FOOD PHOTOGRAPHY EQUIPMENT
As I've mentioned before, I've used the Canon EOS Digital Rebel XS camera with the Canon EF 50mm f/1.8 II lens for the past 2 years and for the majority of the photos on this site. Both are on the lower end of the price range for dSLR equipment. To touch briefly on the Point and Shoot (P&S) versus dSLR issue, I do wholeheartedly agree with the common saying that "it's not the camera, it's the photographer." So no, not even dropping several grand for a professional camera will allow you to instantly take amazing photos. BUT dSLR cameras do generally produce photos with noticeably superior clarity and color. And most importantly, they put an incredible amount of control in your hands. Yes -- it's an investment -- but one that's been more than worth it in the amount of joy, creative expression, and blogging success it's provided me.
Though the Rebel XS has served me very well, I'd recommend starting with a slightly higher-end model (like an XT or XTi/Nikon equivalent or even better if you can afford it) if you expect to be serious about photography. Regardless of the camera, I guarantee the 50mm lens is the best bang for your buck (at around $100) and won't disappoint!
My other indispensable equipment for shooting food include:

- a very affordable tripod (key for getting clear shots even in low light and to free up my hands); do make sure to get a tripod that can withstand the weight of your camera and lens(es) -- higher quality cameras tend to be heavier and you don't want your new camera crashing to the ground!
- any sheer white curtain, bedsheet, or parchment/vellum paper (to diffuse natural light)
- cheap white/black foam boards in various sizes from any craft store (used as light reflectors/absorbers)
- cheap clamps from any hardware store OR any heavy tall object (to hold or prop up your reflector boards);
- 38-inch horizontal tripod arm extender (optional but very helpful to get overhead shots and squeeze into tight corners in my small apartment);
- round 40-inch 5-in-1 flexible collapsible reflector (optional but useful for tight spaces and corners)
BASIC PHOTOGRAPHY LIGHTING AND SETUP
My main and usually sole source of light is natural light. I totally understand how limiting this is in terms of time, but natural light simply breathes life into photos in a way that's hard for artificial lights to provide (though a pretty good counter-argument has been made before). When I first started blogging, I was working a very busy job, but was still able to photograph with natural sunlight in the morning or on weekends. This is a personal preference and priority, but most of the blogs and tutorials I enjoy and linked below also use natural light in their photos. And since it is what I have experience with, this post will only discuss natural light food photography.
My window is fairly tall (almost 5 feet) and almost twice as wide. Since the window faces West, I find that my best hours for photography are between noon and 4:30 pm. My lighting setup usually involves styling my tabletop within 1-2 feet of the window (you can use any strong but diffused light source available to you). I usually prefer to soften the lighting to avoid harsh highlights or shadows, so I've taped large pieces of white parchment paper over my entire window to act as a diffuser. You can also use a sheer white curtain, bedsheet, or vellum paper.

Black paper held to the left to subtract light for more dramatic mood
I use white foam boards in a variety of sizes and a large round expandable reflector (see equipment list above) to bounce more light into areas of the photo where I want it (it's amazing how much of a difference these can make!). The expandable reflector has a silver side and a gold side to give a cooler or warmer tone to the resulting photo. To create a cheaper version of the silver reflector, you could simply wrap one side of a board in aluminum foil as a makeshift reflector. Likewise, I have black boards to subtract light and deepen shadows when that effect is desired (my friend Vera has a great post with photos on this technnique). To use either reflector, I start by positioning it about perpendicular to the table. Then, I may angle the reflector(s) down toward the food or up above the food and move the reflector(s) closer to the food or further away from it, taking photos of each and comparing results until I'm satisfied with the photo.
BASIC EXPOSURE AND CAMERA SETTINGS
To reach your photography potential and get the most out of your dSLR camera, you will need a basic understanding of exposure. Since there are already quite a few excellent posts on this from bloggers that are professional food photographers, I will only do a quick overview of this topic and direct you to their sites for more in-depth lessons with demonstrative photos =).
As illustrated in the diagram below, 4 main factors contribute to exposure (or the the amount of light that passes into your camera and onto the sensor): the amount of light in the scene and camera shutter speed, aperture, and ISO (light sensitivity). To keep this post from becoming a novel, this will be a very general overview with the emphasis being on the effects of each setting rather than the mechanics behind it (which I honestly don't completely understand anyway =p).
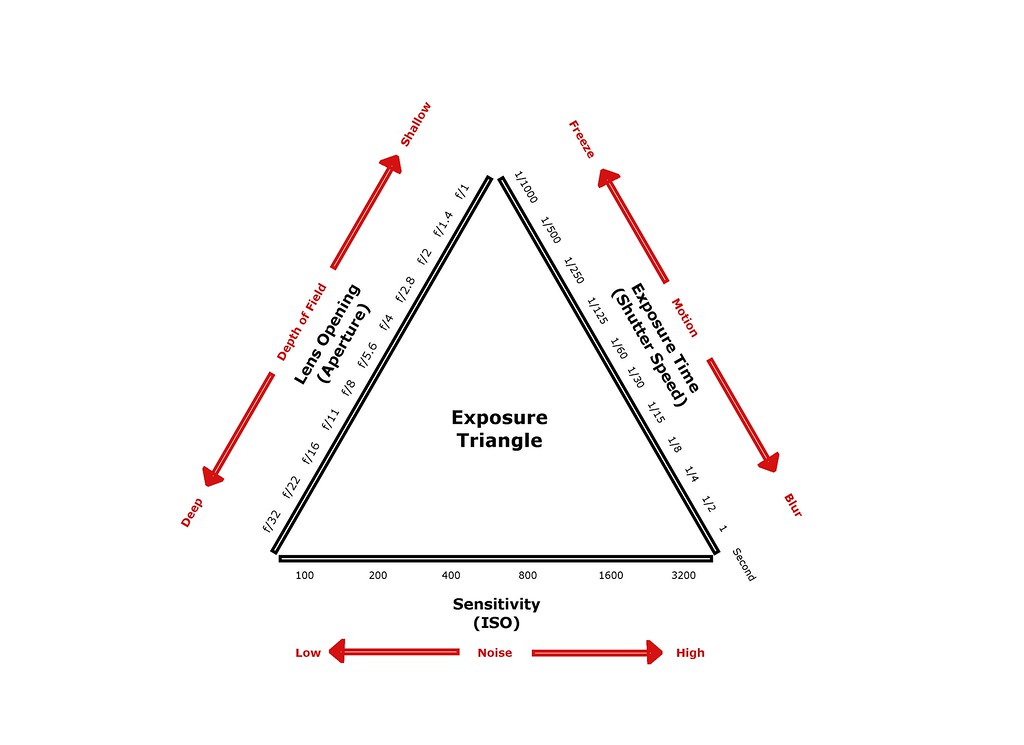
Shutter speed is probably the easiest to understand. It is the setting determining how long the camera shutter remains open to let light in and is measured in fractions of a second. Thus it makes sense that the faster the shutter speed, (such as 1/500) the darker the photo will be (assuming other settings aren't changed), and the slower the shutter speed (such as 1/4), the brighter the photo will be. Shutter speed is also important for capturing motion; a slow shutter speed will capture any movement (intentional or not) as blurring, while a fast shutter speed will "freeze" a moment of that motion clearly.
Aperture reflects the size of the lens opening that lets light into the camera while the shutter is open. Aperture size is expressed in “f-stop” numbers like "f/2.8." The smaller the f-stop, the larger or wider the aperture is. The larger the aperture/lens opening is (such as f/2.8), the greater the amount of light let in and the brighter the photo will be (assuming other settings don't change). The smaller the aperture/lens opening is (such as f/16), the lesser the amount of light let in. The aperture also determines the “depth of field” (DoF). This is the part of a photograph from front to back that is in sharp focus. A very small aperture will keep everything in the frame from near to far in focus (deep DoF). But a large aperture opening (but smaller f-stop!) will keep a small section of the photo in focus (shallow DoF). Large apertures produce photos with the blurry backgrounds that are so popular in food photography.

Moderately large aperture (f/4) to blur the trees outside the window
Finally, ISO is the camera's sensitivity to light. the higher the ISO is (such as 1600) the brighter the photo will be, the lower the ISO is (such as 100) the darker the photo will be (assuming other settings don't change). Increasing the ISO can be very useful for taking photos in low-light settings, but a high ISO also produces photos with more noise (dust-like specks/graininess). Thus, once you know how high your camera can go before the noise becomes visible, you should keep your ISO below that number (unless you are seeking the grainy look for artistic effect).
If the technical terms are still confusing you, here is a metaphor that helped my friend understand exposure more easily. Imagine yourself in a room with no light except from a single window which has shutters. The total amount of light that reaches your eyes is like the exposure. The shutterspeed is like the amount of time the window shutter is opened to let light in. Aperture is like the size of the window. Low ISO is like you are wearing sunglasses (your eyes are then less sensitive to the light) and high ISO is like your eyes are uncovered.
So by adjusting the 3 settings above, you can get the amount of brightness you want in your photo. But as you might have realized, since all 3 factors contribute to the total exposure, there are multiple combinations of settings that give you the same desired amount of overall brightness. So you might be wondering how you decide which combination to use. Well...this is where the unique effects of each setting come in, and you get to exercise some artistic control!
For example, if you were taking a photo of an orange still on the tree and wanted only the orange in focus with the branches and leaves blurry, you would use a large aperture such as f/2.8 to achieve that effect (a shallow depth-of-field). However, since a larger aperture lets more light into the camera, you'll need to increase the shutter speed or decrease the ISO to maintain a good exposure. On the other hand, if you want to capture, say, some wine being poured into a glass, you would use a fast shutter speed such as 1/800. But since this decreases the amount of time light has to enter the camera, you'll need to increase the ISO or aperture to increase the light let in and maintain a good exposure.
Unless you want a purposefully grainy photo, ISO doesn't really offer creative options like shutter speed and aperture do. It is, however, useful for taking photos in low-light settings. With the help of higher ISO (light sensitivity), slow shutter speed, and large aperture settings, I've been able to extend some food photography shoots to as late as 6:30 in the evening still only using natural light! But to get clear images without blurring at low shutter speeds, a tripod is absolutely critical.

Taken around 6 pm with tripod @ f/2.5, ISO 400, 1/125
I know all this can be a lot to take in if you're just getting into photography and trying to learn everything on your own. That's why I'd recommend you start shooting in Aperture Priority mode if you're just starting out. With this setting, you simply increase the aperture (smaller f-stop number!) to have a small area in focus and the rest blurry. Or decrease the aperture (larger f-stop number) to have more of the photo be in focus. The camera will adjust the shutter speed and ISO on it's own to what it calculates as "correct" exposure. If you want things a little brighter or darker than that, there's usually an "exposure compensation" button (circled in red below) to nudge the overall exposure up or down.

Exposure Compensation Button (circled in red) and Exposure Compensation Setting Display (outlined in red rectangle) on a Canon dSLR
Once you're comfortable shooting in Aperture Priority mode, I strongly encourage you to switch to manual mode. It's really not very different, and you'll love having complete creative control so much that you'll wonder how you ever lived without it! The main change from Aperture Priority to manual is that you now control the shutter speed.
For your first time exploring manual mode, you may want to set a moderate ISO of 200 and shutter speed of 1/125. Next choose an aperture setting depending on what depth-of-field you'd like your photo to have. Then look in the viewfinder and with the camera focused on your subject, push down partially on the capture button. This should cause the vertical bar of the viewfinder exposure meter (outlined in red below) to move left or right, indicating under or over-exposure.
Using the basic concepts of exposure I explained above, you should now be able to adjust the 3 settings until the exposure meter shows "correct" exposure (when the vertical bar is centered like in the photo above). For example, if the vertical bar is closer to the right at 1, the meter is indicating underexposure and you know that not enough light is entering the camera. And vice versa if the vertical bar is more to the left at -1.
***To correct for underexposed settings:
-increase ISO;
-decrease shutter speed; OR
-increase aperture (decrease f-stop number)
***To correct for overexposed settings:
-decrease ISO;
-increase shutter speed; OR
-decrease aperture (increase f-stop number)
Of course the point of shooting in manual is not to simply find the nearest "proper" exposure and stay put! Once you have these basics down pat, you'll be able to play with the settings any way you want and be able to find your way to your desired exposure. So that's shooting in manual mode -- not so scary, right? As this process becomes second nature to you with practice, you'll notice you often don't agree with the camera's definition of a "correct" exposure. And really, you don't have to! After realizing I preferred my photos "overexposed" by +1, that's now the level I aim for. Guidelines are merely there to help us find our way. Once you know the rules, you can have a blast bending them =D.
WHITE BALANCE AND RAW FILE FORMAT
When we look around us, whether it's in natural or artificial lighting, sunny or cloudy weather, colors remain fairly consistent because our brain adjusts so that we see them that way. Cameras do not do this, so we as photographers need to take steps to make sure there are no weird color casts in our photos. Most cameras have an automatic setting that will attempt to guess the correct colors, but I prefer not to take any chances. In order to correct a color cast (such as a bluish tint from light on a cloudy day), there needs to be something that is true white or gray/silver in the photo as a standard to compare other colors against. There is often already some fabric, plate, or silverware that can serve this purpose. But in the case that there isn't, I like to take a photo of a piece of white paper in the same lighting and scene that my "real" food photos are taken in. Many image processing programs then let you set the correct white balance by clicking on a neutral part of your photo (such as the white paper). You obviously don't want a piece of paper in your final photo, so these programs allow you to "copy“ the corrected color settings over to your other photos.
To get the best results from post-processing, including fixing the white balance, I highly recommend shooting in RAW format. It's an uncompressed format that's similar to a film negative in that it needs to be processed to be viewed normally. RAW files are larger than JPEG and require more storage space, but that is because they capture more data that allows for extensive correction of the exposure, contrast, color, and other aspects of photos in processing with minimal loss of image quality. This makes it especially ideal for photos taken in low or colorcast light settings that may need more post-processing. Only specific programs can edit RAW files, but most dSLR cameras come with one.
PHOTO PROCESSING
Although I try to create the best photos I can in-camera, I simply don't have a professional studio/equipment and there are always beneficial tweaks to be made in post-processing of RAW and JPEG formats. I usually tweak color balance, contrast, and brightness using the Canon RAW image editor that came with my camera. Then, I convert the RAW file to a large JPEG (2000 pixels wide) and further fine-tune the same settings as well as adjust others such as sharpness, saturation, levels, and curves in Adobe Photoshop. There are many programs available for photo editing to suit a range of budgets and personal styles. You may want to ask around and download some trials before settling on one that's best for you.
It's also difficult to share post-processing steps in detail since it can differ so much between photos, depending on the look/feel I'm trying to achieve. There are 2 methods that I use fairly often in Photoshop that I will share today. First is my favorite way to sharpen images: (1) duplicate the original image in a new layer on top and rename the new layer to "Sharp", (2) with this new layer selected, click on Filter/Other/High Pass. Set the radius between 1.5 and 2.5 depending on the photo size and click OK, (3) change the "Sharp" layer's blending mode to "soft light" and its opacity to between 20 and 30%. Second is a simple technique I use to add depth and "pop" to my photos: (1) duplicate the original image in a new layer above it and rename the new layer to "Deepen", (2) change the "Deepen" layer's blending mode to "soft light" and the opacity to between 5 and 15%. You can adjust this opacity based on your preference.
Oh and one more thing: there ain't no shame in rockin' the stamper! Seriously, I use mine for small touch-ups all the time. That stubborn wrinkle in the linen? Gone! A wayward crumb in an awkward place? BAM. I'm a student in a cramped apartment, not a professional photographer. I wield my stamper with head held high, and so should you!
FOOD/PROP STYLING
If you couldn't tell already from my posts, I loves me some food props! Put me in an antique store and I'm giddier than a kid in a candy shop. It pleases me that prop (and food) stylists are finally starting to get the recognition they deserve. When I started photographing food, I read so much about light, light, and more light! True, photography is at its essence about capturing and manipulating light, but it's nice when the light has lovely textures and objects to play with, too, no? For me, great food photos are ones that tell a story with a time and a place...and props play no small part in setting them there.
ACQUIRING PROPS

Organic-Shaped Dinnerware from West Elm
Disclaimer...hunting for props can be fun yet frustrating, quickly become addictive, and consume lots of money and space =p. But if you dare proceed, I do have some recommendations for you. As professional food prop stylist Robin Zachary wrote in her recent guest post, "Keep [props] tasteful and simple. Remember the food is the star!" I completely agree with this philosophy and recommend starting with affordable ceramic dining/serveware in white or other soft solid colors that won't outshine the food. Ikea, World Market, Bed Bath & Beyond, Crate & Barrel, and Red Vanilla are great places to look. If you're willing to make an investment, the more "organic" style of ceramics is beautiful albeit pricey. Mud Australia sets the bar, but other shops like Gleena and West Elm have excellent offerings as well.

Marta Tumblers from Crate & Barrel
Nice glasses are yet another great basic to have for personal use and photography. Crate & Barrel and World Market offer stylish and affordable barware. I also like to explore thrift and antique shops for unique glasses. You rarely need a set of anything for food props, so feel free to pick up pretty, one-of-a-kind items for dirt cheap at these places. You'll never know when that item may add just the right touch of "special" to a photo.
Silverware is, like all props, a matter of personal taste. Modern pieces that are tasteful can certainly work well in food shots, but I prefer the duller surface and patina of vintage silverware. Their advantage is two-fold because they (1) add a sense of history and continuity to the scene (as if someone has used the spoon or fork for many years and will continue to do so) and (2) have worn surfaces that won't reveal your tripod, reflector, or even your face in their reflective surfaces! I favor antique malls, thrift stores, Etsy, and Ebay for reasonably priced silverware. Don't be afraid to ask the sellers, especially on Etsy, to lower shipping costs or even the sale price by a few dollars. Sometimes they'll agree just to clear out old inventory.

Hem-stitched Napkins from Pottery Barn
Like utensils, napkins and kitchen towels are important to add a touch of realism to food photos, as if someone is about to dig right in. I've had difficulty finding good napkins locally, but Amazon and other online retailers provide some options. It also seems to be common practice to use napkin-sized fabric pieces to achieve a similar effect. Solids or delicate patterns are usually best to avoid overpowering the food. It's not easy to find kitchen towels without patterns or logos these days, but Ikea and Etsy and good places to look. Pottery Barn sells linens with beautiful hemstitching but at a higher cost.

Butter Paneer Curry Pizza on Vintage Chair
Last but definitely not least, are background surfaces. Although they may not be the hero, you'd be surprised at how much a beautifully textured background can set a food photo apart. These surfaces run the gamut from table linens to vintage wood, zinc sheeting to weathered fencing, and from denim fabric to slate slabs. Since large stone and metal surfaces are rarely available to us food photography hobbyists, I'm going to focus on the more obtainable surfaces here:

Browned Butter Pizzookies on Back of Old Roasting Pan
PRE-SHOOT PLANNING
Yes, I plan ahead for my food shoots (when I can make the time). This may sound excessive to some, but it's incredibly helpful to making the food preparation, styling, and photography process flow together smoothly. Plus the sooner I can get photos I'm happy with, the sooner I can eat ^_^. Believe it or not, I have no visual imagination (I can't picture things in my mind). Which is why I find it very useful to sketch out my styling ideas ahead of time (see example below). Sometimes the idea for a set-up just grabs me right away, but more often I like to think about the food I'll be making. Does it have an obvious history, a story? What emotions might it evoke in someone eating it? What mood do I want this dish/photo to convey? Is it associated with a particular time/season? How is this food commonly presented? And that's just a sampling of the questions you could consider.
As I said earlier, the most powerful photos to my mind have a story. I mean this in a way that is not so much about a plot as it is about evoking a time, place, or even just a feeling. I prefer to decide on the message I'm trying to convey earlier in the preparation process rather than later. Once that's known, it can become the common string that ties everything else together, from the color scheme to the lighting or props. And don't feel like you have to stick with what's typical. Experimentation is the fuel to my passion for photography and one of my favorite exercises is to shine a different light on a familiar food.
In addition to furthering the creative process, I find that sketching for a shoot is a great way to get materials organized so that I'm not still digging for a napkin or that perfect spoon when the food is ready to go. Once I'm happy with my styling, I make a list of all the props as well as ingredients I'll need on hand for that dish. It's with me on my grocery trip and later when I lay out the props where they'll be easily accessible during the shoot.
THE SHOOT
I'm gonna let you in on a little secret...I'm clumsy as all get-out and I still hold my breath a lot of the time when I'm styling food. No joke...my boyfriend P could tell ya allll about it. But the takeaway here is: if I can do it, so can you. My typical strategy has 3 parts. Part A: set up the props and adjust camera settings beforehand so you are ready to shoot when the food is done. Part B: slow and steady (and detailed) wins the race. Unless your food is time-sensitive (e.g., anything frozen or a souffle), handle with care and take your time making your food look its best down to the little details. Remember, it's always easier to add more of something than to remove excess. Part C: don't be afraid to play favorites or to fake it! For instance, if you didn't get the hang of piping frosting on cupcakes until the last 3 of the dozen, don't be afraid to photograph only the pretty ones. Or place them in the forefront and use shallow depth-of-field to do a Monet on their plainer sisters. I think readers understand that you're trying to show the best possible presentation of the recipe.

Photographic Evidence of My Clumsiness 8)
Other assorted styling tips I've picked up here and there:

Spinach Feta Stuffed Pretzels and Spaghetti with Tomato Vodka Sauce
COMPOSITION
You've probably heard the saying that practice makes perfect, and indeed it's important to our growth as photographers to shoot often. At the same time, I'm quite convinced that the best thing to ever happen to my photography was the 3-4 months when I was so busy working that I couldn't photograph (or do much of anything else either, for that matter). During those months I'd often browse food blogs during my breaks at the office and started seriously analyzing the photos that drew me in the most. It was only then that I became present to the power of styling and composition in food photography and began to apply it to my own work.
My talented friend, Sylvie, of Gourmande in the Kitchen has actually just published a wonderful post summarizing the principles used to organize the visual elements of lines, shapes, colors, and textures in a photograph that tend to result in a successful composition. The principles discussed are balance, movement, pattern, and proportion; and it's really a must-read for any budding food photographer. The formal terms are new to be, but reading this article was like having the very patterns I'd observed privately put to paper. Though I lack formal training in these principles, I will briefly discuss my personal understanding of and experience with them below.

Sliced Orange and Blanched and Peeled Peaches
Balance
This is one of the most important principles, in my opinion, and strongly affects how we respond to viewing an image. I am not a fan of tilted food shots and I think it is precisely because any chance of balance is thrown out the window. But that's not to say that every piece of the scene must be perfectly level. Tilting some elements (such as cutting boards or cutlery) can be a great way to add tension, movement, and interest to your composition as long as they are well-distributed. As Sylvie notes in her post, balance doesn't have to symmetrical. For example, in my photo of waffles below, the waffles and blueberries on the left are balanced by the silverware and beaker on the right despite their asymmetrical placement. Moreover, balance involves not only distinct objects but also colors, textures, and light. In the photo of strawberry cupcakes below, the greens and yellows of the trees outside help to balance the red of the strawberries. In the shot of lemon polenta cranberry cookies (also below), the dark shadows from the wood board complement to the bright highlights on the cookies above it.

Strawberry N' Cream Cupcakes and Chocolate Nutella Alfajores
Movement
Movement can be quite literal, such as the slicing of an onion or pouring of syrup, or it may refer to the placement of focal points within the image. The second is probably my favorite out of these principles because it was the personal revelation that changed my entire outlook on food photography. One day while perusing a food magazine, I suddenly realized that my eyes were moving between interesting parts of the photograph in a zigzag pattern down the page! This is the explanation you've probably been waiting for as to why some of these photos have odd lines going across them -- I simply highlighted some potential paths your eyes might take as they move across my photos. Of course each person will view the photos slightly differently due to individual preferences, but positioning interesting elements in a way that guides the viewer's eyes through your photo will make anyone's experience more enjoyable and exciting.

Cinnamon Teff Waffles with Blueberry Compote and Lemon Polenta Cranberry Cookies
Pattern
Adding repetition of shapes, colors, etc. creates a structure and continuity in a photo that is pleasant to viewers' eyes. I think that's probably why so many food photos feature multiples of foods rather than one alone. The photos of cookies and waffles (above) and macarons (below) are obvious examples of this. More subtle uses of pattern, which were more intuitive than intentional on my part, can be found in the strawberry and s'mores cupcake photos. In the first photo (above), you may notice that the shape of the bowl with whipped cream somewhat resembles that of the cupcake. In the second photo (below), a stripe-like pattern can be found in the toasted frosting, ridges of the cupcake liner, veins of the leaves, and placement of the branches.

S'mores Cupcakes and Snickers Macarons
Scale and Proportion
Scale refers to the size of objects within the whole photo, while proportion refers to the size of objects in the photo compared to each other. Both are important to the viewer's perception of the object and must be kept in mind. A common mistake of scale is to take a very close-up image of the food in which the food alone takes up most or all of the frame. This is not a view of food that appears natural to our eyes and can sometimes cause the food to become so distorted that it's hard to identify. In this situation, the food photo may perplex more than tempt. The relative size of objects in your photo to each other is also important to a successful composition. For example, I specifically chose my smallest wood board for the photo of lemon polenta cranberry cookies (above) so that the cookies wouldn't look tiny compared to the board. Similarly I used a 5-inch candle stand to hold the Snickers macarons (above) since they would have looked quite ridiculous on my 12-inch cake stand. I was also careful to set the milk bottles and bowl in that photo far in the background so they wouldn't overwhelm the macarons with their size.
RECOMMENDED READING
I know this was a bear of a post, so if you've made it here to the end, I thank and salute you! The purpose of this is to share my experience with anyone who might use it to nourish their own passion for food photography or styling. But since I have so much left to learn myself, I happily point you toward some great sources of tutorials, tips, and inspiring photography. Please feel free to email me if you have further questions, and I'll do my best to help =D.
TIPS AND TUTORIALS
All Photography Posts on White on Rice Couple (Especially the Principles of Photography Series)
The Language of Food Photography Series on Gourmande in the Kitchen (Great styling/composition tips)
Tartelette's Tips on Photography via My Cooking Hut (Good behind-the-scenes photos)
Wrightfood's Photography Post (Lots of detail and photos)
Édes és Keserű's Photography Tips (Including set-up shots)
Bonbini's Basic Food Photography Tips (Including rule of thirds)
Food Pixels' Food Photography Posts and Critiques
INSPIRATION (just a few out of many)
Souvlaki for the Soul
Édes és Keserű
Pure Vegetarian by Lakshmi
Licking the Plate
White on Rice Couple
Cannelle-Vanille
Honey and Jam
Spoonful
House of Brinson
My Little Fabric
My Cooking Hut
Cook Your Dream
Desserts for Breakfast
At Down Under
Homemades by Arfi
Tartelette
101 Cookbooks
What Katie Ate
La Tartine Gourmande
Nordljus
Il Cavoletto Di Bruxelles
Adriana Mullen
Roost
Little Things
à la mode*
Our Kitchen
Donna Hay
Australian Gourmet Traveller
Sweet Paul
Jamie
So by adjusting the 3 settings above, you can get the amount of brightness you want in your photo. But as you might have realized, since all 3 factors contribute to the total exposure, there are multiple combinations of settings that give you the same desired amount of overall brightness. So you might be wondering how you decide which combination to use. Well...this is where the unique effects of each setting come in, and you get to exercise some artistic control!
For example, if you were taking a photo of an orange still on the tree and wanted only the orange in focus with the branches and leaves blurry, you would use a large aperture such as f/2.8 to achieve that effect (a shallow depth-of-field). However, since a larger aperture lets more light into the camera, you'll need to increase the shutter speed or decrease the ISO to maintain a good exposure. On the other hand, if you want to capture, say, some wine being poured into a glass, you would use a fast shutter speed such as 1/800. But since this decreases the amount of time light has to enter the camera, you'll need to increase the ISO or aperture to increase the light let in and maintain a good exposure.
Unless you want a purposefully grainy photo, ISO doesn't really offer creative options like shutter speed and aperture do. It is, however, useful for taking photos in low-light settings. With the help of higher ISO (light sensitivity), slow shutter speed, and large aperture settings, I've been able to extend some food photography shoots to as late as 6:30 in the evening still only using natural light! But to get clear images without blurring at low shutter speeds, a tripod is absolutely critical.
Taken around 6 pm with tripod @ f/2.5, ISO 400, 1/125
I know all this can be a lot to take in if you're just getting into photography and trying to learn everything on your own. That's why I'd recommend you start shooting in Aperture Priority mode if you're just starting out. With this setting, you simply increase the aperture (smaller f-stop number!) to have a small area in focus and the rest blurry. Or decrease the aperture (larger f-stop number) to have more of the photo be in focus. The camera will adjust the shutter speed and ISO on it's own to what it calculates as "correct" exposure. If you want things a little brighter or darker than that, there's usually an "exposure compensation" button (circled in red below) to nudge the overall exposure up or down.
Exposure Compensation Button (circled in red) and Exposure Compensation Setting Display (outlined in red rectangle) on a Canon dSLR
Once you're comfortable shooting in Aperture Priority mode, I strongly encourage you to switch to manual mode. It's really not very different, and you'll love having complete creative control so much that you'll wonder how you ever lived without it! The main change from Aperture Priority to manual is that you now control the shutter speed.
For your first time exploring manual mode, you may want to set a moderate ISO of 200 and shutter speed of 1/125. Next choose an aperture setting depending on what depth-of-field you'd like your photo to have. Then look in the viewfinder and with the camera focused on your subject, push down partially on the capture button. This should cause the vertical bar of the viewfinder exposure meter (outlined in red below) to move left or right, indicating under or over-exposure.

Using the basic concepts of exposure I explained above, you should now be able to adjust the 3 settings until the exposure meter shows "correct" exposure (when the vertical bar is centered like in the photo above). For example, if the vertical bar is closer to the right at 1, the meter is indicating underexposure and you know that not enough light is entering the camera. And vice versa if the vertical bar is more to the left at -1.
***To correct for underexposed settings:
-increase ISO;
-decrease shutter speed; OR
-increase aperture (decrease f-stop number)
***To correct for overexposed settings:
-decrease ISO;
-increase shutter speed; OR
-decrease aperture (increase f-stop number)
Of course the point of shooting in manual is not to simply find the nearest "proper" exposure and stay put! Once you have these basics down pat, you'll be able to play with the settings any way you want and be able to find your way to your desired exposure. So that's shooting in manual mode -- not so scary, right? As this process becomes second nature to you with practice, you'll notice you often don't agree with the camera's definition of a "correct" exposure. And really, you don't have to! After realizing I preferred my photos "overexposed" by +1, that's now the level I aim for. Guidelines are merely there to help us find our way. Once you know the rules, you can have a blast bending them =D.
WHITE BALANCE AND RAW FILE FORMAT
When we look around us, whether it's in natural or artificial lighting, sunny or cloudy weather, colors remain fairly consistent because our brain adjusts so that we see them that way. Cameras do not do this, so we as photographers need to take steps to make sure there are no weird color casts in our photos. Most cameras have an automatic setting that will attempt to guess the correct colors, but I prefer not to take any chances. In order to correct a color cast (such as a bluish tint from light on a cloudy day), there needs to be something that is true white or gray/silver in the photo as a standard to compare other colors against. There is often already some fabric, plate, or silverware that can serve this purpose. But in the case that there isn't, I like to take a photo of a piece of white paper in the same lighting and scene that my "real" food photos are taken in. Many image processing programs then let you set the correct white balance by clicking on a neutral part of your photo (such as the white paper). You obviously don't want a piece of paper in your final photo, so these programs allow you to "copy“ the corrected color settings over to your other photos.
To get the best results from post-processing, including fixing the white balance, I highly recommend shooting in RAW format. It's an uncompressed format that's similar to a film negative in that it needs to be processed to be viewed normally. RAW files are larger than JPEG and require more storage space, but that is because they capture more data that allows for extensive correction of the exposure, contrast, color, and other aspects of photos in processing with minimal loss of image quality. This makes it especially ideal for photos taken in low or colorcast light settings that may need more post-processing. Only specific programs can edit RAW files, but most dSLR cameras come with one.
PHOTO PROCESSING
Although I try to create the best photos I can in-camera, I simply don't have a professional studio/equipment and there are always beneficial tweaks to be made in post-processing of RAW and JPEG formats. I usually tweak color balance, contrast, and brightness using the Canon RAW image editor that came with my camera. Then, I convert the RAW file to a large JPEG (2000 pixels wide) and further fine-tune the same settings as well as adjust others such as sharpness, saturation, levels, and curves in Adobe Photoshop. There are many programs available for photo editing to suit a range of budgets and personal styles. You may want to ask around and download some trials before settling on one that's best for you.
It's also difficult to share post-processing steps in detail since it can differ so much between photos, depending on the look/feel I'm trying to achieve. There are 2 methods that I use fairly often in Photoshop that I will share today. First is my favorite way to sharpen images: (1) duplicate the original image in a new layer on top and rename the new layer to "Sharp", (2) with this new layer selected, click on Filter/Other/High Pass. Set the radius between 1.5 and 2.5 depending on the photo size and click OK, (3) change the "Sharp" layer's blending mode to "soft light" and its opacity to between 20 and 30%. Second is a simple technique I use to add depth and "pop" to my photos: (1) duplicate the original image in a new layer above it and rename the new layer to "Deepen", (2) change the "Deepen" layer's blending mode to "soft light" and the opacity to between 5 and 15%. You can adjust this opacity based on your preference.
Oh and one more thing: there ain't no shame in rockin' the stamper! Seriously, I use mine for small touch-ups all the time. That stubborn wrinkle in the linen? Gone! A wayward crumb in an awkward place? BAM. I'm a student in a cramped apartment, not a professional photographer. I wield my stamper with head held high, and so should you!
FOOD/PROP STYLING
If you couldn't tell already from my posts, I loves me some food props! Put me in an antique store and I'm giddier than a kid in a candy shop. It pleases me that prop (and food) stylists are finally starting to get the recognition they deserve. When I started photographing food, I read so much about light, light, and more light! True, photography is at its essence about capturing and manipulating light, but it's nice when the light has lovely textures and objects to play with, too, no? For me, great food photos are ones that tell a story with a time and a place...and props play no small part in setting them there.
ACQUIRING PROPS
Organic-Shaped Dinnerware from West Elm
Disclaimer...hunting for props can be fun yet frustrating, quickly become addictive, and consume lots of money and space =p. But if you dare proceed, I do have some recommendations for you. As professional food prop stylist Robin Zachary wrote in her recent guest post, "Keep [props] tasteful and simple. Remember the food is the star!" I completely agree with this philosophy and recommend starting with affordable ceramic dining/serveware in white or other soft solid colors that won't outshine the food. Ikea, World Market, Bed Bath & Beyond, Crate & Barrel, and Red Vanilla are great places to look. If you're willing to make an investment, the more "organic" style of ceramics is beautiful albeit pricey. Mud Australia sets the bar, but other shops like Gleena and West Elm have excellent offerings as well.
Marta Tumblers from Crate & Barrel
Nice glasses are yet another great basic to have for personal use and photography. Crate & Barrel and World Market offer stylish and affordable barware. I also like to explore thrift and antique shops for unique glasses. You rarely need a set of anything for food props, so feel free to pick up pretty, one-of-a-kind items for dirt cheap at these places. You'll never know when that item may add just the right touch of "special" to a photo.

Silverware is, like all props, a matter of personal taste. Modern pieces that are tasteful can certainly work well in food shots, but I prefer the duller surface and patina of vintage silverware. Their advantage is two-fold because they (1) add a sense of history and continuity to the scene (as if someone has used the spoon or fork for many years and will continue to do so) and (2) have worn surfaces that won't reveal your tripod, reflector, or even your face in their reflective surfaces! I favor antique malls, thrift stores, Etsy, and Ebay for reasonably priced silverware. Don't be afraid to ask the sellers, especially on Etsy, to lower shipping costs or even the sale price by a few dollars. Sometimes they'll agree just to clear out old inventory.
Hem-stitched Napkins from Pottery Barn
Like utensils, napkins and kitchen towels are important to add a touch of realism to food photos, as if someone is about to dig right in. I've had difficulty finding good napkins locally, but Amazon and other online retailers provide some options. It also seems to be common practice to use napkin-sized fabric pieces to achieve a similar effect. Solids or delicate patterns are usually best to avoid overpowering the food. It's not easy to find kitchen towels without patterns or logos these days, but Ikea and Etsy and good places to look. Pottery Barn sells linens with beautiful hemstitching but at a higher cost.
Butter Paneer Curry Pizza on Vintage Chair
Last but definitely not least, are background surfaces. Although they may not be the hero, you'd be surprised at how much a beautifully textured background can set a food photo apart. These surfaces run the gamut from table linens to vintage wood, zinc sheeting to weathered fencing, and from denim fabric to slate slabs. Since large stone and metal surfaces are rarely available to us food photography hobbyists, I'm going to focus on the more obtainable surfaces here:
- Vintage wood tables: the real deal is pretty expensive, but one day I hope to afford it; meanwhile I've been eyeing this DIY tutorial for faking the farmhouse table look.
- Weathered wood boards: if you have access to a farm or barn, those are your best bets for scoring naturally weathered boards; or you may want to try this DIY tutorial for painted boards.
- Linen, denim, burlap, etc.: local fabric stores are best so you can examine the color and weave before purchasing; but if none are available, online stores like Fashion Fabrics Club stock a large variety and have frequent sales; get at least 1 1/2 yards of any fabric you want to use as a background
- Step outside "the box": there are many other potential backgrounds out there just waiting to be uncovered...you just have to get a lil creative; for example Helene of Tartelette has used vintage ceiling tiles very effectively in food shots. I also read of a stylist who picked up a broken table from the street, sawed its legs off, and got a gorgeous wood backdrop for free. Two examples of my own use of unconventional backgrounds are shown in photos above and below. One was a vintage wood chair and the other was the back of a small, dingy roasting pan.
Browned Butter Pizzookies on Back of Old Roasting Pan
PRE-SHOOT PLANNING
Yes, I plan ahead for my food shoots (when I can make the time). This may sound excessive to some, but it's incredibly helpful to making the food preparation, styling, and photography process flow together smoothly. Plus the sooner I can get photos I'm happy with, the sooner I can eat ^_^. Believe it or not, I have no visual imagination (I can't picture things in my mind). Which is why I find it very useful to sketch out my styling ideas ahead of time (see example below). Sometimes the idea for a set-up just grabs me right away, but more often I like to think about the food I'll be making. Does it have an obvious history, a story? What emotions might it evoke in someone eating it? What mood do I want this dish/photo to convey? Is it associated with a particular time/season? How is this food commonly presented? And that's just a sampling of the questions you could consider.

As I said earlier, the most powerful photos to my mind have a story. I mean this in a way that is not so much about a plot as it is about evoking a time, place, or even just a feeling. I prefer to decide on the message I'm trying to convey earlier in the preparation process rather than later. Once that's known, it can become the common string that ties everything else together, from the color scheme to the lighting or props. And don't feel like you have to stick with what's typical. Experimentation is the fuel to my passion for photography and one of my favorite exercises is to shine a different light on a familiar food.
In addition to furthering the creative process, I find that sketching for a shoot is a great way to get materials organized so that I'm not still digging for a napkin or that perfect spoon when the food is ready to go. Once I'm happy with my styling, I make a list of all the props as well as ingredients I'll need on hand for that dish. It's with me on my grocery trip and later when I lay out the props where they'll be easily accessible during the shoot.
THE SHOOT
I'm gonna let you in on a little secret...I'm clumsy as all get-out and I still hold my breath a lot of the time when I'm styling food. No joke...my boyfriend P could tell ya allll about it. But the takeaway here is: if I can do it, so can you. My typical strategy has 3 parts. Part A: set up the props and adjust camera settings beforehand so you are ready to shoot when the food is done. Part B: slow and steady (and detailed) wins the race. Unless your food is time-sensitive (e.g., anything frozen or a souffle), handle with care and take your time making your food look its best down to the little details. Remember, it's always easier to add more of something than to remove excess. Part C: don't be afraid to play favorites or to fake it! For instance, if you didn't get the hang of piping frosting on cupcakes until the last 3 of the dozen, don't be afraid to photograph only the pretty ones. Or place them in the forefront and use shallow depth-of-field to do a Monet on their plainer sisters. I think readers understand that you're trying to show the best possible presentation of the recipe.
Photographic Evidence of My Clumsiness 8)
Other assorted styling tips I've picked up here and there:
- Buy a spray bottle, fill it with water, and use it to refresh raw fruits or veggies that start to dry up
- Rub or soak sliced apples and pears in lemon juice to slow browning
- Smaller portions of food photograph better than bigger portions, and they look bigger in photos than they do in real life
- To make pretty swirls of spaghetti, lift a section with tongs or clean fingers above the serving plate. Lower the pasta until only the tip is touching the plate, then continue lowering the pasta slowly as you rotate the plate with your other hand. This should cause the pasta to rest in a coil. Repeat with the remaining pasta
- Butter the top of your muffin pan when baking cupcakes to prevent the tops from spreading outward
- To make firm, pipeable cream cheese frosting for cupcakes, use my recipe/method using soft butter and cold cream cheese
- Milk actually photographs to be more yellow than people expect. If this bugs you, you can use heavy cream (which is whiter) instead for pictures or use a layer mask to adjust the color in post-processing
- Flat foods like waffles can tend to look, well, flat in photos. An easy and food-safe styling solution that I use is to tear an extra waffle into smaller pieces to prop up the waffles in the photo to give them more dimension (see waffle photo below)
- If you want to be in your own photo (see pretzel photo below), you just need to use a tripod and set your camera to timed capture.
- Always keep Q-tips on hand for delicate clean-ups
Spinach Feta Stuffed Pretzels and Spaghetti with Tomato Vodka Sauce
COMPOSITION
You've probably heard the saying that practice makes perfect, and indeed it's important to our growth as photographers to shoot often. At the same time, I'm quite convinced that the best thing to ever happen to my photography was the 3-4 months when I was so busy working that I couldn't photograph (or do much of anything else either, for that matter). During those months I'd often browse food blogs during my breaks at the office and started seriously analyzing the photos that drew me in the most. It was only then that I became present to the power of styling and composition in food photography and began to apply it to my own work.
My talented friend, Sylvie, of Gourmande in the Kitchen has actually just published a wonderful post summarizing the principles used to organize the visual elements of lines, shapes, colors, and textures in a photograph that tend to result in a successful composition. The principles discussed are balance, movement, pattern, and proportion; and it's really a must-read for any budding food photographer. The formal terms are new to be, but reading this article was like having the very patterns I'd observed privately put to paper. Though I lack formal training in these principles, I will briefly discuss my personal understanding of and experience with them below.
Sliced Orange and Blanched and Peeled Peaches
Balance
This is one of the most important principles, in my opinion, and strongly affects how we respond to viewing an image. I am not a fan of tilted food shots and I think it is precisely because any chance of balance is thrown out the window. But that's not to say that every piece of the scene must be perfectly level. Tilting some elements (such as cutting boards or cutlery) can be a great way to add tension, movement, and interest to your composition as long as they are well-distributed. As Sylvie notes in her post, balance doesn't have to symmetrical. For example, in my photo of waffles below, the waffles and blueberries on the left are balanced by the silverware and beaker on the right despite their asymmetrical placement. Moreover, balance involves not only distinct objects but also colors, textures, and light. In the photo of strawberry cupcakes below, the greens and yellows of the trees outside help to balance the red of the strawberries. In the shot of lemon polenta cranberry cookies (also below), the dark shadows from the wood board complement to the bright highlights on the cookies above it.
Strawberry N' Cream Cupcakes and Chocolate Nutella Alfajores
Movement
Movement can be quite literal, such as the slicing of an onion or pouring of syrup, or it may refer to the placement of focal points within the image. The second is probably my favorite out of these principles because it was the personal revelation that changed my entire outlook on food photography. One day while perusing a food magazine, I suddenly realized that my eyes were moving between interesting parts of the photograph in a zigzag pattern down the page! This is the explanation you've probably been waiting for as to why some of these photos have odd lines going across them -- I simply highlighted some potential paths your eyes might take as they move across my photos. Of course each person will view the photos slightly differently due to individual preferences, but positioning interesting elements in a way that guides the viewer's eyes through your photo will make anyone's experience more enjoyable and exciting.
Cinnamon Teff Waffles with Blueberry Compote and Lemon Polenta Cranberry Cookies
Pattern
Adding repetition of shapes, colors, etc. creates a structure and continuity in a photo that is pleasant to viewers' eyes. I think that's probably why so many food photos feature multiples of foods rather than one alone. The photos of cookies and waffles (above) and macarons (below) are obvious examples of this. More subtle uses of pattern, which were more intuitive than intentional on my part, can be found in the strawberry and s'mores cupcake photos. In the first photo (above), you may notice that the shape of the bowl with whipped cream somewhat resembles that of the cupcake. In the second photo (below), a stripe-like pattern can be found in the toasted frosting, ridges of the cupcake liner, veins of the leaves, and placement of the branches.
S'mores Cupcakes and Snickers Macarons
Scale and Proportion
Scale refers to the size of objects within the whole photo, while proportion refers to the size of objects in the photo compared to each other. Both are important to the viewer's perception of the object and must be kept in mind. A common mistake of scale is to take a very close-up image of the food in which the food alone takes up most or all of the frame. This is not a view of food that appears natural to our eyes and can sometimes cause the food to become so distorted that it's hard to identify. In this situation, the food photo may perplex more than tempt. The relative size of objects in your photo to each other is also important to a successful composition. For example, I specifically chose my smallest wood board for the photo of lemon polenta cranberry cookies (above) so that the cookies wouldn't look tiny compared to the board. Similarly I used a 5-inch candle stand to hold the Snickers macarons (above) since they would have looked quite ridiculous on my 12-inch cake stand. I was also careful to set the milk bottles and bowl in that photo far in the background so they wouldn't overwhelm the macarons with their size.
RECOMMENDED READING
I know this was a bear of a post, so if you've made it here to the end, I thank and salute you! The purpose of this is to share my experience with anyone who might use it to nourish their own passion for food photography or styling. But since I have so much left to learn myself, I happily point you toward some great sources of tutorials, tips, and inspiring photography. Please feel free to email me if you have further questions, and I'll do my best to help =D.
TIPS AND TUTORIALS
All Photography Posts on White on Rice Couple (Especially the Principles of Photography Series)
The Language of Food Photography Series on Gourmande in the Kitchen (Great styling/composition tips)
Tartelette's Tips on Photography via My Cooking Hut (Good behind-the-scenes photos)
Wrightfood's Photography Post (Lots of detail and photos)
Édes és Keserű's Photography Tips (Including set-up shots)
Bonbini's Basic Food Photography Tips (Including rule of thirds)
Food Pixels' Food Photography Posts and Critiques
INSPIRATION (just a few out of many)
Souvlaki for the Soul
Édes és Keserű
Pure Vegetarian by Lakshmi
Licking the Plate
White on Rice Couple
Cannelle-Vanille
Honey and Jam
Spoonful
House of Brinson
My Little Fabric
My Cooking Hut
Cook Your Dream
Desserts for Breakfast
At Down Under
Homemades by Arfi
Tartelette
101 Cookbooks
What Katie Ate
La Tartine Gourmande
Nordljus
Il Cavoletto Di Bruxelles
Adriana Mullen
Roost
Little Things
à la mode*
Our Kitchen
Donna Hay
Australian Gourmet Traveller
Sweet Paul
Jamie


I'm bookmarking your post right now Xiaolu.
ReplyDeleteI will need time to read it carefully. Thank you for this.
I'm bookmarking this post as well... can only skim it right now but already know it's going to be an excellent read and reference point. Thank you for taking the time to share your knowledge. You're awesome :)
ReplyDeleteThis is bookmarked! My promise to me, to give myself a ME TIME with my camera. If my camera can walk away from me, it left months ago.
ReplyDeleteYes, it's long but it's so worthwhile. Well done on such an informative post Xiaolu. I think you've covered every angle and every question anyone would have on photography for food bloggers. Love it! And easy to understand.
ReplyDeleteOMG - THANK YOU!!! I just got my 1st Nikon DSLR and am trying to figure it all out - You are amazing..best blog post I have ever read!! Nice to meet you! xoxo from Trinidad
ReplyDeleteThanks for sharing, this has been bookmarked and will be studied... I have some of those early photographs you discussed, and am still nowhere near the photographer you are, but I am working on progress.
ReplyDeleteHappy Day,
Jasey @ Jasey's Crazy Daisy
jaseyscrazydaisy.com
Thanks Xiaolu for this great post. I'm so glad that you wrote a lot of great tips and I'm going to read them over and over and over.
ReplyDeletewhat a fabulous post, thank you for sharing! BTW - you're photos are beautiful & very inspiring!
ReplyDeleteThanks for sharing such a wonderful post! I've just started to dabble in food photography and blogging so this is really inspiring! Have a great time in Singapore! How I wish I was back home. ;)
ReplyDeletePhew!! Girl, you need a drink and applause for writing the post :-) So nice of you to take so much time and include all the necessary info in one post. I am sure your readers have learned a lot today, at least I did. If someone couldn't go trough the whole posts they definitely can pick the area they think need help with and learn from the post. The language is easy to understand. Great work!
ReplyDeleteThank you so much for this! I took my time to read every part thoroughly but I'm going to bookmark this to read again because there is so much to learn. I especially loved the part on props and composition, two things(out of many :D) I think I really need to work on. And all those links are great! Thank you again!
ReplyDeleteOMG!!! what a wonderful post. you really got into details, ican't say other than WOW!!! Vera
ReplyDeleteoh and thank you mentionibg me asinspiration! that means a lot to me !
ReplyDeleteWhat a comprehensive piece and beautifully constructed. I can only imagine the time and energy this took. Well done!
ReplyDeletethis was really helpful. i just did a post a new that there were better pictures in there but I just couldn't get them out. now i have a better handle on getting the best out of my photos. I really think this post will make a difference in my photography.
ReplyDeleteWhat a great post and I'm so glad I found your blog. So much great information - you could easily have split it up into 10 different posts!
ReplyDeleteI am constantly telling people on my blog that the trick to good food photography is practice, practice, practice. And then, some more practice. I can't tell you how often I get an email asking me what camera a person should buy to make their photography better and I just shake my head. It doesn't happen the first time you pick up a camera. It's practice in composition, lighting, learning your equipment, sytling, and most importantly, learning to SEE the world around you. You did a wonderful job of covering all the basics!
I watched you growing step by step, it's so amazing that you are so talent in design, design on food, photo, self learning for lights, composition, color theory...all you like you do great.
ReplyDeleteThey are all shining from your sweet, loving heart and beautiful artistic sense. You bring the beautiful and sharing it with us. I am proud of you. Thank you :)
Thanks for the interesting and informative post! Very useful.
ReplyDeleteCheers,
Rosa
This is an AMAZING post - no wonder you've been spending so long on this! I've learnt a few post processing tips so thank you. You ROCK. :D
ReplyDeleteBrilliant post! Love the detail that you have put in it. I look back at my photos from 5 years ago and am appalled and amused. Shows you that if you love something, you can do it better. Food photography is again so much more than just styling and shooting in the right light. It is about creating a stage, a mood, an atmosphere in which to narrate. And the knowledge of which comes from observing, learning about different cuisines, cultures and heaps more.
ReplyDeleteThanks for posting a comprehensive article on this!
the post I have been waiting for. I have no words to thanks you enough! bookmarked and will take me many days to read and understand and even more to practice.. but this is THE keeper.
ReplyDeleteI don't think words will be enough to thank you for this post! A truly great and informative post. Like I said no words can express my gratitude for it. Bookmarking it, taking print outs and going to keep it in my folder of things that need to be preserved! THANK YOU!
ReplyDeleteThis post was so full of interesting, helpful info I've bookmarked it and will be back for sure.
ReplyDeleteI can relate to you when you said your photography got better when you weren't able to because you were too busy. I tore a muscle in the spring and spent the next three months healing and browsing food photog sites and food blogs... I think the best thing that happened to my blog was that injury. Funny how things work out.
Thanks for this post. I will reference it again and again.
Xiaolu,
ReplyDeleteBravo on this amazing piece of writing!! There is so much of information so well illustrated!! I don't know if I could write a post as such!! :) Thanks for the mention too!
Do not short sell yourself. You are an expert!
ReplyDeleteYou've done a GREAT job with this post. I will feature it in my Blog in my next entry. I especially love this quote because it is SO true:
ReplyDelete'For me, great food photos are ones that tell a story with a time and a place...and props play no small part in setting them there.'
Props really do make all the difference.
Xiaolu, great writing! I enjoy myself just reading and viewing your clicks. Thanks for sharing your studio, I love mostly all your props.
ReplyDeleteThank you, really nice post! I just started a food blog and want to learn to take great pictures, this will be very helpful. :)
ReplyDeleteI 1000% love this post and i'm bookmarking it for future reference!
ReplyDeleteWow, this post is amazing! Thank-you, thank-you, thank-you for writing this. As a novice baker/photographer (although I don't think I can even call myself that yet) I truly appreciate any tip I can get, especially from someone as talented as you!
ReplyDeleteMy jaw dropped. Thank you so much for sharing all this wealth of knowledge dear! Even if the last thing I'm planning to be is a food photographer (I have very little patience for taking a picture over and over and over again), it is amazing to learn so much from you! I am so happy for you and your GORGEOUS photos!!! Keep up the amazing work!!
ReplyDeleteGreat Post Xiaolu... thumbs up :D
ReplyDeleteI have bookmarked this... to really digest what you have written slowly...
Fabulous job my girl. You have picked wealth of knowledge over the years and only you could write every single aspect in such an easy to read and understand way (just like your recipes). I will be using and passing this post around alot! Thank you
ReplyDeleteThis is one of the most complete tutorials on DSLR camera usage, food photography and food styling that I have come across! Thank you! Bookmarked, for sure!
ReplyDeleteThis is bookmarked!!! :)
ReplyDeleteVery comprehensive!
I just had a short photography tutorial yesterday with fellow mom bloggers and this post reinforced everything I learned.
Thanks for sharing your passion for photography and styling. You are doing great work here! Keep it up and keep inspiring.
I will share the link to this post on my blog feature next week.
Thank you very much Xiaolu for the informative post. I really learned a lot from you :)
ReplyDeleteHave a great weekend
I just read this from start to finish, and it is, without a doubt, the most helpful, information and clear post on food photography. Thank you so much for the tips! My blog is only 3 months old, and I hope my photos are getting better and that this will help me.
ReplyDeleteI am ECSTATIC that I stumbled across this, it is easily the most useful tutorial I have come across as far as food photography. I have been practicing daily, and really want to take my work to the next level. I'll be bookmarking this to refer back to. Thank you!!
ReplyDeleteWow!! That's quite a lot of info ... very helpful indeed. I gotta read and re-read and let's add another "re" to those as well LOL Thanks for sharing!
ReplyDeleteAmazing post Xialou - I've bookmarked and will definitely have a good read when I have the time!
ReplyDeleteWow, what an incredibly well thought out and thorough post! I'm sure there's a useful tip in there for even the most experienced photographers. I especially appreciate your comment about not replacing old photos - I've been considering that recently, but I think you're right that it's important not to be ashamed of showing your progression. I hope this post gets the recognition it deserves - you must have put a ton of time into this! Thanks!
ReplyDeleteTHANK YOU SO MUCH, Xiaolu! This is fantastic information and I will be referring to it OFTEN! Perhaps there's hope for me yet:)
ReplyDeleteExpressing your knowledge and thoughts about food photography is not an easy task and you have done an extensive work here.
ReplyDeleteAnd thanks for the mention too ;)
Thanks for the wonderful feedback and support, everyone! I'm so glad you're finding this useful =D
ReplyDeleteXiaolu, I'm still reading this, but I just wanted to say this is great amount of information and it was exactly what I needed especially when I'm feeling a bit depressed about my own food photography. I'm going to read carefully word by word and study your post. I know I miss basic stuff too. I just wanted to say thank you and I greatly appreciate this post! I shared on my fan page and I hope everyone will take advantage of free lesson here!
ReplyDeletewow! thanks for this really informative post! just what i need.
ReplyDeleteThank you so much for sharing this information it must have taken you such a lot of time to do it. I am still reading it but I have learned so much already. I hope I am able to put it into practise and improve on my photograpy. I have only just started but I really want to improve.
ReplyDeleteLove this post, Xiaolu! I'll share this with others. Thanks.
ReplyDeleteI love this post. You made all of the information fun easy and accessible even to a beginner. Thanks.
ReplyDeleteThank you for this informational post. You took the time to explain in great detail. I too have bookmarked this page as there is so much to absorb. I too am getting addicted to food photography. There is so much to learn!
ReplyDeleteWhat a great post! Thanks for sharing! I'll do it so by sharing your article from our @Culinographie twitter account which is our food photography blog in French, with Aline from My Little Fabric and Parigote from Carnets Parisiens ! Have a great week-ned!
ReplyDeleteThank you thank you thank you! This post was packed full of information! Written in a way thats entertaining and easy to absorb. You are such an inspiration! Love your blog. Officially following you :)
ReplyDeleteAwesome post - glad to know there are others that get a thrill about shopping for props. Yur enthusiasm shines through in this blog - well done.
ReplyDeleteAngela Bax - http://www.flickr.com/photos/adbax
What an amazing post Xiaolu!!! I spent a lot of time reading all your tips in detail, and each one is so informative and helpful. I learnt a few new things about post processing too. Thanks.
ReplyDeleteThank you again for the positive responses -- I love that you all love this!
ReplyDeleteI have read many posts and tutorials on food photography, this is one of the most simplest and easiest to understand with the right kind of information that every food photographer should know. Thanks so much for sharing your experience and knowledge that you have gained in the last 2 years.
ReplyDeleteYou've got a great photographic prowess. Congratulations for such a great photography.
ReplyDeleteWow, this is packed with amazing information and is so helpful! I just started a food blog a few months ago and my photographs are not the greatest sometimes. I just didn't know where to start with food styling. This is very inspiring and I will be taking your tips into consideration in all my photos in the future! Thank you for sharing your insight!
ReplyDeleteread through this once, and then again, and yet again. love how you crammed SO MUCH information into this post, and loved how you illustrated with your ever so helpful photographs. it gives me encouragement to better my photography techniques :)
ReplyDeletewow first class tutorial so through hats of to you, as a busy mum not my priority but I so admire your work awesome
ReplyDeleteOk I need to print this out! Thanks for spending time on this post. I might actually get the courage for manual mode!
ReplyDeleteWow... thank you so much for sharing this!! So helpful! I, too, have fallen in love with food photography, something I never expected. :)
ReplyDeleteGreat post :) I love photography and I've found that food photography is not as easy as it may look LOL but as you said with some practice anything is possible. Love your pictures and recipes!
ReplyDeleteThis post is CHOCK FULL of useful information. Too much for one sitting, even. Thank you so much for taking the time to put this together. I look forward to reading it carefully and to exploring all of the links as well. Thank you!!! You are a master photographer and teacher.
ReplyDeleteOMG! Xiaolu its so amazing and I am very late on updating it ...Thank you very much!....
ReplyDeleteWhat a great post, thanks for sharing.
ReplyDeleteThanks so much for that. I'll br re- reading your post for reference.
ReplyDeleteThanks for going through the trouble! This post is super helpful!
ReplyDeleteNice post, Xiaolu..very helpful esp for new blogger like me. thanks for the wonderful tutorial, really appreciate it!
ReplyDeleteThis is fantastic! Bookmarked so I can come back later and soak it all in. What a TON of effort you put into this :)
ReplyDeleteOnce more, thank you everyone for your enthusiastic replies to this post from the bottom of my heart. Please don't be shy about emailing me if you have any questions or ideas for follow-up posts on food photography/styling!
ReplyDeletevery comprehensive Xiaolu! Bookmarked for further reading :) Thanks so much for sharing all your knowledge and tips you've gleaned - there's just so much to learn about food photography! xoxo
ReplyDeleteExcellent post packed full of useful tips. You're much appreciated x
ReplyDeleteLoving this post Xiao Lu, Thanks for your effort. Love the clumsiness shot and the tips on making aged woodboard. Now, any advices on indoor lightings? Especially for those who cooks at night (er. me?)
ReplyDeleteGreat post! Thanks for your generous sharing. I'm going to bookmark this post as my future references (still need time to digest all the new techniques).;)
ReplyDeleteYou've improved a lot, i love your pictures, i also love photographing, especially what i bake! You inspire me, you've become such an artist! I really love and enjoy everything you make and photograph!
ReplyDeleteAwesome post Xiaolu! I think yours may be the most detailed and comprehensive post I've read on food photography yet. Thank You so much for sharing all your expertise!!!
ReplyDeleteThis is *incredibly* helpful. Thank you so much.
ReplyDeleteBig Hugs, Xiaolu! Thanks for sharing your knowledge. I find the part on composition especially enlightening. Can't wait to try them out!
ReplyDeleteThis is SUCH a great photography post, Xialou! Thanks so much! :)
ReplyDeleteWhat an incredible blog post. Bookmarking for further reference and also tweeting and such so you can get back link love.
ReplyDeletewhat a great post! i like how you broke down the composition bit, as that's the hardest to explain and to get right. cheers from another DC-area foodie!
ReplyDeletebeautiful article and helps so much with pictures for the blog!
ReplyDeleteThis is an amazing post, Xiaolu! Kudos!!
ReplyDeleteThanks for this post! I have a lot to learn too. I don't own a dSLR but still think my Canon G11 (a cross between a P&S and dSLR) can take some decent pictures.. I've bookmarked this page and will have to study it future at a later date. Thanks once again!
ReplyDeleteSuch fantastic tips and in-depth analysis of your images- I'm saving this to review again and again! Thank you for taking the time to share this. :)
ReplyDeleteWhat a phenomenal post! I will constantly refer to this - thank you!
ReplyDeleteThanks for a detailed post. I am bookmarking this. I came across your post at the right, I just moved from P&S to DSLR (Nikon D3100) and your post is opening doors to new world of photopgraphy. Thanks for sharing your Gyaan :-0
ReplyDeleteGreat tips and advice and thank you for the shout out!
ReplyDeleteThanks for a great post, Xiaolu. Very informative and filed with great tips.
ReplyDeleteThanks, my friends! Your support means so very much to me <3
ReplyDeleteWhat an excellent post you wrote, Xiaolu. Very informative and helpful.
ReplyDeleteHi there, this was an informative and interesting post. I have bookmarked your post and will refer to it from time to time.
ReplyDeleteXiaolu, this food photography and styling post is one of the best I have come across. Thank you so much for the tips, for your insights, and for all the lovely examples! I really learned a lot and I'm eager to put it all into practice.
ReplyDeleteThis is such a fantastic post with tips that I can see myself using. I've been dabbling in a little food photography but haven't had much success. With these tips, hopefully I will see some improvement in time to come ;)
ReplyDeleteGreat post, Xiaolu and thanks for the inspiring list. Many of them make to my list too, the rest I did not know of till now. Will check out. Your ideas have been very clearly and beautifully explained. Thanks for doing this post.
ReplyDeleteWow.. an excellent post. Happened upon here because afriend posted this post! Awesome blog, great pictures and this post gets bookmarked. I am just starting to pic up on some photography basics and styling and this post is going to be a great help!
ReplyDeleteThanks so much
Richa@ Hobby And More Food Blog ,
Hobby And More on Facebook
This is probably the most amazing post on photography I've ever seen! BOOKMARKED forever, or for whenever I get some natural light. You see, when I looked at your set-up, one thing you have that's missing from mine - that big window with beautiful natural light!! LOL
ReplyDeleteThanks so much for posting this! I'm a new food blogger, and wanted to learn how to post better pictures to get more traffic. I took notes on this post, then tried everything out, and I got pictures posted to foodgawker and tastespotting! Couldn't have done it without this!
ReplyDeletethis post is uber helpful! :) one of the first things that attracted me to your blog was the amazing photography!
ReplyDeleteWow I cannot even imagine the amount of TIME this post took you!!
ReplyDeleteI love everything you wrote about.
Recently I was at Food & Light with White on Rice Couple, and two weeks prior to that I was in Mexico City with Penny de los Santos and 6 mos or so ago I did a workshop with Matt A. of Matt Bites and his husband, Adam, on food styling and food photography.
Oh and I love Helene/Tartlette too!
It's all linked in my photography tab.
Your path is much like mine. Start a blog. Have no clue about photography. Somehow get bitten by the bug, and then...life changes.
Love your blog, love this post. It rocks! I could say so much..but Thank You for compiling it and sharing it all is the most important thing to say :)
wow, so cool to see what goes on behind the lens. thanks so much for sharing!
ReplyDeleteGreat tutorial! Saw this on craft gossip. I'm always looking to improve my food photography and styling!!
ReplyDeleteThanks again for the feedback, everyone. I'm so so glad this is proving useful/encouraging for some of you =).
ReplyDeleteThank you so much for all the hulpfull tips.
ReplyDeleteI can see you have put alot of affort in this post.
Thank you so much for creating this valuable post!
ReplyDeleteI appreciate all the thought and detail you put into creating this post for all of us!
A Big thank you!
Jenni Price
(Art Pancakes)
Thank you so much for sharing your knowledge! My husband always says that my blog pictures are worse than a five-year's! I hope I will improve with your tips...
ReplyDeleteThank you. Great post. Well written and very helpful.
ReplyDeleteThank you so much! I rarely take photos of food, but this post will definitely help with the photos I take for my blog. I can't wait to go practice now!
ReplyDeleteThis is one of the best article I have ever read about that subject and I read a lot !!!
ReplyDeleteThank you so so so so much !!!!
Hi XL, I just found your blog and this post is wonderful! I just spent the last hour reading this post (3 complete times) to make sure I digested everything. Your explanations made total sense to me when other articles I have read had not. And I loved your yellow "sight lines". Now I think I am understanding more about movement and balance in my photographs. I made large wedding cakes (4 and 5 tier) and I want better photographs of them. I have been working with lighting and have even started playing with propping but it seems SO hard when the food is on such a large scale. Thanks again for the article, I look forward to reaing more from you!
ReplyDeleteHi Jennifer! Your work looks incredible (just stopped by your site). Thanks a lot for your detailed and very sweet comment. I'm glad to help in any way, and feel free to email or Tweet me if you have any further questions.
ReplyDeleteLove the post. Would you mind suggesting a good tripod as I see you have mentioned the arm extender. I am owning the same camera. Would like to your opinion on the tripod.
ReplyDeleteHi there! Thanks for your comment and glad you found the post helpful. I actually did link in the post to the tripod I use. I basically bought the cheapest one possible since I was spending so much on the camera and lens already. My tripod has worked well, but it doesn't withstand much weight. When I upgrade to a higher model of dSLR, I'll need to get a new one since those cameras are several pounds heavier. If you have a nicer model camera or want to get a tripod for the long term, I'd recommend spending a bit more money to get a quality one, like Manfrotto brand. Hope that helps!
ReplyDeletei am without words for this post. i need a day to study the content of this. I am getting better, but still struggling with lighting, esp concerned b/c fall/winter is coming up with shorter days.. THANK YOU. caps letters does not do you justice here.
ReplyDeleteWhat a great and helpful post! Thank you very much for sharing your experience!
ReplyDeleteLoved this post - just starting out so this is very helpful.
ReplyDeleteHi Nisha!
ReplyDeleteThanks for the message. Unfortunately, I am no expert on the technical details and equipment. I have heard that Manfrotto is among the best brands for tripods, however, so if you can get one at a good deal that is great. I asked my friend who knows a bit more about the topic and he says that if you are getting a fairly light, lower end dSLR (like mine) that Manfrotto should work well. However, if you want the tripod to be more sturdy and last you through potential upgrades to nicer and heavier dSLRs, you may want to get a more expensive model. Hope that helps!
This was a great post, extremely informative. Thank you for sharing!! I've learned a lot.
ReplyDeletehttp://cheesepleasebyjess.blogspot.com/
Nisha, extremely helpful Post! Thanks so much for sharing your secrets! It seems like you've been in to this all your life! Your pictures are the killer :-)
ReplyDeleteThis is AMAZING. Love your work and your tips - so inspiring!
ReplyDeleteI was looking for some reference about food photography and I found your page. Very beautiful blog, love your photos, love the way you present it. Also, thank you very much for sharing this. Really hope that, there is a chance for me to witness how you capture all the food. =]
ReplyDeleteYou may be shy, but you can not tell by your writing. You have been most generous with this post. I have not seen a more thorough, instructional article. I just took a class and I believe you have covered more material in this post than a 5 hour photography class. I hope you will continue to share with us during the coming year.
ReplyDeleteThank you so much for all this generous information. It does take some reading a couple of times but the explanation of shutter speeds and apertures which I have always struggled with. I will be coming back again and again to use these tips. GG
ReplyDeleteThis was helpful - thanks!
ReplyDeleteThank you for all of the information!
ReplyDeleteI love your blog, you should add an RSS feed feature so I can get automatic notifications of new blogs. If you set one up please email me! i will bookmark you for now. Again Excellent Blog!
ReplyDeleteCheap Flights to Mumbai
This is an awesome post!! I appreciate the time and effort you put into this so that myself and other bloggers can benefit from it, I will be going back to read it probably about 10 times to make sure I didn't miss anything. I agree about our early pics, I just went through a mini blog make over and as I was making my recipe index I found myself cringing at my first photo's but it's all good, It's nice to see how far I have come, self taught also by trial and error (lots :)
ReplyDeleteThanks again Xiaolu!
Great post and so detailed. Thanks to Nami I found your blog. This was a lot to take in so I'll have to go back and read more. I do have Helene's book Plate to Pixel along with others. However I just have a point and shoot camera at this time so a DSLR would make all the difference in the world. That's on my list of things to purchase.
ReplyDeleteI look forward to returning to your blog to read more of your recipes and tips.
I also found your post through Nami, and am so glad I did. Thanks for taking the time to explain everything! I can't wait to begin trying some of your suggestions. And luckily my Rebel t3i resembles the camera you used in this post.
ReplyDeleteI also appreciated what you said about not replacing old photos on your blog. I have awful photos dating back to 2008 with a point and shoot. They're dark, not sharp, everything wrong you can think of. And I recently considered replacing them, but like you I feel they're a reminder of how far I've come and it would kind of mess with the integrity of my blog to replace them. Thanks for helping me decide that one!
Very helpful information - thanks so much!
ReplyDeleteThank you so much for the very helpful info, I am writing a post about So you think you want to blog and linking to info that I have found useful in helping me. Would you mind if I linked to this post?
ReplyDeletewooow.
ReplyDeleteWow, great pictorials. I will bookmark this and learn from you Xiaolu. Need to practice on my camera.
ReplyDeleteJenn's ice cream recipes
Thank you, thank you, thank you so much- you don't understand how glad I am to have found this tutorial and how comforting it is to know that everyone does start from scratch!
ReplyDeleteHi Irene! Thanks so much for your sweet comment and it's very nice to hear that you liked the post. Yes, it IS comforting (and very true), isn't it? ;p
DeleteVery nicely written post and it covers so much! Thanks for sharing!
ReplyDeletehey, thank you so much for sharing. i just bookmarked it because i'm gonna read it over and over again :D
ReplyDeleteWow, this is amazing! Thanks for all the tips! I still have so much to learn about food photography!
ReplyDeleteJust wanted to let you know I shared this post in my blog :)
ReplyDeletehttp://www.thelady8home.com/2012/09/04/i-won-an-exotic-rose-drink/
This is one of the better photography posts i have read!!!
ReplyDeleteThis was so helpful to read! Thank you very much for taking the time to share so much detail.
ReplyDeletethank you for this post! A lot fo this Ive been starting to learn, but I also learned some new great tips! Thanks !!
ReplyDelete