Showing posts with label eggs. Show all posts

Saturday, May 18, 2013

Recreating The Baltimore Bomb (Chess Pie with Vanilla Fudge Cookies)

I've always enjoyed eating pies, but they've never consumed my daydreams the way cupcakes and macarons have. Perhaps its their rustic appearance and less portable/adorable packaging. Or perhaps its the added step of having to make pastry dough in advance (a pie without a homemade crust is not a pie worth making IMO). Either way, my thoughts rarely turn toward pie unless autumn's on the horizon.

Baltimore Bomb Pie
At least that's how it used to be until an unassuming slice from the aptly named Dangerously Delicious Pies (DDP) in DC blew me away at first bite. Its name was The Baltimore Bomb, and I guarantee it's like no pastry you've ever tasted. DDP created The Bomb especially for the city of Baltimore, Maryland, using their famous Berger cookies, which are equal parts vanilla cookie and chocolate fudge. The inspired twist was to suspend these decadent cookies in a traditional Southern chess filling. The fudge melts down to bestow its gooey goodness to the entire pie, while the tangy custard reigns in the richness of the chopped Berger's. I strongly encourage everyone in the DC area to experience the real deal at DDP, but I think this recipe hits pretty close to the mark and captures all the elements that make the Baltimore Bomb Pie so exceptional and addictive =D.

P.S. - Please pardon the mediocre photo! I only had 15 minutes during the workday to grab a shot in front of my office building AND it started raining as soon as I got outside. The taste was fantastic though so I wanted to make sure I had a photo for this blog post to tempt you to try the recipe (please do!).

Thursday, October 11, 2012

Celebration Cake (Yellow Layer Cake with Milk Chocolate Ganache)

When it comes to yellow cake, fluffy and moist are where it's at in my book. But sometimes I just can't deal with all the crumbs that break off the second I apply frosting. Especially in planning my first ever multiple-tiered cake, I knew I'd need a yellow cake endowed with a touch more strength and structure than my current go-to. I get enough baking anxiety without adding collapsing cake tiers to the not-so-little list of horrors! Luckily my favorite white cake recipe had a yellow cake (egg yolk) variation built right in! A double batch was just right for the 2 tall tiers pictured above (5 x 4 inches and 8 x 5 inches), and the cake came out nicely firm without sacrificing moistness or flavor.

SMS Cake
Yellow Cake with Milk Chocolate Ganache and Covered in Fondant

Surrounding each cake layer was a generous coating of milk chocolate ganache (I used Trader Joe's Pound Plus bars, which are just $5 for 17.6 oz. and taste seriously amazing). I recommend a milk chocolate-to-heavy cream ratio of 2.8 or 2.9 to 1 so that the ganache will set up firmly and provide a sturdy, smooth (and decadent) base for your fondant covering. And I calculated the total amount of ganache needed using this awesome tool called The Ganacherator. Now if you've read anything about fondant, you'll have heard that a cake covered in fondant will only look as good (read: smooth and straight) as the buttercream or ganache underneath. This is absolutely true, and ganache is much easier to learn with as it will set really firm at room temperature (unlike buttercream). Making celebration cakes is really an art-form and I've got a long long ways to go (as evidenced by the elephant skin, not-quite-straight sides, and drooping of the corners in the above cake). But for anyone interested in going down the rabbit hole, I've shared some of my favorite video tutorials below of ganaching, covering, and smoothing the fondant to get a clean professional look to your fondant cakes. I hope this helps the other beginners out there, and I'd love to get feedback on improving my fondant work from any cake experts out there! Cheers!

Making Ganache for Decorating Cakes by Inspired by Michelle
Covering a Cake in Ganache with Smooth and Straight Sides by Inspired by Michelle
Rolling out Fondant, Covering, and Smoothing a Ganached Cake by Planet Cake
Smoothing Cake Covered in Fondant to Get Sharp Edges by Inspired by Michelle

Thursday, January 12, 2012

Tangerine Orange Mousse Recipe for Pure Joy Events!

Tangerine Mousse
Photography by Rebecca Watkins
A few months back I was lucky enough to contribute some Chinese New Year-themed desserts to a party shoot by Pure Joy Events for the online party magazine, Bird's Party. Christine liked my Tangerine Mousse so much that she asked me to share the recipe on her blog. Though this would be a great, simple dessert for any party, tangerines and oranges are especially suitable for CNY because their names in Chinese sound similar to the words for luck and wealth, respectively. They're thus are frequently given out around this time of year. Please head over to Pure Joy Events blog or if you're in a hurry, you can grab the printable recipe here!

Wednesday, June 1, 2011

A Lotta Chocolate Part 3: Chocolate Cake Roll with Chestnut Cream

Chestnut Chocolate Sponge Cake Roll
Today I'm delighted to inform you that the 3rd post in my chocolate series will be on my dear friend Sala's blog, Veggie Belly. You may remember her as one of the gracious judges of the March 2011 DMBLGIT blog photography contest which I hosted. We live quite close to each other so we've also become good friends in person and not just online. Thus for once I was actually able to present the cake in my guest post for her to taste. Please hop over to her site for her reaction and my post. You can also go straight to the printable recipe here. Thanks for this wonderful opportunity, Sala!

Chestnut Chocolate Sponge Cake Roll Slice

Thursday, May 19, 2011

Indian-Inspired Macarons (Cashew Cardamom Carrot Halwa Macarons)

Yep, I'm back with another set of macarons! Many of you might be thinking "wow she's really caught mac fever!" and you'd be right. But the other (and less frivolous) reason I'm making these charming French treats so often is to achieve consistently tasty and pretty results so I can offer these babies for sale. I just know there are plenty of macaron-lovers out there who simply haven't had the opportunity to try them. So I guess you could also say that I'm on a mission to spread the joy of macarons =p.

After no small number of attempts, I've finally got a feel for proper macaronage (folding the meringue and dry ingredients together). But I continue to struggle with (1) reining in my moody oven with its numerous hot spots and (2) reducing sweetness without sacrificing consistency. I've seen other bloggers use much less sugar with great success, so I know it's possible. Unfortunately I think the sugar stabilizes the batter, so my recent batches have been more finicky than the Snickers macarons recipe. Basically I think problem (1) is the result of (2). If you've any insight on this, I'd love to hear it!

Cashew Cardamom Carrot Halwa Macarons
Since I needed to bake multiple batches to iron out the kinks, I figured why not have some fun with exotic flavors? If you follow me on Twitter, you may have noticed I'm quite fond of Indian food as well as food bloggers. Having grown up with my Indian best friend's family cooking, I've developed quite a taste for that cuisine. In fact, several Indian friends have told me that I must be Indian on the inside =p! After taking my previous macaron inspiration from oriental flavors, it's almost too predictable that I turn to the subcontinent next!

After tossing some ideas around with my friend, Sala, I settled upon a fun and unexpected combination of cardamom-spiced cashew shells filled with buttercream made with real Indian carrot halwa (pudding). I must warn you that the cardamom in these pack quite a punch, especially since I ground mine fresh before using. Feel free to reduce the amount of spice if you're just taking it for a test drive. The macarons will still be tasty regardless.

Now that I've hit India, I'm looking for the next destination on my around-the-world macaron trip. What's next -- Africa, Ireland, Italy, South America? So many possibilities! Where do you think I should stop next? =D

Cashew Cardamom Macarons with Carrot Halwa Filling [Printable Recipe]
Filling adapted from Manjula’s Kitchen
Makes about 25 to 35 macarons

XIAOLU'S NOTES: Please do not try to convert this recipe to volume measurements if you don't have a scale (I use and love this one). This recipe is very sensitive and will not work if the measurements are not exact. Please also note that every oven is different and you'll figure out what works best for yours over time (see this post for great information on ovens and macarons). Since mine has major hot spots, I bake on 2 stacked pans for insulation. If you're uncertain of your ability to pipe uniformly-sized macarons, like me, simply trace 1 1/4-inch circles on your parchment paper, flip the paper over, and pipe on the other side, using the outlines as your guide OR print (choose "fit to page") and slide this template under your parchment as a guide but don't forget to remove before baking! Macarons are best after having been refrigerated for 24 to 48 hours, according to French pastry master, Pierre Herme, "An osmosis takes place between the garnish and the biscuit. When freshly baked this is hard and crisp, but it absorbs some humidity from the filling and its inside becomes more tender while the crust on the surface stays intact" (quote via Not So Humble Pie). So even if you accidentally overbake the shells by a few minutes, maturing the macarons in the fridge for at least 48 hours should undo most of the damage =). See my first macaron post for helpful videos of the whole macaron-making process!

70 g almonds [not roasted or salted]
55 g cashews [not salted]
145 g powdered sugar
1/2 tsp ground cardamom
Pinch of salt
40 g granulated sugar
2 g egg white powder [optional, to stabilize batter in humid weather]
95 to 100 g egg whites [about 3 large egg whites]
1/8 tsp cream of tartar or 1/4 tsp lemon juice [optional, to stabilize meringue]
1 to 1 1/3 cups Carrot Halwa Filling [Recipe below]

Microwave fresh egg whites 10 to 15 seconds in the microwave on medium heat.

Combine the almonds, cashews, powdered sugar, cardamom, and salt in a food processor, and pulse on and off until the nuts are finely ground (about 1 to 2 minutes). Sift the powder to remove any large chunks that remain. Put those chunks back into the food processor and pulse again for another 30 to 60 seconds. Sift again. You will probably have some slightly chunkier almond bits. Hopefully they're no more than a tablespoon or so, in which case you can throw them out.

Weigh out and mix your granulated sugar and egg white powder in a small bowl until uniform; set aside. Using a handheld or stand mixer, whip the egg whites on medium-low speed with cream of tartar until foamy, then turn the speed up to medium to medium-high and gradually add the sugar mixture until you obtain a glossy meringue (it'll look like shaving cream, hold stiff peaks, and stay in place if you turn the bowl upside-down; but don't overbeat your meringue or it will be too dry).

Add all of the nut mixture to the meringue and fold together. Use both a folding motion that scrapes the bottom of the bowl (to incorporate the dry ingredients) and a gentle pressing motion, to deflate the meringue against the side of the bowl. Slow down after all the dry ingredients have been incorporated, and continue folding the mass carefully until you obtain a batter that looks somewhat glossy and flows from the spatula in a thick ribbon. Test the batter by spooning a small amount of the batter up, then dropping it back down on itself. If it melts back into the rest of the batter within 30 seconds, it's ready for piping (this page has a nice photo of this test). If not, fold 2 more strokes and test again.

Fill a pastry bag fitted with a 1/3 to 1/2-inch wide plain tip (I like Ateco #804 or 806) with half of the batter. (When your bag is too full, the pressure causes the batter to rush out in a way that’s difficult to control, making for sloppy macarons.) Pipe tiny blobs of batter onto the 4 corners and center of 2 baking sheets, then line baking sheets with parchment paper OR line with silicone mats. Pipe small rounds (slightly larger than 1 inch wide) straight down and about 1 inch apart onto the baking sheets. Pick up each sheet with both hands and slam it firmly straight downward on the counter 2 to 3 times. This will to force out any large air bubbles. Immediately pop any bubbles that rise up but don't break with a toothpick. Do NOT do this once a few minutes have passed because you'll mess up the shell that's forming.

Preheat the oven to 285 to 300 degrees F. Let the macarons sit out for 25 to 90 minutes to harden their shells a bit (to prevent tops from cracking during baking). Test if they're ready by touching the top and side of one shell lightly. It should feel dry and not stick to your finger at all. Bake one pan at a time for 15 to 22 minutes, depending on the size of the macarons. Let cool completely before trying to move the shells.

Once cool, flip the shells over. If you have trouble removing them from parchment paper, pour a couple of drops of water under the paper while the sheet is still a bit warm, and the macarons will lift up more easily due to the moisture. Don't let them sit there in it too long or they will become soggy.

Fill the shells (spooning or piping) with 1 1/2 to 2 teaspoons buttercream and top with a similarly-sized top shell. For the best flavor and texture, store in the refrigerator for 24 to 48 hours before eating (see notes above for detailed explanation) but they are best if eaten within 6 days. Bring to room temperature before eating.

Carrot Halwa Buttercream
1 Tbsp unsalted butter
1/2 cup shredded carrots
1/3 cup milk
1 tsp sugar
1/16 tsp ground cardamom

1/3 cup sugar
2 large egg whites
Pinch of salt
10 Tbsp unsalted butter, room temperature

Melt the butter in a frying pan on medium heat. Add the shredded carrots and stir-fry for about 5 minutes. Carrots should be tender and slightly darker in color. Add the milk and cook until the milk dries, stirring occasionally.

Next add the sugar, and cardamom powder; stirfry for another 3 minutes until the halwa starts to leave the side of frying pan. Let cool then mash with a potato masher.

Combine the sugar and egg whites in the clean stand mixer bowl. Place the bowl over a pot of boiling water making sure the bottom does not actually touch the water. Whisk constantly until the sugar is completely dissolved and the top becomes foamy.

Remove the bowl to your stand mixer, add a pinch of salt, and beat on high speed with the whisk attachment for at least 3 minutes, until the mixture holds glossy, marshmallow-esque peaks and the bowl is completely cool (very important - the frosting's consistency will be off otherwise).

With mixer on medium-low speed, add butter 1 tablespoon at a time, beating well after each addition (about 10 seconds between each). Increase speed to medium-high; continue beating until frosting appears thick, at least 3 minutes. (You'll hear a distinct slapping sound and visibly see the buttercream go from soupy to a cohesive, pipeable consistency.)

Reduce speed to low and slowly add the cooled carrot halwa. Mix until evenly incorporated.

Tuesday, May 10, 2011

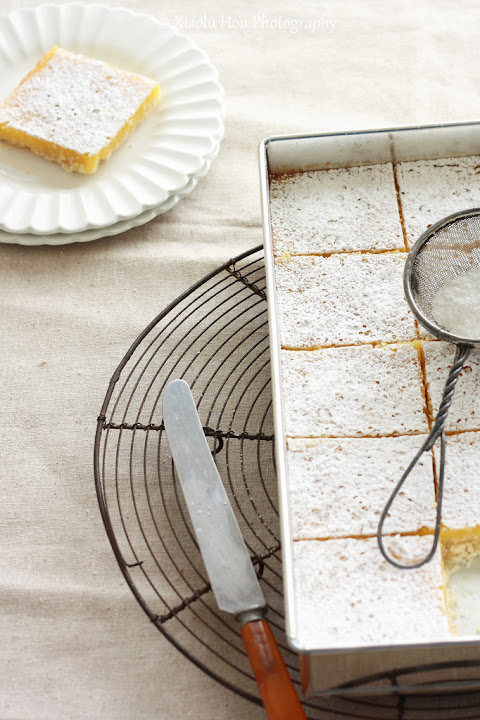
Tart and Full of Passion...fruit (Lemon Lilikoi Bars)

I've made no secret of my adoration of the Australian magazine Donna Hay. Well as a result of regularly pouring over issues of DH, the equally gorgeous Aussie mag Gourmet Traveller, and the blogs of my pals from down under, I've also developed quite a fascination with passionfruit. That vibrant sunny color, that unmistakable flavor, those gorgeous little seeds...I can't but sigh with longing every time I come across such recipes! Thus began my quest to find fresh passionfruit in my local Washington, D.C. area.

I searched high...and I searched low. The interwebs told me these little treasures might be hiding in Asian supermarkets, so I scoured half a dozen to no avail, suffering many strange looks from their Korean managers during the process. My next lead took me to a handful of Hispanic groceries, where I'd heard they might be undercover as "Maracuya." But again I was met with only disappointment. Unexpectedly it was Whole Foods where I finally found my beloved passionfruits, but at $3 apiece I had to walk away.

Tart Lemon Lilikoi Bars
Fortunately my visits to the Hispanic stores hadn't been completely in vain. Though the photographer in me demanded the pretty seeds only fresh passionfruit could provide, I found quite a lovely substitute in this frozen passionfruit pulp. It's brought the vibrant tangy-sweet flavor I expect from passionfruit to my orange passionfruit curd mini tarts and now to these lemon lilikoi (yet another name for this fruit) bars.

As much as I enjoy passionfruit, I left some lemon juice in this recipe as I really love it's in-your-face tartness. You should of course feel free to use all passionfruit pulp or even all lemon juice instead. As you might've guessed by now, I like my bars on the tart side, so feel free to be a little more generous with the sugar if you've got a bigger sweet tooth than me ;p.

Tart Lemon Lilikoi (Passionfruit) Bars [Printable Recipe]
Adapted from Donna Hay Magazine Issue 53 and Recipelink
Makes 24 to 32 bars (9 x 13-inch pan)

XIAOLU'S NOTES: I like my lemon bars quite tangy so feel free to add another 1/4 to 1/2 cup of sugar to the filling if you prefer yours sweeter. In case you're worried, the bars should turn out thicker than in my photo. That slice is thin because my oven is lopsided :(.

1 3/4 cups all purpose flour
2/3 cup powdered sugar, plus extra to garnish
1/4 cup cornstarch
2/3 tsp salt
1 tsp finely grated lemon zest
3/4 cup (1 1/2 sticks) unsalted butter, cool room temperature and cut into 1-inch pieces

4 large eggs
2 large egg yolks
1 1/2 cups sugar, or more according to personal taste
1 Tbsp finely grated lemon zest
Pinch of salt
6 Tbsp all purpose flour, sifted
1/3 cup lemon juice (from 2 lemons)
2/3 cup passion fruit puree

Preheat oven to 350 degrees F. Grease the sides of a 9 x 13-inch baking pan, line with parchment paper, then lightly grease parchment.

To make the crust, combine flour, powdered sugar, cornstarch, salt, and lemon zest in the bowl of a food processor. Add butter and pulse until the mixture is pebbly. Press evenly into the bottom of your prepared pan. Refrigerate for 20 to 30 minutes (optional but preferable. Bake until lightly golden, about 18 to 20 minutes. Set aside crust.

To make the filling, place the eggs and yolks in a medium bowl and whisk to combine. In a separate small bowl, combine the sugar and lemon zest and rub them together until fragrant. Now add the sugar mixture, salt, flour, lemon juice, and passionfruit puree to the egg mixture. Whisk until smooth. Pour this filling over the pre-baked crust and bake for another 25 to 30 minutes, or until just set. Let cool to room temperature, then refrigerate for at least 2 hours or until firm. Sift powdered sugar over the top before slicing and serving.

Friday, May 6, 2011

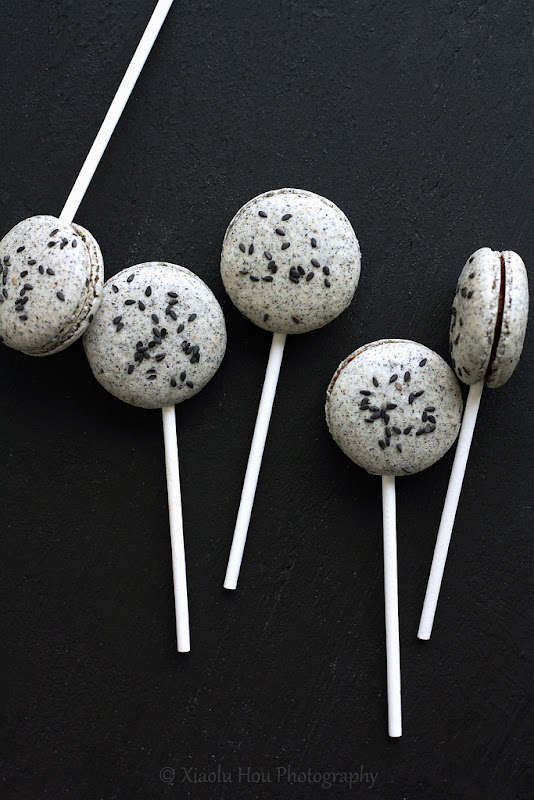
You Might Call Me Hooked... (Black Sesame Macaron Pops with Mochi Filling)

Black Sesame Macaron Ingredients
I think anyone who knows me well would tell you that I have what some would call an "addictive personality." No, thankfully I don't mean any illegal substances or alcohol! But I can become intensely interested (let's not use the O-word here...;p) with things very quickly and often develop an unlimited capacity to read or watch about that thing. For example, my boyfriend P will often walk in on me completely engrossed in a TV show and ask what it is. My reply? "Oh I'm not sure I just came across it 5 minutes ago," which of course leaves him totally perplexed. Or in middle school when I discovered that the huge company Proctor & Gamble made so many of our household products, I became so curious in them that I read a 300+ page book about the history of the company.

But anyway, the real point here is that no one should be surprised that after finally baking my first successful macarons, I caught the Mac Bug bigtime ^_^. Both before and after that batch, I've poured over countless tutorials from fellow bloggers, YouTube videos, and basically any piece of helpful information on the process that I could get my hungry eyes and greedy hands on hehe. But as I learned in my previous attempts, there's no education like rolling up your sleeves and getting in the kitchen. Especially after I remembered the black sesame seeds still stashed in my freezer, it didn't take long for another mac creation to materialize.

Black Sesame Macarons with Chocolate Mochi Fillings
Since I already gushed over the addictive flavor and health benefits of black sesame in my black sesame matcha cupcake post, I'll spare you this time and just send you over there for the details. It delights me that the sesame in these macarons is impossible to miss with respect to appearance, flavor, and fragrance -- as it should be! Still, I couldn't help adding a bit of sesame powder to even the chocolate filling for a double dose of deliciousness (even if it upset the Chinese traditionalist in me just a tad ;p). Finally I had one more Asian twist up my sleeve: a chewy mochi center!

This unusual mix of French and Asian flavors, of crisp, moist, and chewy textures was definitely a risk for me. Especially for what was only my second date with lovely Mr. Macaron, but it definitely paid off! These have been a real hit with my friends, both Chinese and not. Some found them so addictive that my pleas to wait 24 hours before eating them were beyond futile. But that's really not something to complain about =D!

Black Sesame Macarons Bitten
Lastly, many of you left comments to my Snickers Macarons post saying you were still afraid to try these persnickety French treats (I may be paraphrasing haha). I just want to encourage you all to just take the leap! I was just like you for years, thinking that if I just read another post or watched another video I'd finally be ready. But honestly you just have to jump in and do it, and it's not nearly as scary as you think. Yes, there will be imperfect batches (or you may be one of those lucky people who get it on the first try!) but they will still be delicious and impress your friend I promise. In fact I actually underbaked this batch a smidge and got shorter "feet" than I'd have liked, but now I see it as a valuable lesson and look forward to improving the next batch! I hope more of you will join me in my macaron explorations and can't wait to hear about your successes!

Black Sesame Macaron Pops with Mochi Filling and Ganache
[Printable Recipe]
Fillings adapted from Bonbini and Evan’s Kitchen Ramblings
Makes about 25 to 35 macarons

XIAOLU'S NOTES: Please do not try to convert this recipe to volume measurements if you don't have a scale (I use and love this one). This recipe is very sensitive and will not work if the measurements are not exact. Please also note that every oven is different and you'll figure out what works best for yours over time. Since mine has major hot spots, I bake on 2 stacked pans for insulation (see this post for great information on ovens and macarons). If you're uncertain of your ability to pipe uniformly-sized macarons, like me, simply trace 1 1/4-inch circles on your parchment paper, flip the paper over, and pipe on the other side, using the outlines as your guide OR print (choose "fit to page") and slide this template under your parchment as a guide but don't forget to remove before baking! Macarons are best after having been refrigerated for 24 to 48 hours, according to French pastry master, Pierre Herme, "An osmosis takes place between the garnish and the biscuit. When freshly baked this is hard and crisp, but it absorbs some humidity from the filling and its inside becomes more tender while the crust on the surface stays intact" (quote via Not So Humble Pie). So even if you accidentally overbake the shells by a few minutes, maturing the macarons in the fridge for at least 48 hours should undo most of the damage =). See my first macaron post for helpful videos of the whole macaron-making process!

85 g almonds [not roasted or salted]
40 g black sesame seeds
145 g powdered sugar
Pinch of salt
40 g granulated sugar
3 g egg white powder [optional, to stabilize batter in humid weather]
95 to 100 g egg whites [about 3 large egg whites]
1/8 tsp cream of tartar or 1/4 tsp lemon juice [optional, to stabilize meringue]

1/2 cup Black Sesame Ganache (Recipe below)
25 to 35 Pieces of Mochi Filling (Recipe below)
25 to 35 4-inch lollipop sticks

Microwave fresh egg whites 10 to 15 seconds in the microwave on medium heat.

Combine the almonds, sesame seeds, powdered sugar, and salt in a food processor, and pulse on and off until the nuts are finely ground (about 1 to 2 minutes). Sift the powder to remove any large chunks that remain. Put those chunks back into the food processor and pulse again for another 30 to 60 seconds. Sift again. You will probably have some slightly chunkier almond bits. Hopefully they're no more than a tablespoon or so, in which case you can throw them out.

Weigh out and mix your granulated sugar and egg white powder in a small bowl until uniform; set aside. Using a handheld or stand mixer, whip the egg whites on medium-low speed with cream of tartar until foamy, then turn the speed up to medium to medium-high and gradually add the sugar mixture until you obtain a glossy meringue (it'll look like shaving cream, hold stiff peaks, and stay in place if you turn the bowl upside-down; but don't overbeat your meringue or it will be too dry).

Add all of the nut mixture to the meringue and fold together. Use both a folding motion that scrapes the bottom of the bowl (to incorporate the dry ingredients) and a gentle pressing motion, to deflate the meringue against the side of the bowl. Slow down after all the dry ingredients have been incorporated, and continue folding the mass carefully until you obtain a batter that looks somewhat glossy and flows from the spatula in a thick ribbon. Test the batter by spooning a small amount of the batter up, then dropping it back down on itself. If it melts back into the rest of the batter within 30 seconds, it's ready for piping (this page has a nice photo of this test). If not, fold 2 more strokes and test again.

Fill a pastry bag fitted with a 1/3 to 1/2-inch wide plain tip (I like Ateco #804 or 806) with half of the batter. (When your bag is too full, the pressure causes the batter to rush out in a way that’s difficult to control, making for sloppy macarons.) Pipe tiny blobs of batter onto the 4 corners and center of 2 baking sheets, then line baking sheets with parchment paper OR line with silicone mats. Pipe small rounds (slightly larger than 1 inch wide) straight down and about 1 inch apart onto the baking sheets. Pick up each sheet with both hands and slam it firmly straight downward on the counter 2 to 3 times. This will to force out any large air bubbles. Immediately pop any bubbles that rise up but don't break with a toothpick. Do NOT do this once a few minutes have passed because you'll mess up the shell that's forming.

Preheat the oven to 320 degrees F. Let the macarons sit out for 25 to 90 minutes to harden their shells a bit (to prevent tops from cracking during baking). Test if they're ready by touching the top and side of one shell lightly. It should feel dry and not stick to your finger at all. Bake one pan at a time for 5 minutes in the middle shelf of your oven. Now lower the temperature to 300 degrees F and continue baking another 10 to 15 minutes, depending on the size of the macarons. Turn oven back up to 320 degrees F and let it come to temperature again before baking the next batch. Let cool completely before trying to move the shells.

Once cool, flip the shells over. If you have trouble removing them from parchment paper, pour a couple of drops of water under the paper while the sheet is still a bit warm, and the macarons will lift up more easily due to the moisture. Don't let them sit there in it too long or they will become soggy.

Fill the shells (spooning or piping) with 1 teaspoon of ganache, top with a mochi round, add another small dollop of ganache (just enough to cover the mochi because the macaron shell will cause the mochi to dry and harden if they touch directly), and a similarly-sized top shell. For the best flavor and texture, store in the refrigerator for 24 to 48 hours before eating (see notes above for detailed explanation) but they are best if eaten within 5 days. Bring to room temperature before eating.

Black Sesame Ganache
1/3 cup heavy cream
3 oz. semisweet chocolate, roughly chopped
2 tsp honey or light corn syrup
1 Tbsp ground black sesame powder
Pinch of salt

In a small saucepan over medium high heat, bring the cream to a boil. Meanwhile, place chopped chocolate into a small heatproof bowl. Remove cream from heat, pour over chocolate and let stand 5 minutes. Add honey or corn syrup, sesame powder, and salt, then stir everything together until smooth. Set aside until it cools down and thickens a bit (chilling in the fridge or freezer is fine).

Mochi Filling
2/3 cup glutinous rice flour [like Mochiko brand]
Slightly rounded 1/3 cup powdered sugar
2/3 cup PLUS 2 Tbsp water, divided
Cornstarch, for dusting

Put water and 1/4 cup powdered sugar in a microwave-safe bowl and mix well until sugar has dissolved. Add glutinous rice flour to the bowl and mix well until uniform. Put the bowl in the microwave and heat the dough on high heat for 2 minutes. Stir. If the dough pulls away from the side of the bowl, add the remaining 2 tablespoons of water until combined. If not, return bowl to the microwave and heat in 20-second intervals until the dough pulls away from the sides of the bowl, then mix with the remaining water.

Dust a flat pan and your hands with cornstarch. Carefully transfer the hot mochi from the bowl to the pan. Let cool slightly until you can handle the mochi with your hands. Keep your hands well dusted in cornstarch. Cut small pieces of mochi and roll them in your hands so that you end up with about 25 to 35 fairly flat 3/4-inch rounds.

Thursday, April 28, 2011

A Lotta Chocolate Part 2: Snickers Macarons

Not sure how many of you follow me on Twitter, but I've been yappin' about macarons a lot lately and posted this teaser image for a future post last week. Little did I know at the time, but successful macarons would elude me for over a week. So those of you who saw that image had plenty o' time to figure it out! If you put 2 and 2 together and guessed my next post would be Snickers macarons, you get brownie points from me today! =D

5th Time's The Charm!
Similar to my first successful souffles, which took me 5 attempts to attain, the 5th time was the charm for my triumph over macarons (Here's some evidence of my failed attempts...I really hope this doesn't become a pattern!). And I must divide credit among my Twitter friends Stella of Bravetart, Kaitlin of Whisk Kid, Josie of Daydreamer Desserts, Steph of Desserts for Breakfast, Mardi of eat.live.travel.write., and of course the Macaron Queen herself, Helene of Tartelette for their invaluable advice helping me to troubleshoot each failed batch until I got it right this morning. Thank you so much, ladies!

While you probably expect I got frustrated with all these failures (and I did at times), I actually got very invigorated by the learning process. The aggravating yet oddly fun thing about macarons is that there are so many ways to go wrong 8). When each batch came out with a new set of problems, (after the initial wailing) it was fun to play detective, teasing out causes to each symptom. I learned a lot, the most important being that 3 factors really make or break French macarons: properly whipping up the egg whites to stiff peaks, knowing when to stop mixing the batter, and knowing your oven (especially any major hot/cold spots). Each of my failed attempts resulted directly from a failure to do one of the above, and once I figured them out I got the results I wanted. On the flip side, humidity and heat are NOT the great saboteurs of macaron success you've heard them to be. It was warm and humid (rainy with no AC!) all 5 times I baked them but hottest and wettest on the day I succeeded 8).

Snickers Macaron Closeup
If you'll remember, this is the second in a series of chocolate posts that began with my chocolate chunk challah french toast. Plus I'm submitting these to this month's MacTweets challenge: "Decadently Chocolate." Macarons may not be such an unusual way to feature chocolate, but Tartelette's idea to transform a common candy bar into a fancy macaron drew my curiosity enough to warrant a try (or 5 in this case =p). And in the end, I was very impressed. These adorable treats combine the best of both worlds: the classic taste of Snickers bars with the delicate texture and portion-control (ha!) of macarons. Do you love chocolate, Snickers, and/or macarons? If the answer is yes, I really recommend you try these soon!

Now I've probably scared you with all this talk of failed macarons and the recipe below will look impossibly long at first glance, but please rest assured that it's really not so hard. Macaron-making is simply a process that requires hands-on familiarity to perfect, and if you focus on the 3 key things I listed above, you'll have it down in no time. To give you a head's start, I've included some helpful videos below (not my own!) and lots of useful tips in the body of the recipe (which is why it's so long!). Once you've run through the process once or twice, you won't even look at directions anymore 'cause it'll be second nature. And if you learn anything from my experience, I hope it's to try try and try again! While I'm a beginner myself, I'd be happy to answer any macaron questions you may have via Twitter or email.

P.S. - If anyone's interested in this banner, you can print it on PDF HERE, preferably in color on card stock paper.
Simply cut it out and glue/tape it to some wood skewers. Enjoy!


Snickers Chocolate Peanut Caramel Macarons [Printable Recipe]
Adapted from Tartelette, Daydreamer Desserts, and Not So Humble Pie (a great macaron troubleshooting post)
Makes about 25 to 35 macarons

XIAOLU'S NOTES: Please do not try to convert this recipe to volume measurements if you don't have a scale (I use and love this one). This recipe is very sensitive and will not work if the measurements are not exact. Please also note that every oven is different and you'll figure out what works best for yours over time. Since mine has major hot spots, I bake on 2 stacked pans for insulation. If you're uncertain of your ability to pipe uniformly-sized macarons, like me, simply trace 1 1/4-inch circles on your parchment paper, flip the paper over, and pipe on the other side, using the outlines as your guide OR print (choose "fit to page") and slide this template under your parchment as a guide but don't forget to remove before baking! Macarons are best after having been refrigerated for 24 to 48 hours, according to French pastry master, Pierre Herme, "An osmosis takes place between the garnish and the biscuit. When freshly baked this is hard and crisp, but it absorbs some humidity from the filling and its inside becomes more tender while the crust on the surface stays intact" (quote via Not So Humble Pie). So even if you accidentally overbake the shells by a few minutes, maturing the macarons in the fridge for at least 48 hours should undo most of the damage =).

65 g almonds [not roasted or salted]
60 g peanuts [not salted]
15 g cocoa powder
160 g powdered sugar
Pinch of salt
55 g granulated sugar
2 g egg white powder [optional, to stabilize batter in humid weather]
100 g egg whites [about 3 large egg whites]
1/8 tsp cream of tartar or 1/4 tsp lemon juice [optional, to stabilize meringue]

Milk Chocolate Ganache (Recipe below)
Marshmallow Peanut "Nougat" (Recipe below)
About 1/3 cup caramel sauce OR dulce de leche (Recipe below)
About 25 to 35 peanut halves

Separate your eggs 2 to 5 days before, and store the whites in a covered container in the fridge. Bring the egg whites to room temperature before proceeding with the recipe. OR just microwave fresh egg whites 10 to 15 seconds in the microwave on medium heat.

Combine the almonds, peanuts, cocoa powder, powdered sugar, and salt in a food processor, and pulse on and off until the nuts are finely ground (about 1 to 2 minutes). Sift the powder to remove any large chunks that remain. Put those chunks back into the food processor and pulse again for another 30 to 60 seconds. Sift again. You will probably have some slightly chunkier almond bits. Hopefully they're no more than a tablespoon or so, in which case you can throw them out.

Weigh out and mix your granulated sugar and egg white powder in a small bowl until uniform; set aside. Using a handheld or stand mixer, whip the egg whites on medium-low speed with cream of tartar until foamy, then turn the speed up to medium to medium-high and gradually add the sugar mixture until you obtain a glossy meringue (it'll look like shaving cream, hold stiff peaks, and stay in place if you turn the bowl upside-down; don't overbeat your meringue or it will be too dry).

Add all of the nut mixture to the meringue, and fold in. Use both a folding motion that scrapes the bottom of the bowl (to incorporate the dry ingredients) and a gentle pressing motion, to deflate the meringue against the side of the bowl. Slow down after about 25 strokes, and fold the mass carefully until you obtain a batter that flows like magma or a thick ribbon. The whole process should not take more than 50 strokes. Test the batter by spooning a small amount of the batter up, then dropping it back down on itself. If it melts back into the rest of the batter within 30 seconds, it's ready for piping (this page has great photos of this test). If not, fold 2 more strokes and test again.

Fill a pastry bag fitted with a 1/3 to 1/2-inch wide plain tip (I like Ateco #804 or 806) with half of the batter. (When your bag is too full, the pressure causes the batter to rush out in a way that’s difficult to control, making for sloppy macarons.) Pipe tiny blobs of batter onto the 4 corners and center of 2 baking sheets, then line baking sheets with parchment paper OR line with silicone mats. Pipe small rounds (slightly larger than 1 inch wide) straight down and about 1 inch apart onto the baking sheets. Pick up each sheet with both hands and slam it firmly straight downward on the counter 2 to 3 times. This will to force out any large air bubbles. Immediately pop any bubbles that rise up but don't break with a toothpick. Do NOT do this once a few minutes have passed because you'll mess up the shell that's forming.

Preheat the oven to 275 to 300 degrees F. Let the macarons sit out for 25 to 60 minutes to harden their shells a bit (to prevent tops from cracking during baking). Test if they're ready by touching the top and side of one shell lightly. It should feel dry and not stick to your finger at all. Bake one pan at a time for 15 to 20 minutes in the middle shelf of your oven, depending on the size of the macarons. Let cool for 15 to 30 minutes before trying to move the shells.

Once cool, flip the shells over. If you have trouble removing them from parchment paper, pour a couple of drops of water under the paper while the sheet is still a bit warm, and the macarons will lift up more easily due to the moisture. Don't let them sit there in it too long or they will become soggy.

Fill the shells with 1/2 to 1 teaspoon of ganache, then 1/2 to 1 teaspoon of caramel sauce, top with a peanut, a 3/4-inch circle of flattened marshmallow nougat, and a similarly-sized top shell. For the best flavor and texture, store in the refrigerator for 24 to 48 hours before eating (see notes above for detailed explanation) but they are best if eaten within 5 days. Bring to room temperature before eating.

Milk Chocolate Ganache
3 oz. milk chocolate, roughly chopped
4 Tbsp heavy cream

In a small saucepan over medium high heat, bring the cream to a boil. Remove from heat, drop in the milk chocolate and let stand 5 minutes. Stir the chocolate into the cream until smooth. Set aside until it cools down and thickens a bit (chilling in the fridge or freezer is fine).

Marshmallow Peanut "Nougat"
3/4 cup marshmallows
2 Tbsp smooth peanut butter

In a heavy saucepan over medium low heat, melt marshmallows and peanut butter until smooth. Let cool. Once cooled you will be able to pull the "nougat" and from the saucepan and cut pieces to flatten in the palm of your hands and sandwich within the macarons.

Dulce de Leche
Adapted from Cooking for Engineers
Makes about 1 3/4 cups

14-oz. can sweetened condensed milk (NOT evaporated milk)
Heavy cream, as needed

MICROWAVE METHOD:
Pour into large (preferably 2 1/2-qt. capacity) microwave-safe bowl. Heat on medium for 2 minutes. Whisk and repeat until appears curdled (around 7 to 10 minutes total, depending on your microwave oven). To use as a caramel sauce, simply stop heating at this point and stir the dulce de leche until smooth. For a thicker candy-like caramel, continue heating for another 2 minutes or so and stir until smooth again while still hot.

PRESSURE COOKER METHOD:
Peel the label off the can of sweetened condensed milk. Put it in a pressure cooker with enough water to come 2/3 up the can. Do NOT open the cans at all. The can won't explode because the pressure cooker equalizes the pressure, but please still proceed with caution and follow the manufacturer's directions for operating the pressure cooker safely! Close the pressure cooker, and bring it up to full pressure. Turn the heat down to maintain the pressure for 20 (lighter) to 30 (darker and thicker) minutes. Turn off the heat and and let the pressure cooker cool slowly. Once the cooker is completely cool, open the lid and remove the can with tongs. Do not open the can while it is still warm. If there’s any pressure left in the can, it could spray and burn you with hot caramel. Wait until the can has completely cooled before opening it. Remove cooled caramel from can. If too thick for your liking, stir in 2 tablespoons of warm heavy cream at a time until desired consistency.

PREVIOUSLY: Chocolate Chunk Challah Bread French Toast

Saturday, April 23, 2011

Orange Soufflés in Orange Cups (Guest Post on Indian Simmer)

Orange
You all follow the blog, Indian Simmer, right? It's a site written and photographed by the incredibly talented Prerna, and one which I've been a great fan of ever since I saw this post. If you haven't seen it yet, I suggest you check it out right away. Between the delectable photos, creative Indian-centric recipes, and inviting descriptions, I wouldn't be surprised if you get sucked in for at least a good hour 8). Just don't say I didn't warn ya!

As much as I adore Prerna and her site, I do have a sneakier motive for sending you over today. You see, Prerna is on a well-deserved vacation right now and asked me to blog-sit this week in her absence! Thus I'm sharing a guest post today featuring a treat that combines my fondness for fresh citrus fruit with my obsession with cute ways to serve food. Please head over to Indian Simmer to read more about my orange souffles! You can also go straight to the printable recipe here. Thanks, Prerna, for inviting me into your beautiful virtual home!

Orange Souffles

Saturday, April 9, 2011

A Lotta (Scharffen Berger) Chocolate Part 1: Chocolate Chunk Challah and French Toast

Isn't it funny how we often are when it comes to commitments? If asked, we'd list off a number of relationships, goals, etc. we're committed to. But when we take a hard look at our actions, they rarely line up. Or even if we actually do follow up on our promises, we often do so begrudgingly. I bring this up because I'm taking a seminar that's asked us to examine these things. Though the idea that we don't always follow through on our commitments is hardly surprising to anyone (hello New Years Resolutions?!), this seminar has pushed me to think from some new angles.

Chocolate Chunk Challah
One is via the possibility that our disconnect btween speech and action is due to hidden commitments we have that have stronger sway over our actions than those overt ones. You could be secretly committed to being right/in control, to avoiding past pains, or even just allowing yourself some time to be lazy/selfish. What do you guys think? Do you see merit in this concept and some truth of it in examples in your own life? I think I do.

The other (and maybe more interesting to you ;p) reason I bring up commitments is this. About 3 months ago, I asked my dear readers for a little help with a contest. The prize was a huge Scharffen Berger gift basket and I proclaimed that "I'd love to have all that chocolate to use in treats for my friends, family, and all of you." Well, guess what...I WON and it's time for me to make good on my commitment to make y'all some fantastic chocolatastic treats! Fortunately this is an easy promise to keep since I love chocolate, baking, and sharing both with you guys =D.


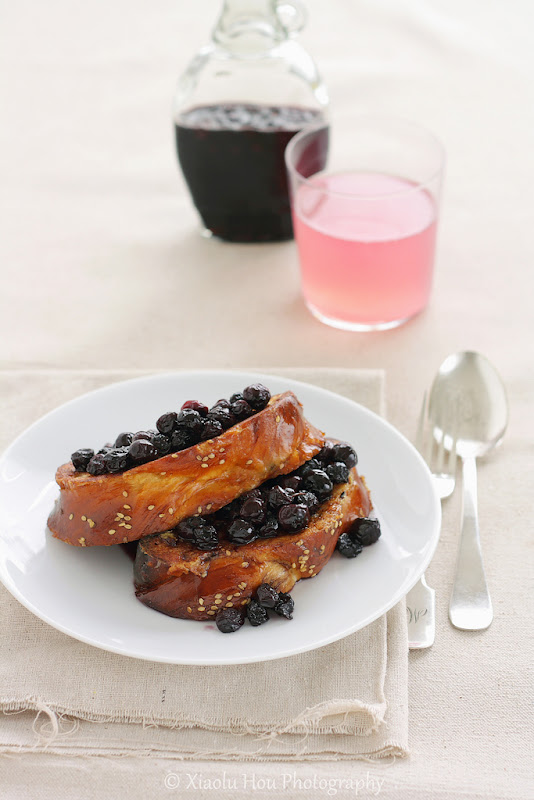
Chocolate Chunk Challah French Toast
What I have planned is a "Lotta Chocolate" series that will span about 4 or 5 posts and feature some less common ways of utilizing this versatile ingredient. And yes, that means you won't be seeing any brownies or chocolate chip cookies in it. But I hope you'll trust me not to lead you astray (though how wrong could you go with chocolate anyway, eh?).

Today I present to you a treat taken from the Scharffen Berger chocolate cookbook, itself, a rich slightly sweet challah bread studded with unexpected chunks of semisweet chocolate. While delicious in its own right, I knew this challah would be even more amazing as French toast. I even "discovered" some blueberries from last summer in the freezer, which were easily transformed into my favorite, blueberry syrup. Honestly, you guys, this couldn't have turned out any better than it did! Between the juicy blueberries in syrup, rich creamy toast, and pockets of melted chocolate, I was in brunch heaven. Won't you join me? ^__^

P.S. - If you enjoy this post and my site in general, I'd be honored if you'd nominate me for Saveur Magazine's 2011 Best Food Blog Awards (nominations close April 22) =D.

P.P.S. - Almost forgot, I'm sending this over to Susan at Wild Yeast for her weekly Yeastspotting event.


Chocolate Chunk Challah Braided Bread [Printable Recipes]
Adapted from The Essence of Chocolate by John Scharffenberger and Robert Steinberg
Makes 2 loaves

XIAOLU'S NOTES: If you're not familiar with 4-strand braids (which I wasn't), watching someone do it is really helpful, much more so than photos or written directions in my opinion. This is a good one I found on Youtube. My bread was overbaked, especially the bottom, so I recommend starting to check for doneness at 25 minutes and NOT using a dark baking pan. Lastly, I love the look of tall challah, so next time I plan to make one braid slightly smaller than the other and to stack the smaller braid atop the larger one for baking like this.

1 1/4 cups lukewarm water, divided
1/2 cup plus 1 Tbsp sugar, divided and more for sprinkling
2 1/2 tsp active dry yeast
4 1/2 to 5 1/2 cups all purpose flour, divided [scoop and sweep measurement]
1 3/4 tsp salt
6 Tbsp canola (or other flavorless) oil
2 Tbsp honey
3 large eggs, divided
4 oz. semisweet chocolate (preferably 62%), cut into chip-size chunks
1 Tbsp sesame seeds

In a small bowl, combine 1/4 cup of the water, 1 tablespoon of the sugar, and the yeast. Stir to dissolve. If it does not foam in 10 to 15 minutes, discard and start with fresh yeast.

In the large bowl of an electric mixer, combine 1 1/2 cups of the flour, the remaining 1/2 cup of sugar, salt, oil, honey, 2 eggs, yeast mixture, and remaining 1 cup of water. Beat at low speed, scraping bowl periodically. Add 3 more cups of flour, then switch to dough hook and knead at low speed, scraping the bowl from time to time, until an elastic dough forms. Only if the dough seems too sticky, add more flour a few tablespoons at a time JUST until dough is no longer sticky but still is soft. Let rest 10 minutes.

On a lightly floured board, shape dough into a 7 x 10-inch rectangle. Press the chocolate pieces into the dough and fold dough in half over the chunks. Seal edges and tuck under; let rest 10 more minutes.

Lightly oil a large bowl. Form the dough into a ball by tucking edges under, and place in the bowl, turning to coat with oil. Cover with a kitchen towel and let rise 45 minutes to 1 hour, until doubled in bulk.

Lightly oil 2 baking sheets. Turn dough out onto a lightly floured board, punch down and divide into 8 equal pieces. Cover half the pieces with a kitchen towel, and roll the remaining 4 pieces into 15-inch ropes. Pinch the ropes together at one end, and set that end near the short side of one baking sheet opposite from you. Braid the ropes by continuing to weave the right-most strand over, under, then over the strands to its left (see notes above for video link). Pinch strands together at the end, and tuck both ends under slightly. Cover the 1st loaf with kitchen towel, and use the same procedure to braid the the remaining 4 ropes on the other pan.

Whisk remaining egg to make an egg wash and brush top of each loaf, being careful not to let egg run down to baking sheet (it can burn). Let rise until doubled, 45 minutes to 1 hour. Twenty minutes into this rise, preheat the oven to 375 degrees F.

Once loaves have doubled in size, brush them with egg one more time, and sprinkle with sesame seeds or sugar. Bake 25 to 35 minutes, or until top is glossy and brown, rotating the pans halfway through. If tops brown too quickly, cover loosely with foil. Cool completely on racks, then wrap well so loaves are airtight and store at room temperature or freeze if not eating immediately.

Challah French Toast with Blueberry Syrup/Compote
Adapted from Bromberg Bros. Blue Ribbon Cookbook and pictures and pancakes
Serves 4 to 6

XIAOLU'S NOTES: If your challah is taller than mine, you may need to use fewer slices or make more of the batter and syrup so there's enough for all 8 slices. This french toast is delicious with regular challah, but I really enjoyed the combination of chocolate and blueberry. And the chocolate could be a wonderful surprise for guests digging into the final product.

1 cup maple syrup
1 1/2 to 2 cups blueberries
4 large eggs
1 cup milk
2 Tbsp sugar
1 tsp pure vanilla extract
1/4 tsp ground cinnamon
Pinch of salt
8 (1-inch) slices challah bread, homemade (see above) or store-bought
4 tsp unsalted butter, or more as needed and to serve

In a small saucepan, combine maple syrup and 1 cup blueberries. bring to a boil and simmer until blueberries release their juices. remove from heat and stir in remaining 1/2 to 1 cup of blueberries. Set aside.

In a large bowl, whisk together the eggs, milk, sugar, vanilla, cinnamon, and salt. Pour the custard into a wide, shallow dish. Soak each slice of bread in the liquid, turning to coat on both sides, until the bread is saturated but not falling apart, 3 to 5 minutes.

Heat a large skillet over medium heat. Melt 1 teaspoon of butter in the pan. Working in batches, cook challah until golden brown, 2 to 3 minutes per side. Repeat with the remaining challah, adding butter if needed.

Divide the toast among individual plates and serve topped with blueberry maple syrup and butter, if desired.

Sunday, April 3, 2011

For My Love: Moist Yellow Caramel Cake and Chocolate Baileys Cupcakes with Liqueur Shots

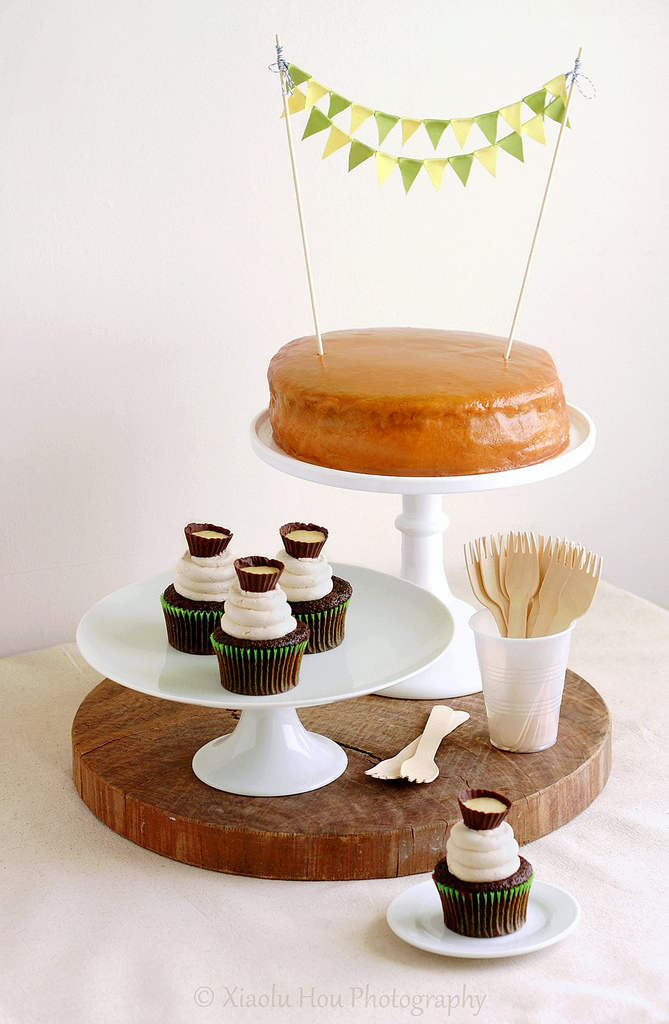
Birthday Dessert Table
It's sometimes funny to me how my views/interests have changed over time. Of course this applies across my life to things both serious and silly, but I bet you can guess which type is on my mind now ;p. For example, if you'd told me just a few years ago that I'd have a blog full of cupcakes (I used to hate this "silly overpriced fad") I'd have been horrified. Perhaps it was going to a "preppy" college, but I really disliked pastel colors, anything "cutesy," and had little interest in things like pretty weddings or party decorations.

Just by looking at this site, you can tell I've changed a bit, no? What started as a subtle shift became a landslide, though, when I discovered some amazing party/style blogs, especially My Sweet & Saucy and Kara's Party Ideas. They're so inspiring I started planning how I'd break the news of my career change to "party planning/catering" to my dad before I knew it. That was just a daydream but with my boyfriend's birthday coming up I had the perfect opportunity to translate all that inspiration into a real party for the love of my life and our friends =).

Pompoms!
From the food to the decorations, my plan for P's birthday party was all about DIY (do-it-yourself). Since P is a pretty down-to-earth guy, I kept things simple using a natural color scheme with accents in green (his favorite color) and yellow. The ribbon cake bunting banner and tissue paper pom-poms (both pictured above) were easy to make using these tutorials: cake bunting and pom-poms. The biggest surprise (and my favorite part of the preparation) was convincing P to help make the pom-poms and discovering that he was a natural at it! On the other hand, mine looked like a dog had chewed on it...=p

We offered our guests a lot to fill their bellies at the party. After munchin' on some store-bought chips and dips, they got to sample P's favorite spiked pasta and customized homemade pizzas at the toppings "bar." There was also plenty to satisfy their sweet tooths. The Boy's favorite cake in the world is his aunt's yellow cake with an amazing caramel frosting. Having tried to recreate it for his last 3 birthdays, I'm happy that's it's finally good enough to be shared! If you've ever had caramel or penuche frosting, you're probably used to it being hard. The beauty of this version is that it stays soft and buttery, a perfect compliment to the oh-so-moist yellow cake.

Patrick's 26th Birthday Party/Cake
Photos from my friend Mimi =D
In honor of P's half-Irish ancestry, I also created some fun chocolate Irish cream cupcakes. To make them as "Irish" as possible, I used my homemade Irish cream 3 ways: in place of milk in the cake batter, to flavor the frosting, and to fill the homemade chocolate cup toppers. The chocolate liqueur "shots" were especially fun -- to make and consume! In case you're wondering about the proper way to eat these, here's how we did it:
  1. Hold the cupcake around its wrapper between your thumb and index finger, then bring it up and toward you so you can drink the Irish cream shot out of the chocolate cup.
  2. Now pick up the empty chocolate cup and gobble it up like a proper chocoholic!
  3. Now eat the remaining cupcake any ole way you want.
I'm happy to report the party was a success! Everyone, including the birthday boy, seemed to have fun and enjoy the food. Like the above-mentioned style blogs inspired me, I hope some of you might be inspired to make your own crafts and treats for your next special gathering!

Moist (Really!) Yellow Layer Cake with Soft Caramel Frosting [Printable Recipe]
Adapted from ChefTalk and from My Yellow Bluff
Makes a 2-layer 9-inch cake (about 10 to 12 servings)

XIAOLU'S NOTES: I think part of the compromise of such a moist, tender cake is that it's quite delicate to handle. I definitely recommend chilling the cakes at least an hour before frosting to firm it up so crumbs won't come off easily. Especially since this frosting is really good at pulling cake bits off hehe. You can't tell in my photo (or at least I hope not!) but a small section of the edge of the cake actually got pulled off by the frosting entirely. So, again, handle with care! Or, if not, it'll be delicious just the same =D.

2 1/4 cups all purpose flour
1 1/2 cups sugar
3 1/2 tsp baking powder
1 tsp salt
1 cup PLUS 1 Tbsp milk
1 tsp apple cider vinegar
1 1/2 Tbsp canola or vegetable oil
1/2 cup (1 stick) unsalted butter, softened
1 3/4 tsp pure vanilla extract
3 large eggs, room temperature
3 large egg yolks, room temperature

Soft Caramel Frosting (Recipe below)

Preheat oven to 350 degrees F. Cut parchment paper to fit the bottom of two 9 x 1 1/2-inch round pans. Grease the pans lightly with oil or cooking spray, then place the paper in the pans and grease the paper.

Sift the flour, sugar, baking powder, and salt into a large mixing bowl. Add the milk, vinegar, oil, butter, and vanilla to the flour mixture and beat with on medium to medium-high speed for 1 to 2 minutes, scraping the sides of the bowl as needed. Add the eggs and yolks and continue beating an additional 2 minutes. Divide batter evenly between the prepared pans.

Bake for 22 to 30 minutes or until a toothpick inserted near the center of a cake comes out clean, or until cake springs back when touched lightly in the center. Cool cakes on wire racks for 15 minutes; remove from pans and cool completely. Frost as desired.

Soft Caramel Frosting
Makes enough to frost a 2-layer cake

XIAOLU'S NOTES: Steph of Cupcake Project also posted an adaptation of this frosting. Though our measurements are different, the technique remains the same. Check out her post for some useful photos of the caramelization process. This frosting doesn’t crust up like many other caramel frostings and retains wonderfully creamy, buttery, and soft. However, it does still become harder to spread as it cools, so you’ll want to have the cake(s) baked, cooled, and ready to frost before making the frosting.

3 cups sugar, divided [save 1/2 cup to brown]
3/4 cup (1 1/2 sticks) unsalted butter
1/2 tsp salt
1 1/4 cups (10 oz.) canned evaporated milk
1 tsp pure vanilla extract
Pinch of baking soda

Mix 2 1/2 cups sugar, 4 tablespoons (1/2 stick) butter, salt, and evaporated milk in a heavy-bottom medium saucepan (at least 3-qt. capacity). Cook over medium heat, stirring periodically until all of the sugar dissolves. Reduce heat to low.

Melt the remaining 1/2 cup of sugar in a small iron skillet, stirring constantly until it turns an even light to medium amber brown color.

Add this caramelized sugar and the remaining stick of butter into the mixture in the pot. Quickly stir everything together thoroughly and continue to cook until “soft ball” stage is reached (about 235 degrees F or when a bit of caramel dropped into cold water forms a soft, malleable ball) – this may take up to 30 minutes. Remove from heat, and let cool and thicken slightly. Add vanilla and baking soda. Use immediately, as the frosting will continue to thicken as it cools.

Chocolate Baileys Cupcakes with Irish Cream Liqueur Shots [Printable Recipe]
Makes 12 cupcakes

1 cup MINUS 1 Tbsp all-purpose flour
3/4 cup PLUS 2 Tbsp sugar
6 Tbsp unsweetened cocoa powder
3/4 tsp baking soda
1/2 tsp baking powder
1/2 tsp salt
1 large egg, room temperature
3/4 tsp instant coffee powder dissolved in 1/2 cup hot water (or 1/2 cup espresso)
1/2 cup Irish cream liqueur (homemade or storebought, like Baileys)
1/4 cup vegetable oil
1 tsp pure vanilla extract

Baileys Swiss Meringue Buttercream (Recipe below)
Irish Cream-Filled Chocolate Shots (Recipe below)

Preheat the oven to 350 degrees F and line a standard muffin pan with paper liners.

In large bowl, stir together the sugar, flour, cocoa, baking soda, baking powder, and salt. Add the egg, Irish cream, coffee (or reconstituted coffee mixture), oil, and vanilla extract. Beat by hand or with an electric mixer on medium speed until well combined (no more than 1 minute).

Pour the batter, which will be thin, to fill the paper liners about 2/3 full. Tap the pan firmly against the counter one time to remove any air bubbles. Bake for 20 to 25 minutes or just until a toothpick inserted into the middle of a cupcake comes out clean. Let cupcakes cool in the pan for 2 minutes, then remove them to a wire rack and let them cool completely there.

Once cupcakes are completely cool, pipe or spread buttercream onto cupcakes and top with Irish cream-filled chocolate shots (be careful to position them securely so they don’t spill). Enjoy!

Irish Cream Swiss Meringue Buttercream
Makes enough to generously frost 12 cupcakes

3 large egg whites
3/4 cup PLUS 2 Tbsp sugar
15 Tbsp unsalted butter, cool room temperature and cut into 10 pieces
1 tsp pure vanilla extract
1/3 to 2/3 cup Irish cream (homemade or storebought, like Baileys)

Combine the sugar and egg whites in the stainless steel bowl of an electric mixer. Bring a large pan of water to a simmer, making sure that the water isn’t high enough that it will not touch the bowl. Set the bowl in the pan of simmering water and whisk constantly until the sugar is completely dissolved and the top becomes foamy. Be careful not to curdle the egg whites. Remove bowl from heat.

Transfer bowl to your mixer and beat on high speed for at least 3 minutes, until the mixture holds glossy, marshmallow-like peaks and the bowl is completely cool (very important -- the frosting's consistency will be off otherwise). If using a stand mixer, switch to the paddle attachment, and add butter to the meringue a tablespoon at a time, beating well after each addition (at least 5 seconds in between). With the mixer on low, add the vanilla and Irish cream, and continue beating 1 minute to incorporate the additions and reduce air bubbles.

Irish Cream-Filled Chocolate Shots

XIAOLU'S NOTES: If you have extra chocolate leftover, you can simply spread it in a layer (about 1/4-inch thick) over some parchment paper or other non-stick flat surface and let it cool completely. Once hard, chop it up to use for chocolate chunks in chocolate chip cookie or other recipes calling for chocolate chips/chunks!

5 to 6 oz. semisweet chocolate, roughly chopped or chipped
1/3 cup Irish cream (homemade or storebought, like Baileys)

I used a mini-sized silicone mold, but mini foil cupcake liners inside of a mini pan should work as well. If using foil liners, be sure to spray the insides with oil first. Bring a small pan of water to a simmer, and set a small heatproof bowl filled with the chopped chocolate on top of the pan. Stir until the chocolate is completely melted. Turn off heat but keep bowl on top of the warm pan. Another option is to microwave the bowl of chocolate at 30 second intervals, stirring in between each, until fully melted and shiny.

Using a small pastry brush, brush the inside of the molds or liners with an even layer of chocolate. Freeze mold or pan for 5 minutes, then brush another layer of chocolate over the first layer. Repeat the previous step one more time (for a total of 3 chocolate layers). Freeze for 20 minutes, then unmold the cups by peeling of one side of the silicone (or foil liner) carefully. Keep cool until ready to use. Fill with 1 teaspoon of Irish cream to serve.

Saturday, March 5, 2011

Ain't So Pretty But Sure Is Tasty (Roasted Vegetable Chorizo Frittata)

After the 2 recent posts about food styling/photography, you all must realize I'm quite devoted to making the food on this blog attractive. After all, we eat with the eyes first, don't we? When I pulled this frittata out of the oven and saw how brown it'd gotten, I knew that task wouldn't be easy this time. Well folks, I made the best of the brown edges and setting sun, but clearly it's far from ideal 8). What I can offer, however, is my guarantee that this frittata will impress you with its ease and yumminess!

Roasted Vegetable Soy Chorizo Frittata

The addition of chorizo sausage (soy in my case) was simply inspired on Donna Hay's part. I loved getting alternating bits of spicy flavorful "meaty" sausage and tender roasted vegetables (both in one bite when I was lucky!). The beets, potatoes, butternut squash, and onion used here are well-suited in taste and seasonality. But that shouldn't stop you from substituting whatever's in season in your part of the world. Please do also play with other herb and spice combinations. Just think of this recipe as a fantastic blueprint from which to build your own favorite frittata.

Now I'd love to know if you make frittata at home. And what are your favorite add-ins? Plus don't forget to enter my giveaway and food blog photography contest if you haven't already!

Roasted Winter Vegetable Chorizo Frittata [Printable Recipe]
Adapted from Donna Hay via The Baking Bird
Serves 4

XIAOLU'S NOTES: The original recipe called for 3/4 cup of heavy cream, half of which I replaced with milk instead. I thought the dish tasted perfect, but feel free to use all cream if you want something richer. On the other hand, if you want to lighten it up a bit, try replacing another 3 tablespoons of cream with milk and/or replacing 1 to 2 whole eggs with 2 egg whites per egg.

3 baby beets OR 1 to 2 regular beets, peeled and sliced
2 small red potatoes, sliced
1/4 medium butternut squash, sliced into 1/6 to 1/4-inch strips
1 small to medium red onion, sliced
1 chorizo sausage, crumbled [I used 1 1/2 vegetarian chorizo sausages]
1 to 2 tsp fresh thyme (optional)
2 Tbsp olive oil
5 large eggs
6 Tbsp milk [whole or lowfat, not skim]
6 Tbsp heavy cream
1/2 cup finely grated parmesan cheese
Sea salt and cracked black pepper, to taste.

Preheat oven to 425 degrees F. Place beets, potato, pumpkin, onion, soyrizo, thyme, and oil in a 9 x 13-inch baking dish (about 2-quart capacity) and toss to combine. Roast for 30 minutes or until vegetables are golden and cooked through.

Place eggs, milk, cream, parmesan, salt and pepper in a bowl and whisk to combine. Pour mixture over the vegetables and return to the oven for another 15 to 20 minutes or until puffed and golden.

Saturday, February 5, 2011

Guest Post: Frozen Brazo de Mercedes Cake

Trissa of Trissalicious was one of the first bloggers to reach out to me as a new kid on the (bloggin') block. I just had the honor of guest posting on her site. And to my delight, she also agreed to prepare a post for mine. As you'll soon experience, Trissa has a wonderfully warm style of writing that's guaranteed to make you smile (and often laugh). Plus her beautiful photos always make me drool. Another thing I love about Trissa is that she's both sweet and spunky. When she learned of my Donna Hay obsession, for example, she immediately offered to mail me the latest issue from Australia. Yet this same lady successfully faked a proposal to get into a famous and completely booked restaurant! How's that for gutsy? Oh and did I mention she's a master of macarons? Some other standout recipes on her blog include the mango natilla custard cake, strawberry watermelon cake, and bechamel prawn-stuffed mussels. But (and I hope I don't seem biased when I tell you) the cake she shares below just jumped to the top of my to-try list! Please give your warmest welcome to my dear friend, Trissa.

Being invited to someone's house for dinner always poses a problem for me. I often wonder, what's the best thing to bring? Given a choice between bringing the standard wine, flowers or food, I'll inevitably resort to bringing food. Then there's the dilemma of what dish to bring. Do I bring an entree or dessert? And God forbid if I bring the same dish that the host is cooking!

Frozen Brazo de Mercedes 1

Being asked to guest blog is just as nerve wracking. Especially when the one asking has such a beautifully written and photographed blog like Xiaolu from 6 Bittersweets. If you haven't already met Xiaolu, let me tell you a little bit more about her. She's a great baker, cook and all-around super foodie. I admire her because she turned her back on a successful career at a law firm to pursue a career in nutrition, for which she is currently studying for. It takes guts and personality to do something like that - and both traits shine through when you read her blog. Plus she makes the most beautiful cakes...

I pondered for weeks over what would be suitable for her blog. I knew she was fond of desserts so definitely something sweet most likely...but what? Should I make something tried and tested or experiment on something new? Would she like it? Would she have already made something similar? The list went on and on...but of course Xiaolu, ever the gracious host, gave me the kind encouragement, inspiration and free hand to let me do as I pleased.

Frozen Brazo de Mercedes 3

So I decided to make a dessert I had never made before but had heard rave reviews from friends and family. It's a twist on a very popular Filipino dessert called Brazo de Mercedes, which literally translates to "The arm of a lady named Mercedes". The reason being the original dessert is shaped like a jelly roll which was supposed to resemble the shape of a woman's arm. The outer layer is a fluffy meringue and inside is a custard made from the left over egg yolks and milk. I had heard that a popular variation on this cake was to freeze it, so instead of a jelly roll, you instead had a frozen layered cake where the bottom layer is made from graham crackers, followed by a thick layer of vanilla ice cream, then the custard and finally the meringue.

Now, I'm not much of a sweet tooth and the idea of ice cream, custard, and meringue sounded a little bit too sugary for my liking - but I did manage to wolf down two large slices, which went down especially well given the heat of the Sydney summer. Everyone else that I offered it to enjoyed it and also asked for seconds so yes, it was a great success. Good enough for Xiaolu's blog?

I'm certainly hoping so! :)

DEFINITELY good enough! Trissa, can I please just have the whole cake to myself? =p

Frozen Brazo de Mercedes

Frozen Brazo de Mercedes [Printable Recipe]
Serves 10 to 12

Meringue Layer
8 egg whites [save yolks for custard layer]
1/2 cup (110 grams) sugar
pinch of cream of tartar or egg white powder

Preheat the oven to 275 F (135 C) for non-convection ovens OR 250 F (120 C) for convection ovens. Grease and line a 15 x 10-inch pan and then grease the baking paper once more. Using a stand mixer, beat the egg whites until semi-stiff peaks and then gradually start adding the sugar until you have stiff peaks but make sure that you don't over beat the egg whites, otherwise it will go grainy. Spread the egg whites on to the baking tray and bake for 40 minutes. Remove from the heat and then place the baking tray on top of a rack and allow to cool. Set aside.

Custard Layer
8 egg yolks
10.58 oz. (300 grams) sweetened condensed milk
3 tablespoons (around 50 grams) of butter

Place the egg yolks and condensed milk in a stainless steel bowl and place the bowl a top a pot of simmering water, making sure that the water does not touch the bottom of the bowl. Mix the egg yolks and the condensed milk until thick using a whisk until the mixture has thickened like a custard. Remove from the heat and then add the butter, making sure to fully incorporate. Allow to cool in the refrigerator and set aside until needed.

Graham Crust
8.8 oz (250 grams) graham crackers OR digestive-style biscuits, crushed using a food processor
2 tablespoons sugar
3 tablespoons (around 50 grams) of butter

Preheat the oven to 350 F (175 C) for non-convection ovens OR 320 F (180 C) for convection ovens .

Heat the butter in the microwave until melted, then add the sugar and the graham crackers. Mix thoroughly and then spread over two 8 1/2 x 6-inch pans. Bake for 10 minutes and then remove. Allow to cool before assembly.

Assembly
4 1/4 cups (1 liter) vanilla ice cream, softened at room temperature for about 10 minutes

To assemble, place a layer of ice cream, around half an inch (1.3 cm or so) thick, over the graham crust. Place the mixture in the freezer and allow to set for around 30 minutes. Then add the custard layer and then return this to the freezer and allow to set for another 30 minutes. Finally, cut the meringue (you will have more than you need, so ensure that you can cut it large enough to fit the tray) to fit the two trays and place on top of the custard layer. Return the dessert to the freezer and allow to set for around three hours.