Showing posts with label breakfast. Show all posts

Wednesday, November 14, 2012

Pumpkin Nut Streusel Muffins with Cream Cheese Filling

Pumpkin Spice Muffin with Cream Cheese Filling and Pecan Streusel
With all the treats I bake, I have to admit my standards are getting higher and higher. And considering the 7 pounds I've put on since starting this job, maybe that's really not a downside =p. Either way, where this is going is that I knew these muffins were winners when even I found myself going back for seconds (and barely resisting a third!). The blogosphere is awash in pumpkin muffins these days, but there's a great reason for that! Pumpkin's not only quintessentially fall in color and flavor, it's also packed with nutrients and keeps your baked goods incr-edibly moist! A hint of rum in my cream cheese filling and the crunch of pecan streusel set my pumpkin muffins apart from the pack. Give these a shot, and I guarantee you'll be going back for more...=p.

Pumpkin Nut Spice Muffins with Cream Cheese Filling [Printable Recipe]
Adapted from Annie's Eats
Makes 11 muffins

XIAOLU'S NOTES: Filling needs to chill for at least 1 1/2 hours, so plan accordingly. Cooled muffins can be sealed in an airtight freezer bag and frozen for up to 3 months. Thaw then reheat in an oven at 350 degrees F.

Filling
3 oz. cream cheese, softened [low-fat is fine]
1.5 oz. (Scant 1/3 cup) powdered sugar, sifted
1/4 tsp unsulphured molasses
1/3 tsp pure vanilla extract
Rounded 1/2 tsp dark rum (optional)

Topping
3 Tbsp sugar
3 Tbsp flour
3/4 tsp ground cinnamon
2 Tbsp unsalted butter, cold and cut into 6 pieces
2 Tbsp walnuts OR pecans, lightly toasted and finely chopped (optional)

Muffin Batter
1 1/2 cups (6.75 oz.) all purpose flour
1 Tbsp unsweetened cocoa powder
1/2 Tbsp ground cinnamon
1 tsp ground nutmeg
3/4 tsp ground cloves [1/3 to 1/2 tsp if freshly ground]
1/2 tsp ground ginger
Large pinch of ground cardamom
1/2 tsp salt
1/2 tsp baking soda
Scant 1/4 tsp baking powder

2 large eggs, room temperature
3/4 cup PLUS 2 Tbsp sugar
1/2 Tbsp unsulphured molasses
1 cup pumpkin puree
6 Tbsp vegetable oil
1/4 cup unsweetened applesauce
1/2 tsp pure vanilla extract

To make the filling, combine all filling ingredients in a medium bowl and mix well until blended and smooth. Transfer the mixture to a piece of plastic wrap and shape into a log about 1 inch in diameter. Smooth the plastic wrap tightly around the log, and place on a plate wide enough to hold the entire log straight and flat. Transfer to the freezer and chill until at least slightly firm, at least 1 1/2 hours.

To make the topping, combine the sugar, flour and cinnamon in a small bowl; whisk to blend. Add in the butter pieces and work into the dry ingredients with a fork or your fingertips until the mixture is coarse and crumbly. Add in chopped walnuts and mix to distribute evenly. Transfer to the refrigerator until ready to use.

To make the muffin batter, preheat the oven to 375 degrees F. Grease top of standard muffin pan, then line with 11 paper liners OR skip the liners and grease the cups. Sift dry ingredients flour through baking powder into a medium bowl and whisk to blend; set aside. In a separate large mixing bowl, combine ingredients eggs through vanilla. Mix on medium-low speed or by hand until blended. With the mixer on low speed, gradually add in the dry ingredients, mixing just until incorporated.

To assemble the muffins, fill the muffin cups just under full with batter, then sprinkle a small amount of the topping mixture over each. Next, remove the frozen log of cream cheese filling from the freezer, slice into 11 equal pieces, then quickly place a slice of the cream cheese mixture into each muffin cup.

Lower the oven temperature to 350 degrees F, then bake the muffins for 20 to 25 minutes, or until a toothpick comes out clean from the upper muffin part (avoid the cream cheese). Let muffins cool in pans for 5 minutes, then transfer them to a wire rack. Let cool COMPLETELY before serving (the cream cheese filling will be very hot!).

Friday, August 26, 2011

Start Your Day Super (Cinnamon Teff Waffles with Blueberry Compote)

Cinnamon Teff Waffles with Blueberry Compote
A few months ago, I was contacted by Phil, a representative for City of Hope -- a leading research and treatment center for cancer, diabetes and other life-threatening diseases -- to ask if I'd make a recipe for their Superfoods Recipe Collection. He explained that over the past few years, the COH cancer research team had identified 5 foods "considered to have cancer-prevention qualities and should be included generously in everyone's diets": pomegranates, mushrooms, blueberries, grapes, and cinnamon.
Blueberry Recipe SealCinnamon Recipe Seal
These shouldn't be viewed as cure-alls or eaten to the exclusion of other healthy foods. But as part of a healthy, balanced diet with minimally processed food, these superfoods will help you control your weight, prevent or fight illness, and extend your lifespan. That was more than enough incentive for me to do my part in promoting 2 of these "superfoods," cinnamon and blueberry. Please head over to City of Hope's Facebook page to check out my Cinnamon Teff Waffles with Blueberry Compote and learn more about their incredible work. If you just need to grab the printable recipe quickly, click here.

Saturday, April 9, 2011

A Lotta (Scharffen Berger) Chocolate Part 1: Chocolate Chunk Challah and French Toast

Isn't it funny how we often are when it comes to commitments? If asked, we'd list off a number of relationships, goals, etc. we're committed to. But when we take a hard look at our actions, they rarely line up. Or even if we actually do follow up on our promises, we often do so begrudgingly. I bring this up because I'm taking a seminar that's asked us to examine these things. Though the idea that we don't always follow through on our commitments is hardly surprising to anyone (hello New Years Resolutions?!), this seminar has pushed me to think from some new angles.

Chocolate Chunk Challah
One is via the possibility that our disconnect btween speech and action is due to hidden commitments we have that have stronger sway over our actions than those overt ones. You could be secretly committed to being right/in control, to avoiding past pains, or even just allowing yourself some time to be lazy/selfish. What do you guys think? Do you see merit in this concept and some truth of it in examples in your own life? I think I do.

The other (and maybe more interesting to you ;p) reason I bring up commitments is this. About 3 months ago, I asked my dear readers for a little help with a contest. The prize was a huge Scharffen Berger gift basket and I proclaimed that "I'd love to have all that chocolate to use in treats for my friends, family, and all of you." Well, guess what...I WON and it's time for me to make good on my commitment to make y'all some fantastic chocolatastic treats! Fortunately this is an easy promise to keep since I love chocolate, baking, and sharing both with you guys =D.


Chocolate Chunk Challah French Toast
What I have planned is a "Lotta Chocolate" series that will span about 4 or 5 posts and feature some less common ways of utilizing this versatile ingredient. And yes, that means you won't be seeing any brownies or chocolate chip cookies in it. But I hope you'll trust me not to lead you astray (though how wrong could you go with chocolate anyway, eh?).

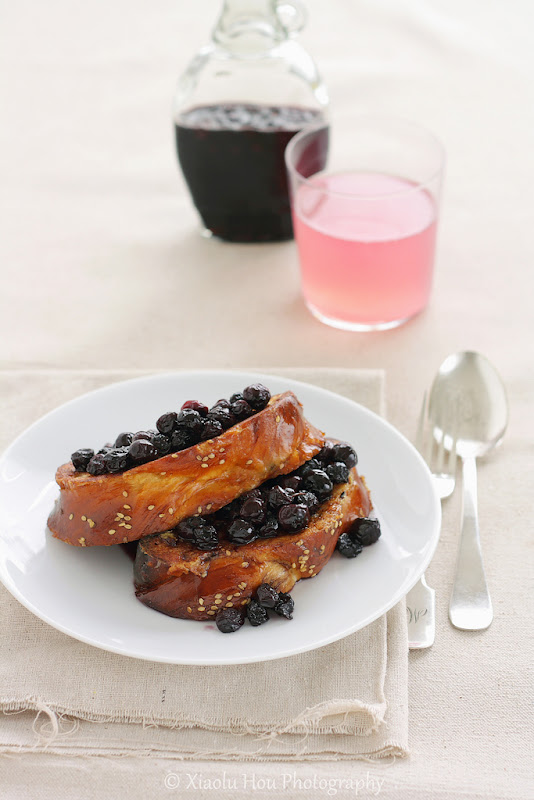
Today I present to you a treat taken from the Scharffen Berger chocolate cookbook, itself, a rich slightly sweet challah bread studded with unexpected chunks of semisweet chocolate. While delicious in its own right, I knew this challah would be even more amazing as French toast. I even "discovered" some blueberries from last summer in the freezer, which were easily transformed into my favorite, blueberry syrup. Honestly, you guys, this couldn't have turned out any better than it did! Between the juicy blueberries in syrup, rich creamy toast, and pockets of melted chocolate, I was in brunch heaven. Won't you join me? ^__^

P.S. - If you enjoy this post and my site in general, I'd be honored if you'd nominate me for Saveur Magazine's 2011 Best Food Blog Awards (nominations close April 22) =D.

P.P.S. - Almost forgot, I'm sending this over to Susan at Wild Yeast for her weekly Yeastspotting event.


Chocolate Chunk Challah Braided Bread [Printable Recipes]
Adapted from The Essence of Chocolate by John Scharffenberger and Robert Steinberg
Makes 2 loaves

XIAOLU'S NOTES: If you're not familiar with 4-strand braids (which I wasn't), watching someone do it is really helpful, much more so than photos or written directions in my opinion. This is a good one I found on Youtube. My bread was overbaked, especially the bottom, so I recommend starting to check for doneness at 25 minutes and NOT using a dark baking pan. Lastly, I love the look of tall challah, so next time I plan to make one braid slightly smaller than the other and to stack the smaller braid atop the larger one for baking like this.

1 1/4 cups lukewarm water, divided
1/2 cup plus 1 Tbsp sugar, divided and more for sprinkling
2 1/2 tsp active dry yeast
4 1/2 to 5 1/2 cups all purpose flour, divided [scoop and sweep measurement]
1 3/4 tsp salt
6 Tbsp canola (or other flavorless) oil
2 Tbsp honey
3 large eggs, divided
4 oz. semisweet chocolate (preferably 62%), cut into chip-size chunks
1 Tbsp sesame seeds

In a small bowl, combine 1/4 cup of the water, 1 tablespoon of the sugar, and the yeast. Stir to dissolve. If it does not foam in 10 to 15 minutes, discard and start with fresh yeast.

In the large bowl of an electric mixer, combine 1 1/2 cups of the flour, the remaining 1/2 cup of sugar, salt, oil, honey, 2 eggs, yeast mixture, and remaining 1 cup of water. Beat at low speed, scraping bowl periodically. Add 3 more cups of flour, then switch to dough hook and knead at low speed, scraping the bowl from time to time, until an elastic dough forms. Only if the dough seems too sticky, add more flour a few tablespoons at a time JUST until dough is no longer sticky but still is soft. Let rest 10 minutes.

On a lightly floured board, shape dough into a 7 x 10-inch rectangle. Press the chocolate pieces into the dough and fold dough in half over the chunks. Seal edges and tuck under; let rest 10 more minutes.

Lightly oil a large bowl. Form the dough into a ball by tucking edges under, and place in the bowl, turning to coat with oil. Cover with a kitchen towel and let rise 45 minutes to 1 hour, until doubled in bulk.

Lightly oil 2 baking sheets. Turn dough out onto a lightly floured board, punch down and divide into 8 equal pieces. Cover half the pieces with a kitchen towel, and roll the remaining 4 pieces into 15-inch ropes. Pinch the ropes together at one end, and set that end near the short side of one baking sheet opposite from you. Braid the ropes by continuing to weave the right-most strand over, under, then over the strands to its left (see notes above for video link). Pinch strands together at the end, and tuck both ends under slightly. Cover the 1st loaf with kitchen towel, and use the same procedure to braid the the remaining 4 ropes on the other pan.

Whisk remaining egg to make an egg wash and brush top of each loaf, being careful not to let egg run down to baking sheet (it can burn). Let rise until doubled, 45 minutes to 1 hour. Twenty minutes into this rise, preheat the oven to 375 degrees F.

Once loaves have doubled in size, brush them with egg one more time, and sprinkle with sesame seeds or sugar. Bake 25 to 35 minutes, or until top is glossy and brown, rotating the pans halfway through. If tops brown too quickly, cover loosely with foil. Cool completely on racks, then wrap well so loaves are airtight and store at room temperature or freeze if not eating immediately.

Challah French Toast with Blueberry Syrup/Compote
Adapted from Bromberg Bros. Blue Ribbon Cookbook and pictures and pancakes
Serves 4 to 6

XIAOLU'S NOTES: If your challah is taller than mine, you may need to use fewer slices or make more of the batter and syrup so there's enough for all 8 slices. This french toast is delicious with regular challah, but I really enjoyed the combination of chocolate and blueberry. And the chocolate could be a wonderful surprise for guests digging into the final product.

1 cup maple syrup
1 1/2 to 2 cups blueberries
4 large eggs
1 cup milk
2 Tbsp sugar
1 tsp pure vanilla extract
1/4 tsp ground cinnamon
Pinch of salt
8 (1-inch) slices challah bread, homemade (see above) or store-bought
4 tsp unsalted butter, or more as needed and to serve

In a small saucepan, combine maple syrup and 1 cup blueberries. bring to a boil and simmer until blueberries release their juices. remove from heat and stir in remaining 1/2 to 1 cup of blueberries. Set aside.

In a large bowl, whisk together the eggs, milk, sugar, vanilla, cinnamon, and salt. Pour the custard into a wide, shallow dish. Soak each slice of bread in the liquid, turning to coat on both sides, until the bread is saturated but not falling apart, 3 to 5 minutes.

Heat a large skillet over medium heat. Melt 1 teaspoon of butter in the pan. Working in batches, cook challah until golden brown, 2 to 3 minutes per side. Repeat with the remaining challah, adding butter if needed.

Divide the toast among individual plates and serve topped with blueberry maple syrup and butter, if desired.

Monday, January 3, 2011

Beginning The New Year With A Pop(over)

Happy New Year, my dears! Eep...can somebody tell me how it got to be 2011 already? Equally important (or perhaps more?) I'm wondering how long it'll be before I remember to write the correct year on things. Like I was lining up a few drafts for upcoming posts yesterday, but damn it they kept disappearing! Ditz that I can be, it was 10 minutes before I realized they'd been shoved back in 2010. I guess I'm in for some "fun" times until I adjust... =).

That issue aside, it's funny how time moves by so fast these days as opposed to when I was younger. Now there's too often little chance to savor the sweet moments. Which is yet another reason I'm thankful to have this site and all of you. Not only can I share my passions and personal adventures here, but your responses and our interactions become wonderful new experiences in and of themselves that are all saved. I just spent an afternoon flipping through the posts of last year. My favorite 6 are listed below -- I hope you remember (or discover) them as happily as I did!

Starting the year with a pop!

Buuuut you didn't think I'd start off the New Year without a new dish now, did ya? One of my resolutions is to tackle my to-try recipes list, which has become quite a beast! It includes fancy treats like the infamous macaron, but I decided to start slow with these easy, versatile popovers. If you've never had one, popovers are light, hollow rolls with golden crusts and soft insides. Their buttery, eggy (in a good way) flavor pairs wonderfully with jam and cream, honey, or simply a smear of butter. They're also a versatile canvas for playing with other flavors; for example, I plan to try a savory herb and cheese variation mmm. The recipe is at the end of this post if you'd like to give it a go yourself :).

Finally, it's on to the list! Thank you all for making 2010 a year to remember here at 6 Bittersweets! I'd love to hear what you'd like to see more of in 2011, and I'm so excited to share even more yummy goodness with you through the New Year!

Favorite Posts of 2010

6. Roasted Sweet Potatoes with Miso-Tahini Glaze - Excited is an understatement of how I felt when I found the recipe for this favorite from the Teaism restaurant. The sauce is simply addictive!

Roasted Sweet Potatoes with Miso-Tahini Glaze

5. Cookies N' Cream Owl Cupcakes - Super delicious, cute, and uses easy-to-find ingredients...these cupcakes were a resounding success. The post remains one of my most popular.

Oreo Cookies & Cream Owl Cupcakes

4. Spiked Spaghetti with Tomato Vodka Cream Sauce - My boyfriend's been scarfing this down and asking for more for so long that I can't believe I only just thought to share this. It doesn't taste like alcohol, but the vodka really adds something special to the sauce.

Spaghetti with Tomato Vodka Cream Sauce

3. Browned Butter Pizzookies with Pecans - It wasn't until I published this post that I realized so many of you had never heard of pizzookies. These babies are quick to whip up and are just full on nutty buttery gooey chocolate-y goodness. I dare you to go back to regular cookies after ;p.

Browned Butter Chocolate Pecan Pizzookie

2. Mangomisu Trifle Cake - Although this was a gorgeous Delicious magazine cover recipe, I didn't expect mine to turn out nearly as pretty or tasty as it did. With all that fruit and creamy mascarpone, this cake wasn't cheap but was worth.every.penny.

Mangomisu with Raspberry Sauce

1. S'mores Cupcakes - I almost didn't make these cuppin' cakes due to illness, but thank goodness I decided to soldier on because these are the best cupcakes I've made or eaten to date. And I welcome any excuse to wield my torch and unleash the inner pyro (mwahaha) 8D.

S'mores Cupcake

Popovers [Printable Recipe]
Barely adapted from Baking with Julia via Muffins Are Ugly Cupcakes
Makes about 11 popovers (but will vary between baking pans/cups)

1 cup all purpose flour
1 cup whole or 2% milk, room temperature
1/2 tsp salt
3 eggs, room temperature
2 Tbsp unsalted butter, melted and slightly cooled

Preheat your oven to 425 degrees F. Grease your popover or muffin pan or standalone paper souffle cups.

In a large bowl, mix flour and salt together. In a small bowl, beat eggs and milk together. Add egg mixture and melted butter into flour mixture. Mix everything together well by hand or using a blender, food processor, or stand mixer. If your batter is lumpy, pour it through a strainer to remove the lumps. The batter will be quite thin, similar to the consistency of crepe batter. Pour batter into greased popover or muffin pan or standalone baking cups so that each cup is half filled. If using standalone cups, set them on a cookie sheet for baking.

Bake for 25 minutes, without opening the oven door. By that time, the popovers should have popped and should be nicely browned. At this point, lower the temperature to 350 degrees F and bake for another 15 to 20 minutes to dry out the insides. Remove from oven, let cool slightly, and enjoy with your meal!

Monday, September 27, 2010

Girl Meets Torch (Bruléed Oatmeal)

Bananers

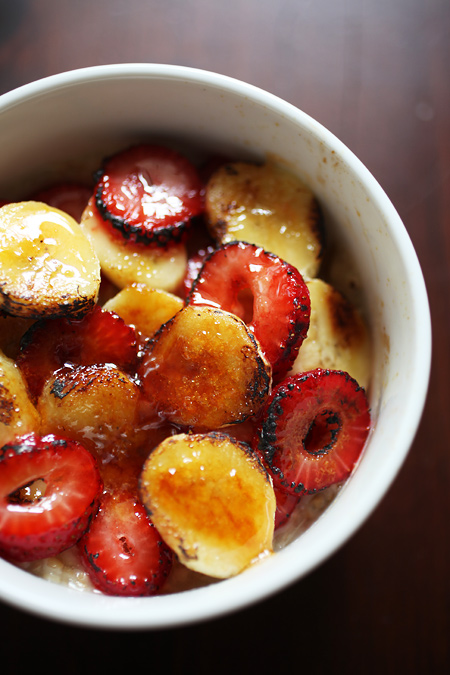
The motto of my absolute favorite food magazine is "special made simple" (I'm sure many of you immediately knew which one I meant XD). It's a wonderful approach to cooking, and I always look forward to new ways of applying it. But I also find the reverse mentality, "simple made special," equally if not more appealing. The perfect example of this can be found in my new favorite breakfast: Bruléed Oatmeal.

I happened upon this brilliantly easy method on the blog, à la mode*, while hunting for creative uses for my kitchen torch. Oddly enough, I'd bought one not to make classic creme brulée but to fulfill a cupcake vision. The idea to brulée breakfast has certainly breathed new life into my neglected tool. With just a few sprinklings of sugar and blasts of heat, I can regularly transform run-of-the-mill breakfasts into treats worth getting up for. Please do make sure you have enough gas in your torch. That way you'll get more drool-inducing results like this instead of the light browning in my photo.

For those of you who also own a kitchen torch, what uses have you found for it other than creme brulée?

Bruleed Oatmeal Breakfast!

Strawberry Banana Oatmeal Brûlée [Printable Recipe]
From à la mode*
Serves 1

XIAOLU'S NOTES: I actually doubled the recipe for the bowl of oatmeal in the photo, but the fruit doesn't keep well so I suggest you make only as much as you'll eat right away. Almost any fruit can be substituted here. Just don't expect the fruit to taste cooked, since the torch is really just there to caramelize the sugar into crunchy goodness! Please be careful not to overheat the edges of the bowl or bowl may crack, and be careful handling the bowl afterwards; it will be hot! Rick from à la mode* says that a torch works the best for this, but that about 20-30 seconds under the broiler should also work. If you try this, check first that your bowl is oven-safe.

1 portion of oatmeal, cooked and lightly sweetened
3-4 fresh strawberries, sliced
1/2 banana, sliced
1 Tbsp sugar

Add cooked oatmeal to a heat-proof bowl. Over top, arrange sliced banana and strawberries cut side up, to expose flat surfaces. Sprinkle evenly with sugar. Light torch and heat sugar till golden brown, making sure to pass torch slowly back and forth over fruit.

Sunday, February 21, 2010

Ricotta Pancakes

Is there any better way to start the weekend than with decadent yet light-on-the-tongue blueberry pancakes? If you answered an enthusiastic "no!," then you're in for a treat (and let's be friends 8p). I confess, I knew little about Bill Granger before other than a vague recognition of his name. But if ricotta hotcakes are anything to judge a man by, we need to get up close and personal!

Blueberry Ricotta Hotcakes

This recipe came together fairly quickly. Beating the egg whites separately is probably the fussiest part, but turns out to be pretty easy with a handheld mixer. It's also crucial to the result, since it's what makes these pancakes so fluffy. On the other hand, the cuppa ricotta and 4 egg yolks in the batter lends these a silky richness. With a generous pat of butter and blanket of maple syrup, these are pretty darn perfect.

Now I'd love to know, what breakfast treat lures you out of bed on a Saturday morning?

Bill Granger’s Ricotta Hotcakes [Printable Recipe]
Adapted from Bill Granger via Bread and Butter

1 cup ricotta cheese (I used part-skim with no problems)
3/4 cup milk
4 large eggs, separated
1 1/4 cup unbleached all purpose flour
2 tablespoons sugar
A dash of salt
2 teaspoons grated lemon zest
1 teaspoon baking powder
1-2 cups blueberries or other berries, if desired, for pancakes and garnish
Butter or neutral-tasting oil to grease the pan

Pour milk into mixing bowl, and add egg yolks. Mix till just combined. Add flour, baking powder and salt and mix. Add lemon zest and mix.

Beat egg whites until stiff but not dry peaks form, and gently fold through batter, leaving some streaks of white. Lastly, add ricotta and mix gently. (Take care to not overmix as you want to have chunky bits of ricotta to bite into later on!)

Heat a non-stick or cast iron pan or griddle over medium heat, then grease lightly with butter or oil. (I tend to use a small dollop, and then wipe the excess off with a kitchen towel so it doesn’t get overly greasy.)

Pour 1/2 cup of batter (per hotcake) into the pan. Sprinkle a few berries onto the batter, if using. Cook on one side until little bubbles appear (~2 minutes), flip over, and cook on the other side for about 1 minute. (You can keep cooked hotcakes warm in a low heat oven as you fry up the rest.)

Serve with a generous sprinkle of icing sugar, maple syrup, and/or whatever fruits you like.

Wednesday, December 2, 2009

Dreamy Apricot Ginger Scones

2009.11.30 Apricot Ginger Scones

Were it not for Smitten Kitchen, I might be before you today recounting the epic journey it took to find the perfect recipe for light, tender scones. Luckily for us all, Deb already completed this "scone quest" and returned with a jewel of a recipe, generously shared on her blog. So let me simply tell you how I switched up the add-ins to suit my fancy and (hopefully) send you off to do the same.

This soon after Thanksgiving, I was predictably cranberried out (fruits are verbs too, didn't ya know?). What I was in the mood for was ginger. But this spicy sister wanted some company for these long cold nights... The sunny hues of dried apricots caught my eye at the store not long after. It had to be a sign...

2009.11.30 Apricot Ginger Scones

And what a lovely pair these two made. Each bite of these scones contained wonderful little bursts of flavor, from the modest sweetness of the apricots to the bolder heat of the crystallized ginger. I actually craved even more fruit, so I've upped the amount in the recipe below. Despite using a little less butter than the original recipe, the texture remained so tender (must be all that cream...). These scones aren't very sweet, so they'd be lovely with a dollop of your favorite jam. Now I'd really love for you to share your favorite scone flavors with me. Won't you please?

2009.11.30 Apricot Ginger Scones

Apricot Ginger Scones [Printable Recipe]
Adapted from America’s Test Kitchen Cookbook via Smitten Kitchen
Makes about 8 to 12 scones

2 cups (10 ounces) unbleached all-purpose flour, preferably a low-protein brand such as Gold Medal or Pillsbury and not King Arthur
1 tablespoon baking powder
1/4 cup sugar
1 teaspoon ground ginger
1/2 teaspoon salt
4 tablespoons unsalted butter, chilled and cut into 1/4-inch cubes
2/3 cup moist dried apricots, chopped into about 8 pieces per apricot
1/4 cup crystallized ginger, roughly chopped
1 cup heavy cream

Adjust oven rack to middle position and heat oven to 425 degrees F.

Place flour, baking powder, sugar, ground ginger, and salt in large bowl or work bowl of food processor fitted with steel blade. Whisk together or pulse six times.

If making by hand: use two knives, a pastry blender or your fingertips and quickly cut in butter until mixture resembles coarse meal, with a few slightly larger butter lumps. Stir in apricots and crystallized ginger.

If using food processor: remove cover and distribute butter evenly over dry ingredients. Cover and pulse 12 times, each pulse lasting 1 second. Add apricots and crystallized ginger and pulse one more time. Transfer dough to large bowl.

I used a cake ring to get the dough into a circle.
2009.11.30 Apricot Ginger Scones [Collage]

Stir in heavy cream with a rubber spatula or fork until dough begins to form, about 30 seconds. Transfer dough and all dry, floury bits to countertop and knead dough by hand just until it comes together into a rough, sticky ball, 5 to 10 seconds. Form scones by either a) pressing the dough into an 8-inch cake pan, then turning the dough out onto a lightly floured work surface, cutting the dough into 8 wedges with either a knife or bench scraper (the book’s suggestion) or b) patting the dough onto a lightly floured work surface into a 3/4-inch thick circle, cutting pieces with a biscuit cutter, and pressing remaining scraps back into another piece (what Deb did) and cutting until dough has been used up. (Be warned if you use this latter method, the scones that are made from the remaining scraps will be much lumpier and less pretty, but taste fine.)

Place rounds or wedges on ungreased baking sheet. This step is optional, but freeze the cut-out scone dough in their baking pan for 8 to 12 minutes to help them hold their shape better AND to help them rise higher. Now bake until scone tops are light brown, 12 to 15 minutes. Cool on wire rack for at least 10 minutes. Serve warm or at room temperature.