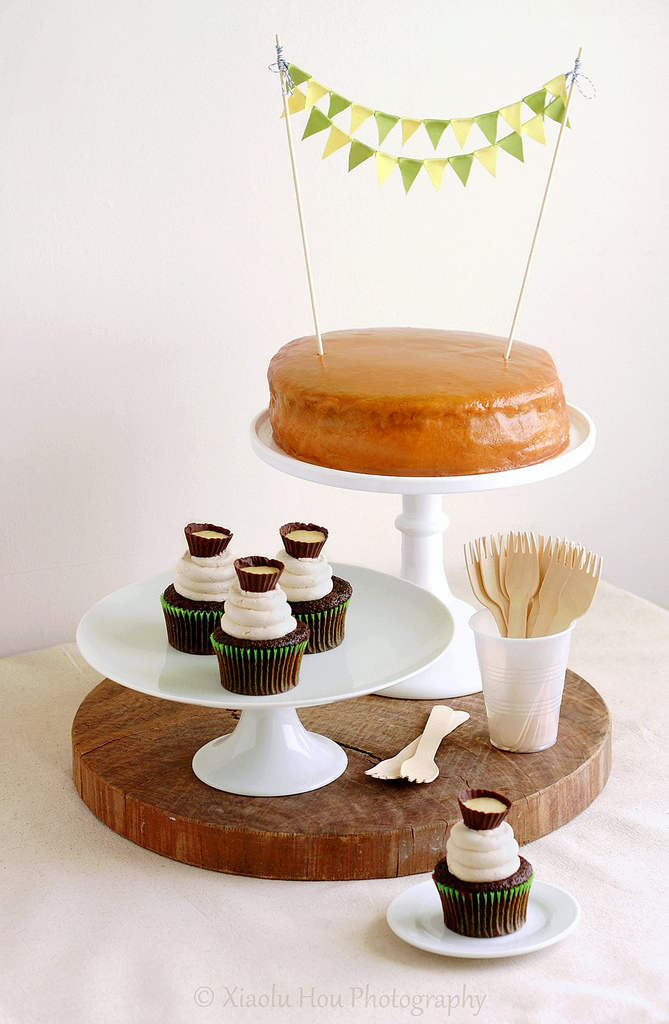
It's sometimes funny to me how my views/interests have changed over time. Of course this applies across my life to things both serious and silly, but I bet you can guess which type is on my mind now ;p. For example, if you'd told me just a few years ago that I'd have a blog full of cupcakes (I used to hate this "silly overpriced fad") I'd have been horrified. Perhaps it was going to a "preppy" college, but I really disliked pastel colors, anything "cutesy," and had little interest in things like pretty weddings or party decorations.
Just by looking at this site, you can tell I've changed a bit, no? What started as a subtle shift became a landslide, though, when I discovered some amazing party/style blogs, especially
My Sweet & Saucy and
Kara's Party Ideas. They're so inspiring I started planning how I'd break the news of my career change to "party planning/catering" to my dad before I knew it. That was just a daydream but
with my boyfriend's birthday coming up I had the perfect opportunity to translate all that inspiration into a real party for the love of my life and our friends =).
From the food to the decorations, my plan for P's birthday party was all about DIY (do-it-yourself). Since P is a pretty down-to-earth guy, I kept things simple using a natural color scheme with accents in green (his favorite color) and yellow. The ribbon cake bunting banner and tissue paper pom-poms (both pictured above) were easy to make using these tutorials:
cake bunting and
pom-poms. The biggest surprise (and my favorite part of the preparation) was convincing P to help make the pom-poms and discovering that he was a natural at it! On the other hand, mine looked like a dog had chewed on it...=p
We offered our guests a lot to fill their bellies at the party. After munchin' on some store-bought chips and dips, they got to sample
P's favorite spiked pasta and customized homemade pizzas at the toppings "bar." There was also plenty to satisfy their sweet tooths. The Boy's favorite cake in the world is
his aunt's yellow cake with an amazing caramel frosting. Having tried to recreate it for his last 3 birthdays, I'm happy that's it's finally good enough to be shared! If you've ever had caramel or
penuche frosting, you're probably used to it being hard. The beauty of this version is that it
stays soft and buttery, a perfect compliment to the oh-so-moist yellow cake.

Photos from my friend Mimi =DIn honor of P's half-Irish ancestry, I also created some fun chocolate Irish cream cupcakes. To make them as "Irish" as possible, I used my
homemade Irish cream 3 ways: in place of milk in the cake batter, to flavor the frosting, and to fill the homemade chocolate cup toppers.
The chocolate liqueur "shots" were especially fun -- to make and consume! In case you're wondering about the proper way to eat these, here's how we did it:
- Hold the cupcake around its wrapper between your thumb and index finger, then bring it up and toward you so you can drink the Irish cream shot out of the chocolate cup.
- Now pick up the empty chocolate cup and gobble it up like a proper chocoholic!
- Now eat the remaining cupcake any ole way you want.
I'm happy to report the party was a success! Everyone, including the birthday boy, seemed to have fun and enjoy the food.
Like the above-mentioned style blogs inspired me, I hope some of you might be inspired to make your own crafts and treats for your next special gathering!
Moist (Really!) Yellow Layer Cake with Soft Caramel Frosting [
Printable Recipe]
Adapted from
ChefTalk and from
My Yellow BluffMakes a 2-layer 9-inch cake (about 10 to 12 servings)
XIAOLU'S NOTES: I think part of the compromise of such a moist, tender cake is that it's quite delicate to handle. I definitely recommend chilling the cakes at least an hour before frosting to firm it up so crumbs won't come off easily. Especially since this frosting is really good at pulling cake bits off hehe. You can't tell in my photo (or at least I hope not!) but a small section of the edge of the cake actually got pulled off by the frosting entirely. So, again, handle with care! Or, if not, it'll be delicious just the same =D.
2 1/4 cups all purpose flour
1 1/2 cups sugar
3 1/2 tsp baking powder
1 tsp salt
1 cup PLUS 1 Tbsp milk
1 tsp apple cider vinegar
1 1/2 Tbsp canola or vegetable oil
1/2 cup (1 stick) unsalted butter, softened
1 3/4 tsp pure vanilla extract
3 large eggs, room temperature
3 large egg yolks, room temperature
Soft Caramel Frosting (Recipe below)
Preheat oven to 350 degrees F. Cut parchment paper to fit the bottom of two 9 x 1 1/2-inch round pans. Grease the pans lightly with oil or cooking spray, then place the paper in the pans and grease the paper.
Sift the flour, sugar, baking powder, and salt into a large mixing bowl. Add the milk, vinegar, oil, butter, and vanilla to the flour mixture and beat with on medium to medium-high speed for 1 to 2 minutes, scraping the sides of the bowl as needed. Add the eggs and yolks and continue beating an additional 2 minutes. Divide batter evenly between the prepared pans.
Bake for 22 to 30 minutes or until a toothpick inserted near the center of a cake comes out clean, or until cake springs back when touched lightly in the center. Cool cakes on wire racks for 15 minutes; remove from pans and cool completely. Frost as desired.
Soft Caramel FrostingMakes enough to frost a 2-layer cake
XIAOLU'S NOTES: Steph of
Cupcake Project also posted an adaptation of this frosting. Though our measurements are different, the technique remains the same. Check out
her post for some useful photos of the caramelization process. This frosting doesn’t crust up like many other caramel frostings and retains wonderfully creamy, buttery, and soft. However, it does still become harder to spread as it cools, so you’ll want to have the cake(s) baked, cooled, and ready to frost before making the frosting.
3 cups sugar, divided [save 1/2 cup to brown]
3/4 cup (1 1/2 sticks) unsalted butter
1/2 tsp salt
1 1/4 cups (10 oz.) canned evaporated milk
1 tsp pure vanilla extract
Pinch of baking soda
Mix 2 1/2 cups sugar, 4 tablespoons (1/2 stick) butter, salt, and evaporated milk in a heavy-bottom medium saucepan (at least 3-qt. capacity). Cook over medium heat, stirring periodically until all of the sugar dissolves. Reduce heat to low.
Melt the remaining 1/2 cup of sugar in a small iron skillet, stirring constantly until it turns an even light to medium amber brown color.
Add this caramelized sugar and the remaining stick of butter into the mixture in the pot. Quickly stir everything together thoroughly and continue to cook until “soft ball” stage is reached (about 235 degrees F or when a bit of caramel dropped into cold water forms a soft, malleable ball) – this may take up to 30 minutes. Remove from heat, and let cool and thicken slightly. Add vanilla and baking soda. Use immediately, as the frosting will continue to thicken as it cools.
Chocolate Baileys Cupcakes with Irish Cream Liqueur Shots [
Printable Recipe]
Makes 12 cupcakes
1 cup MINUS 1 Tbsp all-purpose flour
3/4 cup PLUS 2 Tbsp sugar
6 Tbsp unsweetened cocoa powder
3/4 tsp baking soda
1/2 tsp baking powder
1/2 tsp salt
1 large egg, room temperature
3/4 tsp instant coffee powder dissolved in 1/2 cup hot water (or 1/2 cup espresso)
1/2 cup Irish cream liqueur (
homemade or storebought, like Baileys)
1/4 cup vegetable oil
1 tsp pure vanilla extract
Baileys Swiss Meringue Buttercream (Recipe below)
Irish Cream-Filled Chocolate Shots (Recipe below)
Preheat the oven to 350 degrees F and line a standard muffin pan with paper liners.
In large bowl, stir together the sugar, flour, cocoa, baking soda, baking powder, and salt. Add the egg, Irish cream, coffee (or reconstituted coffee mixture), oil, and vanilla extract. Beat by hand or with an electric mixer on medium speed until well combined (no more than 1 minute).
Pour the batter, which will be thin, to fill the paper liners about 2/3 full. Tap the pan firmly against the counter one time to remove any air bubbles. Bake for 20 to 25 minutes or just until a toothpick inserted into the middle of a cupcake comes out clean. Let cupcakes cool in the pan for 2 minutes, then remove them to a wire rack and let them cool completely there.
Once cupcakes are completely cool, pipe or spread buttercream onto cupcakes and top with Irish cream-filled chocolate shots (be careful to position them securely so they don’t spill). Enjoy!
Irish Cream Swiss Meringue ButtercreamMakes enough to generously frost 12 cupcakes
3 large egg whites
3/4 cup PLUS 2 Tbsp sugar
15 Tbsp unsalted butter, cool room temperature and cut into 10 pieces
1 tsp pure vanilla extract
1/3 to 2/3 cup Irish cream (
homemade or storebought, like Baileys)
Combine the sugar and egg whites in the stainless steel bowl of an electric mixer. Bring a large pan of water to a simmer, making sure that the water isn’t high enough that it will not touch the bowl. Set the bowl in the pan of simmering water and whisk constantly until the sugar is completely dissolved and the top becomes foamy. Be careful not to curdle the egg whites. Remove bowl from heat.
Transfer bowl to your mixer and beat on high speed for at least 3 minutes, until the mixture holds glossy, marshmallow-like peaks and the bowl is completely cool (very important -- the frosting's consistency will be off otherwise). If using a stand mixer, switch to the paddle attachment, and add butter to the meringue a tablespoon at a time, beating well after each addition (at least 5 seconds in between). With the mixer on low, add the vanilla and Irish cream, and continue beating 1 minute to incorporate the additions and reduce air bubbles.
Irish Cream-Filled Chocolate ShotsXIAOLU'S NOTES: If you have extra chocolate leftover, you can simply spread it in a layer (about 1/4-inch thick) over some parchment paper or other non-stick flat surface and let it cool completely. Once hard, chop it up to use for chocolate chunks in chocolate chip cookie or other recipes calling for chocolate chips/chunks!
5 to 6 oz. semisweet chocolate, roughly chopped or chipped
1/3 cup Irish cream (
homemade or storebought, like Baileys)
I used a mini-sized silicone mold, but mini foil cupcake liners inside of a mini pan should work as well. If using foil liners, be sure to spray the insides with oil first. Bring a small pan of water to a simmer, and set a small heatproof bowl filled with the chopped chocolate on top of the pan. Stir until the chocolate is completely melted. Turn off heat but keep bowl on top of the warm pan. Another option is to microwave the bowl of chocolate at 30 second intervals, stirring in between each, until fully melted and shiny.
Using a small pastry brush, brush the inside of the molds or liners with an even layer of chocolate. Freeze mold or pan for 5 minutes, then brush another layer of chocolate over the first layer. Repeat the previous step one more time (for a total of 3 chocolate layers). Freeze for 20 minutes, then unmold the cups by peeling of one side of the silicone (or foil liner) carefully. Keep cool until ready to use. Fill with 1 teaspoon of Irish cream to serve.