
Some of you may remember that I set out on The Great Quest for The Perfect Red Velvet Recipe back in the spring (has it really been that long already...). When I posted about it, I was just veering off into unexplored territory after finding none of the famous recipes to my taste. Well I'm happy to finally make it known that I've found The One! After 8 attempts and much tweaking, I've combined several inspirations and some crazy add-ins of my own to bring a new and hopefully well-loved red velvet recipe into the world =D.
Lastly, I want tell you about a really awesome surprise I got earlier this week. A while ago I left a comment on my friend Angie's blog. She'd just been visited by the Fairy Hobmother, and to my delight the Fairy stopped here next and gifted me with a fabulous Amazon gift card! Then when I was offered the chance to share the joy, of course I said yes! Now if you want a visit from the Fairy, just make your wish and comment below. Best of luck and thanks again, Fairy Hobmother!
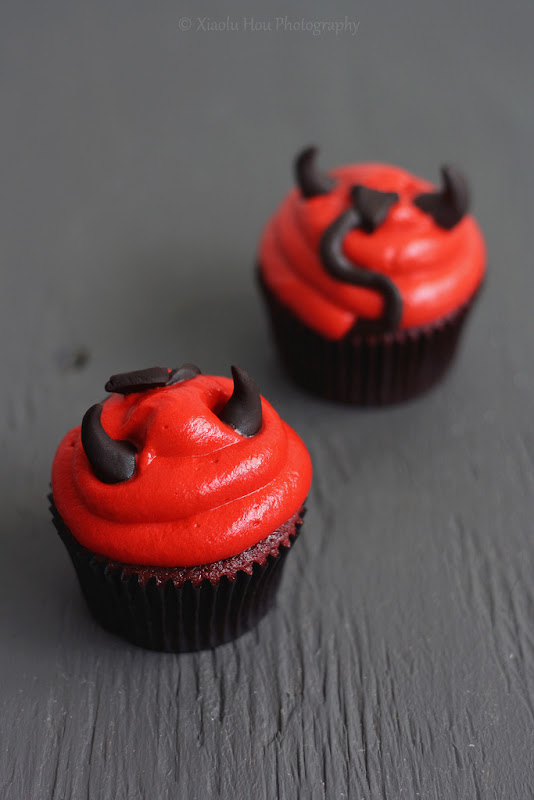
6 Bittersweets' Best Red Velvet Cupcakes [Printable Recipe]
Makes 12 cupcakes
XIAOLU’S NOTES: It can be hard to get a strong red color when coloring white frosting. Making the frosting 24 hours ahead of time may help, since the color will darken over time. Do NOT use liquid food coloring since it will add too much moisture to the frosting. The modeling clay recipe below will make more than you'll need. You can store any extra for up to 1 month. If you don’t have buttermilk, you can use the following substitution. For this recipe, use 1 1/2 teaspoons of apple cider vinegar with enough milk added to total 1/2 cup PLUS 1 tablespoon. Stir well and let sit for at least 5 minutes before using. Do NOT substitute the cake flour in this recipe.
1 cup (4 oz.) cake flour [stirred, spooned, and leveled to measure]
1/4 cup (1.12 oz.) all purpose flour [stirred, spooned, and leveled to measure]
1 1/2 Tbsp (0.32 oz.) unsweetened natural cocoa powder
Slightly rounded 1/2 tsp baking soda
Scant 1/2 tsp salt
3/4 cup sugar
1/4 cup unsalted butter, melted and cooled slightly
1 Tbsp red GEL food coloring [I use Wilton No-Taste but you may need more or less depending on brand]
1/2 cup PLUS 1 Tbsp buttermilk, room temperature
3 Tbsp vegetable or canola oil
2 Tbsp mayonnaise (NOT fat-free or olive oil; low-fat is fine)
1 large egg, room temperature
1 tsp apple cider vinegar
1 tsp pure vanilla extract
Cream Cheese Frosting (Recipe below)
24 Modeling Chocolate Horns AND 12 Fondant Horned Tails (Recipe below)
If making the devil decorations, remember to make and color your frosting red ahead of time as well as to make the modeling chocolate ahead of time! I recommend making the horns and tails before baking the cupcakes. You can let them sit out to dry slightly as you bake, cool, and frost the cupcakes.
Preheat the oven to 350 degrees F. Grease the top of a standard 12-cup muffin pan (in case you get some “muffin top” action). Line pan with 12 baking liners.
Sift the flours, cocoa powder, baking soda, salt, and sugar into a large bowl; stir to ensure even distribution and set aside. In a separate bowl or measuring cup, whisk together the melted butter and gel coloring until blended. Then add the buttermilk, oil, mayonnaise, egg, vinegar, and vanilla until well combined. Now add the wet ingredients to the dry, and mix until the batter is mostly smooth (no more than 2 minutes and small lumps are fine).
Distribute batter evenly among baking cups, filling each about 2/3 full. When finished, slam the pan evenly and firmly downward from 2 inches above the counter to force out any large bubbles. Bake for 16 to 23 minutes, or until a toothpick inserted into the center of a cupcake comes out clean. Remove from oven right away, let cool for 2 minutes, then transfer cupcakes to a wire rack to finish cooling.
Once cupcakes have cooled completely, use a piping bag fitted with a medium round tip to pipe swirls from the outside edge inward and upward on each cake. Just before serving (condensation may form on the modeling chocolate if stored in a container with the moist/warm cupcakes), insert 2 chocolate horns directly opposite to each other near the top of a cupcake's frosting. Insert the non-pointed end of a chocolate tail at the base of the frosting between the 2 horns. Carefully place the rest of the tail up the side of the frosting, curving it in an "S" shape. Press the tail, including the point, gently into the frosting to secure it. Now you're looking at a devilish "behind." Add tails to all the other little devil-cakes in the same way. By now I just know you'll be feeling a little sinful. Go ahead...give in to it and take a bite...I won't tell =p.
Pipeable and Not-too-sweet Cream Cheese Frosting
1 cup (2 sticks) unsalted butter, room temperature
2 cups powdered sugar
1 tsp pure vanilla extract
Red gel/paste/powdered food coloring, as much as needed to reach desired shade
8 oz. (1 block) cream cheese, cold and cut into 6 to 8 chunks
Sift powdered sugar into a small bowl. [If using powdered food coloring, sift a small amount in with the powdered sugar.] In a larger mixing bowl, cream the butter, 1 1/2 cups of powdered sugar, vanilla, and a few drops of food coloring until thoroughly blended and fluffy. Add more food coloring, if needed, until you reach something close to the shade you want. Add the cream cheese, a chunk at a time, beating after each addition (just enough to work it in until it’s smooth). If needed, add more powdered or gel food coloring until the desired shade is achieved. Be careful to avoid overbeating or the cream cheese may start to break down and become gloppy. Chill for 24 hours (ideally) to allow the red color to deepen. Then beat again until smooth just before using.
Modeling Chocolate Devil Horns and Tail
Chocolate adapted from Cake Central
10 oz. semisweet chocolate (coarsely chopped chunks or chips)
1/3 cup light corn syrup
Black gel or paste food coloring, as needed
Making the modeling chocolate: In a shallow bowl, melt the chocolate in microwave (be careful so that the temperature does not exceed 100 degrees F) for 2 minutes; stir. If chocolate is not completely melted, return to microwave for 30 seconds at a time and stir until smooth.
Add corn syrup to the chocolate and mix well (scrape all the corn syrup into the chocolate with a rubber spatula). Using a rubber spatula, stir and fold mixture, scraping the sides and bottom of the bowl well, until no shiny syrup is visible and the mixture forms a thick ball.
Pour mixture onto a large sheet of wax or parchment paper and spread with the spatula until it’s about 1/2-inch thick; let it sit and stiffen, uncovered, for about 2 hours. After that, knead black food coloring into the modeling chocolate 1 to 2 drops at a time until you get the desired shade. Use at once or store in an airtight container at room temperature for up to 1 month.
Shaping the horns: Make 24 balls about 1/2 inch across with the modeling chocolate. Flatten one side of each ball against your working surface. Use your index fingers to roll the other end down to a point. Smooth and flatten the the chocolate, curving the points to one side until it looks like a horn. Set the finished horn down on its flattened end, and repeat until you have made 24 horns.
Shaping the pointed tails: Roll modeling chocolate into 12 ropes about 2 1/2 inches long and 1/6-inch thick each; set aside. Shape 12 small pieces of modeling chocolate into flat triangles that are each about 1/8 inch thick and and 1/2 inch on all 3 sides. Join each triangle to one of the ropes made earlier by pressing one end of the rope into a triangle.


These are super cute! I've never made red velvet cakes/cupcakes before and your post is very convincing. I might just have to give it a try soon. Love the decoration/costume you have on these cupcakes! :) Love your post title too!
ReplyDeleteDevilishly cute! They look so spooky and great.
ReplyDeleteCheers,
Rosa
I might give this a try, Xiaolu as they look so devilishly scrumptious! well done on another wedding order:-)
ReplyDeleteSo very cute! I have never made or ate a red velvet cake as the color puts me off. But you want me change my mind!
ReplyDeleteI was excited, until I saw... Mayonnaise?? Oh noes.........
ReplyDeleteDefinitely gonna try making these tomorrow! Cute decorations!
ReplyDeleteThanks, you guys!
ReplyDeleteMeemee - yay :). please let me know how you like it!
Wow, Xiaolu, those are truly as devilish as devilish can get in a cupcake! Brilliant Halloween idea! I need to make a blood red frosting for Halloween, but I don't want to use too much. Is there any particular shade of red that colors the best with less?
ReplyDeleteThese are so fun! Love it!
ReplyDeleteBeautiful and so fun!
ReplyDeleteWell done!
Oh Xilau, I have a weakness for red velvet cupcakes and your look so soo tempting. The funny thing is I don't really fancy eating them myself. I just love to bake them for kids parties and the plus is my boys love it!
ReplyDeleteYou know, you just taught me something--there's no need to load your recipes with pics, all you need is a single shot like this one. Awesomeness is the only adjective I can think of!! Looks like I've missed lots of your gorgeous posts, need to catch up.. :)
Plz read *Xiaolu*.. sorry for the misspell!
ReplyDeleteAdorable!
ReplyDeleteRed velvet is such a classic favorite! Love the way you decorated these-especially the horns and tail. Great post of halloween treats!
ReplyDeleteOh, they look devilishly cute! I love that red color Xiaolu!
ReplyDeleteThey look awesome, very creative
ReplyDeleteWow, mayonnaise - I would never have thought to add that. I'm going to have to give these a try because baking with mayo is just too tempting. Do you think homemade mayo would work? I'm not a fan of the store variety...
ReplyDeletelove love love the red! i quite favor a more chocolatey taste in my red velvet cupcakes - just wondering if in your attempts you tried a variation with a greater proportion of cocoa powder and if it turned out well?
ReplyDeleteoh and just wanted to be sure - for the cake and all-purpose flour, would you mind converting it to metric measurements? do you use the 1cup of AP flour to 125g measure? :)
Gorgeous, and definitely perfect in time for Halloween! Love how committed you are to testing your recipes and getting them JUST right!
ReplyDeleteWhat lovelies! I love the red frosting and the devilish look:)
ReplyDeleteThese are amazing!! Brilliant idea! I'm so excited for Halloween! I can justimagine the vampire-esque bloody smiles that the red food dye would leave behind- LOL!
ReplyDeleteFor once, I think little red "devils' are adorable :)
ReplyDeletelol, so cute.
ReplyDeleteThanks for your nice responses, everyone!
ReplyDeleteJavelinWarrior - I think homemade mayo should work just fine as long as you haven't added any additional flavors and used a neutral-tasting oil to make it.
Lisa - I used Americolor gel color but it still took quite a bit to get the shade so red. Sadly there isn't much of a way around it. Just be sure to use Americolor or Wilton no-taste gel color if you want to try it. I hear that some red colorings have a bad taste.
Janine - I haven't tried this specific recipe with more cocoa powder, but I'm sure you could add a tablespoon or so without much issue. If you want to add more than that, I'd recommend reducing the cake flour to balance out the additional cocoa. In earlier iterations of my recipe, I did try using 3 tablespoons of cocoa and found the flavor too strong. If it tastes noticeably of chocolate I think I just want it to be full-on chocolate. But that's just my personal taste :). I'd love to hear how your more chocolatey variation turns out! I'd say to use 114 grams CAKE flour and 31 grams AP flour.
these are fantastic! almost too cute (wicked) to eat !!! Love 'em
ReplyDeleteThey are beautiful! With all your recommendations, I'll have to try this recipe :)
ReplyDeleteOh my goodness those are so cute! Your so talented!
ReplyDeleteThey are so cute!
ReplyDeleteThese looks so wonderful!! Perfect for halloween!
ReplyDeletesuper cute! and i'm intrigued by the addition of mayo to the cupcake! will have to try it :)
ReplyDeleteHilarious! LOVE that deep red!
ReplyDeletePeople (myself included) really are picky about their red velvets! I thought I had found my perfect recipe...but now I need to try this!
ReplyDeleteomg! I will have to try this out too. I am putting this on my Pinterest.
ReplyDeleteJust right for halloween! Spookily awesome!
ReplyDeleteYOu know I like that cupcake, don't you? :-) LOVE those tiny little horns that devil cake has. Red velvet has always been one of my favorite cake flavors so I know I am gonna try this recipe for sure but you know what sounds even better? How about you become my "fairy hobmother" and bring me some of those while visiting me soon! :-)
ReplyDeleteI've had red velvet cake on my to make list for a while now. I really like the sound of this recipe. Congrats on the Fairy Hobmother! I've been wishing for a dutch oven for a while, so maybe someday the Fairy Hobmother will visit me too!
ReplyDeleteOoohh..the red frosting with the tail look so spooky..am gonna try these wicked yet scrumptious bakes today.
ReplyDeleteI was just at a Scharffenberger food gig today and as the chef explained making a cake, he was saying that some recipes call for mayonnaise, which is the same as having eggs and oil in regular recipes. I hadn't thought of it that way, but it's true! Mayo is just emulsified eggs and oil! You learn something new every day. :) these little cakes are devishly cute. I love 'em. :)
ReplyDeleteIf the fairy hob mother were to visit me, I definitely have a few baking items I'd like, and I've been lusting after some of the Cook's Illustrated cook books. And good quality chocolate. I'd like some of that, too. :) I love that Amazon sells everything. :)
thanks xiaolu :) once I assemble the ingredients i'm definitely trying it :D will let you know how it goes!!
ReplyDeleteDevilishly amazing!! the cupcakes looks cute. I love this post, Great pics. Happy halloween :)
ReplyDeletecute! Love it! :)
ReplyDeletespooky & cute ! your creativity is so inspiring girl :D
ReplyDeleteReally cute!!
ReplyDeletePerfect for Halloween, and I bet they taste fantastic.
ReplyDeleteHow very spooooooooOOOoooky:)
ReplyDeleteLast Halloween I made a brain cake, with a red velvet interior - I got a lot of funny looks at the party I brought it too, ha.
As for mayo, I love mayo so much; I've enjoy substituting it into many cakes. But I've found not to tell people that there's mayo in it, as that often prompts disgust AND funny looks. Even though the final product is not mayo-ey at all!
Looking forward to you additional frightful recipes:)
So cute.....I can see myself making these with Maryam when she's a tad older!
ReplyDeleteThanks for the comments, everyone! Glad many of you love Halloween too!
ReplyDeleteWhat cute little devils!
ReplyDeleteLOVE IT! :D
ReplyDeleteHeehee these are cute little delicious devils that I'd love to eat them all. :-)
ReplyDeletewow! these devil cupcakes are simply great! You've just given me a great idea for Halloween! Love your blog! I'll be back, and back, and back... :) Alessia
ReplyDeleteNo, I absolutely can't believe Halloween is coming up! It's not as celebrated here as it is in the US, but that doesn't mean I won't be getting festive on my own.
ReplyDeleteLove how you've decorated these red velvet cupcakes - such a nice twist on the usual divine white icing :) And totally agree with you that red velvet is an art form. So hard to find the "perfect" recipe!
sounds like you've done some valuable research! i won't lie--red velvet isn't my favorite. i do love the devil decor, though. :)
ReplyDeleteWow! These are so amazing and devilish!!!! I love the horns and tails so cute (if you can say that about anything devil related) and that bright red frosting is fantastic and just right!!! You are so talented Xiaolu.
ReplyDeleteThe cutest red velvet cupcakes ever!
ReplyDeleteThanks again, you all!
ReplyDeleteFantastic! I was going to ask about that deep red color but you answered it at the bottom. RV is a true favorite of mine so I think these will be appearing at our adult halloween party!
ReplyDeleteTake care
LOVE them!! They looks great!
ReplyDeleteso cute and devilish at the same time. Gorgeous!
ReplyDeleteamazing as always :)))
ReplyDeleteRed velvet cupcakes look nice and chocolaty,the frosting on top looks creamy and moist!
ReplyDeleteThank you for sharing,Xiaolu!:-)
Your halloween creation looks gorgeous!! You're so talented!
ReplyDeleteThese cupcakes could not look any cuter. They almost look too good to eat.
ReplyDeletebeautiful cupcakes!! I still remember other Haloween treats from you!
ReplyDeleteThanks, Anh and everyone else!!
ReplyDeletesaw these while wasting time on knapkins - so freaking cute! awesome job :)
ReplyDeleteThis is so nice. DO you mind to link this post to my hosted Halloween Party Event @ http://hankerie.blogspot.com/2011/10/event-october-halloween-party.html
ReplyDeleteThis post is so fetish-worthy, I've been inspired to include it in my Friday Food Fetish blog. If you have any objections, please let me know
ReplyDeletethe red color looks so evil. perfect halloween party food
ReplyDeleteYou make the most beautiful cupcakes - always, dearie! These are just too cute. :D
ReplyDeleteThese look amazing!! I can't wait to see your other Halloween cupcakes. :)
ReplyDeleteI made these the other day (although slightly modified to be black velvet, and I made them spiders instead of devils) and the recipe is just fantastic! Thank you so much. I wrote a post about it, and link back to you. Credit where credit is due!
ReplyDeleteThis is just great! just in time for Halloween parties! This is one sure hit!
ReplyDeleteWow! Love the devilish look of the cupcake! Thank you for sharing the recipe with us!I just can't stop staring at them!
ReplyDeleteHi Xiaolu, I tried the recipe using dutch processed cocoa instead of the mentioned natural one. The taste was good, however the texture was in between cake-like and mochi. Wonder if you know the type of cocoa would affect the texture or due to overmixing or some other reason?
ReplyDeleteHi Jacelyn! Thanks for trying my recipe, but sorry it didn't work out as you'd hoped. Dutch-processed cocoa powder has been neutralized while natural cocoa powder remains ACIDIC. Since baking soda requires acid to produce carbonation and therefore rise, I think your cupcakes MAY have risen less due to your substitution of cocoa powder type. However, with only 1 1/2 T cocoa in this recipe, I can't imagine that this alone caused the problem in your finished cakes. Did you use the toothpick test to make sure the cakes were completely cooked? Also, I'm wondering if you use an oven thermometer? Most ovens are not actually at the temperature you set them. Perhaps your oven runs cooler than your setting? This might explain cake that has not risen/cooked as much as it should. Hope that helps! I've used this recipe dozens of times with consistent, delicious results and hope you'll be able to get the same result next time!
DeleteHi Xiaolu, Just wanted to let you know I tried out your recipe today, and it is the best red velvet I've ever had! I usually don't care for it much, but this recipe is wonderful! I love the little crust that forms on top of the cupcakes, it's extra tasty! I also accidentaly doubled the butter to 1/2 cup, so I'm not sure if that contributed to the forming of that crust or not, but either way, YUM! And it holds up well in cake form too! Made a 6" and 10" that baked wonderfully! Thanks for the recipe!
ReplyDeleteHi Renee! Thanks you SO MUCH for your message! I love hearing about when people try and enjoy my recipes, especially when it's a flavor or food they don't "usually like" =D. I've seen RV recipes with like double the fat-content (oil or butter) of mine so I have no doubt it still turned out great. I think the crunchy crust probably has more to do with sugar content and your oven, though. Thanks for reporting that it worked well as a cake. I actually just made a tall 6-inch cake using this recipe for a wedding order as well. Cheers! Xiaolu
Delete