Wednesday, October 31, 2012
Happy Halloween!
I know I've been out of the blogging loop and haven't been visiting your sites as much as I'd like to, so I'd love to hear about your Halloween or just about how you've been in general in the comments below!
Dark, Rich Chocolate Buttercream Frosting [Printable Recipe]
Makes enough to frost at least 2 dozen cupcakes
2 cups unsweetened cocoa powder
4 to 5 cups powdered sugar
Large pinch salt
1 1/2 cups (3 sticks) unsalted butter, softened
5 to 8 Tbsp milk, half and half, OR heavy cream
1 Tbsp pure vanilla extract
Sift the cocoa powder, powdered sugar, and salt into a large bowl. In another large mixing bowl, cream the butter using an electric mixer. Alternate adding the sifted mixture (1 cup at a time) with adding the cream, mixing well between each addition. Once all the powdered mixture and 5 tablespoons of the milk have been incorporated into the frosting, turn the speed up to high and continue beating until a light, fluffy texture is achieved, at least 2 minutes. [Since the frosting will significantly lighten in color as it's beaten, you will need to scrape the sides of the mixing bowl carefully to ensure the darker portions are mixed in to make a uniformly colored frosting. Add more cream or powdered sugar if you want to thin or thicken the frosting. Use finished frosting right away to frost cooled cupcakes or cakes. If not using right away, frosting can be covered and stored at cool room temperature for at least 2 days. However, you may need to re-beat the frosting briefly if it's been siting a long time.
Monday, October 31, 2011
Happy Halloween!
Saturday, October 29, 2011
My Tips for Great (Cupcake) Success and Halloween Recipes Round-up!
Though I'm no expert, I take a lot of pride in everything I do and wouldn't want to share anything less than the best with you guys. So instead of my original post, I'm going to share some general cupcake tips which have helped make most of my other cupcake experiments successful. Plus a quick round-up of all my Halloween recipes for you last-minute planners =p.
XIAOLU'S CUPCAKE TIPS:
- Use a good muffin pan. I recommend one that's nonstick and has some weight (like this one). A sturdier pan will be less likely to warp (become misshapen) easily. I recall using my new pan for the first time 3 years ago and noticing an immediate difference. My cupcakes rose at least 1/4 inch higher and baked more evenly.
- Buy an oven thermometer (or even 2!) and always preheat at least 25 minutes, ovens (even brand new ones) are notorious for being inaccurate as to temperature. Buy your own thermometer and rely on it rather than your oven's. If your oven tells you that it's up to 400 degrees F only 5 minutes after you turned it on...it's lying...
- If it's your first time making a recipe, try to read it a few days in advance in case you need to buy/prepare anything ahead of time. At the very least, try to read it before you start making the cupcakes.
- Lightly grease the top of your cupcake pan BEFORE putting in liners. Especially if you overfill the cups with batter later, this will make it much easier to lift the cupcakes out later. I've found that the grease seems to reduce the "muffin-top" effect and encourages the cakes to rise up and not outward.
- Use good-quality baking liners. Especially if you bake cupcakes/muffins a lot, this should be a no-brainer. I usually buy basic solid liners (white, brown, black) in bulk online so that I'm never low -- I usually search for the lowest prices on Etsy. Cupcake Social is one seller I've had a good experience with. If you're a fan of those paper souffle standalone baking cups (similar to those Wilton nut cups except that those aren't oven-safe), you can get a LOT of them for cheap here. Unsuitable liners can take a lot away from your final product. For example, I bought white liners at the grocery store when I was nearly out of my usual liners. Luckily I didn't need to use them because when I placed one into the pan, it wouldn't even fit without a big fold forming along the top. Liners can also differ in their non-stick coating. Some are so non-stick that they tend to pull away from the cupcake. Trust me, this is NOT a good look!
- When measuring flour for cakes, it's best to go by weight OR to stir the flour, spoon it into the measuring cup, then level it with a knife or other straight edge. The method of measurement can make a big difference. Scooping up the flour with your measuring cup will compact the flour, result in you using too much flour, and the cake being too dry.
- Sift dry ingredients together, it helps minimize the formation of clumps of dry ingredients when they're being mixed into the batter later.
- Unless the recipe specifies otherwise, use room temperature eggs and butter. Obviously if you'll be heating up the butter or eggs as part of the recipe, you don't need to worry about the starting temperature. But if you'll be creaming the butter with sugar, you'll need it to be warm enough to properly incorporate the air that will make your cake fluffy. Room temperature eggs are also important if the eggs are to mix in evenly in the batter. You can speed up their warming by placing them in a bowl of lukewarm water. Once the water becomes cool, replace it with more warm water. Do this until the eggs no longer feel cool to the touch.
- If whisking by hand, beat eggs separately (or with other wet ingredients) before adding to batter. I always pre-beat my eggs even for one-bowl recipes because of one incident. When crumbling up my favorite chocolate cake to make cake pops one time, I noticed there were chunks of something rubbery in the cake. I realized these were from streaks of egg white that didn't get totally mixed into the batter. Referring back to the bullet point above, it's important to use room temperature eggs as well to avoid these streaks.
- If whisking by hand, whisk in one direction only when first combining wet and dry ingredients. Once the 2 are fairly combined, you can change directions, but I find that changing directions before the dry ingredients are mixed in results in more clumping.
- Unless the recipe instructs otherwise, always stop mixing as soon as the added ingredients have been mixed in. Overmixing will result in developing the gluten (proteins that make bread chewy) in the batter too much = tough cake!
- For even and clean distribution of batter, use a cookie/ice cream scoop. I love love LOVE this scoop -- it makes dividing up batter a cinch and is also great for cookies and ice cream, of course.
- Don't overfill your baking liners. I've rarely seen a recipe that calls for filling more than 3/4 full. Most cupcakes recommend somewhere between 2/3 and 3/4 full. A few batters rise exceptionally high, so if the recipe says to only fill 1/2 full, follow the directions!
- After filling pan with batter, slam pan directly down on counter from a height of 2 inches. Don't do this though if the batter is exceptionally delicate. Otherwise, it helps push any big air bubbles to the top and out. This way you won't have big holes and tunnels in your finished cakes.
- Don't open the oven door before the last 5 minutes of baking. Cakes can be very sensitive to temperature changes and drafts. Especially opening the door during the first 1/2 of baking can have big consequences such as the cake collapsing.
- Always check in on your cupcakes about 5 minutes before the baking time listed in the recipe. Due to variations in ovens, pans, altitude, and whatever else, it's a good idea to check your goods a little early. Better that than dry, overbaked cakes (ew). For most cakes the toothpick test is fairly accurate; the cupcakes are ready as soon as a toothpick stuck into the middle of the cupcake comes out mostly clean (a few moist crumbs are usually ok; wet batter or a lot of crumbs are not).
- Regardless of what the recipe says, move cupcakes from pan to cooling rack no more than 5 minutes after they come out of the oven (but be careful not to burn yourself!). After persistent issues with cupcake liners separating from the sides of the cake (as mentioned above), I did some research and found 2 main culprits. First was the type of baking liner used, and second was steam formed when cupcakes sat cooling in their pans for too long. After figuring these out, I haven't had this problem again.
- Let cupcakes cool on racks COMPLETELY before frosting unless the recipe says otherwise. Even if your cupcakes feel just barely warm, that bit of heat is probably going to be enough to melt your frosting if you try to put it on too early.
- To fill cupcakes, I prefer the "cone method" or using a cookie cutter. The cone method simply means using a paring knife to cut a cone about halfway down into the cupcake, then using the tip of the knife to help pop the cone out. Or you can use a 1-inch wide round cookie cutter. Press the cutter down into the center of the cupcake, left it up and out, then use the tip of a knife to help you pull out the round of cake you just cut. With either method, you can spoon/pipe in the filling at this point. Now you can either put back the cone/round of cake on top of the filling or frost directly on top of the filling.
- Cupcakes with any perishable ingredients (like whipped cream or cream cheese frosting) should be stored in the fridge. Other cupcakes can be stored, well-covered, at room temperature. They are usually good for several days this way.
- If you make cupcakes ahead of time and want to keep them fresh/moist, wrap or place them in an airtight container and freeze them. Defrost before frosting and serving.
- Share the joy of cupcakes with friends and family. I promise, they taste better when enjoyed together ;p.
Wednesday, October 26, 2011
Halloween Candy Giveaway Winner!
Saturday, October 22, 2011
Spooky Graveyard Vanilla Cookies N' Cream Cupcakes (Guest Post for Pure Joy Events)
Wednesday, October 19, 2011
If You Want To Live and Thrive, Let the Spider Run Alive (Black Widow Chocolate Rum Cupcakes)
If you're wondering what the post title's all about, it's just a quote I found while searching for a spider-related saying for these cupcakes. This one caught my eye right away...heck if I saw a Black Widow, I certainly wouldn't mess with it! There's just something extra creepy about that red hourglass marking, don't you think?
So I've seen plenty of adorable spider cupcake ideas (like those featured over on McCormick's Kitchen PLAY), but I really wanted to make my version more realistic and creepy than those I'd come across ^_^. Since it's notoriously difficult to color homemade fondant a true black and I happened to have some black modeling chocolate on hand, I turned to this medium to make my crawly friends more dimensional and thus, my spidery vision start coming to life. Then melted chocolate, red candy melts, and a good blast of cold freezer air did the rest!
One thing that I failed to foresee was that the semisweet chocolate I used wouldn't be dark enough to match the black modeling fondant. That's why I've replaced semisweet with dark chocolate in the recipe below and also suggested that you even add a bit of black food coloring to make these truly black widows rather than "brown widows" as my boyfriend called mine hehe. Hope that you like these and you're having as much fun preparing for All Hallow's Eve as I am! And be sure to stay tuned for the next cupcake in my Halloween series -- it's so good you might even call it deadly...8p.
Black Widow Chocolate Rum Cupcakes [Printable Recipe]
Makes 12 to 14 cupcakes
XIAOLU'S NOTES: These can easily be converted into kid-friendly moist chocolate cupcakes by substituting the 3 tablespoons of rum with boiling water and simply omitting the rum from the ganache. The ganache needs to be used shortly after it's made. Toppers can be made in advance and stored at room temperature, but you should re-freeze the toppers for 10 to 15 minutes before moving them to the cupcakes since they (especially the spiders) are quite delicate. I made my spider toppers with semisweet chocolate and they turned out a bit too brown, so I definitely recommend using dark chocolate and even adding some black food coloring.
1 cup sugar
3/4 cup PLUS 2 Tbsp all purpose flour
6 1/2 Tbsp unsweetened Dutch-process cocoa powder
3/4 tsp baking powder
3/4 tsp baking soda
1/2 tsp salt
1 large egg, room temperature
1/2 cup milk [NOT skim]
1/4 cup vegetable oil
1 tsp pure vanilla extract
5 Tbsp boiling water [OR 1/2 cup IF omitting rum]
3 Tbsp dark rum
Rum Chocolate Ganache (Recipe below)
White Chocolate Spiderwebs (Recipe below)
Chocolate Spiders (Recipe below)
Heat oven to 350 degrees F. Grease tops of a cupcake pan and then line it with baking liners.
In a large bowl, sift together sugar, flour, cocoa, baking powder, baking soda and salt. Add egg, milk, oil and vanilla; beat on medium speed for about 2 minutes. Stir in boiling water and rum (batter will be thin). Pour batter into prepared cupcake liners, filling no more than 3/4 full. If there is batter left over, fill an additional 1 to 2 liners in another baking pan OR standalone baking cups with the remaining batter. Bake 18 to 23 minutes or until a toothpick or thin knife inserted into the center of one comes out clean. Cool 5 minutes, then remove from pans to wire racks to finish cooling. Make the ganache as you wait for the cupcakes to cool.
Dip each cupcake upside-down into the ganache up to the liner, lift cake out of chocolate, and let excess ganache drip off. Next, turn cupcake right-side up and place on wire rack to let ganache set. (If ganache begins to harden before all of the cupcakes are dipped you may heat for 5-second intervals in a microwave until chocolate is smooth again).
After 30 minutes, once ganache has partially set, center a white chocolate spiderweb and then a chocolate spider atop each cupcake. Enjoy!
Rum Chocolate Ganache
3 oz. bittersweet chocolate (chips or finely chopped bar)
1/3 cup heavy cream
1 tsp unsalted butter
2 tsp dark rum
Make ganache after cupcakes are mostly cooled off. Place chocolate in a small to medium bowl. Bring heavy cream and butter just to a boil. Pour hot cream mixture over chocolate and let sit for about 5 minutes. Begin stirring mixture and continue stirring until the mixture is uniform and smooth (may take about 5 minutes of stirring). Stir in rum. Use immediately.
White Chocolate Spiderwebs
Slightly adapted from Country Living
3/4 cup white chocolate chips
Microwave white chocolate chips in a bowl for 30 seconds and stir. Continue to microwave in 20-second intervals until almost melted. Stir again until chocolate is completely melted. Pour inside a zipper-lock bag with one tip snipped off to create an opening for piping.
Line a cookie sheet with parchment or wax paper. Slide the spiderweb template underneath paper. To make each web, use piping opening to trace white chocolate along design, making sure to connect all lines. Repeat process until you've created 12 to 14 toppers (depending on the number of cupcakes). Chill them in refrigerator for 10 minutes. Then, using a spatula, carefully remove webs from parchment.
Chocolate Spiders
Modeling Chocolate (Recipe below)
1/2 cup roughly chopped dark chocolate
Black oil-based or powder food coloring (optional)
Red royal icing or melted candy melts
Microwave chopped dark chocolate in a bowl for 30 seconds and stir. Continue to microwave in 20-second intervals until almost melted. Stir again until chocolate is completely melted. If desired, add black oil-based or powder food coloring (do NOT use liquid/gel coloring; if you do, the chocolate will clump together and you'll have to toss it!) a little at a time, stirring well in between additions, until the chocolate is the desired shade of black. Pour inside a zipper-lock bag with one tip snipped off to create an opening for piping.
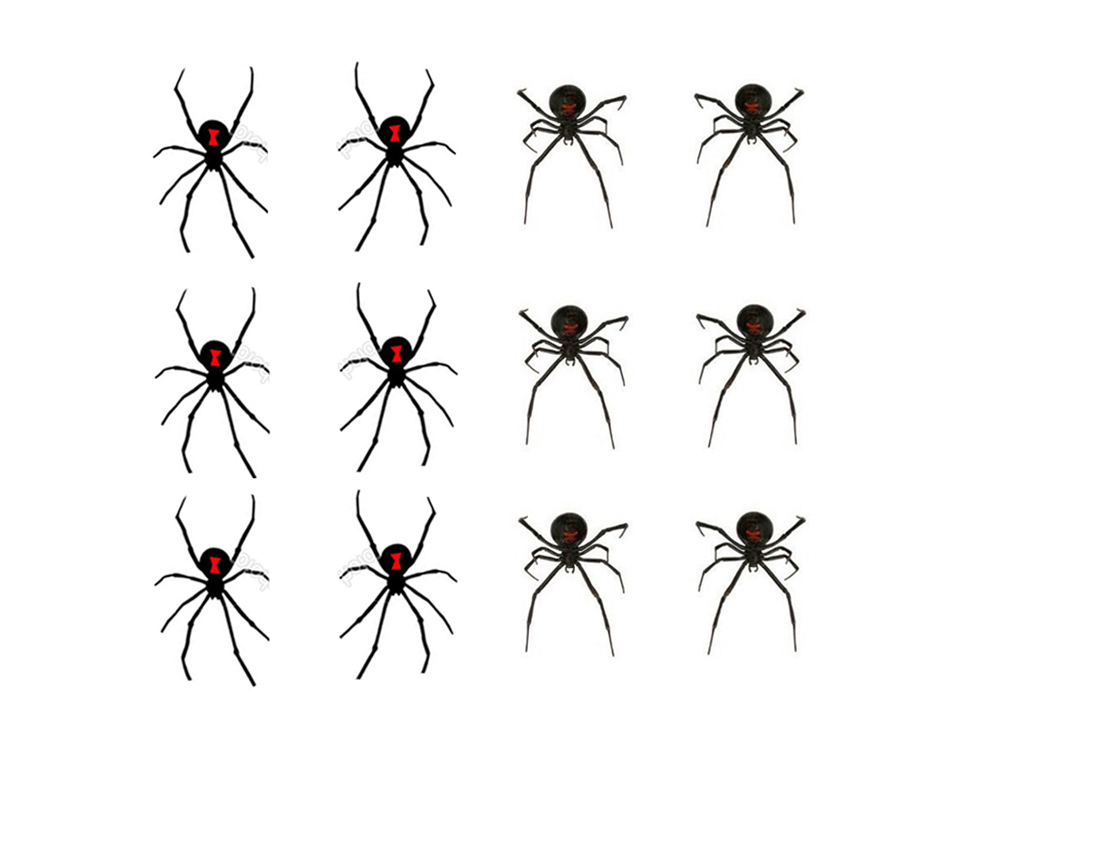
Line a cookie sheet with parchment or wax paper. Slide a spider template [I simply printed out some cartoony images of black widow spiders I found online; here's what I used] underneath paper OR you could pipe freehand IF you trust yourself to do this. To make each spider, first roll modeling chocolate into 12 to 14 balls about the size of large green peas. Pipe a small dot of melted chocolate on the parchment above the round area of a spider on the template, and press ball of modeling chocolate onto it to secure. Now pipe chocolate to trace along the rest of the design, forming the spider head and legs. Make sure to connect all lines. Repeat process until you've created 12 to 14 spider toppers (depending on the number of cupcakes). Now place red royal icing or red candy melts (melted the same way as the chocolate chips above) into a zipper-lock bag. Snip off a tiny bit of the tip for piping, then trace and fill in an hourglass shape on each modeling chocolate spider "abdomen." Chill spiders in refrigerator for at least 15 minutes. Then remove carefully from parchment just before transferring to cupcakes.
Modeling Chocolate
10 oz. semisweet chocolate (coarsely chopped chunks or chips)
1/3 cup light corn syrup
Black food coloring, as needed (such as McCormick Black Food Color)
In a shallow bowl, melt the chocolate in microwave (be careful so that the temperature does not exceed 100 degrees F) for 2 minutes; stir. If chocolate is not completely melted, return to microwave for 30 seconds at a time and stir until smooth. Add corn syrup to the chocolate and mix well (scrape all the corn syrup into the chocolate with a rubber spatula). Using a rubber spatula, stir and fold mixture, scraping the sides and bottom of the bowl well, until no shiny syrup is visible and the mixture forms a thick ball. Pour mixture onto a large sheet of wax or parchment paper and spread with the spatula until it’s about 1/2-inch thick; let it sit and stiffen, uncovered, for about 2 hours.
After that, knead black food coloring into the modeling chocolate 1 to 2 drops at a time until you get the desired shade. Use at once or store in an airtight container at room temperature for up to 1 month.
I'm submitting these Black Widow Spider Cupcakes to McCormick's Kitchen PLAY Contest as a conceptual adaptation of My Baking Heart's Spider Cupcakes. They're giving away ten $50 prizes to those who recreate any of the recipes in this month's Halloween-themed Progressive Party. If you're interested in entering, you can review the complete contest rules here. Deadline is October 31, 2011. Good luck!
Monday, October 17, 2011
Monday Favorites and Kitchen Safety Tips!
Thursday, October 6, 2011
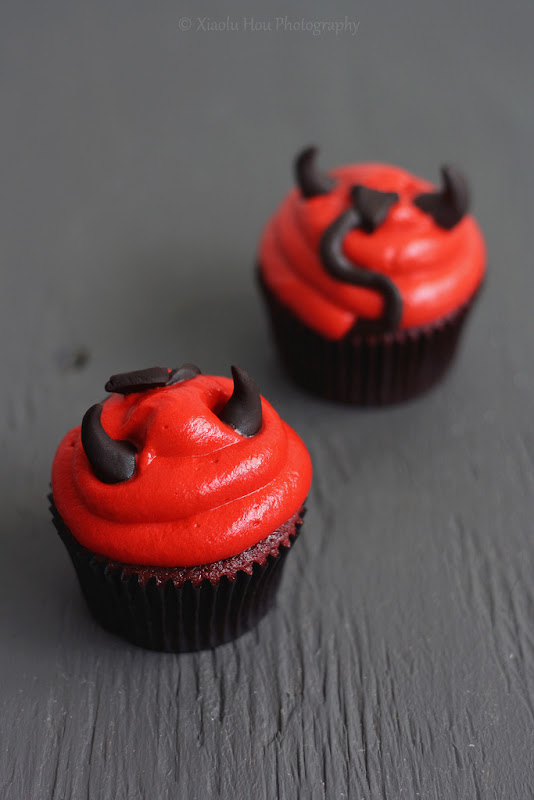
Devilishly Delicious! (The Best Red Velvet Cupcakes)
Some of you may remember that I set out on The Great Quest for The Perfect Red Velvet Recipe back in the spring (has it really been that long already...). When I posted about it, I was just veering off into unexplored territory after finding none of the famous recipes to my taste. Well I'm happy to finally make it known that I've found The One! After 8 attempts and much tweaking, I've combined several inspirations and some crazy add-ins of my own to bring a new and hopefully well-loved red velvet recipe into the world =D.
This recipe has been tested frequently for over half a year and has won the approval of dozens of tasters. One friend liked my red velvet cupcakes so much, in fact, that she just asked me to make 140 of them for her wedding =D. I really do hope you'll give these cupcakes (and their Halloween costume) a try. The ingredient list is longer than your usual RV recipe, but they're all ingredients that you probably already have in your pantry. And if you do make them, please send me your feedback and, even better, a photo along with it!
Lastly, I want tell you about a really awesome surprise I got earlier this week. A while ago I left a comment on my friend Angie's blog. She'd just been visited by the Fairy Hobmother, and to my delight the Fairy stopped here next and gifted me with a fabulous Amazon gift card! Then when I was offered the chance to share the joy, of course I said yes! Now if you want a visit from the Fairy, just make your wish and comment below. Best of luck and thanks again, Fairy Hobmother!
6 Bittersweets' Best Red Velvet Cupcakes [Printable Recipe]
Makes 12 cupcakes
XIAOLU’S NOTES: It can be hard to get a strong red color when coloring white frosting. Making the frosting 24 hours ahead of time may help, since the color will darken over time. Do NOT use liquid food coloring since it will add too much moisture to the frosting. The modeling clay recipe below will make more than you'll need. You can store any extra for up to 1 month. If you don’t have buttermilk, you can use the following substitution. For this recipe, use 1 1/2 teaspoons of apple cider vinegar with enough milk added to total 1/2 cup PLUS 1 tablespoon. Stir well and let sit for at least 5 minutes before using. Do NOT substitute the cake flour in this recipe.
1 cup (4 oz.) cake flour [stirred, spooned, and leveled to measure]
1/4 cup (1.12 oz.) all purpose flour [stirred, spooned, and leveled to measure]
1 1/2 Tbsp (0.32 oz.) unsweetened natural cocoa powder
Slightly rounded 1/2 tsp baking soda
Scant 1/2 tsp salt
3/4 cup sugar
1/4 cup unsalted butter, melted and cooled slightly
1 Tbsp red GEL food coloring [I use Wilton No-Taste but you may need more or less depending on brand]
1/2 cup PLUS 1 Tbsp buttermilk, room temperature
3 Tbsp vegetable or canola oil
2 Tbsp mayonnaise (NOT fat-free or olive oil; low-fat is fine)
1 large egg, room temperature
1 tsp apple cider vinegar
1 tsp pure vanilla extract
Cream Cheese Frosting (Recipe below)
24 Modeling Chocolate Horns AND 12 Fondant Horned Tails (Recipe below)
If making the devil decorations, remember to make and color your frosting red ahead of time as well as to make the modeling chocolate ahead of time! I recommend making the horns and tails before baking the cupcakes. You can let them sit out to dry slightly as you bake, cool, and frost the cupcakes.
Preheat the oven to 350 degrees F. Grease the top of a standard 12-cup muffin pan (in case you get some “muffin top” action). Line pan with 12 baking liners.
Sift the flours, cocoa powder, baking soda, salt, and sugar into a large bowl; stir to ensure even distribution and set aside. In a separate bowl or measuring cup, whisk together the melted butter and gel coloring until blended. Then add the buttermilk, oil, mayonnaise, egg, vinegar, and vanilla until well combined. Now add the wet ingredients to the dry, and mix until the batter is mostly smooth (no more than 2 minutes and small lumps are fine).
Distribute batter evenly among baking cups, filling each about 2/3 full. When finished, slam the pan evenly and firmly downward from 2 inches above the counter to force out any large bubbles. Bake for 16 to 23 minutes, or until a toothpick inserted into the center of a cupcake comes out clean. Remove from oven right away, let cool for 2 minutes, then transfer cupcakes to a wire rack to finish cooling.
Once cupcakes have cooled completely, use a piping bag fitted with a medium round tip to pipe swirls from the outside edge inward and upward on each cake. Just before serving (condensation may form on the modeling chocolate if stored in a container with the moist/warm cupcakes), insert 2 chocolate horns directly opposite to each other near the top of a cupcake's frosting. Insert the non-pointed end of a chocolate tail at the base of the frosting between the 2 horns. Carefully place the rest of the tail up the side of the frosting, curving it in an "S" shape. Press the tail, including the point, gently into the frosting to secure it. Now you're looking at a devilish "behind." Add tails to all the other little devil-cakes in the same way. By now I just know you'll be feeling a little sinful. Go ahead...give in to it and take a bite...I won't tell =p.
Pipeable and Not-too-sweet Cream Cheese Frosting
1 cup (2 sticks) unsalted butter, room temperature
2 cups powdered sugar
1 tsp pure vanilla extract
Red gel/paste/powdered food coloring, as much as needed to reach desired shade
8 oz. (1 block) cream cheese, cold and cut into 6 to 8 chunks
Sift powdered sugar into a small bowl. [If using powdered food coloring, sift a small amount in with the powdered sugar.] In a larger mixing bowl, cream the butter, 1 1/2 cups of powdered sugar, vanilla, and a few drops of food coloring until thoroughly blended and fluffy. Add more food coloring, if needed, until you reach something close to the shade you want. Add the cream cheese, a chunk at a time, beating after each addition (just enough to work it in until it’s smooth). If needed, add more powdered or gel food coloring until the desired shade is achieved. Be careful to avoid overbeating or the cream cheese may start to break down and become gloppy. Chill for 24 hours (ideally) to allow the red color to deepen. Then beat again until smooth just before using.
Modeling Chocolate Devil Horns and Tail
Chocolate adapted from Cake Central
10 oz. semisweet chocolate (coarsely chopped chunks or chips)
1/3 cup light corn syrup
Making the modeling chocolate: In a shallow bowl, melt the chocolate in microwave (be careful so that the temperature does not exceed 100 degrees F) for 2 minutes; stir. If chocolate is not completely melted, return to microwave for 30 seconds at a time and stir until smooth.
Add corn syrup to the chocolate and mix well (scrape all the corn syrup into the chocolate with a rubber spatula). Using a rubber spatula, stir and fold mixture, scraping the sides and bottom of the bowl well, until no shiny syrup is visible and the mixture forms a thick ball.
Pour mixture onto a large sheet of wax or parchment paper and spread with the spatula until it’s about 1/2-inch thick; let it sit and stiffen, uncovered, for about 2 hours. After that, knead black food coloring into the modeling chocolate 1 to 2 drops at a time until you get the desired shade. Use at once or store in an airtight container at room temperature for up to 1 month.
Shaping the horns: Make 24 balls about 1/2 inch across with the modeling chocolate. Flatten one side of each ball against your working surface. Use your index fingers to roll the other end down to a point. Smooth and flatten the the chocolate, curving the points to one side until it looks like a horn. Set the finished horn down on its flattened end, and repeat until you have made 24 horns.
Shaping the pointed tails: Roll modeling chocolate into 12 ropes about 2 1/2 inches long and 1/6-inch thick each; set aside. Shape 12 small pieces of modeling chocolate into flat triangles that are each about 1/8 inch thick and and 1/2 inch on all 3 sides. Join each triangle to one of the ropes made earlier by pressing one end of the rope into a triangle.
Tuesday, September 27, 2011
Tuesday Favorites!
Saturday, October 30, 2010
That Bloody Rat's Got My Cupcake! (Red Berry Chocolate Cupcakes)
It's the first time I've filled cupcakes simply with jam, and I quite enjoyed the taste. The "bloody" color and oozy consistency also make any red berry jam or preserve a good topping for this time of year. To be frank, these chocolate strawberry rats take a bit of time and effort to make. So I really didn't have the time/patience left to mix up a frosting anyway ;p.
It takes a few tries to get used to the rat-assembly procedure, so don't worry if you feel clumsy at first. I was impressed with the results, both the appearance -- I certainly had never associated strawberries with rats before! -- and the taste -- chocolate-coated things are generally yummy.
Of course I do realize I'm posting this the day before Halloween (my bad!), and some of these ingredients may take time to track down. If you're looking for some equally impressive Halloween cupcakes with only easy-to-find ingredients, be sure to check out the creepy crawly, mummy, and owl cupcakes from my previous posts.
So do you have big plans for this Sunday? I'd love to hear all about your creative costumes and treats. Happy early Halloween, everyone!
Bloody Red Berry Chocolate Rat Cupcakes [Printable Recipe]
Adapted from VCTOTW via CHOW and Karen Tack via Redbook
Makes 12 cupcakes
XIAOLU'S NOTES: I recommend having extra sliced and slivered almonds for the rats so that you can pick the best-shaped ones.
1 cup soy milk [or regular milk]
1 teaspoon apple cider vinegar
3/4 cup granulated sugar
1/3 cup canola oil
1 teaspoon vanilla extract
1/2 teaspoon almond extract, or more vanilla extract
1 cup all-purpose flour
1/3 cup cocoa powder, regular or Dutch-processed
3/4 teaspoon baking soda
1/2 teaspoon baking powder
1/4 teaspoon salt
3/4 cup strawberry or raspberry jam/preserves
Strawberry Chocolate Rats (Recipe below)
12 4-inch pieces of black licorice lace
Preheat oven to 350 degrees F and line a muffin pan with baking liners.
Whisk together the soy milk and vinegar in a large bowl, and set aside for a few minutes to curdle. Add the sugar, oil, vanilla extract, and almond extract, if using, to the soy milk mixture and beat until foamy. In a separate bowl, sift together the flour, cocoa powder, baking soda, baking powder, and salt. Add in two batches to wet ingredients and beat until no large lumps remain (a few tiny lumps are OK).
Fill liners 3/4 full with batter. Bake 18 to 20 minutes, until a toothpick inserted into the center comes out clean. Transfer to a cooling rack and let cool completely.
Stir berry jam well, and heat in the microwave for 5 to 10 seconds. Transfer jam to a piping bag fitted with a long pointed tip OR a squeeze bottle. Insert tip into each cupcake and squeeze out a small amount of jam into the cupcake. Then pull the tip out of the frosting and squeeze a little more on top of the cupcake in several (bloody XD) blobs. Place a strawberry chocolate rat on top of each cupcake. Insert one end of a 4-inch piece of black licorice into the cupcake directly behind the rat, then insert the other end into the cupcake on one side of the rat. Lastly and most importantly, enjoy sharing your creepy creations!
Strawberry Chocolate Rats
12 large strawberries, stems removed
1 cup (6 oz.) chocolate chips
2 tsp shortening (use a brand without trans fat like Spectrum)
15 chocolate wafer cookies (1 package of Nabisco brand is 40 cookies)
24 sliced almonds
24 slivered almonds
24 red/yellow and 12 brown candy-coated chocolate-covered sunflower seeds
Place chocolate wafer cookies in a food processor fitted with steel blade, and process until cookies are finely ground. Transfer crumbs to a small bowl and set aside.
Line a cookie sheet with parchment or wax paper. Trim a small piece from one side of each strawberry so they can rest horizontally on the paper. Insert 2 sliced almonds -- about 1 inch from pointed end of strawberry and about 1 inch apart -- to make the ears of the rat.
Place chocolate chips into a heatproof bowl, and microwave for 30-second intervals, stirring well after each interval, until the chocolate is completely smooth. Be careful not to burn the chocolate! Stir in the shortening and mix until smooth.
Insert a fork into the large end of a strawberry (Angle the fork upwards into the strawberry so it won't slip off when you're tapping the fork later.). Holding strawberry on the fork over the bowl of melted chocolate, spoon chocolate over strawberry to coat. Allow excess chocolate to drip off, tapping fork lightly. Sprinkle with chocolate wafer cookies crumbs to coat. Tap fork lightly again to remove excess crumbs. While still holding the strawberry up on the fork, add red/yellow candies for the eyes, slivered almonds for the teeth, and brown candies for the nose. Use another fork or spoon to transfer strawberry to prepared cookie sheet. Repeat with the remaining 11 strawberries. If the chocolate starts to solidify as you're working with it, you can microwave it again at 10-second intervals until it softens again. Refrigerate (or freeze at least 5 minutes if you're in a hurry to use them) rats until ready to serve.
Saturday, April 17, 2010
Hootin' for Cupcakes (and late for Cupcake Hero)
Oh my...it's less than 24 hours until I have to get on a plane to China and I have yet to start packing. You might say I like to do things last minute ;p. With that in mind, you shouldn't be surprised when I tell you next that I'm tardy for this month's Cupcake Hero challenge, which asked us to take our baking inspiration from either of 2 wonderfully creative cupcake decorating books by Karen Tack and Alan Richardson, Hello, Cupcake! or What's New, Cupcake?.
The design for my halloween pumpkin cupcakes last fall came from Hello, Cupcake!, so I already knew this as a treasure trove of unique ideas. After then eying (har har ^_^) their owl cupcakes for months, it took but an instant for me to decide on them for this challenge. I did put my own spin on their recipe and re-tooled the directions, so be sure to read on if you want my version.
Since I already had to buy Oreo cookies for the owl "eyes," I figured I might as well step it up another notch by adding them to the batter. On the other hand, I saw no need to pipe frosting on these already-darling ears, so I (gladly, since it was 2 a.m. by that point) dropped that part with no ill effect that I can tell.
My friend Kelly, upon discovering what the cupcake fairy had left in her office, even exclaimed this was "seriously the cutest thing" she'd ever seen and that she enjoyed its adorable stare. Cupcake.Win XD. To balance out tootin' my own horn hehe and because they're truly charming and creative, I recommend you check out this round-up I found of other owl cupcakes.
Cookies N' Cream Owl Cupcakes [Printable Recipe]
Adapted from VCTOTW via CHOW and Hello, Cupcake! via Duncan Hines
Makes 15-17 cupcakes
XIAOLU'S NOTES: The number of cookies listed below for decoration is if you split and cut the cookies perfectly every time. It's tougher than it looks, but gets easier the more you do it. Even so, I'd have more on hand just in case. An entire regular-sized package of Oreo cookies was enough for me for the batter AND decorations. Splitting the cookies is the most time-consuming part of the recipe but is most important to the final appearance. Since the ganache frosting can set fairly quickly, I recommend having all the toppings ready when you begin frosting, then decorating each cupcake right after frosting rather than going back once you've frosted the batch.
Cookies N' Cream Cupcakes (Recipe below)
Chocolate Ganache Frosting (Recipe below)
30-34 Oreo, Newman-O, or other chocolate cream-filled cookies
30-34 chocolate-covered mints (Junior Mints)
15-17 candy-coated chocolates (M&Ms)
Split the sandwich cookies in half crosswise, keeping the cream side hole (microwaving 5 cookies at a time for 3-5 seconds helps to keep the cream side solid). [I found my frosting spatula split the cookies most cleanly.] Use the dull side of a paring knife to remove any excess crumbs from cream filling and to smooth the sides of filling that has shifted during splitting.
Collect the remaining sides of the cookies without cream to use for the ears. Make 2 parallel cuts with a serrated knife in these cookies 1/2 inch from each rounded side, discarding the 1/2 inch strip that remains from the center of the cookie.
Pair up the cream sided cookie halves so that those with similar amounts of cream are together. Gently push Junior Mints into the cream of each, but don't push too hard or you'll squish the mint. [Play around with different positions to give each "owl" its own expression and personality :).]
Use a small spoon or spatula to smooth chocolate ganache frosting onto the tops of the cooled cupcakes. Place the cream sided cookies, cream side up, on the middle of the cupcakes, making sure that the eyes are oriented the way you want. Push gently to make sure they've adhered to the frosting.
To make the ears, attach the cut cream-less cookies to the cupcakes above the "eyes", textured side facing up and round edges inward. These should hang over the edge of the cupcakes, but be sure to press them into the frosting where possible to make sure they adhere well.
Lastly, press M&M candies [standing them up on their sides] between and slightly below the cookie "eyes" as beaks. Show them off to everyone XD!
Cookies N' Cream Cupcakes
1 cup soy milk [or regular milk]
1 teaspoon apple cider vinegar
3/4 cup granulated sugar
1/3 cup canola oil
1 teaspoon vanilla extract
1/2 teaspoon almond extract, or more vanilla extract
1 cup all-purpose flour
1/3 cup cocoa powder, Dutch-processed or regular
3/4 teaspoon baking soda
1/2 teaspoon baking powder
1/4 teaspoon salt
1 cup chopped Oreo, Newman-O, or other chocolate cream-filled cookies
(about 8-10 cookies)
Preheat oven to 350 degrees F and line 2 muffin pans (or use 1 pan plus as many free-standing paper souffle cups as needed) with baking liners.
Whisk together the soy milk and vinegar in a large bowl, and set aside for a few minutes to curdle. Add the sugar, oil, vanilla extract, and almond extract, if using, to the soy milk mixture and beat until foamy. In a separate bowl, sift together the flour, cocoa powder, baking soda, baking powder, and salt. Add in two batches to wet ingredients and beat until no large lumps remain (a few tiny lumps are OK). Gently fold in chopped cookies.
Fill liners 3/4 full with batter. Bake 18 to 20 minutes, until a toothpick inserted into the center comes out clean. Transfer to a cooling rack and let cool completely.
Chocolate Ganache Frosting
1/2 cup heavy cream
5 ounces semisweet chocolate, finely chopped
[or use a combination of semisweet and bittersweet]
1-2 tablespoons corn syrup
Combine the chocolate and cream in a medium, microwave-safe bowl. Try to submerge the chocolate as much as possible, but it's okay to have some above the cream. Microwave the mixture on medium for 1 minute. Stir and heat again in 15-second increments, stirring thoroughly each time, until fully melted. Stir in corn syrup. Let this cool and thicken (in the fridge if needed) before using. If it cools too much, reheat in the microwave at 5-second intervals until it softens to the consistency you want.
Tuesday, October 6, 2009
Halloween Pumpkin M&M Cupcakes and Cookbook GIVEAWAY
Can you guess what time it is again?! IT'S CUPCAKE HERO TIME!! Okay now I know you're thinking this girl needs to cut back on the sugar / coffee / Red Bull, and maybe I do...but with Halloween coming up we all know how likely that's gonna be (mwahaha). Returning to the ever-important topic of cupcakes, I've been plotting a while now for October's challenge (partly to distract myself while waiting for the results of September's throwdown including one of my entries).
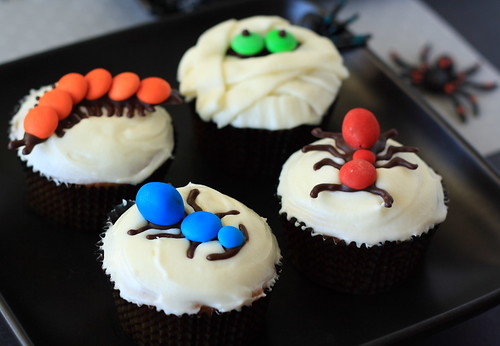
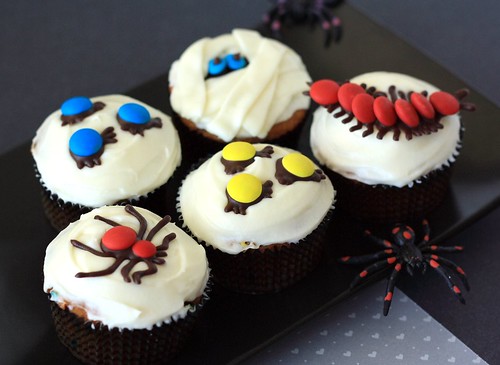
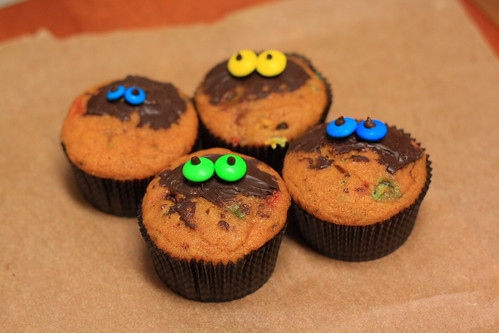
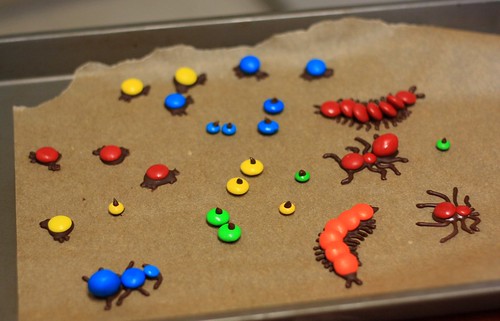
The theme this month, Booo-tiful Pumpkin Cupcakes, had both flavor and decorative components. We were told to use pumpkin in some part of the cupcake plus to make the top "Halloween-y." Aye aye, Captain CB! Our awesome hostess was even so kind as to point us to this goldmine of ideas. I went in search of a cool-lookin' design that wouldn't require anything too fussy (like fondant or food coloring) and found these fun chocolate M&M insect and mummy toppings. All the instructions on how to make these yourself are below and know that I love questions =).
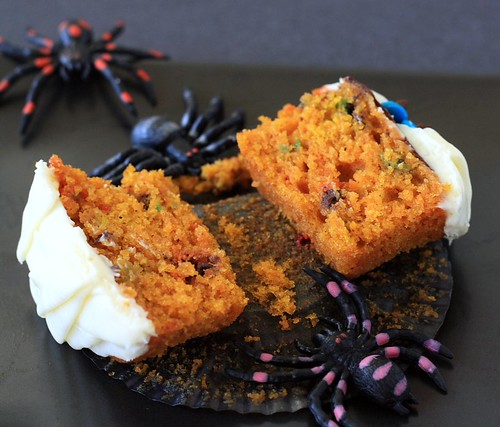
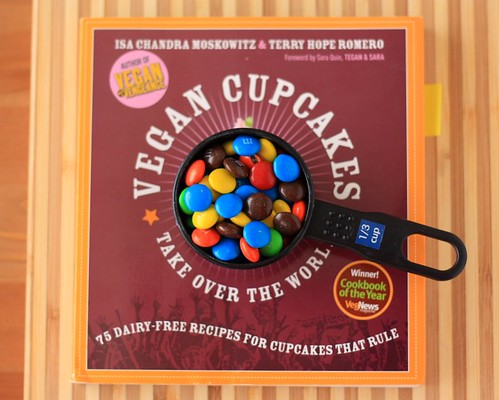
Let's not be shallow though and forget what's on the inside (I'll be here all night, folks 8p): unbelievably moist pumpkin cake with a hint of spice, punctuated by chocolate candy bits. I de-veganized the original recipe by cookbook goddesses Isa and Terry (which they'll hopefully forgive), but that can be easily reversed using vegan versions of the candies, cream cheese, etc.
Vegan or not, the recipes in their cookbook Vegan Cupcakes Take Over the World (VCTOTW) are some of the best in existence. There are so many unique flavors, like green tea, Boston cream pie, rum raisin, and margarita cupcakes. This book would rock anyone's socks off, so I want to give a free copy to one of you! To enter this giveaway, simply leave a comment by next Friday, October 16, telling me your favorite thing about Halloween. Please make sure to leave your email address so I can contact you if you win.
Creepy Pumpkin M&M Cupcakes [Printable Recipe]
Adapted from VCTOTW and Hello, Cupcake!
Makes 12 cupcakes
XIAOLU'S NOTES: I had work in the afternoon, so I baked the cupcakes midday and refrigerated them until I had time to prepare the rest at night. This worked out great so don't be intimated if you can't do all this at once!
1 cup canned pumpkin (NOT pumpkin pie filling)
1/3 cup vegetable oil
3/4 cup plus 2 tablespoons sugar
1/4 cup soy milk (I used regular milk)
1 teaspoon pure vanilla extract
1 1/4 cups all purpose flour
1/2 teaspoon baking powder
1/2 teaspoon baking soda
1/2 teaspoon ground cinnamon
1/8 teaspoon ground nutmeg
1/4 teaspoon salt
1/3 cup M&M candies, roughly chopped up
Cream Cheese Frosting (Recipe below)
Chocolate and M&M Insects and Eyes (Recipe below)
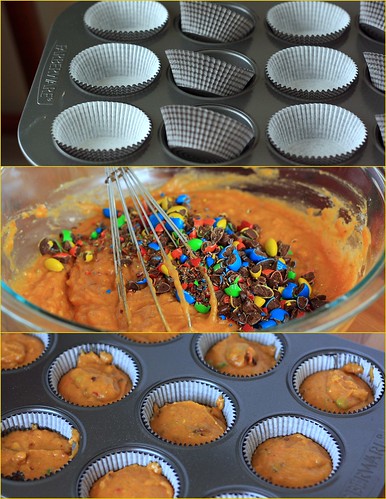
Preheat the oven to 350 degrees F and line a standard muffin pan with paper liners. Sift the flour, baking powder, baking soda, spices, and salt together into a small bowl. Set aside.
In a medium bowl, stir the pumpkin, oil, sugar, milk, and vanilla together until thoroughly mixed. Add in the dry ingredients and stir into the wet ingredients until just combined. Fold in the chopped M&M candies.
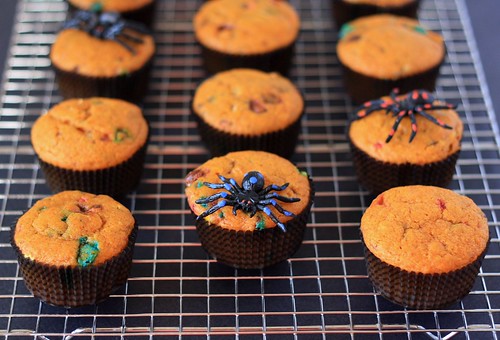
Fill paper liners about 2/3 full with batter. Tap the pan firmly against the counter one time to remove any air bubbles. Bake for 20 to 25 minutes or just until a toothpick inserted into the middle of a cupcake comes out clean. Let cupcakes cool in the pan for 5 minutes, then remove them to a wire rack and let them cool completely there.
To assemble insect cupcakes: spread an even layer of cream cheese frosting onto the cupcakes using a knife or spatula. Gently peel the chocolate candy insects from the parchment paper, place one or more on each cupcake, and press slightly to secure. That's it!
To assemble mummy cupcakes: if you have melted chocolate leftover from making the insects and eyes, squeeze 1-2 teaspoons on the top center of each cupcake then spread and and smooth it out with a spatula. Place a pair of M&M eyes on top of the chocolate (or directly on the cupcake). Next, fit a piping bag with an Ateco #48 tip (or other rectangular basketweave tip) and fill it with cream cheese frosting. Make the "bandages" by piping flat strips of frosting at different angles across each cupcake, leaving only a strip right around the eyes.
Cream Cheese Frosting
8 ounces (1 cup) cream cheese (low-fat is fine), room temperature
1/4 cup (2 ounces or 1/2 stick) unsalted butter, room temperature
1/2 teaspoon pure vanilla extract
1/8 teaspoon salt
1 1/2 to 2 1/2 cups sifted powdered (confectioner's) sugar
In a large bowl beat the cream cheese and butter until soft and smooth. On low speed beat in the vanilla, salt, and sugar. Start with 1 1/2 cups of sugar and add more to achieve desired sweetness and stiffness. Finally, beat on high speed for a few moments until smooth.
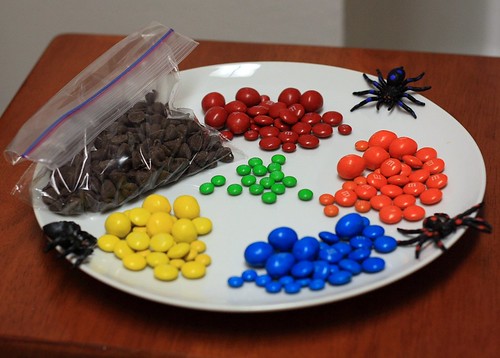
Chocolate and M&M Insects and Eyes
Regular, mini, and peanut M&M candies
3/4 cup semisweet chocolate chips
XIAOLU'S NOTE: I roughly followed the templates from Hello, Cupcake! If you'd like to try them, just leave a comment with your email and I'll send it right over.
Using a fairly thick and dark pen or marker, draw outlines of insects or whatever creepy design you want on light-colored paper. Separate your candies by color.
Place chocolate chips in a plastic zipper-lock bag and microwave at 10-second intervals, massaging the bag in between, until the chocolate is fully melted. Press as much air as possible out of the bag then close the top.
Lay a piece of parchment or wax paper over the outlines you made earlier. Use scissors to cut off a 1/16-inch corner of the plastic bag and pipe the chocolate onto the parchment paper along the outlines underneath, making sure to connect all the parts to each insect. Before the chocolate hardens, place the M&M candies on top.
If making mummy cupcakes, spread out pairs (one for each cupcake) of mini or regular M&M candies in matching bright colors. Use the same bag of melted chocolate to pipe dots on the candies to make pupils.
Chill all piped chocolate in the refrigerator until firm, at least 5 minutes.
XIAOLU'S NOTE: If the chocolate starts to solidify as you're working with it, you can microwave it again at 10-second intervals until it softens again.