Wednesday, October 12, 2011
Wordless Wednesday: Laduree Macarons in NYC
Mmm...worth. every. penny. Right, Joanne? 8-)
Labels:
cookie/cracker,
macaron,
photography,
wordless wednesday
Tuesday, October 11, 2011
Tuesday Favorites!
I'm literally just back in town from a fun weekend in NYC catching up with old and new friends. Thanks C, J, W, L, and Joanne for making this a weekend to remember! Before we get to this week's favorite food photos, I just want to quickly share that a food photo of my own (last year's bloody rat cupcakes) has been published by the Danish magazine BoligLiv, both online and in print! I was especially awed when I got my complimentary hard copy and saw the gorgeous food photos published in the same issue as my photo (including the first photo below). On top of that, I'm bursting with joy to announce another big milestone for 6 Bittersweets: the number of you subscribing to this blog has now surpassed 2,000! Thanks, as always, from the bottom of my heart. I wouldn't have accomplished any of this without your incredible support and kindness!
Barmbrack Bread with Fruit Compote and Cheese Photograph from BoligLiv Magazine
Laduree French Macarons Photograph from Licking the Plate
Fried Okra from Dine & Dish
Marshmallow S'more Pops by One Stone Events via Hostess with the Mostess
Brush Embroidery Flower Cake Pops from The Cake Poppery
Wedding Cake with Lace Pattern, Fabric-look Ruching, and Buttons by Amy Beck Cake Design via Elizabeth Anne Designs
Chicken Salad Wrap from La Petite Cuisine
Spring Peas Soup Photograph from Cintamani
Pea, Lamb, Mint, and Potato Stew from Island Menu
Strawberry Cream Shortbread Cookies from Il Cavoletto Di Bruxelles
Pirate Ship Fondant Cupcake Toppers by Lynlee's Petite Cakes via Pure Joy Events
Apple Zucchini Bread from Citrus and Candy
Adorable Owl Treat Boxes (with Template) from Paper Crave
Labels:
bookmarks,
favorites,
links,
vegetarian
Monday, October 10, 2011
Musical Monday: Neon Indian "Arcade Blues"
There're always so many new bands and albums coming out these days that it's hard for me to keep up sometimes. That's why I really appreciate people like my friend Steve-o and Michelle of Une-deux Senses, fellow music afficionados that help highlight the best of what`s out there so I can cut straight to the good stuff when I do have time to explore new music.
It was Michelle who recently turned me on to this group, Neon Indian, and now I can't get enough of their sound. I don't know if the 80s synth, the singer's voice, or what...but listening to their songs, especially "Arcade Blues" (video above), causes a welcome dreamlike nostalgia to wash over me. I hope you give them a listen and if you like this single, be sure to also check out their other songs "Polish Girl" and "Hex Girlfriend."
Thursday, October 6, 2011
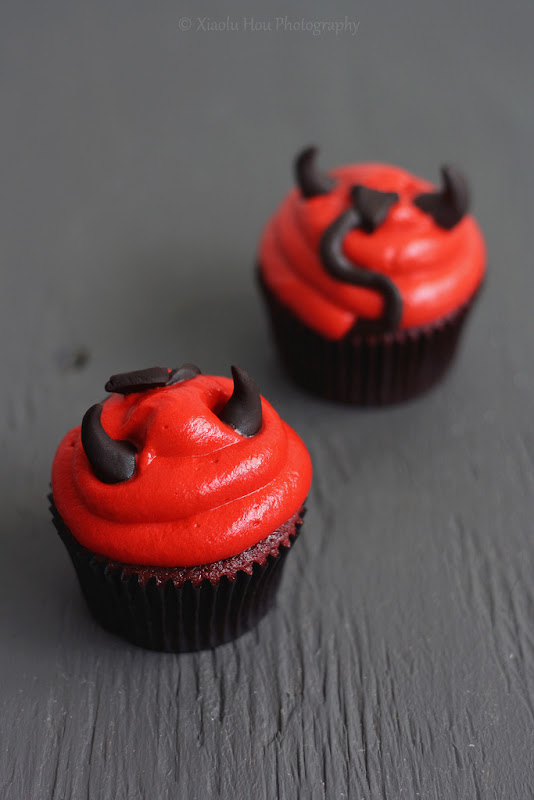
Devilishly Delicious! (The Best Red Velvet Cupcakes)
Can you guys believe that Halloween is less than a month away?! I hope you all are as excited as me because I've got lots of spooky cupcakes coming up in the next few weeks! We've got some creepin' crawlies, a couple a' brainiacs, and even a few cuppies workin' the graveyard shift...if ya know what I mean =p. But for those of you who're feelin' a might devilish this All Hallow's Eve, I've got just the treat you need...Devilishly Delicious Red Velvet Cupcakes!
Some of you may remember that I set out on The Great Quest for The Perfect Red Velvet Recipe back in the spring (has it really been that long already...). When I posted about it, I was just veering off into unexplored territory after finding none of the famous recipes to my taste. Well I'm happy to finally make it known that I've found The One! After 8 attempts and much tweaking, I've combined several inspirations and some crazy add-ins of my own to bring a new and hopefully well-loved red velvet recipe into the world =D.
This recipe has been tested frequently for over half a year and has won the approval of dozens of tasters. One friend liked my red velvet cupcakes so much, in fact, that she just asked me to make 140 of them for her wedding =D. I really do hope you'll give these cupcakes (and their Halloween costume) a try. The ingredient list is longer than your usual RV recipe, but they're all ingredients that you probably already have in your pantry. And if you do make them, please send me your feedback and, even better, a photo along with it!
Lastly, I want tell you about a really awesome surprise I got earlier this week. A while ago I left a comment on my friend Angie's blog. She'd just been visited by the Fairy Hobmother, and to my delight the Fairy stopped here next and gifted me with a fabulous Amazon gift card! Then when I was offered the chance to share the joy, of course I said yes! Now if you want a visit from the Fairy, just make your wish and comment below. Best of luck and thanks again, Fairy Hobmother!
6 Bittersweets' Best Red Velvet Cupcakes [Printable Recipe]
Makes 12 cupcakes
XIAOLU’S NOTES: It can be hard to get a strong red color when coloring white frosting. Making the frosting 24 hours ahead of time may help, since the color will darken over time. Do NOT use liquid food coloring since it will add too much moisture to the frosting. The modeling clay recipe below will make more than you'll need. You can store any extra for up to 1 month. If you don’t have buttermilk, you can use the following substitution. For this recipe, use 1 1/2 teaspoons of apple cider vinegar with enough milk added to total 1/2 cup PLUS 1 tablespoon. Stir well and let sit for at least 5 minutes before using. Do NOT substitute the cake flour in this recipe.
1 cup (4 oz.) cake flour [stirred, spooned, and leveled to measure]
1/4 cup (1.12 oz.) all purpose flour [stirred, spooned, and leveled to measure]
1 1/2 Tbsp (0.32 oz.) unsweetened natural cocoa powder
Slightly rounded 1/2 tsp baking soda
Scant 1/2 tsp salt
3/4 cup sugar
1/4 cup unsalted butter, melted and cooled slightly
1 Tbsp red GEL food coloring [I use Wilton No-Taste but you may need more or less depending on brand]
1/2 cup PLUS 1 Tbsp buttermilk, room temperature
3 Tbsp vegetable or canola oil
2 Tbsp mayonnaise (NOT fat-free or olive oil; low-fat is fine)
1 large egg, room temperature
1 tsp apple cider vinegar
1 tsp pure vanilla extract
Cream Cheese Frosting (Recipe below)
24 Modeling Chocolate Horns AND 12 Fondant Horned Tails (Recipe below)
If making the devil decorations, remember to make and color your frosting red ahead of time as well as to make the modeling chocolate ahead of time! I recommend making the horns and tails before baking the cupcakes. You can let them sit out to dry slightly as you bake, cool, and frost the cupcakes.
Preheat the oven to 350 degrees F. Grease the top of a standard 12-cup muffin pan (in case you get some “muffin top” action). Line pan with 12 baking liners.
Sift the flours, cocoa powder, baking soda, salt, and sugar into a large bowl; stir to ensure even distribution and set aside. In a separate bowl or measuring cup, whisk together the melted butter and gel coloring until blended. Then add the buttermilk, oil, mayonnaise, egg, vinegar, and vanilla until well combined. Now add the wet ingredients to the dry, and mix until the batter is mostly smooth (no more than 2 minutes and small lumps are fine).
Distribute batter evenly among baking cups, filling each about 2/3 full. When finished, slam the pan evenly and firmly downward from 2 inches above the counter to force out any large bubbles. Bake for 16 to 23 minutes, or until a toothpick inserted into the center of a cupcake comes out clean. Remove from oven right away, let cool for 2 minutes, then transfer cupcakes to a wire rack to finish cooling.
Once cupcakes have cooled completely, use a piping bag fitted with a medium round tip to pipe swirls from the outside edge inward and upward on each cake. Just before serving (condensation may form on the modeling chocolate if stored in a container with the moist/warm cupcakes), insert 2 chocolate horns directly opposite to each other near the top of a cupcake's frosting. Insert the non-pointed end of a chocolate tail at the base of the frosting between the 2 horns. Carefully place the rest of the tail up the side of the frosting, curving it in an "S" shape. Press the tail, including the point, gently into the frosting to secure it. Now you're looking at a devilish "behind." Add tails to all the other little devil-cakes in the same way. By now I just know you'll be feeling a little sinful. Go ahead...give in to it and take a bite...I won't tell =p.
Pipeable and Not-too-sweet Cream Cheese Frosting
1 cup (2 sticks) unsalted butter, room temperature
2 cups powdered sugar
1 tsp pure vanilla extract
Red gel/paste/powdered food coloring, as much as needed to reach desired shade
8 oz. (1 block) cream cheese, cold and cut into 6 to 8 chunks
Sift powdered sugar into a small bowl. [If using powdered food coloring, sift a small amount in with the powdered sugar.] In a larger mixing bowl, cream the butter, 1 1/2 cups of powdered sugar, vanilla, and a few drops of food coloring until thoroughly blended and fluffy. Add more food coloring, if needed, until you reach something close to the shade you want. Add the cream cheese, a chunk at a time, beating after each addition (just enough to work it in until it’s smooth). If needed, add more powdered or gel food coloring until the desired shade is achieved. Be careful to avoid overbeating or the cream cheese may start to break down and become gloppy. Chill for 24 hours (ideally) to allow the red color to deepen. Then beat again until smooth just before using.
Modeling Chocolate Devil Horns and Tail
Chocolate adapted from Cake Central
10 oz. semisweet chocolate (coarsely chopped chunks or chips)
1/3 cup light corn syrup
Some of you may remember that I set out on The Great Quest for The Perfect Red Velvet Recipe back in the spring (has it really been that long already...). When I posted about it, I was just veering off into unexplored territory after finding none of the famous recipes to my taste. Well I'm happy to finally make it known that I've found The One! After 8 attempts and much tweaking, I've combined several inspirations and some crazy add-ins of my own to bring a new and hopefully well-loved red velvet recipe into the world =D.
This recipe has been tested frequently for over half a year and has won the approval of dozens of tasters. One friend liked my red velvet cupcakes so much, in fact, that she just asked me to make 140 of them for her wedding =D. I really do hope you'll give these cupcakes (and their Halloween costume) a try. The ingredient list is longer than your usual RV recipe, but they're all ingredients that you probably already have in your pantry. And if you do make them, please send me your feedback and, even better, a photo along with it!
Lastly, I want tell you about a really awesome surprise I got earlier this week. A while ago I left a comment on my friend Angie's blog. She'd just been visited by the Fairy Hobmother, and to my delight the Fairy stopped here next and gifted me with a fabulous Amazon gift card! Then when I was offered the chance to share the joy, of course I said yes! Now if you want a visit from the Fairy, just make your wish and comment below. Best of luck and thanks again, Fairy Hobmother!
6 Bittersweets' Best Red Velvet Cupcakes [Printable Recipe]
Makes 12 cupcakes
XIAOLU’S NOTES: It can be hard to get a strong red color when coloring white frosting. Making the frosting 24 hours ahead of time may help, since the color will darken over time. Do NOT use liquid food coloring since it will add too much moisture to the frosting. The modeling clay recipe below will make more than you'll need. You can store any extra for up to 1 month. If you don’t have buttermilk, you can use the following substitution. For this recipe, use 1 1/2 teaspoons of apple cider vinegar with enough milk added to total 1/2 cup PLUS 1 tablespoon. Stir well and let sit for at least 5 minutes before using. Do NOT substitute the cake flour in this recipe.
1 cup (4 oz.) cake flour [stirred, spooned, and leveled to measure]
1/4 cup (1.12 oz.) all purpose flour [stirred, spooned, and leveled to measure]
1 1/2 Tbsp (0.32 oz.) unsweetened natural cocoa powder
Slightly rounded 1/2 tsp baking soda
Scant 1/2 tsp salt
3/4 cup sugar
1/4 cup unsalted butter, melted and cooled slightly
1 Tbsp red GEL food coloring [I use Wilton No-Taste but you may need more or less depending on brand]
1/2 cup PLUS 1 Tbsp buttermilk, room temperature
3 Tbsp vegetable or canola oil
2 Tbsp mayonnaise (NOT fat-free or olive oil; low-fat is fine)
1 large egg, room temperature
1 tsp apple cider vinegar
1 tsp pure vanilla extract
Cream Cheese Frosting (Recipe below)
24 Modeling Chocolate Horns AND 12 Fondant Horned Tails (Recipe below)
If making the devil decorations, remember to make and color your frosting red ahead of time as well as to make the modeling chocolate ahead of time! I recommend making the horns and tails before baking the cupcakes. You can let them sit out to dry slightly as you bake, cool, and frost the cupcakes.
Preheat the oven to 350 degrees F. Grease the top of a standard 12-cup muffin pan (in case you get some “muffin top” action). Line pan with 12 baking liners.
Sift the flours, cocoa powder, baking soda, salt, and sugar into a large bowl; stir to ensure even distribution and set aside. In a separate bowl or measuring cup, whisk together the melted butter and gel coloring until blended. Then add the buttermilk, oil, mayonnaise, egg, vinegar, and vanilla until well combined. Now add the wet ingredients to the dry, and mix until the batter is mostly smooth (no more than 2 minutes and small lumps are fine).
Distribute batter evenly among baking cups, filling each about 2/3 full. When finished, slam the pan evenly and firmly downward from 2 inches above the counter to force out any large bubbles. Bake for 16 to 23 minutes, or until a toothpick inserted into the center of a cupcake comes out clean. Remove from oven right away, let cool for 2 minutes, then transfer cupcakes to a wire rack to finish cooling.
Once cupcakes have cooled completely, use a piping bag fitted with a medium round tip to pipe swirls from the outside edge inward and upward on each cake. Just before serving (condensation may form on the modeling chocolate if stored in a container with the moist/warm cupcakes), insert 2 chocolate horns directly opposite to each other near the top of a cupcake's frosting. Insert the non-pointed end of a chocolate tail at the base of the frosting between the 2 horns. Carefully place the rest of the tail up the side of the frosting, curving it in an "S" shape. Press the tail, including the point, gently into the frosting to secure it. Now you're looking at a devilish "behind." Add tails to all the other little devil-cakes in the same way. By now I just know you'll be feeling a little sinful. Go ahead...give in to it and take a bite...I won't tell =p.
Pipeable and Not-too-sweet Cream Cheese Frosting
1 cup (2 sticks) unsalted butter, room temperature
2 cups powdered sugar
1 tsp pure vanilla extract
Red gel/paste/powdered food coloring, as much as needed to reach desired shade
8 oz. (1 block) cream cheese, cold and cut into 6 to 8 chunks
Sift powdered sugar into a small bowl. [If using powdered food coloring, sift a small amount in with the powdered sugar.] In a larger mixing bowl, cream the butter, 1 1/2 cups of powdered sugar, vanilla, and a few drops of food coloring until thoroughly blended and fluffy. Add more food coloring, if needed, until you reach something close to the shade you want. Add the cream cheese, a chunk at a time, beating after each addition (just enough to work it in until it’s smooth). If needed, add more powdered or gel food coloring until the desired shade is achieved. Be careful to avoid overbeating or the cream cheese may start to break down and become gloppy. Chill for 24 hours (ideally) to allow the red color to deepen. Then beat again until smooth just before using.
Modeling Chocolate Devil Horns and Tail
Chocolate adapted from Cake Central
10 oz. semisweet chocolate (coarsely chopped chunks or chips)
1/3 cup light corn syrup
Black gel or paste food coloring, as needed
Making the modeling chocolate: In a shallow bowl, melt the chocolate in microwave (be careful so that the temperature does not exceed 100 degrees F) for 2 minutes; stir. If chocolate is not completely melted, return to microwave for 30 seconds at a time and stir until smooth.
Add corn syrup to the chocolate and mix well (scrape all the corn syrup into the chocolate with a rubber spatula). Using a rubber spatula, stir and fold mixture, scraping the sides and bottom of the bowl well, until no shiny syrup is visible and the mixture forms a thick ball.
Pour mixture onto a large sheet of wax or parchment paper and spread with the spatula until it’s about 1/2-inch thick; let it sit and stiffen, uncovered, for about 2 hours. After that, knead black food coloring into the modeling chocolate 1 to 2 drops at a time until you get the desired shade. Use at once or store in an airtight container at room temperature for up to 1 month.
Shaping the horns: Make 24 balls about 1/2 inch across with the modeling chocolate. Flatten one side of each ball against your working surface. Use your index fingers to roll the other end down to a point. Smooth and flatten the the chocolate, curving the points to one side until it looks like a horn. Set the finished horn down on its flattened end, and repeat until you have made 24 horns.
Shaping the pointed tails: Roll modeling chocolate into 12 ropes about 2 1/2 inches long and 1/6-inch thick each; set aside. Shape 12 small pieces of modeling chocolate into flat triangles that are each about 1/8 inch thick and and 1/2 inch on all 3 sides. Join each triangle to one of the ropes made earlier by pressing one end of the rope into a triangle.
Making the modeling chocolate: In a shallow bowl, melt the chocolate in microwave (be careful so that the temperature does not exceed 100 degrees F) for 2 minutes; stir. If chocolate is not completely melted, return to microwave for 30 seconds at a time and stir until smooth.
Add corn syrup to the chocolate and mix well (scrape all the corn syrup into the chocolate with a rubber spatula). Using a rubber spatula, stir and fold mixture, scraping the sides and bottom of the bowl well, until no shiny syrup is visible and the mixture forms a thick ball.
Pour mixture onto a large sheet of wax or parchment paper and spread with the spatula until it’s about 1/2-inch thick; let it sit and stiffen, uncovered, for about 2 hours. After that, knead black food coloring into the modeling chocolate 1 to 2 drops at a time until you get the desired shade. Use at once or store in an airtight container at room temperature for up to 1 month.
Shaping the horns: Make 24 balls about 1/2 inch across with the modeling chocolate. Flatten one side of each ball against your working surface. Use your index fingers to roll the other end down to a point. Smooth and flatten the the chocolate, curving the points to one side until it looks like a horn. Set the finished horn down on its flattened end, and repeat until you have made 24 horns.
Shaping the pointed tails: Roll modeling chocolate into 12 ropes about 2 1/2 inches long and 1/6-inch thick each; set aside. Shape 12 small pieces of modeling chocolate into flat triangles that are each about 1/8 inch thick and and 1/2 inch on all 3 sides. Join each triangle to one of the ropes made earlier by pressing one end of the rope into a triangle.
Labels:
best recipe,
chocolate,
cupcake,
cupcake topper,
decorations,
devil,
Halloween,
holiday,
vegetarian
Wednesday, October 5, 2011
UPrinting Postcards Giveaway Winner!
Thanks to everyone who entered my customized postcards giveaway! The randomly selected winner is Anna (comment #6) -- congrats and have fun customizing your new cards!
Tuesday, October 4, 2011
Tuesday Favorites!
Phew -- I can't tell you how happy I am to be speaking to you from the other end of an insane week at school 8D! A relaxing weekend was just spent happily gorging on pecan dulce de leche French macarons, finally wrapping up the fantastic Rome TV series, and starting up a new obsession in the form of Game of Thrones. Unfortunately the weekend also ended with me morphing into a big ball of cold germs, so I'm just gonna put these favorites up and jump back in bed before I infect anyone else 8p. Did you guys have a good weekend? Would love to hear about it!
Chocolate Pots de Creme with Rosemary Whipped Cream from Jewels of NY
Blackberry Jam from Yummy Supper
Cream Wedding Cake with Flowers via Luna and Chloe Weddings
Tomatoes for Polenta from Gourmande in the Kitchen
Ramen Noodle Photograph from A Food Lover's Journey
Sweet Chili Sauce from Cinnamon and Thyme
Blueberries with Yogurt Photograph from Les Hirondelles
Soba Noodle Soup Photograph via Three to One
Maki Sushi from Amuses Bouche
Caramel Apple Pecan Cupcakes Photograph from Shirley Nemesh
Baked Acorn Squash Gratin from The Healthy Foodie
Lemon Curd Mini Tarts with Grapes Photograph from The Little Squirrel
Tea Photograph from Honey and Jam
Turkish Delight Mini Cheesecakes with Roasted Rhubarb from Masterchef Magazine
Subscribe to:
Posts (Atom)